


905E, 9.1, 9.10 Treadmills
Page 13
Procedure 4.1 - Calibrating the Lift Assembly
Procedure
1.
Place the magnetic safety key in the
ACTIVATE
position, then turn on the treadmill with the
circuit breaker.
2.
Turn the crank handle in the negative direction until the crank handle will no longer move
without using excessive force.
Note:
Do not overtighten the crank handle.
3.
Press the
SCAN
key, then view the electronic console as the treadmill scans time, speed,
distance, and percent.
4.
If the electronic console displays zero percent
. . .
THEN . . .
OTHERWISE . . .
Continue with the next step.
Skip to Step 8.
5.
Turn the crank handle in the positive direction until the crank handle will no longer move
without using excessive force.
6.
Press the
SCAN
key, then view the electronic console as the treadmill scans time, speed,
distance, and percent.
7.
If the electronic console displays ten percent
. . .
THEN . . .
OTHERWISE . . .
The lift mechanism is calibrated
Continue with the next step.
correctly; place the magnetic safety
key in the
OFF
position, then unplug the
treadmill from the wall outlet.
Note:
When you perform the next step, the electronic console will display the PROM version number,
check the LED’s that make up the electronic console display, and display the potentiometer
increment number.
8.
With the Enter Your Weight banner scrolling and the incline at minimum (zero percent),
press and hold the
SPEED
▲
,
SPEED
▼
,
STOP
, and
SCAN/ENTER
keys simultaneously.
9.
Record the PROM version number and potentiometer increment number.
Содержание 9.10
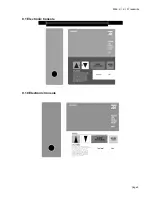
Страница 5: ...905E 9 1 9 10 Treadmills Page 5 9 1 Electronic Console 9 10 Electronic Console...
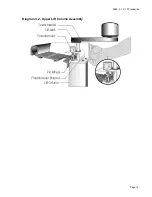
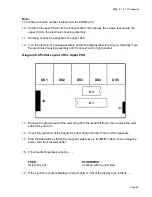
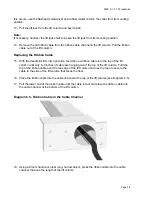
Страница 15: ...905E 9 1 9 10 Treadmills Page 15 Diagram 4 2 Upper Lift Column Assembly...
Страница 44: ...905E 9 1 9 10 Treadmills Page 44 Diagram 7 1 Wiring Diagram 905e 9 1 9 10...
Страница 45: ...905E 9 1 9 10 Treadmills Page 45 Diagram 7 2 Block Diagram 905e 9 1 9 10 Treadmills...


