background image

PD138 Minimux

®

 II Temp & Process Scanner 

Instruction Manual 

ORDERING INFORMATION 

24 VDC 

Model 

115 VAC 

Model 

230 VAC 

Model 

Description 

PD138-2 

PD138-3 

PD138-4 

8 Channel Temp & Process Scanner 

PD138-2-CL PD138-3-CL PD138-4-CL 

8 Channel Temp & Process Scanner 
with current loop resistor 

Notes: 
1. Message labels for the PD138 may be specified at time of order or later. See page 33 for details. 
2. There is no special cable required to connect multiple PD138s together. 

Enclosures 

Model 

# of Units 

Description 

Mounting 

PDA2501-V 

Plastic NEMA 4X Enclosure 

Through Door 

PDA2502-V 

Plastic NEMA 4X Enclosure 

Through Door 

PDA2503-V 

Plastic NEMA 4X Enclosure 

Through Door 

PDA2504-V 

Plastic NEMA 4X Enclosure 

Through Door 

PDA2505-V 

Plastic NEMA 4X Enclosure 

Through Door 

PDA2506-V 

Plastic NEMA 4X Enclosure 

Through Door 

PDA2522 

Plastic NEMA 4X Enclosure; 1(V) 1(H) 

Through Door 

PDA2601-V 

Stainless Steel NEMA 4X Enclosure 

Through Door 

PDA2602-V 

Stainless Steel NEMA 4X Enclosure 

Through Door 

PDA2603-V 

Stainless Steel NEMA 4X Enclosure 

Through Door 

PDA2604-V 

Stainless Steel NEMA 4X Enclosure 

Through Door 

PDA2605-V 

Stainless Steel NEMA 4X Enclosure 

Through Door 

PDA2606-V 

Stainless Steel NEMA 4X Enclosure 

Through Door 

PDA2622 

SS NEMA 4X Enclosure; 1(V) 1(H) 

Through Door 

PDA2701-V 

Steel NEMA 4 Enclosure 

Through Door 

PDA2702-V 

Steel NEMA 4 Enclosure 

Through Door 

PDA2703-V 

Steel NEMA 4 Enclosure 

Through Door 

PDA2704-V 

Steel NEMA 4 Enclosure 

Through Door 

PDA2705-V 

Steel NEMA 4 Enclosure 

Through Door 

PDA2706-V 

Steel NEMA 4 Enclosure 

Through Door 

PDA2722 

Steel NEMA 4 Enclosure; 1(V) 1(H) 

Through Door 

PDA2801 

Plastic NEMA 4X Enclosure 

Through Cover 

Systems 

Model Description 

Kit 

Components 

PDS178 

Temperature 
Scanning & Alarming 
System 

PD765-6R2-00 
PD138-3 
PDA2821 

Process & Temperature 
Meter 
Minimux II 
Plastic NEMA 4X Enclosure 

PDS178X2 

Large Display 
Temperature 
Scanning & Alarming 
System 

PD765-6X2-00 
PD138-3 
PDA2821 

Trident X2 Meter 
MINIMUX II Scanner 
Plastic NEMA 4X Enclosure 

www.

.com

[email protected]

1.800.561.8187

Содержание Minimux II PD138

Страница 1: ...Controlled Scanning Adjustable Dwell Time for Each Channel Independent Alarm Input for Each Channel First Out Alarm Indication Alarms Indicated by LEDs Built in Horn and Relay Built In 85 dB Horn with...

Страница 2: ...ioning could result in personal injury or property loss Anyone using this product for such applications does so at his her own risk Precision Digital Corporation shall not be held liable for damages r...

Страница 3: ...8 EXTERNAL SIL ACK STOP GO CONNECTIONS 19 PROGRAMMING OVERVIEW 19 Front Panel Pushbuttons and Status LED Indicators 19 Programming Dwell Time 21 Programming Dwell Time for Multiple PD138 System 22 Ret...

Страница 4: ...Maintained Alarm 29 Sequence F2A 30 Acknowledge 31 Stop On Alarm 32 MESSAGE LABELS 33 MOUNTING DIMENSIONS 34 Table of Contents Figure 1 Panel Cutout and Mounting 10 Figure 2 Connector Labeling for PD...

Страница 5: ...or PLC Multiple units can be connected together to scan an unlimited number of points Front panel push buttons allow for easy programming of independent adjustable dwell times as well as rapid channel...

Страница 6: ...gh Door PDA2602 V 2 Stainless Steel NEMA 4X Enclosure Through Door PDA2603 V 3 Stainless Steel NEMA 4X Enclosure Through Door PDA2604 V 4 Stainless Steel NEMA 4X Enclosure Through Door PDA2605 V 5 Sta...

Страница 7: ...r more than 0 5 seconds The scan may be resumed by pressing and releasing the STOP GO button quickly less than 0 5 seconds Alarm Input Independent alarm input for each channel Input Impedance 25 Kohm...

Страница 8: ...0 50 60 Hz 4 VA 12 24 VDC 9 18 VAC 50 60 Hz 2 W LED Test All LEDs are tested on power up Enclosure 1 8 DIN high impact plastic UL94V 0 Front Panel NEMA 4X panel gasket provided Warranty 3 years parts...

Страница 9: ...on and service should be performed only by trained service personnel INSTALLATION There is no need to remove the instrument from its case to complete the installation wiring and setup Unpacking Remove...

Страница 10: ...ck off the two screws so that there is 6 4 mm or less through the bracket Slide the bracket toward the front of the case and remove Insert the unit into the panel cutout Install mounting brackets and...

Страница 11: ...put and output connections for the Minimux II are made to a 23 position removable screw terminal connector supplied with each unit The following table gives the input and output terminal assignments S...

Страница 12: ...s and connecting the third wire of each sensor to the TP terminal and to the temperature meter Connect like color leads to terminals 1A 1B 2A 2B 3A 3B etc Connect odd color leads to terminal TP Connec...

Страница 13: ...ess meter must be setup for 1 5 V input and the complete system should be calibrated together The PD6000 s internal transmitter power supply may be used to power the transmitters However only the tran...

Страница 14: ...PD138 Minimux II Temp Process Scanner Instruction Manual 14 Voltage Inputs www com information itm com 1 800 561 8187...

Страница 15: ...determine if there are two or more Minimux II connected together No special cable is needed to connect multiple PD138s together There are three connections that must be made to connect multiple PD138s...

Страница 16: ...alarms from any unit in the system or via external switches However each Minimux II s relay will operate independently so it may be necessary to wire them in parallel to drive a single alarm device Al...

Страница 17: ...normally high pull up to 5V Relay contacts from a Precision Digital meter or a low level logic output from a PLC can be used to drive the PD138 alarm input lines Note Under normal condition the NC co...

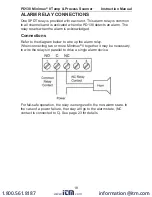
Страница 18: ...m is acknowledged Connections Refer to the diagram below to wire up the alarm relay When connecting two or more Minimux II together it may be necessary to wire the relays in parallel to drive a single...

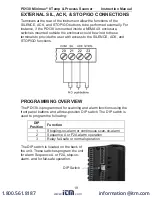
Страница 19: ...access to the SILENCE ACK and STOP GO functions PROGRAMMING OVERVIEW The PD138 is programmed for scanning and alarm functions using the front panel buttons and a three position DIP switch The DIP swit...

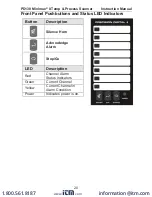
Страница 20: ...uttons and Status LED Indicators Button Description Silence Horn Acknowledge Alarm Stop Go LED Description Red Channel Alarm Status Indicators Green Current Channel Yellow Current Channel in Alarm Con...

Страница 21: ...LED will blink green but will turn red during the actual programming mode 4 Unit will beep and channel 1 will illuminate indicating PD138 is ready to be programmed 5 Dwell times are programmed with th...

Страница 22: ...e power off 2 Apply power while holding the STOP GO button 3 Release the STOP GO button two seconds after power has been applied All dwell time programming is stored in non volatile memory for 10 year...

Страница 23: ...38 can be programmed to respond to alarm conditions either via Sequence A or Sequence F2A Refer to page 26 for a description of these sequences DIP Switch 2 Position Alarm Sequence OFF A Factory Defau...

Страница 24: ...l the connections have been made to the PD138 and it has been programmed for the particular application it operates pretty much on its own The only intervention it might receive from an operator would...

Страница 25: ...t system the built in horn of the unit where the alarm condition occurred will activate Alarm Relay In a multiple unit system only the alarm relay of the unit where the alarm occurred will transfer Th...

Страница 26: ...2A also detects both momentary and maintained alarms as well as which alarms occurred first on a complete scan cycle First Out Alarms F2A The main feature of Sequence F2A is its ability to indicate wh...

Страница 27: ...An internal horn sounds 3 An alarm relay transfers The way red LEDs behave during an alarm depends on whether the PD138 was programmed to respond to alarms via Sequence A or Sequence F2A Both of thes...

Страница 28: ...welled on channel 3 for the appropriate settling time it poles channel 3 s alarm in line and finds it to be in alarm The LED starts flashing yellow red and green the horn sounds and the alarm relay tr...

Страница 29: ...find the alarm is gone momentary and turn off the red LED Channel 3 s LED will appear green before the Minimux II moves on to channel 4 If Maintained Alarm When the Minimux II returns to channel 3 th...

Страница 30: ...or the appropriate settling time it poles channel 3 s alarm in line and finds it to be in alarm The LED starts flashing yellow red and green the horn sounds and the alarm relay transfers Channel 5 is...

Страница 31: ...moves on to the next channel it will check the alarm in line and find the alarm is still there and it will not turn the red LED off The Minimux II continues to scan and again returns to channel 3 the...

Страница 32: ...will cause the horn to silence and the relay to transfer 2 Remain on the alarmed channel and acknowledge the alarm by pressing and holding the STOP GO button for more than 0 5 seconds to freeze the s...

Страница 33: ...y time by completing the form below Horizontal mounting labels available see page 10 for sample Make copies of this page for additional message labels Please include label with my order I have the PD1...

Страница 34: ...PD138 Minimux II Temp Process Scanner Instruction Manual 34 MOUNTING DIMENSIONS Figure 3 Case Dimensions Side View Figure 4 Case Dimensions Top View www com information itm com 1 800 561 8187...

Страница 35: ...PD138 Minimux II Temp Process Scanner Instruction Manual 35 NOTES www com information itm com 1 800 561 8187...

Страница 36: ...PD138 Minimux II Temp Process Scanner Instruction Manual LIM138_C SFT053 Ver 1 0 up 10 15 www com information itm com 1 800 561 8187...

Отзывы: