POWXQ5330
EN
Copyright © 2013 VARO
P a g e
|
6
www.varo.com
Only use saw blades that are recommended by the manufacturer and that fulfil the EN847-1
standard.
Always use the accessories that are recommended by this manual.
Select the correct saw blade for the material must be sawn.
To reduce the generation of noise, always make sure that the blade is sharp and clean.
Only use correctly sharpened saw blades. Never exceed the maximum speed that is
indicated on the saw blade.
Before installing the saw blade, clean the axle, the flanges (especially the assembly
surfaces) and the hexagonal nut. Incorrect mounting can lead to vibrations/knocking or
slipping of the saw blade.
Prevent that the saw comes into contact with metals, such as nails and screws. Search for
and remove all nails, screws and other foreign materials from the workpiece, before you
start to work.
Remove spanners, cut off pieces and the other items from the saw table, before turning on
the switch.
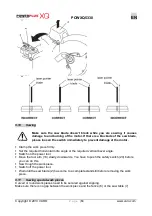
NEVER wear gloves while working; the wearing of gloves is only recommended while
cutting tools are being replaced.
Make sure that your hands stay clear of the cutting line of the saw blade.
NEVER stand in the cutting line of the saw blade and NEVER let anyone else stand in that
position.
Let the saw run for a few moments before inserting a workpiece. Listen for vibrations or
knocking of the saw blade, which can indicate improper mounting or balancing of the blade.
The equipment may not be used for making grooves or recesses.
Replace the table insert when it is worn out.
NEVER make any adjustments on the machine while it is turning. Remove the plug from the
socket before making any adjustments.
If necessary, use a push block. A push block MUST be used for longitudinal sawing of
smaller workpieces, so that your hands and fingers are kept well away from the saw blade.
Always store your push block, whenever it is not in use.
Pay special attention to the instructions that help to reduce the hazard of KICK BACK. KICK
BACK is a sudden reaction to a jammed, bent or badly aligned saw blade. KICK BACK
causes the workpiece to be thrown back in the direction of the operator. KICK BACK can
lead to serious injuries. KICK BACK can be avoided by keeping your saw blade sharp, by
keeping the rip fence parallel to the saw blade, by maintaining the riving knife and the saw
guard in good condition and in the right position, by keeping a good grip on the workpiece
until you have pushed it completely past the saw blade, and by not sawing any twisted or
skewed wood pieces, or pieces that do not have a straight edge for moving along the rip
fence, in a longitudinal direction.
Do not carry out any free-hand operations. Free-hand means that you use your hands for
supporting the workpiece, or for leading it with your hands, instead of using the rip fence or
the mitre block.
NEVER bend over or around the saw blade. NEVER reach for a workpiece, before the saw
blade has come to a complete stop.
Avoid a sudden or too quick infeed of a workpiece. Workpieces made of hard material
should be fed in as slowly as possible. Never fold or turn a workpiece while feeding it into
the saw. If the saw blade jams or ceases to turn while the workpiece is being fed in, turn the
equipment off immediately. Remove the plug from the socket. Remove the piece that is
blocking the saw.
NEVER try to remove sawed off chips, and never touch the saw guard, as long as the saw
blade is turning.
Remove all lose knots from the workpiece, BEFORE starting to saw.
Do not maltreat the cable. Never pull on the cable, for removing the plug from the socket.
Do not expose the cable to heat, oil, water or sharp edges.


