background image

10

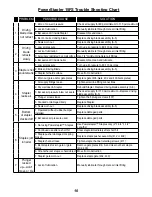
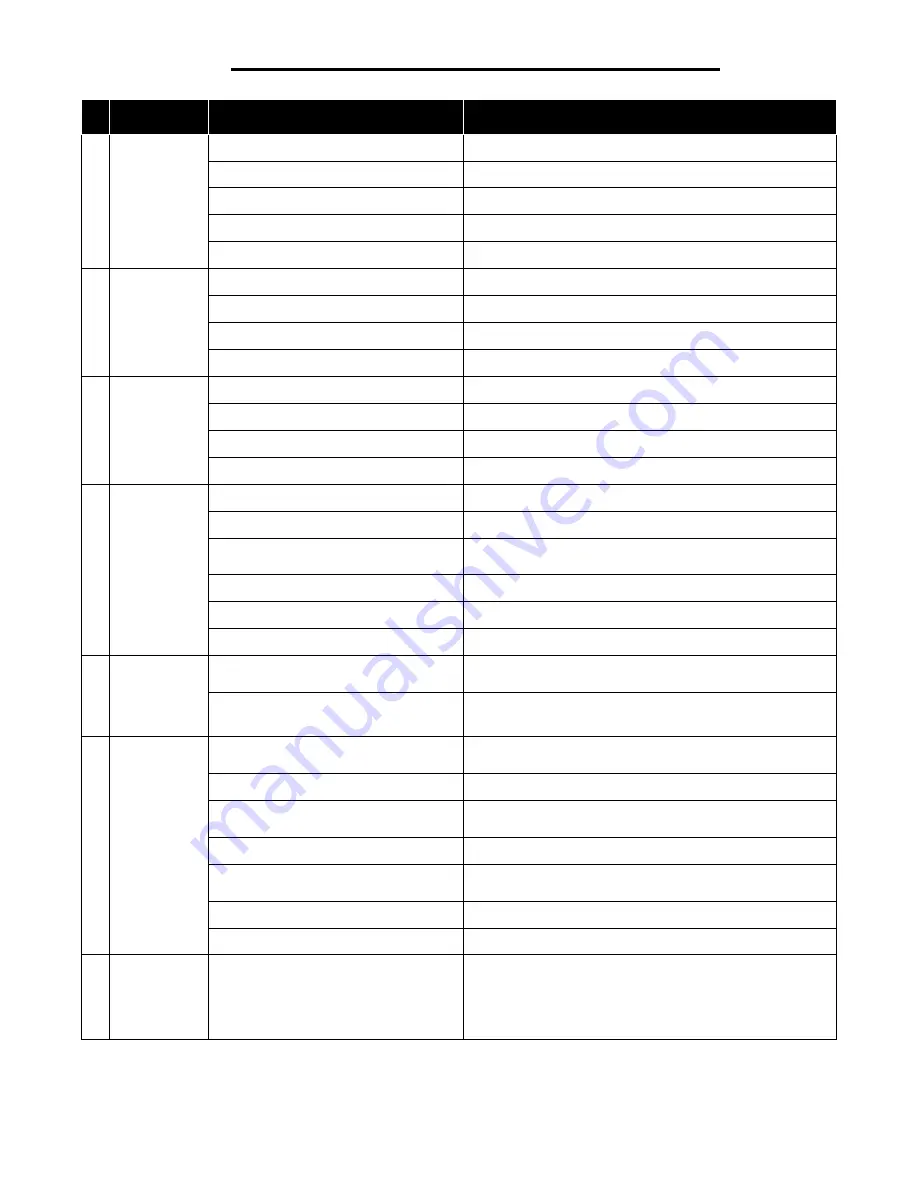
PROBLEM

POSSIBLE CAUSE

SOLUTION

1

Driving 

blade does 

not retract

1. Zero of Low air pressure

Check air supply for 80 psi minimum to 110 psi maximum

2. Lack of lubrication

Manually lubricate through male air inlet 

fi

 tting

3. Excessive dirt inside Stapler

Disassemble and clean

4. Bent or burred driving blade

Replace driving blade assembly (A-5)

5. Seals worn out

Replace driving blade assembly (A-5)

2

Driving 

blade 

retracts 

slowly

1. Low air pressure

Turn up air pressure to 80-110 psi max

2. Lack of lubrication

Manually lubricate through male air inlet 

fi

 tting

3. Air supply restricted by small ori

fi

 ce Use 1/4" minimum diameter air 

fi

 ttings

4. Excessive dirt inside nailer

Disassemble, clean and lubricate

3

Staple is not 

countersunk

1. Low air pressure

Turn up air pressure to 80-110 psi max

2. Broken Driving Blade

Replace driving blade assembly (A-5)

3. Stapler hit hard surface

Move from obstruction

4. Worn out gate and/or gate plates

Replace gate (406-Gate, 402 and 403-Gate plates)

4

Stapler 

leaks air

1. Air supply 

fi

 ttings loose

Tighten all air line 

fi

 tting connections

2. Dry wall dust in Stapler

Rebuild Stapler, Replace driving blade assembly (A-5)

3. Excess air pressure blew out seals Check air supply for 110 psi maximum—Replace driving 

blade assembly (A-5)

4. Plunger screws loose

Tighten the 5 plunger screws (107)

5. Cracked or damaged body

Replace Stapler

6. Seals worn out

Replace driving blade assembly (A-5)

5

Bottom 

of stapler 

cracked off

1. Operated without rubber bumper 

installed

Replace damaged parts

2. Excessive air pressure used

Replace damaged parts

6

Staples jam 

in nailer

1. Not using Powerstapler™ Staples

Use Powerstapler™ Staples only (2”,1-3/4”,1-1/2” 

Lengths)

2. Continued use after a short hit

Clear staple immediately after short hit

3. Staple pusher damaged or spring 

broken

Replace staple pusher assembly (412 or 409)

4. Staple channel loose

Tighten staple channel retaining screws (411)

5. Bent staple stuck in gate or gate 

plates

Remove gate plates B & A and clear out bent staple 

(402, 403)

6. Hit another set staple or hard object Move from obstruction
7. Stapler gate worn out

Replace staple gate (402, 403)

7

Plunger 

locked 

up—won't 

move or 

fi

 re

1. Lack of lubrication

Manually lubricate through male air inlet 

fi

 tting

PowerStapler 15FS Trouble Shooting Chart

Содержание 15FS

Страница 1: ...MANUEL D INSTRUCTIONS ET D ENTRETIEN Read this manual before you use this PowerStapler Follow all safety warnings and instructions If you are uncertain about the operation of the stapler call us dire...

Страница 2: ...tion any Powernailer that does not conform to this warranty Claims must be made no later than fifteen 15 days after the end of the warranty period POWERNAIL will perform all repair or replacements its...

Страница 3: ...use the Stapler to explode To prevent fire or explosion use only regulated compressed air do not use bottled gases of any kind no oxygen or combustible gasses to power this Stapler Stapler is intended...

Страница 4: ...er first 4 Rack the flooring into place with the rubber end of the mallet supplied with the Stapler Place the Stapler Roller Foot on the tongue edge of the flooring strip to be stapleed Be sure the Ro...

Страница 5: ...emove the adapter foot staple channel Remove large rubber bumper Install new rubber bumper slide staple channel onto drive blade Install adapter foot with four screws using 5mm allen wrench Turn stapl...

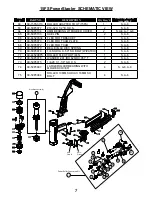
Страница 6: ...Body Not Sold Separately 1 N A 302 09 15FS 302 Handle 1 S 303 09 15FS 303 Nut 4 S 304 09 15FS 304 Handle Bracket 2 S 305 09 445 5418 Air Fitting 3 8 x 1 4 1 S 401 09 15FS 401 Hex Socket Head Bolt 4 S...

Страница 7: ...W MOLDED COVER 2 S A 6 A 7 A 8 65 09 50P3103 AXEL PIN 2 S A 6 66 09 44529334 FLEX FOOT BRACKET 1 S A 6 67 09 50P3073 FLEX FOOT CAM PLATE 1 S A 6 68 09 50P3072 FLEX FOOT CAM 1 S A 6 69 09 50P3079 BELL...

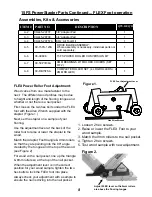
Страница 8: ...en Wrench supplied with the stapler Figure 1 Next set the stapler on a sample of your flooring Use the adjustment lever at the back of the roller foot to raise or lower the stapler to the wood Match t...

Страница 9: ...d EAR protection Use safety glasses with side shields NEVER point tool at yourself or others in the work area Only connect air to an unloaded tool and always keep tool pointed in a safe direction Disc...

Страница 10: ...hten all air line fitting connections 2 Dry wall dust in Stapler Rebuild Stapler Replace driving blade assembly A 5 3 Excess air pressure blew out seals Check air supply for 110 psi maximum Replace dr...

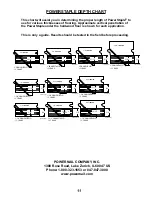
Страница 11: ...G UNDERLAYMENT 3 4 1 1 8 1 2 FLOORING UNDERLAYMENT 3 4 1 UNDERLAYMENT 5 8 FLOORING 3 4 13 16 3 4 FLOORING UNDERLAYMENT 3 4 31 32 1 2 FLOORING UNDERLAYMENT 3 4 7 8 UNDERLAYMENT 5 8 FLOORING 2 POWERSTAP...

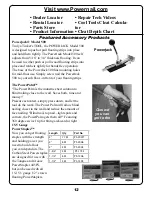
Страница 12: ...6 to 3 4 thickness flooring It can be used to either push or pull wood flooring strips into place and ratchets tightly for hands free operation The base of the PowerJack 500 has mounting holes for mid...

Отзывы: