background image


www.powermaxfitness.net 

10  Cross head tapping screw 

49  Cushioning pad 

11  Cross head tapping screw 

33 

50  Running belt 

12 

Phillips head self-tapping 
self-drilling screw 

51  Running board 

13 

Phillips head self-tapping 
self-drilling screw 

52  Multi wedged belt 

14 

Cross head three 
combination screw 

53  Shock reducing pad 

15 

Pan head inner hexagon 
tapping screw 

54  Power wire buckle 

16 

Pan head inner hexagon 
tapping screw 

55  Power switch 

17 

Pan head inner hexagon 
tapping screw 

56  Handle grip 

18 

Pan head inner hexagon 
tapping screw 

14 

57  Tube plug 

19 

Pan head inner hexagon 
tapping screw 

58  Shock reducing spring 

20 

Pan head inner hexagon 
tapping screw 

59  Omni direction moving wheel 

21 

Pan head inner hexagon 
tapping screw 

60  Spacer sleeve 

22 

Pan head inner hexagon 
tapping screw 

61  Spacer sleeve 

23 

cylindrical head inner 
hexagon screw 

62  Rubber pad 

24 

Cylindrical head inner 
hexagon screw 

63  Siderail buckle(round) 

25 

Cylindrical head inner 
hexagon screw 

64  Siderail buckle(long) 

26  Flat washer 

65  Wheel 

27  Flat washer 

66  Wheel 

28  Flat washer 

67  Plastic base holder 

29  Spring Washer 

68  Kicking type air pressure rod 

30  Spring Was her 

69  DC motor 

31  Locknut 

70  Power line 

Содержание TDA-360-10.1

Страница 1: ...ual OWNER S MANUAL Read all instructions carefully before using this product Retain this owner s manual for the future s reference Product may be slightly different with photos it is subject to actual...

Страница 2: ...l PowerMax Fitness s obligation under this warranty is limited to replacing or repairing free of charge any parts which may prove to be defective under normal home use This warranty does not include a...

Страница 3: ...nt we may modify machines when necessary and will not notify again It all depends on the actual product 1 PRODUCT BRIEF A Multifunctional Motorized Treadmill MAIN PARAMETERS AND PARTS LIST MAIN TECHNI...

Страница 4: ...ultifunction frame Option pc 1 ACCESSORY BAG LIST No Name Qty No Name Qty 1 Inner Hexagon spanner 6mm 1 7 MP3 cable 1 2 Inner Hexagon spanner 5mm 1 8 Base corner cover 1 set 3 Combination wrench 1 9 S...

Страница 5: ...End cap 1 3 Upright column 2 42 Side siderail 1 4 Incline frame assembly 1 43 Left protective cover 1 5 Console frame 1 44 Right protective cover 1 6 Oil tank assembly 1 45 Shocking reducing frame 1...

Страница 6: ...head inner hexagon tapping screw 14 57 Tube plug 2 19 Pan head inner hexagon tapping screw 3 58 Shock reducing spring 2 20 Pan head inner hexagon tapping screw 4 59 Omni direction moving wheel 2 21 Pa...

Страница 7: ...nded electric outlet should have a dedicated circuit do not share with other electrical equipment Keep children away from the machine to avoid accidents Avoid too long time and overload operation othe...

Страница 8: ...t an electric shock Don t use machine for more than 2 people at the same time and don t get close to the machine when it is in use Or it may be an accident or injury due to falls People who can t expr...

Страница 9: ...d plug Completely insert the plug to standard socket If the equipment grounding conductor s connection is improper it will cause electric shock If you have doubts about whether your product is grounde...

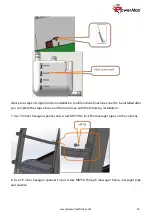
Страница 10: ...o lock the console on the columns 4 Use screwdriver and screw M5 14 to fix the base corner covers on the columns 5 Take out the console connect the signal lines one by one A put the extra exposed line...

Страница 11: ...s as follow A Open the cover of the silicon oil tube on the front motor cover B Cut the upper part of the silicon oil bottle C Squeeze the silicon oil from the hole not more than 90ml otherwise it wil...

Страница 12: ...ines need to be installed after you complete the steps above and then continue with the following installation 7 Use 5 inner hexagon spanner and screw M8 20 to lock the massager pipes on the columns 8...

Страница 13: ...asher use M8 15 spring cushion and washer to lock the massager on the massager frame 10 Put the foams through the massager frames and put the dumbbells on the frame 11 Put the safety key on the pictur...

Страница 14: ...es children cannot reach If it is eaten or split into eyes by mistake please use water to wash and consult doctor immediately 3 Safety key Introduction The treadmill can only start when the safety key...

Страница 15: ...mode press these shortcut keys to change the incline immediately 9 Volume A In USB playing mode press these buttons to turn up or turn down the volume B Press Volume long time can mute the machine DIS...

Страница 16: ...the screen Safety Key Function Disconnect the safety key the treadmill will stop immediately and the screen will display E7 and there will be an alarm sound Put the safety key back all data will be cl...

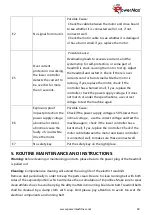
Страница 17: ...eed 2 5 6 7 8 9 10 5 3 2 Incline 3 5 6 8 6 5 8 7 5 2 P12 Speed 2 3 5 6 8 6 9 6 5 3 Incline 5 7 5 8 6 5 9 10 6 2 TRANSLATION OF ERROR CODES Error code Description Solution E1 Communication Abnormal whe...

Страница 18: ...ower supply voltage abnormal or motor abnormal cause the faulty of circuit while drive the motor Possible Cause Check if the power supply voltage is 50 lower than normal voltage use the correct voltag...

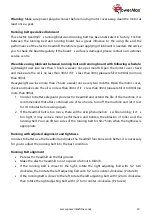
Страница 19: ...ase refill it to 90ml no more than 90ml 1 In order to better safeguard your electric treadmill and extend the life of the machine it is recommended that after continued use of two hours turn off the m...

Страница 20: ...te B If your instantaneous step stops the running belt but the multi wedge belt and former roller is still running it indicates that the running belt is loose and appropriate adjustments must be made...

Отзывы: