background image


Dust Collection 

The use of a dust collection system with the 
Disc Sander is strongly recommended. It will 
maintain shop cleanliness, and help prevent 
possible health hazards caused by wood dust.  

Make sure the capacity of the dust collector is 
suitable for this size machine. Minimum 600 
cubic feet per minute is recommended. 

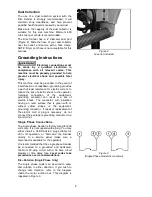
The Disc Sander has a 4” diameter dust port 
(Figure 2). Slide the hose of your dust collector 
over the outlet, and secure with a hose clamp. 
NOTE: Dryer vent hose is not acceptable for this 
purpose. 

Grounding Instructions 


Electrical connections must 

be made by a qualified electrician in 
compliance with all relevant codes. This 
machine must be properly grounded to help 
prevent electrical shock and possible fatal 
injury.


This machine must be grounded. In the event of 
a malfunction or breakdown, grounding provides 
a path of least resistance for electric current, to 
reduce the risk of electric shock to the operator. 
Improper connection of the equipment-
grounding conductor can result in a risk of 
electric shock. The conductor, with insulatio n 
having an outer surface that is green with or 
without yellow stripes, is the equipment-
grounding conductor.  If repair or replacement of 
the electric cord or plug is necessary, do not 
connect the equipment-grounding conductor to a 
live terminal. 

Single Phase Connections 

The single phase Sander is factory wired for 230 
volts only. It is not supplied with a plug. You may 
either install a UL/CSA-listed plug suitable for 
230 volt operation, or “hard-wire” the Sander 
directly to a service panel (make sure a 
disconnect is available for the operator).  

It is recommended that the 

single phase

 Sander 

be connected to a grounded and dedicated, 
minimum 30 amp circuit with a 30 amp circuit 
breaker or time delay fuse. 

Local codes take 

precedence over recommendations. 

Disc Rotation (Single Phase Only) 

The single phase model can be wired to allow 
disc rotation in either direction. If you wish to 
change disc direction, refer to the diagram 
inside the motor junction box. This diagram is 
repeated in Figure 3. 


Figure 2 

hose not included 


Figure 3 

(Single Phase model disc reversal) 


Содержание DS20

Страница 1: ...0 inch Disc Sander Model DS20 Three Phase model shown WALTER MEIER Manufacturing Inc 427 New Sanford Road LaVergne TN 37086 Part No M 0460226 Ph 800 274 6848 Revision G1 12 2010 www powermatic com Copyright 2010 Walter Meier Manufacturing Inc ...

Страница 2: ...postage prepaid to a location designated by us For the name of the location nearest you please call 1 800 274 6848 You must provide proof of initial purchase date and an explanation of the complaint must accompany the merchandise If our inspection discloses a defect wewill repair or replace the product or refund the purchase price at our option We will return the repaired product or replacement at...

Страница 3: ...bly 7 Dust Collection 8 Grounding Instructions 8 Extension Cords 9 On Off Switch Padlock 9 Adjustments 10 Table Movement 10 Squaring the Table 10 Replacing Abrasive Disc 10 Miter Gauge 11 Operation 11 Forward Reverse Switch 3 Phase 12 Brake 12 Replacement Parts 14 Parts List DS20 Disc Sander 15 Exploded View DS20 Disc Sander 17 Parts List Brake Assembly 18 Electrical Connections 19 ...

Страница 4: ...with the machine unplugged from the power source 13 Some dust created by power sanding sawing grinding drilling and other construction activities contain chemicals known to cause cancer birth defects or other reproductive harm Some examples of these chemicals are Lead from lead based paint Crystalline silica from bricks cement and other masonry products Arsenic and chromium from chemically treated...

Страница 5: ...sed air to remove chips or debris do not use your hands 28 Do not stand on the machine Serious injury could occur if the machine tips over 29 Never leave the machine running unattended Turn the power off and do not leave the machine until it comes to a complete stop 30 Remove loose items and unnecessary work pieces from the area before starting the machine 31 After turning switch to ON always allo...

Страница 6: ...28 3 16 Table Surface from Floor maximum height in 35 7 8 Distance Between Disc and Table in 0 20 Distance Between Mounted Abrasive and Table in 0 17 Dust Port Diameter in 4 Dust Collection Minimum CFM Required 600 Disc Speed RPM 1 720 Overall Size LxWxH in 31 x 28 x 48 1 2 Footprint LxW in 22 1 2 x 22 1 2 Net Weight approximate lbs 426 Shipping Weight approximate lbs 529 The above specifications ...

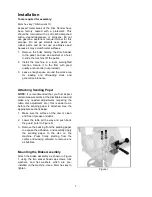
Страница 7: ... loading and off loading stock and general maintenance Attaching Sanding Paper NOTE It is recommended that you first inspect certain measurements at the disc table area and make any needed adjustments squaring the table disc adjustment etc this is easier to do before the sanding paper is attached See the appropriate sections below 1 Make sure the surface of the disc is clean and free of grease or ...

Страница 8: ...he equipment grounding conductor can result in a risk of electric shock The conductor with insulation having an outer surface that is green with or without yellow stripes is the equipment grounding conductor If repair or replacement of the electric cord or plug is necessary do not connect the equipment grounding conductor to a live terminal Single Phase Connections The single phase Sander is facto...

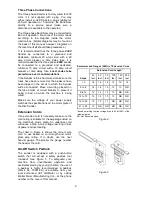
Страница 9: ...the machine is being wired Make sure the voltage of your power supply matches the specifications on the motor plate of the Disc Sander Extension Cords If an extension cord is necessary make sure the cord rating is suitable for the amperage listed on the machine s motor plate An undersize cord will cause a drop in line voltage resulting in loss of power and overheating The chart in Figure 4 shows t...

Страница 10: ...zontal position and placing a square on the table and flush against the disc It is easier to do this without an abrasive disc attached See Figure 8 2 Adjust the table until the square is flush against both surfaces 3 If required adjust the pointer to the zero mark and retighten the screw Replacing Abrasive Disc The DS20 takes standard 20 diameter cloth or paper back sanding discs We recommend 60 g...

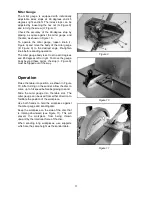
Страница 11: ...es left or right To move the gauge body beyond these points the stop L Figure 9 must be flipped out of the way Operation Raise the table into position as shown in Figure 10 After turning on the sander allow the disc to come up to full speed before beginning to sand Slide the miter gauge into the table slot The miter gauge can be used from either direction to facilitate the position of the workpiec...

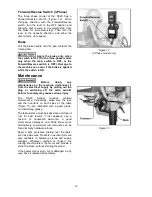
Страница 12: ...ctrical supply by pulling out the plug or switching off the main switch Failure to comply may cause serious injury The DS20 Sander requires minimal maintenance Periodically make sure the rack and the trunnions on both sides of the table Figure 13 are lubricated with a good grade non hardening grease The table surface must be kept clean and free of rust for best results If rust appears use a mixtur...

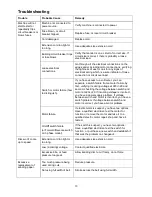
Страница 13: ...g voltage at 220 20 and second checking the voltage between switch and motor at 220 20 If incoming voltage is incorrect you have a power supply problem If voltage between switch and motor is incorrect you have a switch problem If voltage between switch and motor is correct you have a motor problem Motor failure If electric motor is suspect you have two options Have a qualified electrician test the...

Страница 14: ...g paper surface Use coarser grit for stock removal Feed pressure too great Do not force workpiece into disc Use just enough pressure and let the sanding disc do the work Sanding paper burns or clogs quickly Too much pressure sanding disc biting too deeply into workpiece Adjust for slight sanding action and make several passes Workpiece pulled from hand No support for workpiece Use miter gauge Keep...

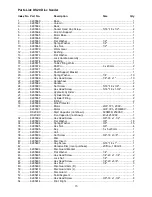
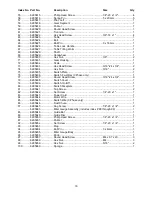
Страница 15: ...er 1 27 6295586 Cylinder Head 2 28 6295587 Cylinder Fitting 2 29 6295588 E Ring 2 30 6295589 Wire Protector 1 31 6295590 Motor 2HP 1Ph 230V 1 6295591 Motor 3HP 3Ph 230 460V 1 DS20 SC Start Capacitor not shown 500MFD 250VAC 1 DS20 RC Run Capacitor not shown 40uf 250VAC 1 32 6295592 Hex Head Screw 3 8 16 x 1 1 2 3 33 6295593 Flat Washer 3 8 16 34 6295594 Spring Washer 3 8 15 35 6295595 Hex Nut 3 8 4...

Страница 16: ...Switch Plate 1 76 6295636 Switch Fwd Rev 3 Phase only 1 77 6295637 Round Head Screw 3 16 24 x 3 4 9 78 6295638 Switch Cover 1 79 6295639 Switch On Off 1 80 6295640 Switch Faceplate 1 81 6295641 Tap Screw 2 82 6295642 Set Screw 1 4 20 x 1 1 83 6295643 Power Cord 1 84 6295644 Motor Wire 1 85 6295645 Switch Wire 3 Phase only 1 86 6295646 Dust Chute 1 87 6295647 Cap Screw 1 4 20 x 1 4 2 6295663 Miter ...

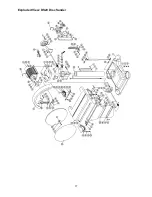
Страница 17: ...17 Exploded View DS20 Disc Sander ...

Страница 18: ...d 1 2 TS 2311081 Hex Nut M8 1 3 DS20 203 Push Body 1 4 TS 2361061 Lock Washer M6 4 5 TS 1503041 Socket Head Cap Screw M6 x 16 4 6 DS20 206 Bracket 1 7 TS 1540031 Hex Nut M5 1 8 TS 2205301 Hex Cap Screw M5 x 30 1 9 DS20 209 Spring 1 10 TS 1550061 Flat Washer M8 2 11 TS 2361081 Lock Washer M8 2 12 TS 1504051 Socket Head Cap Screw M8 x 25 2 ...

Страница 19: ...19 Electrical Connections ...

Страница 20: ...20 WALTER MEIER Manufacturing Inc 427 New Sanford Road LaVergne Tennessee 37086 Phone 800 274 6848 www waltermeier com ...

Отзывы: