background image

21

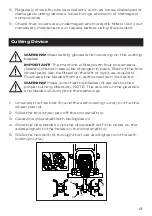
a

b

c

d

5.  Regularly check for obvious defects, such as loose, dislodged or 

damaged cutting devices, loose fixings and worn or damaged 

components. 

6.  Check that covers are undamaged and correctly fitted. Carry out 

necessary maintenance or repairs before using the product.

  Cutting Device

WARNING! 

Wear safety gloves when working on the cutting 

blades! 

IMPORTANT!

 The machine is fitted with four tine wheels 

(blades) that can easily be changed in pairs. Both of the tine 

wheel pairs can be fitted on the left or right, as required. 

Purchase the blades from an authorised service centre. 

WARNING! 

Make sure that the blades (d) are set to their 

proper turning direction. NOTE: The arrows on the gearbox 

and blades should point the same way.

1.  Unscrew the hex bolt (b) and the self-locking nut (a) on the tine 

wheel pair (d). 

2.  Slide the tine wheel pair off the driveshaft (c). 
3.  Clean the driveshaft with biological oil. 
4.  Slide the new blades onto the driveshaft with the holes on the 

axles aligned to the holes on the driveshaft (c). 

5.  Slide the hex bolt (b) through the hole and tighten on the self-

locking nut (a).

Содержание 577184

Страница 1: ...help you get the best from your product ensuring it is assembled correctly and safely If you need help or have damaged or missing parts call the Customer Helpline on 01904 727 509 IMPORTANT Please rea...

Страница 2: ...eral safety warnings 3 Intended use 9 Warning symbols 11 In the box 13 Assembly 14 Preparation 16 Operation 19 Maintenance and repair 20 Troubleshooting 23 Technical data 24 Disposal 25 Getting help 2...

Страница 3: ...ine Save all warnings and instructions for future reference This machine MUST NOT be used by children and persons with reduced physical sensory or mental capabilities or lack of experience and knowled...

Страница 4: ...hine Local regulations can restrict the age of the operator Never operate the machine while people especially children or pets are nearby Keep in mind that the operator or user is responsible for acci...

Страница 5: ...the supply and extension cord for signs of damage or aging If the cord becomes damaged during use disconnect the cord from the power supply immediately DO NOT TOUCH THE CORD BEFORE DISCONNECTING THE S...

Страница 6: ...ening Do not put hands or feet near or under rotating parts Keep clear of the discharge opening at all times Do not transport the machine while the cutting blade is running You must stop the machine i...

Страница 7: ...with multi blades take care as manually rotating one blade can cause other blades to rotate Be careful during adjustment of the machine to prevent entrapment of the fingers between moving blades and f...

Страница 8: ...d via a residual current device RCD with a tripping current of not more than 30mA If the supply cord is damaged it must be replaced by the manufacturer its service agent or similarly qualified persons...

Страница 9: ...them to the letter This will help to prevent risks and hazards Always be alert when using the machine so that you can recognise and handle risks early Fast intervention can prevent serious injury and...

Страница 10: ...n and noise reduction To reduce the impact of noise and vibration emissions limit the time of operation use low vibration and low noise operating modes as well as wear personal protective equipment PP...

Страница 11: ...fore transporting the machine or before inspecting cleaning or conducting any other maintenance Beware of sharp blades Blades continue to rotate after the motor is switched off Remove the plug from th...

Страница 12: ...f disposing of them as household waste All tools cables and packaging should be sorted taken to the local recycling centre and disposed of in an environmentally friendly way The product complies with...

Страница 13: ...e Box Parts 1 Right handle 2 Left handle 3 Frame 4 Fixing nuts and bolts x 4 5 Cord clips x 2 6 Screws x 4 7 Middle handle 8 Motor housing 9 Lower handle 10 Protection guard 11 Blades 2 1 3 4 5 6 7 8...

Страница 14: ...e required when assembling the electric tiller 2 Keep all packaging until the electric tiller is fully assembled and has been operated successfully NOTE Always recycle the packaging in accordance with...

Страница 15: ...nuts and bolts to fix the upper and middle handles firmly together Align the middle handle frame with the lower handle Use the nuts and bolts to fix the middle and lower handles firmly together NOTE M...

Страница 16: ...ut or damaged do not touch it Disconnect from the power supply immediately and have the damaged cable replaced by an authorised service agent WARNING If operating the appliance in a damp location is u...

Страница 17: ...the on off switch is in its OFF position Connecting the extension cord to a suitable socket Double the extension cord about a foot from the end Push the loop through the hole on the rear safe guard a...

Страница 18: ...machine inadvertently You must press the switch button A firstly and then hold the switch trigger B Switching on 1 Press the lock button A 2 Hold the switch trigger B and release the switch button A...

Страница 19: ...as tiles or steps WARNING Before switching the machine on make sure that it is not touching any other objects and hold it firmly in both hands NOTE After working with the machine switch it off To tra...

Страница 20: ...blue wire must be connected to the terminal marked N or coloured black The brown wire must be connected to the terminal marked L or coloured red WARNING Never connect live or neutral wires to the ear...

Страница 21: ...irs Both of the tine wheel pairs can be fitted on the left or right as required Purchase the blades from an authorised service centre WARNING Make sure that the blades d are set to their proper turnin...

Страница 22: ...using the original packaging for storage or covering the product with a suitable cloth or enclosure to protect it against dust Transportation 1 Switch the product off and disconnect it from the power...

Страница 23: ...this section In most cases the problem can be solved quickly Fault Possible Cause Solution Product does not start 1 Not connected to power supply 2 Power connection is loose 3 Other electrical defect...

Страница 24: ...exceed 80dB A and ear protection measures are necessary The declared vibration value has been measured in accordance with a standard test method according to EN 709 and may be used for comparing one p...

Страница 25: ...ories are made of various recyclable materials Dispose of the tiller in accordance with your local recycling regulations not with household waste Getting Help Our dedicated UK based customer helpline...

Страница 26: ...e repair of the item where this is possible or a replacement or a refund Your statutory rights remain unaffected in particular any rights you may have under the Consumer Rights Act 2015 This warranty...

Отзывы: