background image


For Technical Support: 

Visit our website at:  

www.power-tronics.com


Call Us at: 

(830) 895-4700 

If you do not have any of the specifications of your generator’s exciter, or if you 

don’t know where to start when trying to determine your exciter specs, please 

see the section below for instructions on measuring and calculating your exciter 

specifications. 


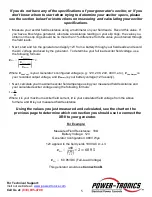
•   Measure your exciter field resistance using a multimeter on your field leads.  Record this value.  If 

you have a brush-type generator, also take a resistance reading on your slip rings:  the value you 
obtain on the slip rings should be no more than 1% difference from the value you obtained through 
the field leads.   

 
•   Next, start and run the generator and apply 12V from a battery through your field leads and record 

the AC voltage produced by the generator.  To determine your full load exciter field voltage, use 
the following formula: 

E

Exc.

 =


Where 

E

Gen.Conf

.

 is your Generator’s configured voltage (e.g.: 120, 208, 240, 480V, etc.), 

E

Gen.Output

 is 

your recorded output voltage, and 

E

Battery


is your battery voltage (12V usually).   

 
•   Next, calculate your maximum exciter field amperage using your measured field resistance and 

your calculated exciter voltage using the following formula: 


Where 

I

 is your maximum exciter field current, 

E

 is your calculated field voltage from the above 

formula, and 

R

 is your measured field resistance.   


Using the values you just measured and calculated, see the chart on the 

previous page to determine which connection you should use to connect the 

XR8 to your generator. 


For Example: 


Measured Field Resistance:  18Ω 

Battery Voltage:  12V 

Generator Configuration: 480V Wye 


12V applied to the field yields 189VAC L1-L3. 

E

Exc.

 =


480

$%&

$'

∗ 2 = 60.95


E

Exc.

 =

   60.95VDC (Full-Load Voltage) 


This generator would use 

Connection B


E

Gen

.

Conf

.

E

Gen

.

Output

E

Battery

"


#


$


$


%


&


'


'


* 2

I

=

E

R

Содержание XR8

Страница 1: ...nal inexpensive digital interface module This capability makes the XR8 suitable for automated or unattended installations or large scale parallel operations Like our previous models the XR8 is fully repairable All major electronic components are not encapsulated to facilitate repair while all sensitive components are encapsulated to protect them from contamination and moisture The XR8 is compatibl...

Страница 2: ...enerators 7 Hookup Connection A 8 Parallel Configuration for Connection A 9 Hookup Connection B 10 Parallel Configuration for Connection B 11 Hookup Connection C 12 Parallel Configuration for Connection C 13 Initial Setup and Commissioning 14 Optional Power Tronics Add On Modules 15 Conversion From Shunt Wound to Solid State Regulation 16 Internal Fuse Replacement 17 Application Troubleshooting 18...

Страница 3: ...rly installed the XR8 Universal Voltage Regulator is designed to provide a lifetime of service A Generator voltage regulator has several automated tasks it must perform in order to provide reliable clean and regulated electricity It must build up the generator regulate the terminal voltage within its design specifications and protect both itself and the generator should a fault situation arise The...

Страница 4: ... A B or C from the chart below Exciter Field Resistance 26Ω Exciter Full Load Voltage 125VDC Use connection A See Page 8 Exciter Field Resistance 13Ω Exciter Full Load Voltage 63VDC Use connection B See Page 10 Exciter Field Resistance 6 5Ω Exciter Full Load Voltage 32VDC Use connection C See Page 12 Note about Field Resistance When measuring field resistance on a brushless generator simply measur...

Страница 5: ...rator To determine your full load exciter field voltage use the following formula EExc Where EGen Conf is your Generator s configured voltage e g 120 208 240 480V etc EGen Output is your recorded output voltage and EBattery is your battery voltage 12V usually Next calculate your maximum exciter field amperage using your measured field resistance and your calculated exciter voltage using the follow...

Страница 6: ...39V Parallel Wye 208 240V 3ø Voltage L L 208 240V Voltage L N 120 139V NOTE 208V is Standard Voltage Series Delta 240V 3ø Voltage L L 240V Voltage L1 L2 N 120V Voltage L3 N 208V NOTE L3 N is a High Leg 208V instead of 120V Double Delta 120 240V 1ø Voltage L L 240V Voltage L N 120V Preferred Single Phase Connection Don t Use Zig Zag if Possible NOTE Derate generator by 1 3 rated capacity when using...

Страница 7: ...Measure your field resistance and proceed with sizing on Page 4 DPE Winding and Auxiliary Winding These generators use an extra winding in the main stator as a power supply for the voltage regulator in an attempt to give the regulator a clean power source that isn t affected by load The XR8 has proprietary filtering circuitry in its sensing stage that is largely unaffected by generator load Becaus...

Страница 8: ...or use on 480V systems either connect the regulator to the winding center taps T7 and T9 See Page 6 or use a 480 240V step down transformer rated at 1 5KVA Connecting the input of the XR8 to 2 different legs of the generator as shown in the diagram below will result in greater regulation accuracy than when connecting line neutral NOTE It is not necessary to jumper terminals 7 and 8 if not using th...

Страница 9: ...ance a bit at a time until satisfactory droop is achieved CT should be sized at 25 35VA burden XR8 Professional Series Universal Voltage Regulator 240VAC MAX Secondary Voltage 100K 2W Unit Parallel Switch Reactive Droop Adjustment 10Ω 100W CT Rating XXX 5A 25 35VA Transformer Rating XXX 240V 1 5KVA Regulator On Off Switch Rate for Primary Voltage 10A Setup Tips Isolation Transformer is recommended...

Страница 10: ... to the unit will result For use on 480V systems either connect the regulator to the winding center taps T7 and T9 See Page 6 or use a 480 240V step down transformer rated at 1KVA Connecting the input of the XR8 to 2 different legs of the generator as shown in the diagram below will result in greater regulation accuracy than when connecting line neutral NOTE It is not necessary to jumper terminals...

Страница 11: ...tance a bit at a time until satisfactory droop is achieved CT should be sized at 25 35VA burden XR8 Professional Series Universal Voltage Regulator 240VAC MAX Secondary Voltage 100K 2W Unit Parallel Switch Reactive Droop Adjustment 10Ω 100W CT Rating XXX 5A 25 35VA Transformer Rating XXX 240V 1KVA Regulator On Off Switch Rate for Primary Voltage 10A Setup Tips Isolation Transformer is recommended ...

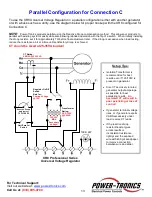
Страница 12: ...ither connect the regulator to the winding center taps T7 to T0 See Page 6 or use a 480 120V step down transformer rated at 500VA Preferred for superior regulation accuracy Connecting the input of the XR8 to 2 different legs of the generator through a transformer will result in greater regulation accuracy than when connecting line neutral as shown in the diagram below NOTE It is not necessary to j...

Страница 13: ...resistance a bit at a time until satisfactory droop is achieved CT should be sized at 25 35VA burden XR8 Professional Series Universal Voltage Regulator 120VAC MAX Secondary Voltage 100K 2W Unit Parallel Switch Reactive Droop Adjustment 10Ω 100W CT Rating XXX 5A 25 35VA Transformer Rating XXX 120V 500VA Regulator On Off Switch Rate for Primary Voltage 10A Setup Tips Isolation Transformer is recomm...

Страница 14: ... turning the adjustment screw clockwise right The voltage adjustment is a 25 turn pot NOTE The maximum internal voltage setpoint is 260VAC This helps prevent accidental over voltage conditions due to incorrect installation 8 Place the generator on line and observe the frequency and voltage 9 If the generator is being paralleled measure the droop during loading and adjust the droop resistor as nece...

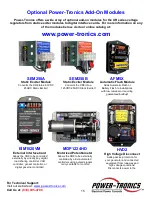
Страница 15: ...Converts the XR8 into a 125VDC 25ADC Static Exciter AFM5X Automatic Flash Module Adds Automatic Flash or Battery Flash to installations with low residual or requiring guaranteed buildup EIM1020VM External Interface Card Allows the XR8 to be controlled externally by virtually any digital load sharing controller VAR controller genset controller or digital governor controller MOP1224HD Motorized Pote...

Страница 16: ...e the XR8 Universal Voltage regulator with older Shunt Wound exciters that originally had manual mechanical or series solid state voltage regulators by converting the wiring as in the diagrams below If the generator will not build up after conversion try switching your F and F leads at the regulator and try starting up again NOTE Armature brushes MUST BE ISOLATED from the field leads for proper op...

Страница 17: ... Littelfuse Part Number 0314010 MXP or 0314010 HXP Fuse Replacement Procedure Refer to the image above for easy reference Remove the 4 screws located on the front of the aluminum mounting can to allow removal of the can Remove the aluminum mounting can from the circuit card Use a continuity tester or multimeter to test the fuses A good fuse will read continuity or 0Ω resistance Replace open fuses ...

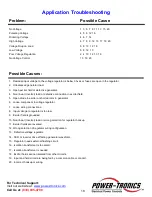
Страница 18: ...generator 4 Non linear Inverter load or defective connection in exciter field 5 Open diode in exciter or shorted rotor in generator 6 Loose component in voltage regulator 7 Loose wiring connections 8 Input voltage to regulator is too low 9 Exciter field is grounded 10 Non linear Inverter load or wrong selection for regulator hookup 11 Exciter fields are reversed 12 Wrong selection of regulator wir...

Страница 19: ...atus light is not on do not continue this test 6 SLOWLY turn the internal voltage adjustment CW until the incandescent light bulb turns fully on then adjust the internal voltage adjustment CCW until the light bulb is off 7 Observation You should be able to taper the incandescent light bulb on and off in a relatively smooth manner If the light flashes on or off quickly the regulator has an internal...

Страница 20: ...ww power tronics com warranty Problem Description History Please be detailed Ship To Address City State Zip Country Company Name Contact Person Telephone Number Email Address Primary Load Please Explain Repair Warranty Request Information Generator Leads Check One 12 10 6 4 3ø 4 1ø 3 Generator Wiring Mode Check One High Wye Low Wye Series Delta Zig Zag Double Delta Single Phase Other Terminal Volt...

Страница 21: ...se date and serial number of the defective part A repair request form must be sent in with the product before repairs will begin You can obtain this form by contacting Power Tronics Inc Send repairs to Power Tronics Inc 2802 Cobbler Ln Kerrville Texas USA 78028 Send in repairs only by UPS or FedEx USPS will NOT deliver to our facility Any one of the following conditions will void the warranty v Ov...

Отзывы: