GB-2
GB-3
GB
GB
CHARGING THE POWER START
WARNING: The
Power-Start MUST BE SWITCHED OFF
and the switch key must be removed
BEFORE
the
charger is connected to it. Ensure all output cables are disconnected. Failure to do so may damage the charger
and will prevent the unit from charging.
Connect the charger plug to the 4-pole socket on the front of the unit. Plug the charger into the mains. Note: The
8A charger supplied with the 1224-HD and the 24-HD must also be switched on using the switch on the back of the
charger. The “Charge Indicator” LED will illuminate. The charger LEDs will indicate when the unit is full, however,
the Power-Start must be left on charge when it is not being used.
Only charge using the supplied charger. No
other charger should be used as this may cause damage to the batteries. Never leave the Power-Start discharged
at any time. This may cause permanent damage to the batteries and will invalidate the warranty.
CHARGING FROM A VEHICLE
Power-Start may also be charged from a 12 volt vehicle cigarette lighter socket by using the optional cigarette
lighter lead. This lead is designed to connect the charge socket on the Power-Start to the cigarette lighter on the
vehicle. The Power-Start will only be recharged slowly using this lead and only while the vehicle engine is running.
Therefore the pack should normally be recharged using the mains charger. Insufficient charging of the pack may
result in failure and this is not covered by the warranty.
STARTING & CONNECTIONS
STARTING VEHICLES
Always follow the vehicle manufacturer’s instructions for safe jump-starting. Check the voltage of the vehicle
system (12 V or 24 V). Ensure the Power-Start key-switch is in the "OFF" position. Switch off all lights and other
loads on the vehicle.
Connect the Power-Start output cable to the correct socket (12 V or 24 V) on the power pack. Connect to the
vehicle system observing correct polarity.
The pack MUST be connected to the correct voltage and polarity of
the vehicle system.
If the polarity is wrong a buzzer will sound and the reverse indicator LED will light up. Reconnect correctly. Always
check that the connection polarity is right even if the buzzer does not sound.
Switch on Power-Start by inserting and turning the switch key. Make sure cables are free of turning parts of the
engine and start the engine normally.
If the engine does not start within 6 seconds, stop and wait for one
minute before making a further attempt.
After the engine has started, allow it to run for a few minutes to recharge
the vehicle’s on-board battery. Switch off the engine then switch off the Power-Start and remove the negative
clamp, then the positive clamp. Restart the engine from the vehicle’s on-board battery.
NOTE:
It is not recommended that the Power-Start is used to start vehicles without a battery fitted or with a battery
that has had the electrolyte dried out. Damage may occur to the Power-Start or the vehicle if the Power-Start is
disconnected or switched off while the engine is running.
INDEX
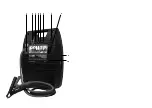
1 24V CONNECTOR
2 4-POLE CHARGER SOCKET
3 REVERSE INDICATOR LED
4 CHARGE INDICATOR
5 PUSH TO TEST BUTTON
6 STATE OF CHARGE LEDS
7 MAIN SWITCH
8 12V CONNECTOR
9 SAFETY FUSE
10 CIGARETTE LIGHTER SOCKET
Table 1: Part location refer to drawing on page 14
GENERAL
The Power-Start range of portable power packs are designed to assist with starting 12 and 24 volt vehicles that
have discharged batteries. To ensure safe and trouble-free operation of your Power-Start you must follow the
instructions below.
IMPORTANT INFORMATION
FOR YOUR SAFETY
DO NOT SHORT CIRCUIT OR TAMPER WITH THIS UNIT. ALWAYS OBSERVE CORRECT POLARITY AND
SYSTEM VOLTAGE WHEN CONNECTING.
Failure to do so may lead to a HAZARDOUS situation, damage the pack or the vehicle and may invalidate the
warranty. Remove personal items such as rings, bracelets and watches when working with a vehicle battery. Use
Power-Start for boosting standard 12 V or 24 V vehicle batteries only. Switch unit off when not in use.
WARNING
Before initial use, the Power-Start must be put on charge overnight (16Hrs). Failure to do so may reduce the life of
the product and invalidate the warranty.
CHARGING
CHECKING STATE OF CHARGE
The state of charge is best checked 2 hours after charging. Ensure all cables are disconnected. Push the “Push
to test” button. The LEDs will indicate the approximate state of charge of the unit.
Содержание 24HD
Страница 8: ...1 2 3 4 5 6 7 8 9 10 ...

