background image

3

English

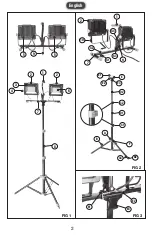
PRODUCT OVERVIEW

1. 

Carrying Handle

2. 

Work Light Heads

3. 

Lens

4. 

Side Locking Knobs

5. 

On/Off Switch

6. 

LEDs

7. 

H-Stand

8. 

Tripod

9. 

Power Cord

See FIG 1

UNPACKING CONTENTS

Important!


Due  to  modern  mass  production 

techniques, it is unlikely the product is faulty or that a part 

is missing. If you find anything wrong, do not operate the 

tool until the parts have been replaced or the fault has been 

rectified. Failure to do so could result in serious personal 

injury.

contents In packaGe

Description 


Quantity 


Work Light Heads 


  2

Stand With Carrying Handle  

  1

Tripod 


  1

Manual  


  1

SPECIFICATIONS

Rated Power ...........................120 V~, 60Hz, 170W

Brightness ..............................20,000 Lumens

Color Temperature ..................5000K Bright White

CRI .........................................>80

Cord ....................................... 9 ft. 18/3 SJTW 

Tripod Height .........................  30" - 65"

Net Weight ............................. 13.1 lb

IMPORTANT SAFETY INSTRUCTIONS

READ  AND  UNDERSTAND  ALL  WARNINGS,  CAUTIONS 

AND  OPERATING  INSTRUCTIONS  BEFORE  USING  THIS 

EQUIPMENT.  Failure  to  follow  all  instructions  listed  below 

may  result  in  electric  shock,  fire  and/or  serious  personal 

injury.


WaRnInG:


RISK  OF  ELECTRIC  SHOCK,  Do 

not use with an extension cord near water or where water 

may accumulate. Keep work light at least 16 feet from 

pools and spas. Keep plugs and receptacles dry. Use only 

three-wire outdoor extension cords with grounded plugs 

and grounded receptacles.


Ground  Fault  Circuit  Interrupter  (GFCI)  protection 

should be provided 

on the circuit(s) or outlet(s) to be 

used  for  this  light  in  wet  locations.  Receptacles  are 

available having the built-in GFCI protection and are able 

to be used for this measure of safety.


Use  only  with  an  extension  cord  for  outdoor  use, 

such as an extension cord of cord type: SW, SW-A, SOW, 

SOW-A,  STW,  STW-A,  STOW,  STOW-A,  SJW,  SJW-A, 

SJOW, SJOW-A, SJTW, SJTW-A, or SJTOW, SJTOW-A.


Do not look directly at the lighted lamps to avoid eye 

injuries.


Always  keep  the  work  light  away  from  any 

flammable surface or materials. 


Always  check  damaged  or  worn-out  parts  before 

using the work light. 

Broken parts will affect the work 

light  operation.  Replace  or  repair  damaged  or  worn 

parts  immediately.  If  repairs  are  needed,  consult  a 

professional electrician.


Do not use a pressure washer to clean this product.


Do not modify the work light in any way.


Unauthorized 

modification may impair the function and/or safety and 

could  affect  the  life  of  the  product. There  are  specific 

applications for which the work light was designed. 


Store work light in a secure place out of the reach of 

children.


Inspect it for good working condition prior to 

storage and before re-use. 

ASSEMBLY INSTRUCTIONS

attacHInG WoRk LIGHt HeaDs to 
stanD (FIG 2)

1. 

Place the stand (7) on a flat surface. 

2. 

Rotate the carrying handle (1) straight up. Tighten the 

handle locking knob (G3) to secure it in place. 

3. 

Install one work light head (2) on the stand (7) by sliding 

and positioning the U-shape bracket (10) under the bolt 

cap  (G2)  as  shown  in  FIG  2. Tighten  the  locking  knob 

(G1) to secure the work light head in place. Repeat the 

procedure on the second work light head. 

4. 

Hang the power cable splitter (H) on the hook (G4).

SYMBOLOGY

SYM-

BOL

DESCRIP-

TION

SYM-

BOL

DESCRIPTION

V

Voltage

Alternating current

A

Amperes

Symbol of safety warning 

and precautions  

Hz

Hertz

Read operator's manual

W

Watts

No dumping with house-
hold Waste

LM

Lumens

ETL listing for U.S. and 
Canada

Содержание PWLD200T

Страница 1: ...ASSISTANCE SANS FRAIS LÍNEA DE AYUDA GRATUITA www powersmithPRODUCTs com The images are for illustration purpose only Actual product may vary for different models Les images sont à titre d illustration seulement Le produit réel peut varier pour différents modèles Las imágenes son sólo para fines ilustrativos El producto real puede variar para diferentes modelos SAVE THIS MANUAL FOR FUTURE REFERENC...

Страница 2: ...FIG 1 FIG 2 5 9 5 1 2 3 4 7 6 8 2 E1 D2 D1 E E3 E2 C1 F B A C2 B2 E1 E3 E2 FIG 3 10 G2 G3 G4 G1 1 2 H 7 C3 2 English ...

Страница 3: ... of safety Use only with an extension cord for outdoor use such as an extension cord of cord type SW SW A SOW SOW A STW STW A STOW STOW A SJW SJW A SJOW SJOW A SJTW SJTW A or SJTOW SJTOW A Do not look directly at the lighted lamps to avoid eye injuries Always keep the work light away from any flammable surface or materials Always check damaged or worn out parts before using the work light Broken p...

Страница 4: ...djust the Light Direction loosen the side locking knobs 4 FIG 1 Adjust the work light head to desired position and retighten knobs SWITCH ACTION Each of the work light head is equipped with an On Off switch 5 FIG 1 located on the back side of the work light Press the switch once to turn the work light on and press the switch a second time to turn it off Always turn the work light off before unplug...

Страница 5: ... de terre doit être fourni sur les circuits ou les prises de courants utilisés pour cette lampe de travail pour emplacement mouillé Les embases de connecteur sont dotées d une protection de fuite à la terre et peuvent être utilisées pour cette mesure de sécurité N utiliser qu avec des cordons prolongateurs prévus pour un usage extérieur comme ceux des types suivants SW SW A SOW SOW A STW STW A STO...

Страница 6: ...ue métallique surélevée au milieu du pied FONCTIONNEMENT RÉGLAGE DE LA DIRECTION DU FAISCEAU LUMINEUX La tête de la lampe de travail peut être basculée à la verticale jusqu à un angle de 30 degrés vers le bas ou de 90 degrés vers le haut Pour régler la direction du faisceau lumineux desserrer les boutons de verrouillage latéral 4 FIG 1 Régler la tête de la lampe de travail à la position désirée pu...

Страница 7: ... es necesario efectuar reparaciones consulte con un electricista profesional No use un lavador a presión para limpiar este producto No modifique la luz de trabajo de ninguna manera La modificación no autorizada puede impedir el funcionamiento y la seguridad y podría afectar la vida útil del producto Hay aplicaciones específicas para las que fue diseñada la luz de trabajo Almacene la luz de trabajo...

Страница 8: ...placa de metal elevado en el centro del soporte UTILIZACIÓN AJUSTE DEL SENTIDO DE LA LUZ La cabezadelaluzdetrabajopuedeinclinarseverticalmente hasta 30 hacia abajo o 90 hacia arriba Para ajustar el sentido de la luz afloje las perillas de traba lateral 4 FIG 1 Ajuste la cabeza de la luz de trabajo a la posición deseada y vuelva a apretar las perillas Este producto está garantizado libre de defecto...

Страница 9: ...9 NOTES ...

Страница 10: ...Richpower Industries Inc 736 Hampton Road Williamston SC USA www richpowerinc com 2021 08 V01 ...

Отзывы: