Power Fist 8988404 Скачать руководство пользователя страница 10

8988404 

1/2 in. Electric Impact Wrench 

V1.0 

10 

For technical questions call 1-800-665-8685 

The carbon brushes may require maintenance when performance decreases 
or the tool stops working completely. 
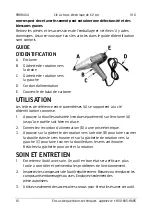
1. 

Remove the carbon brush cover (E). 

2. 

Keep track of the orientation of the installed brushes, then remove 
them from the housing. 
a. 

If either brush is worn down by more than half, replace both. 

b. 

If the brushes can be reused, rub the dirty surfaces with a pencil 
eraser to clean. 

3. 

Install the brushes in the proper orientation. Ensure that the carbon 
parts are touching the motor armature. The springs should face away 
from the motor and operate freely. 

4. 

Reinstall the covers. Do not overtighten. 

CLEANING 

Wipe the surface with a clean, dry cloth. 

DISPOSAL 

Recycle a tool damaged beyond repair at the appropriate facility.  
Contact your local municipality for a list of disposal facilities or by-laws for 
electronic devices, batteries, oil or other toxic liquids. 
 

Содержание 8988404

Страница 1: ...V4 0 8988404 Please read and understand all instructions before use Retain this manual for future reference ELECTRIC IMPACT WRENCH...

Страница 2: ...property damage injury or death if certain instructions are not followed DANGER This notice indicates an immediate and specific hazard that will result in severe personal injury or death if the prope...

Страница 3: ...dow 2 Keep anyone not wearing the appropriate safety equipment away from the work area 3 Store unused tools properly in a safe and dry location to prevent rust or damage Lock tools away and keep out o...

Страница 4: ...connected to a properly grounded receptacle 1 Disconnect the tool from the power supply before making any adjustments changing accessories cleaning servicing or when storing Such preventive safety mea...

Страница 5: ...prong or modify the plug in any way as this will render the tool unsafe b Do not use any adapter plugs WARNING All wiring should be performed by a qualified electrician POWER CORD 1 Insert the power c...

Страница 6: ...rols is dangerous and can cause an injury A qualified technician must repair and verify the power tool is operating correctly before it can be used 2 Ensure the power supply matches the tool s motor v...

Страница 7: ...may cause temporary or permanent physical injury Take frequent breaks when using the tool 2 If you feel any medical symptoms related to vibrations such as tingling numbness and white or blue fingers s...

Страница 8: ...unintended purpose 2 Do not use the tool if any parts are damage broken or misplaced Repair or replace the parts 3 Torque required depends on the thread s condition When tightening critical components...

Страница 9: ...good condition is efficient easier to control and will have fewer problems 2 Inspect the tool components periodically Repair or replace damaged or worn components Only use identical replacement parts...

Страница 10: ...replace both b If the brushes can be reused rub the dirty surfaces with a pencil eraser to clean 3 Install the brushes in the proper orientation Ensure that the carbon parts are touching the motor arm...

Страница 11: ...onnected to extension cord that is too long or has a diameter that is too small Connect tool directly to outlet or use appropriate extension cord Tool performance decreases 1 Socket accessory is worn...

Страница 12: ...V1 0 8988404 Vous devez lire et comprendre toutes les instructions avant d utiliser l appareil Conservez ce manuel afin de pouvoir le consulter plus tard CL CHOCS LECTRIQUE...

Страница 13: ...ssure ou de d c s si on ne respecte pas certaines instructions DANGER Cet avis indique un risque imm diat et particulier qui entra nera des blessures corporelles graves ou m me la mort si on omet de p...

Страница 14: ...pre bien clair e et exempte de toute distraction Placez les lampes de fa on ne pas travailler dans l ombre 2 Assurez vous que les personnes qui ne portent pas l quipement de s curit appropri ne se tro...

Страница 15: ...dement l aide des deux mains Un outil tenu d une seule main peut causer une perte de contr le S CURIT EN LECTRICIT AVERTISSEMENT Ne touchez et ne manipulez pas un outil sous tension avec une partie du...

Страница 16: ...mpromis s ils sont modifi s 6 Assurez vous que la source d nergie est conforme aux exigences de votre quipement consulter les sp cifications 7 Au moment de c bler un outil lectrique respectez tous les...

Страница 17: ...rop chaud au toucher 3 Pour r duire le risque de choc lectrique assurez vous que toutes les connexions sont s ches et qu elles ne pr sentent aucun contact avec le sol Ne touchez pas la fiche avec les...

Страница 18: ...on d arr t avant de brancher l appareil la source d nergie 5 D branchez l appareil de la source d nergie avant de proc der son installation ou son entretien 6 Ne dirigez jamais l outil vers votre pers...

Страница 19: ...enez souvent des pauses lorsque vous utilisez cet outil 2 Si vous ressentez des sympt mes reli s aux vibrations comme un fourmillement un engourdissement des doigts blancs ou bleus consultez un m deci...

Страница 20: ...vous pouvez subir des blessures corporelles graves 1 Utilisez le bon outil pour la t che effectuer Cet outil a t con u pour une utilisation sp cifique vitez de modifier ou d alt rer cet outil ou de l...

Страница 21: ...ication comprise 1 Appuyez la douille souhait e vendue s par ment sur l enclume A jusqu ce qu elle soit bien en place 2 Connectez le cordon d alimentation D une prise lectrique 3 Appuyez sur la g chet...

Страница 22: ...e du moteur Les balais de carbone peuvent n cessiter un entretien lorsque l outil pr sente une baisse de rendement ou qu il cesse de fonctionner compl tement 1 Retirez le couvercle du balai de carbone...

Страница 23: ...nt us es ou endommag es 1 Connectez 2 V rifiez ou r initialisez le disjoncteur 3 Remplacez les balais de carbone ou demandez un technicien qualifi de proc der l entretien de l outil L outil fonctionne...

Страница 24: ...ter du moteur sont bloqu s 3 L outil est branch une rallonge trop longue ou dont le diam tre est trop petit 1 Diminuez la pression appliqu e sur l outil 2 Soufflez la poussi re du moteur au moyen d ai...

Отзывы: