background image

13

8. Select Error Beep Mode

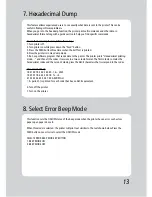
7. Hexadecimal Dump

This feature allows experienced users to see exactly what data is sent to the printer. This can be 
useful in finding software problems.
When you go into the hex dump function, the printer prints all commands and other data in 
hexadecimal format along with a guide section to help you find specific commands.

To use the hex dump feature, follow these steps
1. Turn printer off.
2. Turn printer on while press down the “Feed” button.
3. Press the FEED button three times when the Self Test is printed.
4. Now the printer is in Hex dump mode.
5. Run any software program that sends data to the printer. The printer prints ”Hexadecimal printing 
mode…” and then all the codes it receives in a two-column format. The first column contains the 
hecadecimal codes and the second column gives the ASCII characters that correspond to the codes.

Hecadecimal Dump
1B 21 00 1B 26 02 40 40  .!..& . @ @
1B 25 01 1B 63 34 00 1B  .%..c4 ..
41 42 43 44 45 46 47 48  ABCDEFGH

 A period (.) is printed for each code that has no ASCII equivalent.

6. Turn off the printer.
7. Turn on the printer.

This function sets the ON/OFF status of the beep mode when the printer has an error such as low  
paper, open paper door, etc. 

When this mode is selected, the printer will print text similiar to the text shown below. Press the 
FEED button once or twice to select the ON/OFF mode. 

SELECT ERROR BEEP MODE BY BUTTON
1. BEEP MODE ON
2. BEEP MODE OFF

Содержание ION-PT2

Страница 1: ...Receipt Printer User s Manual MODEL ION PT2 All specifications are subject to change without notice...

Страница 2: ...anel 10 3 2 Error Indicators 10 4 Self Test 11 5 ASCII Print 12 6 Select Baudrate Mode 12 7 Hexadecimal Dump 13 8 Select Error Beep Mode 14 9 Printer Cleaning 14 10 Specifications 15 10 1 General Spec...

Страница 3: ...H DRAWER CABLE CONNECTOR POWER CONNECTOR INTERFACE CONNECTOR USB Used to turn on off power to the printer Features LED indicators to indicate printer status and buttons to operate the printer Push dow...

Страница 4: ...2 1 Unpacking Your printer box should include these items If any items are damaged or missing please contact your dealer for assistance The Printer Interface Cables Paper Roll 2 Setting Up the Printe...

Страница 5: ...oth the printer and the computer are turned off For connection to a host computer For connection to a host computer For connection of the AC adapter Never unplug the AC adapter while the printer is on...

Страница 6: ...mit data line RS 232C level 3 RxD Input Printer receive data line RS 232C level 4 20 DTR Output Printer handshake to host line RS 232C level 6 DSR Input Data Send Ready 1 7 GND System Ground USB Inter...

Страница 7: ...11 modular connector The driver is capable of supplying a maximum current of 1 0A for 510ms or less when not printing PIN SIGNAL DESCRIPTION 1 Signal GND 2 Drawer kick out drive signal 1 Output 3 Dra...

Страница 8: ...glued to the core because the printer cannot detect the paper end correctly Turn off power switch 1 Make sure that the printer is not receiving data Otherwise data may be lost 2 Open the printer cover...

Страница 9: ...9 5 Note the correct direction that the paper comes off the roll 6 Pull out a small amount of paper roll as shown Then close the cover 7 Tear off the paper as shown O X...

Страница 10: ...the FEED button to feed paper continuously 3 2 Error indicators This section explains the different patterns signaled by the two LED indicators located on the top cover of the printer STATUS PAPER ERR...

Страница 11: ...he printer settings then prints the following and pauses Error LED On SELECT MODE BY BUTTON 1 ASCII PRINT 2 SELECT BAUDRATE MODE 3 HEXADUMP MODE 4 SELECT ERROR BEEP MODE 3 Press the FEED button consec...

Страница 12: ...I PRINT 5 ASCII Print After entering the BAUDRATE MODE the list of baudrates that can be selected will be printed Similar to the Self Test you can press the FEED button to select a BAUDRATE Once the f...

Страница 13: ...t sends data to the printer The printer prints Hexadecimal printing mode and then all the codes it receives in a two column format The first column contains the hecadecimal codes and the second column...

Страница 14: ...aning is completed wait a few minutes before adding paper and closing the paper door Note 1 Make sure to turn the printer power off prior to cleaning 2 Wait 10 minutes for the print head to cool befor...

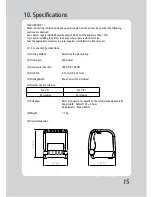
Страница 15: ...ect against electrostatic AC line noise etc 10 1 General Specifications 1 Printing Method Direct line thermal printing 2 Print speed 220mm sec 3 Dot density Hor Ver 180 DPI X 180 DPI 4 Dot Pitch 0 141...

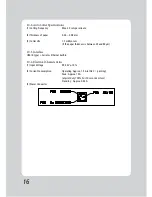
Страница 16: ...million cuts if the paper thickness is between 65 and 80 m 10 3 Interface USB B type Serial or Ethernet built in 10 4 Electrical Characteristics 1 Input Voltage DC 24V 10 2 Current Consumption Operati...

Страница 17: ...to 90 RH without condensation 10 6 Reliability 1 MCBF 70 million lines 2 Print Head Life 100 million pulses 150Km 3 Cutter Life 1 5 million cuts if the paper thickness is between 65 and 80 m 10 7 Cert...

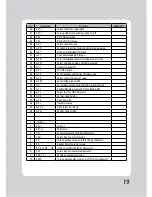
Страница 18: ...3 Set line spacing 19 ESC Select peripheral device 20 ESC Cancel user defined characters 21 ESC Initialize printer 22 ESC D Set horizontal tab positions 23 ESC E Turn emphasized mode on off 24 ESC G...

Страница 19: ...lect cut mode and cut paper 54 GS W Set printing area width 55 GS Set relative vertical print position in page mode 56 GS a Enable disable Automatic Status Back ASB 57 GS f Select font for HRI charact...

Отзывы: