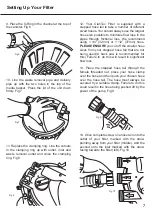
5. Turn the lid over and remove the plastic
waste removal pipe and delivery pipe from the
filter lid. Remove the sponges from the filter lid
and media basket and sponge from within the
canister. Fig 4
6. Rinse the filter media and canister out with
tap water
DO NOT USE SOAP OR
DETERGENTS TO RINSE YOUR MEDIA
.
7. Place the sponges back onto the lid and refit
the waste removal pipe and delivery pipe to the
plastic tubes. Reinsert the black sponge and
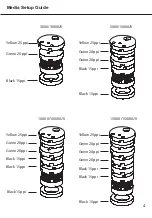
CeramiSub back into the canister. Refer to
page 4.
8. The sealing O-Ring sits on the rim of the
canister body. This is a vital part of the filter and
it is important that it is installed correctly. It is
lubricated during production, however it is
important that it is re lubricated using a pond
safe lubricant when ever the filter is
disassembled. Replace it periodically if it shows
any signs of deterioration. Fig 5
1. Prior to installing the ClariTec you must first
ensure the O-Ring which seals the filter is in
place and wash the filter media.
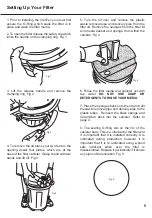
2. To open the filter release the safety clip which
locks the handle on the clamping ring. Fig 1
3. Lift the release handle and remove the
clamping ring. Fig 2
4. To remove the lid place your two feet on the
opening assist foot plates, which are at the
base of the filter canister. Grasp the lid with two
hands and lift off. Fig 3
Setting Up Your Filter
6
Fig 5
Fig 2
Fig 1
Fig 3
Fig 4


