background image


          3032 


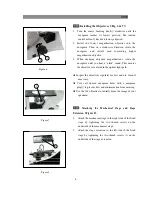
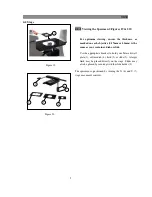
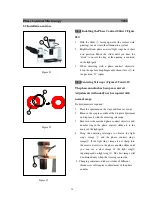
2-2-6 Installing the Stage Plate

Figure 9


1.    Install the glass stage plate 

 into the stage opening. 


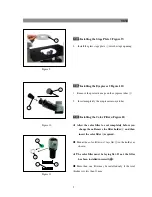
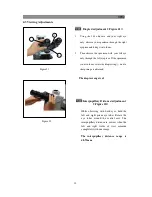
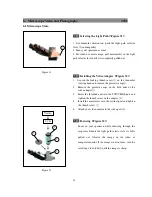
2-2-7 Installing the Eyepieces

Figure 10


1

.    Remove the protective caps on the eyepiece tubes

2.    Insert completely the eyepieces into eyetubes. 


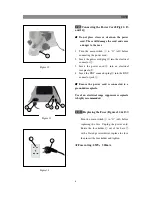
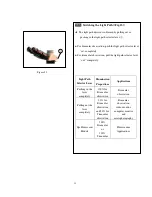
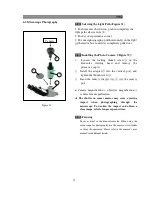
2-2-8 Installing the Color Filters (Figure 11)   


Allow  the  color  filter  to  cool  completely  before  you 

change them. Remove the filter holder

,

 and then 

insert the color filter 

required.


● 

Mount  the  color  filter  so  it  lays  flat 

  in  the  holder  as 

shown.


The  color  filter  must  be  laying  flat.  If  not,  the  filter 

has been installed incorrectly

● 

More  than  one  filter  may  be  installed  only  if  the  total 

thickness is less than 11mm. 


Figure 9 

Figure 10 

Figure 11 


Содержание 3032 series

Страница 1: ...an 10595 886 2 8712 0600 886 2 8712 2677 fax info polysciences tw US Headquarters 400 Valley Road Warrington PA 18976 800 523 2575 215 343 6484 800 343 3291 215 343 0214 fax info polysciences com www...

Страница 2: ...ry hot Do not touch these parts until they have completely cooled Never attempt to handle a hot halogen bulb 6 All electrical connectors power cord should be inserted into an electrical surge suppress...

Страница 3: ...g recessed optical surfaces Avoid using an excessive amount of solvents as this may cause problems with optical coatings or cemented optics or the flowing solvent may pick up grease making cleaning mo...

Страница 4: ...r Condenser Eyepieces Trinocular Viewing Head 3032 INVERTED MICROSCOPE SERIES 1 Illumination Bracket Stage Base On Off Switch Variable Light Intensity Adjustment Dial Fine Focus Knob Coarse Focus Knob...

Страница 5: ...ct all optical surfaces for dust and debris clean if necessary Please save the hexagonal wrench for future use Retain all stryofoam cartons if reshipment is ever required 2 Figure 2 Lamp House 3 Micro...

Страница 6: ...n all fingerprints with a dry soft cloth 2 2 2 Installing the Condenser Illumination Assembly Figure 4 1 Insert the condenser illumination unit 1 into the bracket 2 2 Turn the condenser illumination u...

Страница 7: ...lick sound This ensures the objective is centered in the optical light path Inspect the objectives regularly for dirt and oil clean if necessary Cover all unused nosepiece holes with a nosepiece plug...

Страница 8: ...Installing the Color Filters Figure 11 Allow the color filter to cool completely before you change them Remove the filter holder and then insert the color filter required Mount the color filter so it...

Страница 9: ...cord into an electrical receptacle 5 4 Insert the BNC connector plug into the BNC connector jack Ensure the power cord is connected to a grounded receptacle Use of an electrical surge suppressor recep...

Страница 10: ...ure 15 Diopter ring Light path selector lever Light switch Tension adjustment collar Main switch Coarse focus knob Fine focus knob Phase contrast slider Color filter holder Aperture diaphragm adjust l...

Страница 11: ...1 3 Adjusting the Tension Adjustment Collar Figure 18 The tension of the coarse focus knob has been factory adjusted Rotate the tension adjustment collar in the direction shown by the arrow Figure 18...

Страница 12: ...s your container dish or slide Use the appropriate bracket to hold your Terasaki well plate 3 culture dish 4 flask 5 or slide 5 A larger flask may be placed directly on the stage Slides may also be pl...

Страница 13: ...If the specimen is not in focus rotate the diopter ring until a sharp image is obtained The diopter range is 5 4 3 2 Interpupillary Distance Adjustment Figure 22 While observing with both eyes hold t...

Страница 14: ...pull the light path selector lever out completely Light Path Selector Lever Illumination Proportions Applications Pushing in the lever completely 100 for Binocular observation Binocular observation Pu...

Страница 15: ...ed on the objective To adjust the aperture diaphragm remove the eyepiece then looked into the viewing tube Your field of view will appear as Figure 25 The proportion may be changed by turning the aper...

Страница 16: ...hase objectives are 10x and 20x They are mounted on the objective turret as described in 2 2 4 5 1 2 Phase Contrast Annulus Slider Figure 27 The phase annulus ring has been centered The phase annulus...

Страница 17: ...with normal usage If adjustments are required 1 Place the specimen on the stage and focus as usual 2 Remove the eyepiece without the diopter adjustment and replace it with the centering telescope 3 En...

Страница 18: ...ad and remove the protective cap 2 Remove the protective caps on the both ends of the video adapter 3 Screw the threaded end into the CCD CMOS port and tighten the thumb screw on the adapter 3 3 Insta...

Страница 19: ...otective cap 2 Install the adapter into the vertical port and tighten the thumb screw 3 Insert the camera adapter into into the camera port Camera magnification objective magnification x camera lens m...

Страница 20: ...m Sensitivity and Graduation of Fine Focus 0 002mm Movement Range from the surface focus of stage plate up 8mm down 3mm Mechanical Stage Size 250mm x 160mm Movement Range 120mm width 78mm length Illum...

Страница 21: ...the slide Coverglass is too thick or thin Use a coverglass of the appropriate thickness 0 17mm Slide may be upside down Turn slide over so the cover glass faces up Immersion oil is on a dry Check the...

Страница 22: ...e upside down Turn the slide over so the high power objectives cover glass faces up Cover glass is to thick Use a 0 17mm cover glass High power objective contacts Slide upside down Turn the slide over...

Страница 23: ...at www polysciences com European Headquarters Handelsstrasse 3 D 69214 Eppelheim Germany 49 6221 765767 49 6221 764620 fax info polysciences de Asia Pacific Headquarters Polysciences Asia Pacific Inc...

Отзывы: