
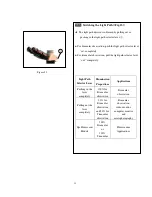


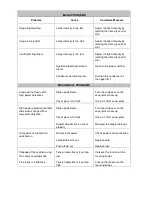

IMAGE PROBLEMS
Problem
Cause
Corrective Measure
Image tinged yellow
Lamp intensity is too low
Adjust the light intensity by
rotating the intensity control
dial
Image is too bright
Lamp intensity is too high
Adjust the light intensity by
rotating the intensity control
dial
Insufficient brightness
Lamp intensity is too low
Adjust the light intensity by
rotating the intensity control
dial
Aperture diaphragm closed
Open to the proper setting
too far
Condenser position too low
Position the condenser at
the upper limit
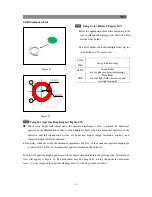
MECHANICAL PROBLEMS
Image will not focus with
Slide upside down
Turn the slide over so the
high power objectives
cover glass faces up
Cover glass is to thick
Use a 0.17mm cover glass
High power objective contacts
Slide upside down
Turn the slide over so the
slide when changed from
cover glass faces up
low power objective
Cover glass is to thick
Use a 0.17mm cover glass
Diopter adjustment is not set
Readjust the diopter settings
properly
Lamp does not light when
No electrical power
Check power cord connection
switched on
Lamp bulb burnt out
Replace bulb
Fuse blown out
Replace fuse
Slippage of focus when using
Tension adjustment is set too
Increase the tension on the
the coarse focusing knob
low
focusing knobs
Fine focus is ineffective
Tension adjustment is set too
Loosen the tension on the
high
focusing knobs


