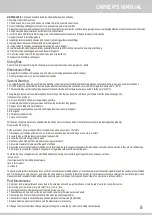
Beforeassemblingyourproduct,pleasetakeafewminutestocheckthecontentsandbecomefamiliarwithalltheparts.
1. Select alevelarea, andcompletelyremovealldebris,twigs,stones,etc.DONOTselectanareaunderoverheadelectricallines,trees,orwithin15feetof ahouse,
building, etc.
2. Thepoolshallbelocatedaminimumdistanceof6ft(1.83m)fromanyelectricalreceptacle.
3. All220-240volt,15and20amperereceptacleslocatedwithin20ft(6.0m)ofthepoolshallbeprotectedbyaresidualcurrentdevice(RCD).
The20ft(6m)distanceismeasuredviatheshorteststraightlinedistancethesupplycordwouldfollow withoutpiercingafloor,wall,ceiling,doorway,window,or
other permanent barrier.
4. Contactyourlocalutilities,checkingthatnoundergroundcables,telephonelines,gaslines,etc.runbeneaththeareayouhaveselected.
Setup Instructions
1. Locatealevelandflat areatosetupthe pool. Makesurethe ground isfree fromsharpobjects, asthey maypuncturethepool.
2. LIFT thepoollineracrosstheground.DONOT dragthelinerfromonelocationtoanotherlocation.
3. CarefullyunfoldtheQuickSet
®
poolandinspectseamsformanufacturingdefects. Withtheinflatableringonthetopside,layoutthepoolintheareaselected,
making sure the pool bottom is both flat and oval-shaped. Pull out the four rectangular flaps of wall material from the base of the pool, used for the
frame (two on each side).
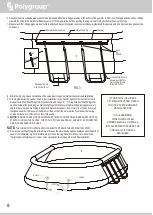
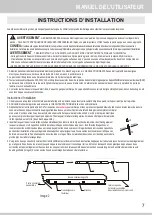
4. Locatethefourmetalpipe(HorizontalBeams)fortheleftandright supportframesectionsofthepool.Alsolocatethe
4
fourU-Shape Pipeframes. EachendoftheU-ShapepipewillhaveaCaptobeinstalled.Locatethe8PipeCapsand
install, pushthe buttons inas youinsertthe Cap ontothe pipe end. Look throughthe holes intheCap as youinstallit
andslightlyrotatetheCap untilthebuttons alignwiththeholes andpop up, lockingthe Capontothe pipes end.FIG. 1
NowplacetwooftheU-Shapepipesoneachsideofpoolneartherectangularflaps.
5
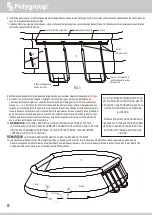
5. Now,taketwoHorizontalBeams(differentparts),thenslidethemtogether,depressthebuttonasyouinsertthemtogetherandslightlyrotatethemuntilthebutton
alignswiththeholeandpopsup.NowinstalltheplasticBeamPlugsinbothendslightlytappingthemintoplace.NowslidethisHorizontalBeamassemblythrough
thesleevestitchedalongthelongsidesof thepool, underthering onboth sides.FIG. 2. MakecertainthattheholesfortheU-ShapePipeframe arefacingout.
FIG.2
7
3
2
2
3
Deflated Top Ring
Horizontal
Beam Assembly
Holes Facing Out
Sleeve
Insert Horizontal
Beam Assembly Into
Sleeve As Shown
WARNING
-DONOToverfillthepooland/ orallowpeopletolayoverorsitonpoolwall-DOINGSOCANCAUSEPERMANENTINJURY!
DRAINpooltotheproperlevelafteraheavyrain.
TIP:
It will be mucheasier to installyour pool if youunfold it and let it layin direct sunlightfor about 2 hours priorto installation.This will help to insurea
wrinkle-freefitbecausethepoolmaterialwillbemorepliableallowingittoformintoshapeduringinstallation.
WARNING
- VERY IMPORTANT! SITE MUST BE LEVEL, STABLE, COMPACTED SOIL.
• Thepool mustbe assembled onasmoothandlevelsiteof firmsoilthat isfree ofstones, gravel, sticks,blacktop, orother oilbasecompounds.
Donot installpoolonawoodendeck oranytypeof woodensurface.Youcannotusesandand/oruncompactedsoiltoprovidealevelsurfaceforthis pool;
itwillonly wash out.
• FAILURE TO FOLLOW THE INSTRUCTIONS BELOW WILL CAUSE POOL TO COLLAPSE AND WILL VOID THE WARRANTY!
SETUP INSTRUCTIONS
OWNER′S MANUAL
Содержание SUMMER WAVES 15'
Страница 3: ......
Страница 14: ...Distribu au sein de l Union Europ enne par Germany Sales Service Office RMS GmbH Besselstr 25 68219 Mannheim...
Страница 16: ......


