7
7
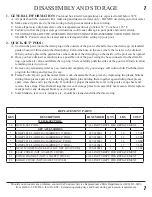
DISASSEMBLY AND STORAGE
1. GENERAL INFORMATION:
Pool must be stored if temperatures are expected to fall below 32°F.
A. All parts should be cleaned with a mild soap and lukewarm water only - DO NOT use detergent or hot water.
B. Make sure all parts are dry before storing to help prevent mildew from forming.
C. Store all parts in a dry heated area where temperatures do not go below 32° F or above 125° F.
D. Failure to follow the proper storage instructions could cause damage to pool parts and void warranty.
E. YOU MUST FOLLOW THE ASSEMBLY INSTRUCTIONS TO REASSEMBLE YOUR POOL NEXT
SEASON. Pool site must be cleared and leveled again before setting up your pool.
2. QUICK-SET
®
POOL:
A. To drain the pool, locate the drain plug on the outside of the pool wall and remove the drain cap. A standard
garden hose will thread onto the drain fitting. Extend the hose to the area where the water is to be drained.
When you have placed the garden hose where desired, the drain plug on the inside of the pool can be opened.
B. Once you have drained as much water as possible out of the pool, using the hose connected to the drain fit-
ting, open the air valve and deflate the top ring. Then, carefully push the sides of the pool wall down to allow
remaining water to run out.
C. Remove any remaining water as you wash and completely dry pool using a soft cotton cloth. Push the drain
plug into the fitting and replace the cap.
D. Frame Pools: If your pool has metal frame work, disassemble those pieces by depressing the plastic buttons
sliding those pieces apart or by removing the plastic pins holding them together again sliding those pieces
apart, clean them and wipe them dry. If in doubt of proper disassembly refer to the pools set-up sheet and
reverse those steps. Place them all together in a safe storage place for reassembly next season. Order replace-
ment parts for any damaged, broken, or worn parts
E. Solar blankets, leaf covers, ladders, etc., should be cleaned and dried before storing
REPLACEMENT PARTS
KEY
DESCRIPTION
ID NUMBER QTY
LBS
COST
QUICK-SET POOL
30
QUICK-SET POOL
CALL PARTS DEPT. FOR REPLACEMENT
GFP ACCESSORIES
*
COMPLETE LADDER w/BARRIER (36” POOL)
097-020001
1
10
35.00
*
COMPLETE LADDER w/BARRIER (42” POOL)
097-020002
1
14
45.00
*
COMPLETE LADDER w/BARRIER(48” POOL)
097-020003
1
16
50.00
*
COMPLETE LADDER w/BARRIER (52” POOL)
097-030048
1
17
55.00
*
DUAL MAINTENANCE KIT (LEAF NET & VACUUM)
096-050024
1
3
15.00
80
LEAF COVER (NOT A SAFETY COVER)
CALL PARTS DEPT. FOR REPLACEMENT
81
SOLAR BLANKET (NOT A SAFETY COVER)
CALL PARTS DEPT. FOR REPLACEMENT
82
SOLAR COVER (NOT A SAFETY COVER)
CALL PARTS DEPT. FOR REPLACEMENT
Should you encounter any problems, contact the Customer Service Representative/Parts Department at (800) 813-0206
from 8 AM to 5 PM Mon. thru Fri. EST. Extended operating days and hours during peak season requirements.


