6.16
CLUTCHING
Drive Clutch Disassembly
1.
In a straight line, mark the sheaves and the cover with a
black marker or etched with a scribe.
2.
Remove the clutch.
3.
Place the drive clutch in the clutch compression tool (PN
8700220).
4.
Compress the clutch in the compression tool, then secure
the chain.
5.
Evenly remove the cover fasteners. The cover bushing may
be damaged if the cover is side-loaded or mis-aligned.
6.
Carefully remove the tension from the compression tool.
7.
Remove the cover and inspect the cover bushing. Replace
if damaged or worn.
NOTE: Replace the cover bushing if the inside
diameter is over 1.40
″
(28.95mm)
8.
Remove the spring.
9.
Mount the drive clutch securely in a drive clutch holding
fixture (PN 2871358).
10. Remove the jam nut in a counterclockwise direction
(standard thread) using the drive clutch spider nut socket
(PN 2871358).
11. Install the spider removal tool (PN 2870341), and remove
the spider in a counterclockwise direction (standard
thread).
12. Measure the total thickness of the spacer washers that are
installed on top of the clutch spacer. Record the thickness
of these spacer washers.
13. Inspect both sheave surfaces for wear or damage.
14. Inspect the moveable sheave bushing for wear or damage.
15. Remove all three drive clutch weights.
16. Inspect each weight. The surface should be smooth, with
no waves or galling. Place bolt inside weight to check
flyweight bushing and pin surface for wear by rocking the
weight back and forth.
17. Inspect all the rollers, bushings and roller pins by pulling a
flat metal rod across the roller.
18. Roller can also be inspected by rolling with a finger to feel
for flat spots, roughness, or loose bushing.
NOTE: The flyweight bushing is not replaceable. If
flyweight bushing is damaged both the flyweight, pin
and nut will need to be replaced.
19. Inspect to see if the roller and bushing are separating.
20. Bushing must fit tightly in roller.
21. Replace roller and pin if roller fails to roll smoothly (no flat
spots) or if the bushing is loose or worn.
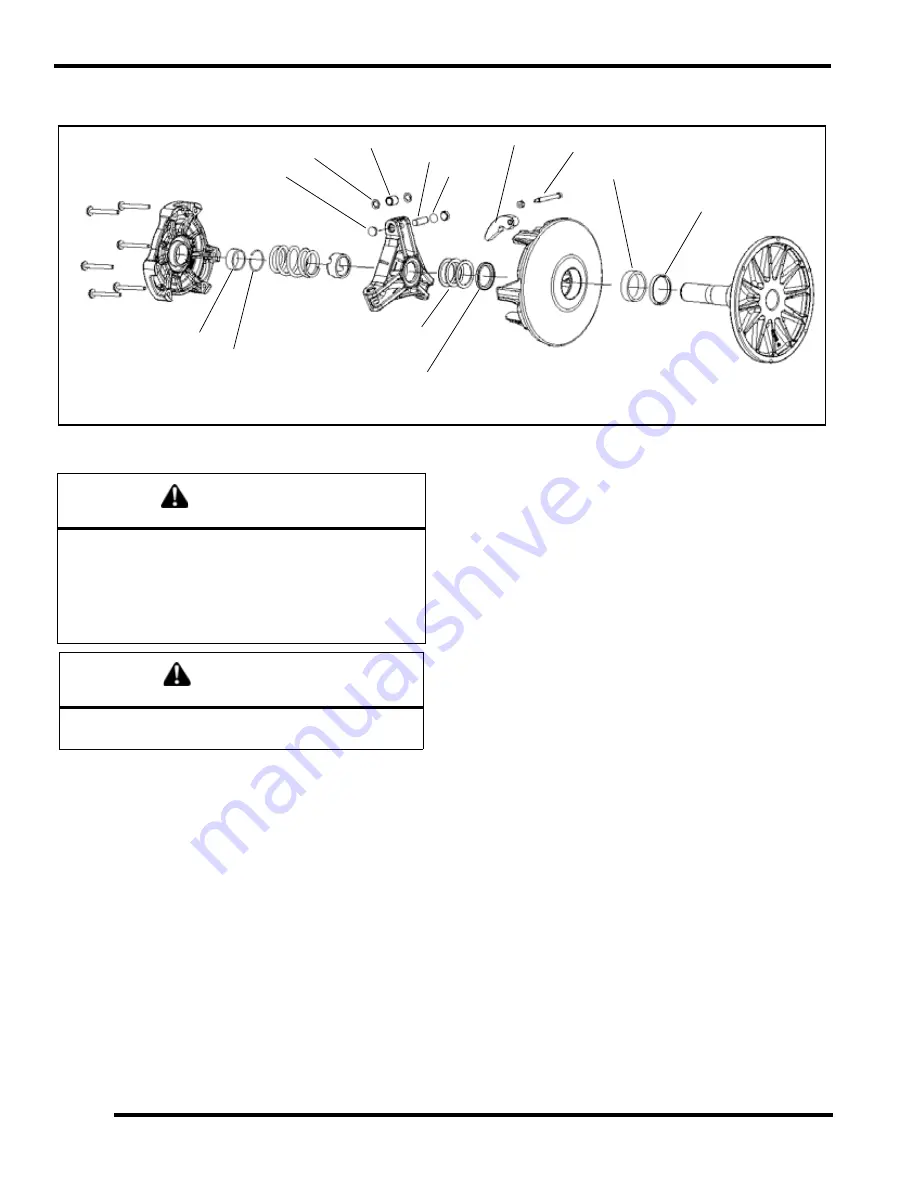
STATIONARY SHEAVE
MOVEABLE SHEAVE
SPIDER
COVER
SPRING
JAM NUT
SPACERS
CLUTCH SPACER
BEARING SLEEVE
MOVEABLE INSERT
COVER BEARING
RETAINER
SPIDER BUTTON
WASHER
ROLLER
ROLLER PIN
WASHER
WEIGHT
WEIGHT PIN
CAUTION
Wear eye protection when servicing the drive clutch.
Sheaves must be marked to provide a reference point
for dutch balance and spider indexing. If the sheaves
are not marked and the spider washers are changed or
misplaced, the clutch may be out of balance and dam-
age to the clutch may result.
WARNING
Clutch spring is under extreme tension, use caution
when disassembling the clutch.
Содержание 340 LX 2007
Страница 4: ......
Страница 40: ...NOTES MODEL SPECIFICATIONS 1 36...
Страница 51: ...2 11 GENERAL 2 SPECIAL TOOLS Special Tools...
Страница 52: ...2 12 GENERAL...
Страница 53: ...2 13 GENERAL 2...
Страница 54: ...2 14 GENERAL...
Страница 80: ...NOTES MAINTENANCE 3 26...
Страница 91: ...4 11 FUEL DELIVERY 4 Throttle Opening Vs Fuel Flow VM only...
Страница 104: ...NOTES FUEL DELIVERY 4 24...
Страница 114: ...5 10 ENGINE 500 600 Touring WideTrak LX Touring WideTrak...
Страница 146: ...NOTES ENGINE 5 42...
Страница 170: ...NOTES CLUTCHING 6 24...
Страница 214: ...NOTES FRONT SUSPENSION STEERING 8 20...
Страница 259: ...10 11 CHASSIS HOOD 10...
Страница 260: ...NOTES CHASSIS HOOD 10 12...
Страница 272: ...11 12 BATTERY ELECTRICAL SYSTEMS ELECTRIC START GEN II EDGE System Schematic...
Страница 276: ...11 16 BATTERY ELECTRICAL SYSTEMS ELECTRIC START IQ CARBURETED CFI System Schematic 600 HO Carbureted...
Страница 277: ...11 17 BATTERY ELECTRICAL SYSTEMS 11 System Schematic 600 700 CFI...
Страница 286: ...11 26 BATTERY ELECTRICAL SYSTEMS Chassis Relay...
Страница 288: ...11 28 BATTERY ELECTRICAL SYSTEMS Vehicle Speed Sensor...
Страница 293: ...11 33 BATTERY ELECTRICAL SYSTEMS 11 CFI Power System CFI Ignition Injection Power...
Страница 294: ...11 34 BATTERY ELECTRICAL SYSTEMS CFI Crank Position System CFI Safety Stop System...
Страница 295: ...11 35 BATTERY ELECTRICAL SYSTEMS 11 CFI Full Load Fuel Injectors CFI Part Load Fuel Injectors...
Страница 296: ...11 36 BATTERY ELECTRICAL SYSTEMS CFI Chassis Power CFI Ignition Coils...
Страница 297: ...11 37 BATTERY ELECTRICAL SYSTEMS 11 CFI TBAP Sensor CFI TPS Engine Temp Sensors...
Страница 298: ...11 38 BATTERY ELECTRICAL SYSTEMS CFI Exhaust Solenoid CFI Knock Sensor...
Страница 299: ...11 39 BATTERY ELECTRICAL SYSTEMS 11 CFI Fuel Pump CFI Diagnostic Connections...
Страница 300: ...11 40 BATTERY ELECTRICAL SYSTEMS CFI MFD Circuits CFI MFD Power Circuits...
Страница 301: ...11 41 BATTERY ELECTRICAL SYSTEMS 11 CFI Fuel Level Circuit CFI Vehicle Speed Circuit...
Страница 302: ...11 42 BATTERY ELECTRICAL SYSTEMS CFI Mode Set Switch CFI PERC Switch...
Страница 318: ...12 1 Wiring Diagrams 2007 340 550 GEN II EDGE Models...
Страница 319: ...12 2 Wiring Diagrams 2007 Wide Trak...
Страница 320: ...12 3 Wiring Diagrams 2007 500 XCSP...
Страница 321: ...12 4 Wiring Diagrams 2007 600 HO Carbureted 1 of 2...
Страница 322: ...12 5 Wiring Diagrams 2007 600 HO Carbureted 2 of 2...
Страница 323: ...12 6 Wiring Diagrams 2007 600 HO Carbureted Hood Harness...
Страница 324: ...12 7 Wiring Diagrams 2007 600 700 CFI 1 of 2...
Страница 325: ...12 8 Wiring Diagrams 2007 600 700 CFI 2 of 2...
Страница 327: ...12 10 Wiring Diagrams...


