Polaris 2881667 Скачать руководство пользователя страница 6

Instr 9926739

Rev 02 2018-09

Page 6 of 9

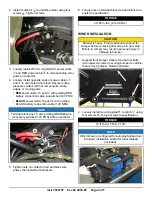
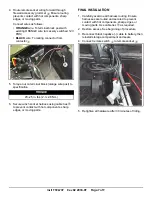
5. Route winch cable through roller fairlead

e

, then

install fairlead to front bumper using two each
screws

g

and nuts

1(

. Screws are installed from

REAR to FRONT.

6. Reinstall front bumper with retained fasteners. See

previous Step 1.

7. Attach hook

w

to loop at end of cable

r

, then

secure using cotter pin.

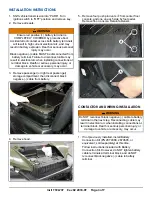
REMOTE SOCKET INSTALLATION

IMPORTANT

Verify opposite side of wall is free from structure,

components, wiring, lines, ducts, etc.

1. Drill holes in dash panel as follows:

a. 1–1/16 inch (27 mm) hole

G

centered between

two fastener dimples

F

b. Two 1/4 inch (6 mm) holes at dimples

F

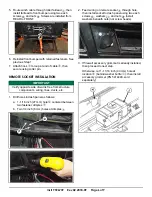
2. Feed wiring on remote socket

o

through hole,

then install socket to dash panel using two each
screws

j

, washers

2!

, and nuts

2)

. Install

washers beneath nuts (not screw heads).

3. If firewall accessory grommet is already installed,

then proceed to next step.

Otherwise, cut 1–11/16 inch (43 mm) hole at
location

H

(behind washer bottle

J

), then install

accessory grommet (PN 5414440, sold
separately).

Содержание 2881667

Страница 1: ...ts ordering information KIT CONTENTS This kit contains parts for installation of the winch only Prior installation of a Battery Connection Kit PN 2879388 2879685 or equivalent is also required sold separately This Kit includes REF QTY PART DESCRIPTION PART NUMBER 1 1 Winch 4500 HD 2207537 1 1 1 Cam Rotary Winch Freespool not shown 5633169 2 1 Hook 2411836 Instr 9926739 Rev 02 2018 09 Page 1 of 9 P...

Страница 2: ... Hex Flange Locking M10 X 1 5 7547423 20 2 Nut Hex Flange Locking M5 X 0 8 7547427 21 2 Washer Flat M5 7556724 22 2 Screw Hex Flange M10 X 1 5 X 20 7519905 1 Winching Guide 9923644 1 Instructions 9926739 Items marked are included in Hardware Kit PN 2879172 Hardware kit is universal and contains additional parts not used for this installation TOOLS REQUIRED Safety Glasses Cutting Tool Drill Drill B...

Страница 3: ...ssory may occur 3 Remove passenger or right rear passenger storage compartment then disconnect black negative cable from battery 4 Remove hood 5 Remove four push pin rivets A from center floor console and one on each side by foot pedal Remove floor console Retain fasteners CONTACTOR AND WIRING INSTALLATION WARNING Do NOT reconnect black negative cable to battery terminal in the next step Reconnect...

Страница 4: ... ORANGE wire accessory switched 12V POS will be used later 5 Tighten nuts on contactor red and black wire posts then install terminal boots 6 Torque nuts on terminal block red and black wire posts to specification TORQUE 20 25 in lbs 2 3 2 8 Nm WINCH INSTALLATION CAUTION Bumper is heavy Provide adequate support for bumper before removing final screws in next step Failure to comply may result in pe...

Страница 5: ...lor posts on winch b Route opposite end of cables up through under hood liner towards contactor Ensure routing prevents contact with hot components sharp edges or moving parts including suspension and steering components throughout their full range of travel c Loosely install yellow winch cable d and blue winch cable f to corresponding color posts on contactor d Tighten nuts on contactor AND winch...

Страница 6: ...ide of wall is free from structure components wiring lines ducts etc 1 Drill holes in dash panel as follows a 1 1 16 inch 27 mm hole G centered between two fastener dimples F b Two 1 4 inch 6 mm holes at dimples F 2 Feed wiring on remote socket o through hole then install socket to dash panel using two each screws j washers 2 and nuts 2 Install washers beneath nuts not screw heads 3 If firewall ac...

Страница 7: ...ire post to specification TORQUE 20 25 in lbs 2 3 2 8 Nm 6 Secure winch socket harness using cable ties s to prevent contact with hot components sharp edges or moving parts FINAL INSTALLATION 1 Carefully examine all harness routing Ensure harnesses are routed and secured to prevent contact with hot components sharp edges or moving parts Use cable ties s as required 2 Restore access See beginning o...

Страница 8: ...position check winch for proper operation To extend cable depress and hold the OUT button To recover cable depress and hold the IN button OUT IN GEAR SELECTION WARNING Do NOTattempt to change gear setting while the cable is under tension Failure to relieve cable tension prior to changing gears may result in winch failure resulting in serious personal injury or death Your winch is equipped with two...

Страница 9: ... but winch motor is silent then verify electrical connections between winch and contactor are free of damage and or corrosion If winch makes noise but does not move verify winch is in gear If winch is in gear but winch still does not move have a dealer inspect the winch Winch operates too slowly Winch is improperly loaded Verify rope cable is not binding on spool or fairlead Winch will not change ...

Отзывы: