


Instr 9926739
Rev 02 2018-09
Page 4 of 9
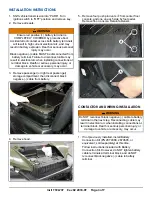
2. Install contactor
t
to underhood liner using four
screws
h
. Tighten screws.
3. Loosely install 250 mm long BLACK power cable
u
and RED power cable
i
to corresponding color
posts on contactor.
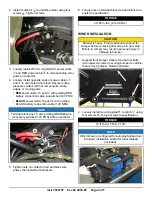
4. Loosely install opposite ends of power cables
u
and
i
to vehicle terminal block. Ensure routing
prevents contact with hot components, sharp
edges, or moving parts.
•
RED
power cable: To post
C
with existing RED
battery connection cable (unswitched 12V POS)
•
BLACK
power cable: To post
D
with existing
BLACK battery connection cable (12V NEG)
NOTE
Terminal block post
E
with existing ORANGE wire
(accessory switched 12V POS) will be used later.
5. Tighten nuts on contactor (red and black wire
posts), then install terminal boots.
6. Torque nuts on terminal block (red and black wire
posts) to specification.
TORQUE
20–25 in. lbs. (2.3–2.8 Nm )
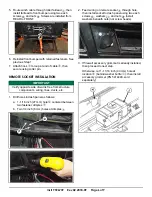
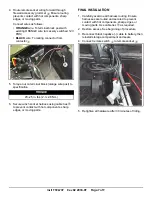
WINCH INSTALLATION
CAUTION
Bumper is heavy. Provide adequate support for
bumper before removing final screws in next step.
Failure to comply may result in personal injury or
damage to bumper.
1. Support front bumper while removing four bolts
(two upper, two lower) securing bumper to vehicle,
then remove bumper. Retain hardware.
2. Loosely install mounting plate
a
to winch
q
using
four screws
l
. Torque screws to specification.
TORQUE
14 ft. lbs. (10 Nm) ± 10%
NOTE
Winch shown is configured for autostop fairlead (not
included); installation similar for roller fairlead
(included).