background image


24


Otherwise, you may manually set the NVR’s IP address by selecting the 
“Use the following IP” radio button, and fill in the blanks of “IP address”, 
“Subnet Mask” and “Gateway”.  

2.  Enter the HTTP port number if needed. The default port number is 80. 

Enter the DNS address if needed: 

You may


select the “Obtain a DNS address automatically” radio button to obtain the 

DNS address automatically. If you want the NVR to use a specific DNS server, you 
will need to enter at least one (Primary) DNS address. 

1.  Enter the IP address of the “Primary DNS Address” properly. 

2.  Enter the IP address of the “Secondary DNS Address” properly. 

Camera  

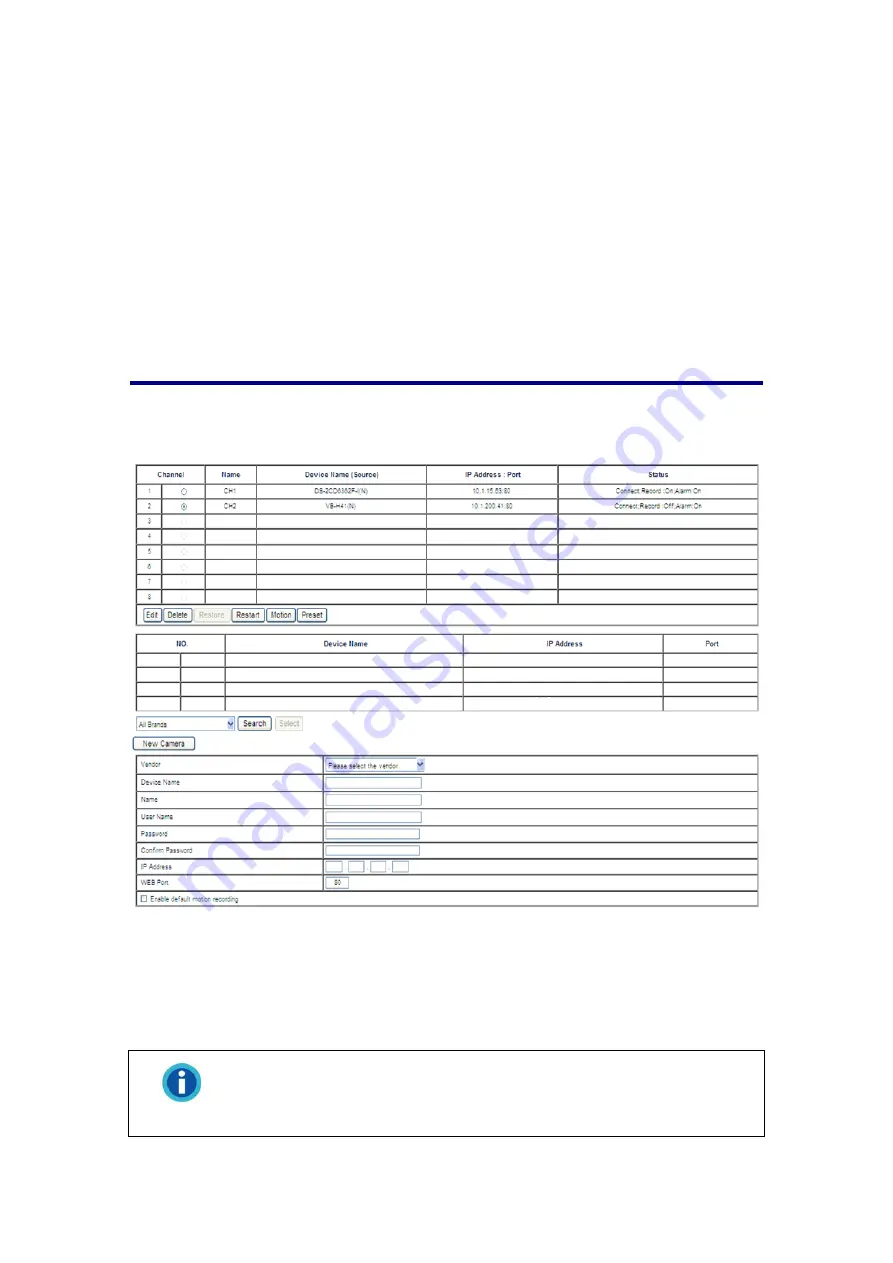
You may add and configure the settings for the IP Cameras as follows: 

Channel 


Add an IP Camera 

1.  Go to the “Setup” page and click on “Camera”, “Channel” tab. 

2.  Select a vendor from the drop-down list to only search for IP cameras of a specific 

vendor, or select “All Brands” to search for all available IP Cameras. 


Information 

The system allows you to find and add Onvif-compliant IP cameras. It 
does not guarantee to support all IP cameras that declare themselves 
as Onvif-compliant. “Restart”, “Reset”, “Motion” and “Text Overlay” 
functions will be disabled with Onvif type IP cameras. 

3.  Click the “Search” button, and the NVR will automatically detect and list any 

Содержание NVR Slim380Pro

Страница 1: ...Setup Configuration Technical Guides ...

Страница 2: ...tries of states such as the surreptitious recording of audio and or video communications for certain purposes If you have any question about whether a proposed use of your products is lawful you should consult a local legal authority before proceeding The product is designed and produced to achieve sustainable environmental improvement We strive to produce products in compliance with global enviro...

Страница 3: ...he Network Device Search Tool Application 9 Log in to the NVR Method II by using the Internet Explorer IE 10 Log in to the NVR Method III by using EasyLink and UDID 10 Easy Accessibility with EasyLink and UDID 11 How to obtain the UDID 11 Connect to your NVR from any computer using EasyLink and UDID 12 NVR Viewer Windows 13 Live 13 Playback 15 Alarm 18 Log out of the NVR 18 Chapter III Advanced NV...

Страница 4: ...1 Search Tool 42 IP Configuration Information 43 Use the NVR with Dynamic IP Address 44 Proxy Server 45 RTSP Server Feature 47 Reset the NVR 47 Appendix A Glossary 48 Appendix B Customer Service and Warranty 52 Statement of Limited Warranty 52 FCC Radio Frequency Statement 53 ...

Страница 5: ... and IP Camera system in the network environment Chapter II describes how to log in to the NVR interface and the NVR viewer window operations Chapter III provides you with plenty of illustrations and information about advanced configuration of the NVR You may get familiar with it and try out all functions provided with the NVR Chapter IV provides useful technical information and usage tips Appendi...

Страница 6: ...you don t need to use it for a certain period of time to avoid any risks of causing fire 10 Do not disassemble the NVR case This device contains no user serviceable parts Leave servicing to qualified personnel 11 Do not remove the NVR s hard disk s while the device is still turned on and operating Please make sure the power is disconnected from the NVR or your hard disk may be damaged 12 Please co...

Страница 7: ...D Unique Device Identification Effective video preview over Internet via Plustek Dual Stream Recording Technology Intuitive and powerful playback functions for investigation Alarm View for alarm monitoring and instant playback Minimum System Requirements1 The NVR is recommended to work with personal computer or network that meets the following requirements Operating System Microsoft Windows XP Vis...

Страница 8: ...or our customer service directly NVR X840P X880P X888P 1 NVR 2 AC Adapter 3 Quick Guide 4 Installation CD NVR Slim388Pro Slim380Pro 1 NVR 2 AC Adapter 3 Quick Guide 4 Installation CD 5 MFB Multi Function Button Pin Reset Pin 6 Hard Disk Screws x 4 7 Device Mounting Screws x 4 3 Save the box and packing materials in case you need to transport this NVR in the future The product packaging can be recy...

Страница 9: ...X888P 1 Multi Function Button 2 USB Port 3 Power Status Indicator 4 HDD2 Indicator4 5 HDD1 Indicator 6 RESET Hole 7 LAN Port 8 VGA Port 9 DC Jack 4 This function may or may not be available depending on the NVR model you purchase ...

Страница 10: ...B Multi Function Button Hole 5 DC Jack 6 GPIO terminal Pin from left to right top to bottom row Function 1 Output 2 Output 2 2 Output 1 Output 1 3 Input 2 Input 2 4 Input 1 Input 1 5 Ground Ground 6 Console Console 7 Console Console 8 Console Console 7 VGA Port 8 LAN Port 9 RESET Hole ...

Страница 11: ...n IP camera s address should range from 192 168 10 2 240 1 Connect IP cameras to the Switch s LAN port 2 Plug the RJ 45 connectors into the NVR s LAN port and the Switch s LAN port 3 Plug the AC adapter into the DC Jack of the NVR Plug the other end of the power cable into a standard AC power outlet After the NVR has booted it will beep three times and the HDD indicator will blink slowly to indica...

Страница 12: ...stributable Package x86 Attention If you are running on Windows XP 8 you must install this patch before you can start monitoring Otherwise please proceed with the next step 9 Run the Network Device Search Tool application on the CD ROM to search for NVRs 10 Your NVR works properly when the NVR appears in the Network Device Search Tool window 11 Double click on your NVR The NVR s login page should ...

Страница 13: ...splayed Attention Depending on your LAN environment DHCP or Static IP you may want to configure the NVR s network settings at this point Contact your network administrator for the correct values to enter then enter a valid Account Password before clicking Submit 4 Select and double click on the desired NVR 5 The System Login page appears on the screen You may choose the system language from the dr...

Страница 14: ... admin as your password and click Login Attention The admin and admin are the default user name and password for your first login of the NVR as Administrator Please change the default password as soon as possible To change the password please refer to the section Users Log in to the NVR Method III by using EasyLink and UDID The EasyLink program allows you to easily connect to your NVR from any com...

Страница 15: ...allows you to easily connect to your NVR from any computer using the NVR s Unique Device Identification UDID How to obtain the UDID Method I by using a USB drive 1 Connect a USB drive to the NVR 2 Press the Multi function button 3 The NVR will beep and copy the files required to establish a connection via EasyLink to the USB drive including a bmp file containing a QR code image with the UDID 4 The...

Страница 16: ...ll be loaded automatically Enter the HTTP port number if needed The default port number is 80 4 Click on the Create Tunnel button 5 Click on the Connect button The NVR s login window will open in your default web browser 6 Enter the NVR s Username and Password and change the Language if necessary then click on the Login button to log in to the NVR Attention The connection dialog of the EasyLink pr...

Страница 17: ...tle bar on top of each window to select that channel There are a few lights in the top right corner of each window to indicate the channel status The red light indicates that the video stream is being recorded The walking man indicates that an alarm is being triggered Toolbar functions5 The buttons in the Toolbar and their respective functions are shown in the following table Button Function Click...

Страница 18: ...lected channel Select the preset position from the drop down list to move to the predefined position of the supported camera Please go to the Setup page and click on Camera Channel tab to create the drop down list options in advance Tick the check box to perform pan tilt and zoom operations digitally by moving the mouse pointer on the 1x1 viewer window of the selected channel Select the desired ch...

Страница 19: ... Click this button to open the iris Playback Click the Playback button at the top right corner to display the records playback page 1 The Search dialog appears Clicking the button will also open this dialog window Select Date Click on the date you want to review in the calendar The dates with video records are displayed in bold fonts Camera Select the camera to play back its video footage 2 Select...

Страница 20: ...ing on the Stop button Tick the checkbox of Post Time Information on Video to display time on the video You can specify an export folder by clicking on the button then selecting the desired folder in the dialog that appears Click on the Exit button to close the Video Export dialog 4 Click the button to take a snapshot of the currently displayed image 5 Click the button to switch to full screen mod...

Страница 21: ...ent recording Jump to the next section of the selected recording Schedule recording Jump 5 minutes forward Event recording Jump to the previous section of the selected track Schedule recording Jump 5 minutes backwards 7 In the status bar area under the control buttons you may move the button to a desired location to playback from that point Also you may select the speed option from the drop down l...

Страница 22: ...ra drop down list to only display one channel s alarm records Click the button to playback a desired alarm record Log out of the NVR To exit the NVR page click the Logout button at the top right corner of the NVR s main page Attention Please do NOT click on the button on the Internet Explorer window to exit the NVR Clicking on the button will not change the logged in status of the user 6 This func...

Страница 23: ...e 1 Click the Setup button at the top right corner to display the advanced configuration page The left side of the page shows the configuration menu There are 7 menus available System Network Camera Recording Event Management and Logs 2 Click on each menu item to enter the sub menus You may configure the settings according to your special requirements The following individually describes the menus...

Страница 24: ...Go to the Setup page and click on System Status tab and the current status of the NVR will be displayed You can alter some of the settings shown in this section from other menu items You may click the Setup button to configure each setting Server ...

Страница 25: ...o act as a UPnP device You will be able to visit the NVR from My Network Places Click the Save button to save the settings Date Time Set the Time Zone 1 Go to the Setup page and click on System Date Time tab 2 Select the desired Time Zone from the drop down list 3 Check the Automatically adjust for daylight saving time changes option if needed 4 Click the Save button to save the settings Set the T...

Страница 26: ...ngs Backup the current settings Click on the Backup button to backup all the settings you have made in the NVR system and a window will pop up asking you to save the backup file You may choose a saving folder for the backup file Restore settings Restore previous settings You may restore the NVR to previous settings by loading a saved backup file See the above Backup settings section for more infor...

Страница 27: ...start schedule Export System Information Export the system and or debug information for technical support Click the Export button to save the system and or debug information and send the information to our customer service for technical support Network Settings Go to the Setup page and click on Network Settings tab In the Settings menu you may configure the NVR s settings accordingly Choose the IP...

Страница 28: ...Address properly 2 Enter the IP address of the Secondary DNS Address properly Camera You may add and configure the settings for the IP Cameras as follows Channel Add an IP Camera 1 Go to the Setup page and click on Camera Channel tab 2 Select a vendor from the drop down list to only search for IP cameras of a specific vendor or select All Brands to search for all available IP Cameras Information T...

Страница 29: ...the Device Name for the IP Camera The Name is of more importance as it will be used throughout the menus and the user interface of the NVR Viewer Enter the IP Camera s User Name and Password Enter the password again in Confirm Password Activate the Enable default motion recording checkbox if desired 6 Click the Add button to add the IP Camera to the channel list The IP Camera s connection recordin...

Страница 30: ...Enable default motion recording checkbox if desired 3 Click the Add button to add the IP Camera to the channel list The IP Camera s connection recording and alarm status will be shown Add a new general IP Camera manually Information This method is intended for power users as it requires knowledge of the IP camera s RTSP URLs Contact your IP camera s manufacturer for the correct URLs to enter If yo...

Страница 31: ...onnection recording and alarm status will be shown Change the IP Camera information 1 In the channel list you may select the IP Camera by clicking the respective radio button 2 You may click the Edit button to edit the information of the IP Camera 3 You may click the Delete button to delete the IP Camera 4 You may click the Restore button to reset the IP Camera to its factory default values 5 You ...

Страница 32: ...window click the New button on the Motion Detection page A blue motion detection frame will be created and you may configure its settings If you see motion detection frames in the camera window select a Motion Windows from the drop down list on the Motion Detection page The motion window will be activated with blue borders and you may configure its settings 4 Drag the blue borders of the active Mo...

Страница 33: ...lick the Finish button to bring you to the event wizard Information The Motion Detection settings for a camera will not take effect until you configure Motion Detection as an Event Trigger for the camera Please refer to the Channel section for more information Video Set video display 1 Go to the Setup page and click on Camera Video tab 2 Select the camera you want to adjust the video settings for ...

Страница 34: ...ty Image quality 250GB 320GB 500GB 750GB 1000GB 1250GB 1500GB High 96KB 3 02 3 86 6 03 9 04 12 06 15 07 18 08 Normal 48KB 6 03 7 72 12 06 18 08 24 11 30 14 36 17 10 fps frames per second Low 24KB 12 06 15 44 24 12 36 16 48 22 60 28 72 34 Notes Recording conditions 1 channel recording time 24 hours day All above figures are estimates actual figures may differ depending on the complexity of the real...

Страница 35: ...or days of the week to record For example you can enable the recording from 6 pm to 12 pm for every day of the week b Select a preset record schedule setting and check the Active checkbox to activate the record schedule c You may set up to 6 schedules from No 1 to No 6 4 Select the No recording option if you do not want to record video 5 Click the Save button to save the settings for the camera In...

Страница 36: ...ID 0 uses data striping to create one large volume high performance virtual drive However if one hard disk fails all data will be lost RAID 1 uses data mirroring to create redundancy where data on both hard disks will be identical The system will continue to function even if one hard disk fails Event Channel In the event settings menu you may configure the event the IP Camera responds to and the o...

Страница 37: ...e input event from the drop down list as active inactive or change For the Sound event you will need to select the sound volume level at which the event will be triggered This function is only available when the connected IP Camera is supported For the Device Digital Input Ports event you will need to connect an external sensor or device to the NVR s input port Choose the input port from the drop ...

Страница 38: ...ads all images recorded for the 3 seconds to the selected FTP server b Every 1 sec maximum xx Frame When an event is triggered the number of the image frames that the NVR will upload to the FTP Server is determined by this setting This value cannot be higher than the Frame Rate value on the Video page Please refer to the Video section for more information For example You set the NVR to upload all ...

Страница 39: ...nue 2 Check the Send email via server option If you configure the System status report settings you may additionally set the specific time to send the daily report Enter the Subject of the email Click the Finish button to complete the settings Management Users Go to the Setup page and click on Management Users tab to display the Users page An Administrator account with the User Name admin and defa...

Страница 40: ...ervices tab Click the Add button in the SMTP column In this menu you can configure several email addresses The NVR can automatically send alarm messages by using the configured email addresses when an event is triggered See the Channel section for more information about automated email alerts Add email addresses 1 Go to the Setup page and click on Management Services tab 2 Click the Add button in ...

Страница 41: ...red FTP server when an event is triggered See the 7Channel section for more information about automated uploading to the FTP server Add a FTP Server 1 Go to the Setup page and click on Management Services tab 2 Click the Add button in the FTP column and enter the FTP server information in this page 3 Enter the following information Connection Name Enter the name for this FTP Server e g Plustek FTP...

Страница 42: ...ain Host Name Enter the registered unique name together with the selected domain name e g xyz homeip net b Select dyn plusteksecurity com as DDNS Server from the drop down list After the device has been restarted or changed IP it will report to the DDNS server automatically You will get an URL address like xxxxxxxxxxxx dyn plusteksecurity com where xxxxxxxxxxxx is the MAC Address of this device in...

Страница 43: ...s a port s active status and cannot be changed Current Status Shows you the port s current status as defined by the Active Definition Output Duration Sec Only applicable to output ports Set the duration the output port will remain active using the drop down list Logs System Go to the Setup page and click on Logs System tab to display the system log page Select All Normal or Error from the drop dow...

Страница 44: ... tab to display the camera log page Select All Normal Error or Alarm from the drop down list The camera log page keeps a record on the settings or changes made for all the cameras Click Export to export the log file or click Delete to delete all the records ...

Страница 45: ...ocal or remote Consistent light on Consistent blinking until process done One 2 beep sound HDD ready Consistent light on Consistent light on Camera searching adding only local Consistent blinking during process consistent light on when process done Consistent light on One 2 beep sound when process done HDD format failure Consistent light on Consistent blinking One 3 beep sound every 10 seconds HDD...

Страница 46: ...o configure settings 2 Name the selected NVR in the Name section 3 Enter the correct IP address of the NVR if you have STATIC checked If you have DHCP checked please jump to Step 5 Information The NVR should have the same IP configuration information of your PC except the IP address Please refer to the IP Configuration Information section to get the correct subnet mask and gateway of your PC 4 Ent...

Страница 47: ...he Command Prompt window 2 Enter ipconfig after C and press the Enter key on your keyboard 3 Write down the information including IP Address Subnet Mask and Gateway for IP configuration of the NVR Information When you connect the NVR to your community network the PC IP configuration information is for your reference Revise the last number to specify a unique IP address for the NVR ...

Страница 48: ...low 1 Connect the NVR to the network via Ethernet switching hub 2 Insert the installation CD into the CD ROM drive open the SearchTool folder on the Installation CD and double click on Plustek_Network_Device_Search_Tool exe The NVR that you connected to your network will be displayed in the opened window 3 If you choose the STATIC option please enter the Submask and Gateway in the Search Tool wind...

Страница 49: ... Proxy Server A proxy server is generally used to connect to the Internet in order to maintain the security of a network in some corporate environments When your NVR is connected to such a network the proxy server may prevent you from accessing the NVR Please consult your network administrator or ISP for any details on disusing proxy server in your corporate environment You may follow the steps be...

Страница 50: ...lick the OK button in the window Or click the Advanced button in the LAN Settings window and follow Step a and Step b a Enter the NVR s IP address in the Exceptions field on this page b Click the OK button in the Proxy Settings window to confirm the settings ...

Страница 51: ...the NVR please keep your NVR connected to your network and follow the steps 1 Insert the reset pin into the RESET hole of the NVR 2 Stab the RESET button with the pin for 5 seconds 3 All settings are reset to their factory default settings Attention All the settings you have configured in the NVR will be lost after resetting Please make sure to Backup settings if necessary before resetting 11 This...

Страница 52: ...e Internet Explorer to browse website ActiveX controls may assure the normal displaying of images DHCP DHCP Dynamic Host Configuration Protocol is a communications protocol that lets network administrators manage centrally and automate the assignment of Internet Protocol IP addresses in an organization s network DNS DNS Domain Name System is a service that locates various Internet domain names and...

Страница 53: ...AP IMAP Internet Message Access Protocol is a standard protocol for accessing e mail from your local server IMAP requires continual access to the server during the time that you are working with your mail IMAP provides the user more capabilities for retaining e mail on the server and for organizing it in folders on the server IMAP can be thought of as a remote file server MAC Address In a local ar...

Страница 54: ...ork to a remote site through common customer premises equipment which is the telephone company s term for a modem and similar devices PPPoE can be used to have an office or building full of users share a common Digital Subscriber Line DSL cable modem or wireless connection to the Internet PPPoE combines the Point to Point Protocol PPP commonly used in dialup connections with the Ethernet protocol ...

Страница 55: ...d data in the form of message units between computers over the Internet While IP takes care of handling the actual delivery of the data TCP takes care of keeping track of the individual units of data called packets that a message is divided into for efficient routing through the Internet WEP WEP is the short form of Wired Equivalent Privacy It is a security protocol for wireless local area network...

Страница 56: ...urer warranty includes all parts and labor and is not valid without the receipt of original purchase To obtain warranty service you may contact the authorized dealer or distributor or visit our website to check out the available service information or send a request via E mail for further help If you transfer this product to another user warranty service is available to that user for the remainder...

Страница 57: ... a domestic environment this product may cause radio interference in which case the user may be required to take adequate measures This equipment generates uses and can radiate radio frequency energy and if not installed and used in accordance with the instructions may cause harmful interference to radio communications However there is no guarantee that interference will not occur in a particular ...

Отзывы: