Brivis
10
Evap AC OM
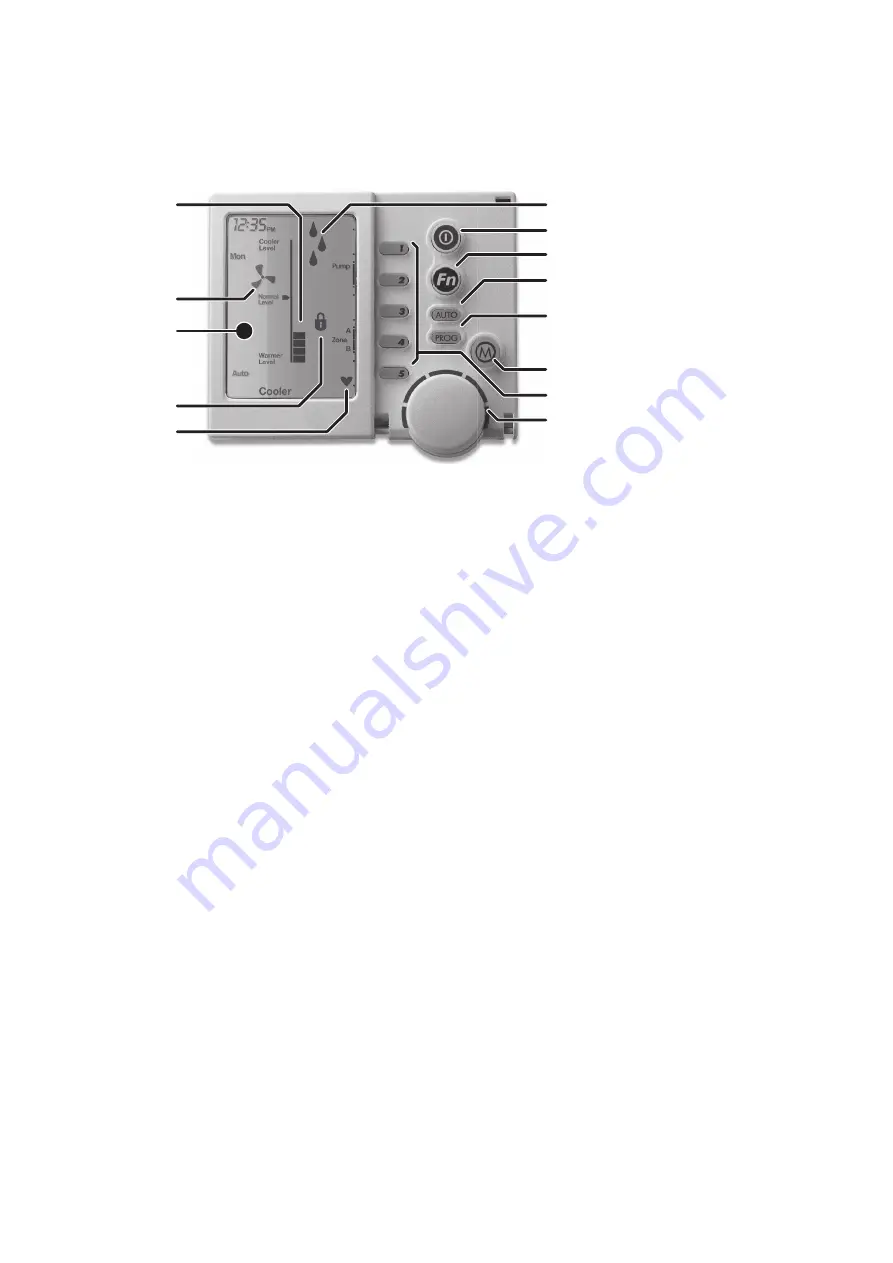
ABOUT YOUR BRIVIS NETWORKER WALL CONTROL
The Brivis Networker wall control operates the complete cooling system, communicating key information and
sensing the temperature� It is an important part of the unit and the following text will explain its operation�
1�
On/Off Button
This is the button to turn the Brivis Networker ON or OFF�
2�
Function (Fn) Button
The function button, when used in conjunction with keys 1 & 2 allows the user to perform specialised functions
such as message repeating & Brivis Networker locking� The Fn button also activates the LED backlight�
3�
Mode (M) Button
This button is used to set/change the controller PIN�
4�
Heartbeat Symbol
A flashing heart icon in the bottom right hand corner indicates that the room temperature is being sensed from
this Brivis Networker�
5�
Program (PROG) Button
This button is used to set the Brivis Networkers automatic program�
6�
Auto (AUTO) Button
This button allows the user to switch between the Auto Program and the Manual Operation�
7�
Rotary Dial
This Dial is used to change the Cooler settings�
8�
Variable Keys
The keys numbered 1 to 5 (14 to18) vary their function depending on the program or mode displayed� They
will only have a function if text appears on the screen beside the key & a black rectangular box� (Keys used
for zoning function may also display an arrow)
9�
Water Droplets Symbol
The two alternating water droplets indicate that the cooler pump is turned on�
10�
Fan Symbol
When the fan is flashing it indicates the unit is in pre-wet mode. When the fan is rotating it indicates the fan
is turned on�
11�
Thermometer / Fan Speed Bar
In auto mode the thermometer indicates the set comfort level� In manual mode the thermometer indicates the
set fan speed�
12�
Padlock Symbol
The padlock symbol indicates the child proof lock has been set� For more information refer to the section
Locking the Brivis Networker�
13�
Digital Display (LCD screen)
Provides you with information about the system� The display shows the current time via a Digital Clock in the
top left corner, the Day of the Week on the left-hand side, and the type of Appliance selected at the bottom.
The display will also show scrolling messages across the top of the screen� The messages usually relate to a
certain action such as cooler Pre-Wet which shows -
“Pre-Wetting cooler pads - Please Wait!”
1
9
2
6
5
3
8 - (14,15,16,17,18)
7
4
12
10
13
11
NETWORKER WALL CONTROL OPERATION
NETWORKER WALL CONTROL OPERATION
ABOUT YOUR BRIVIS NETWORKER WALL CONTROL
The Brivis Networker wall control operates the complete cooling system, communicating key information and
sensing the temperature. It is an important part of the unit and the following text will explain its operation.
1.
On/Off Button
This is the button to turn the Brivis Networker ON or OFF.
2.
Function (Fn) Button
The function button, when used in conjunction with keys 1 & 2 allows the user to perform specialised functions
such as message repeating & Brivis Networker locking. The Fn button also activates the LED backlight.
3.
Mode (M) Button
This button is used to set/change the controller PIN.
4.
Heartbeat Symbol
A flashing heart icon in the bottom right hand corner indicates that the room temperature is being sensed from
this Brivis Networker.
5.
Program (PROG) Button
This button is used to set the Brivis Networkers automatic program.
6.
Auto (AUTO) Button
This button allows the user to switch between the Auto Program and the Manual Operation.
7.
Rotary Dial
This Dial is used to change the Cooler settings.
8.
Variable Keys
The keys numbered 1 to 5 (14 to18) vary their function depending on the program or mode displayed. They
will only have a function if text appears on the screen beside the key & a black rectangular box. (Keys used
for zoning function may also display an arrow)
9.
Water Droplets Symbol
The two alternating water droplets indicate that the cooler pump is turned on.
10.
Fan Symbol
When the fan is flashing it indicates the unit is in pre-wet mode. When the fan is rotating it indicates the fan
is turned on.
11.
Thermometer / Fan Speed Bar
In auto mode the thermometer indicates the set comfort level. In manual mode the thermometer indicates the
set fan speed.
12.
Padlock Symbol
The padlock symbol indicates the child proof lock has been set. For more information refer to the section
Locking the Brivis Networker.
13.
Digital Display (LCD screen)
Provides you with information about the system. The display shows the current time via a Digital Clock in the
top left corner, the Day of the Week on the left-hand side, and the type of Appliance selected at the bottom.
The display will also show scrolling messages across the top of the screen. The messages usually relate to a
certain action such as cooler Pre-Wet which shows -
“Pre-Wetting cooler pads - Please Wait!”


