background image

20

7 Using the Camera as a Web Cam

• Setting up NetMeeting

  NOTE:


Set the camera to Capture mode


 and select PC Cam mode before starting NetMeeting™. Please refer to section 8 Using the Camera as a PC 

Cam for more detail information.
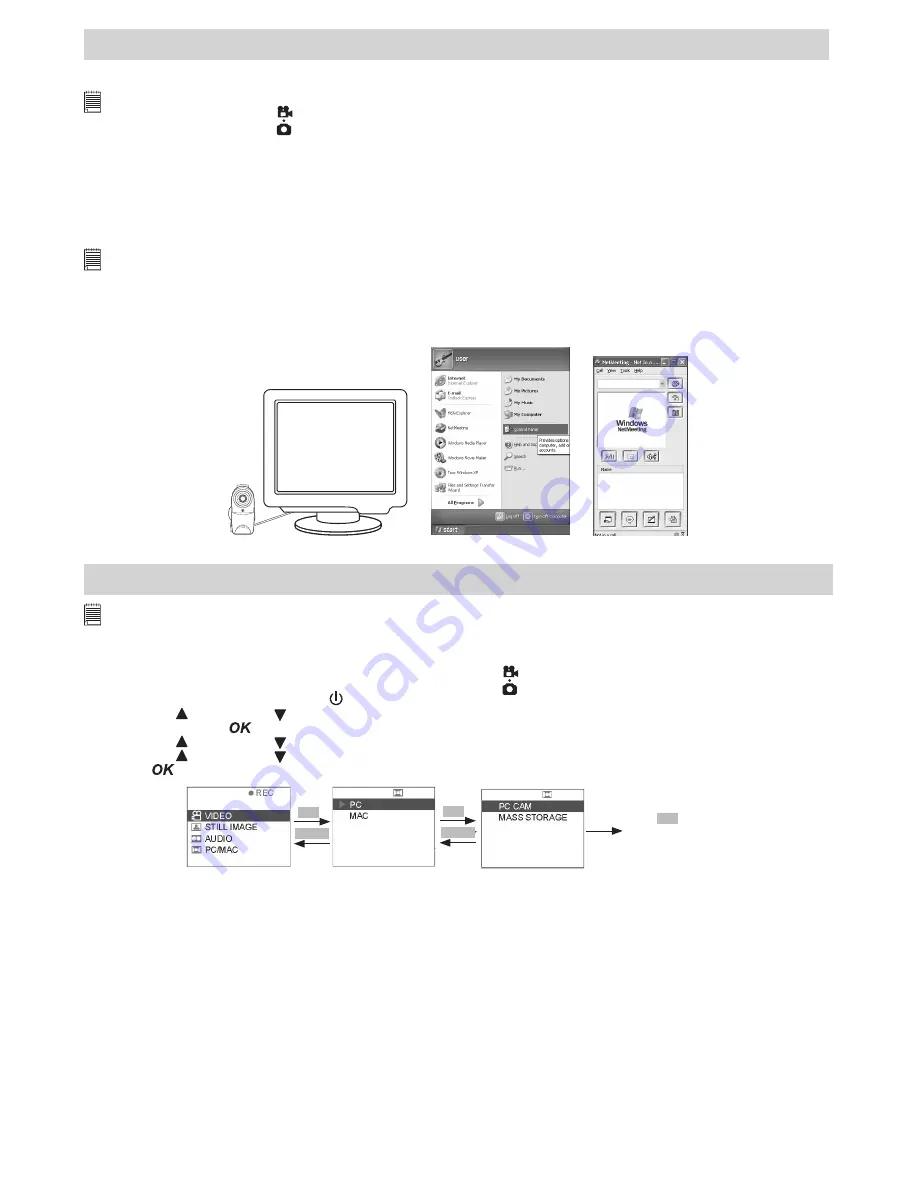
1. Connect your 

SPYPEN AIAS/ VIVA-DV1 

to the USB cable on one end.

2. Connect the USB cable to a USB port on your PC on the other end.

3. Put your 

SPYPEN AIAS/ VIVA-DV1 

on top of your PC monitor or another flat surface.

4. Connect your microphone (not included) to your audio card’s external microphone connector.

• Start NetMeeting

  NOTE:


For Windows XP / 2000 users who use NetMeeting for the first time , Go to Start -> Run ->type in “conf” ->click “OK” and then follow the on-

screen set up instruction to set up NetMeeting. 

1. Double click the “NetMeeting” icon on the desktop or select the “NetMeeting” icon from the Windows 

Start Menu.

2. If you need further help on how to use Microsoft® NetMeeting™, select the “Help” under the menu bar 

and  choose  the  topic  you  need.    You  can  also  visit  the  website:  http://www.microsoft.com/windows/

netmeeting. 

VIVA DI

GIT

AL

CA

M

ER

A

F

3.5

f=8.5m

m

8 Using the Camera as a PC Cam (PC only)

  IMPORTANT!


Before using the Web Cam function, make sure that your camera had been switched to PC Camera Mode.  PC camera mode is not 

supported by Apple Macintosh. 

• Setting to PC Camera 

1.  Select the Capture/playback selector to Capture Mode 

2.  Pull left to open the LCD panel

3.  Press the Power On/Off button   until the LCD on

4.  Press UP   and DOWN   button to select “PC/MAC” on the LCD Display

5.  Press OK Button 

 to confirm

6.  Press UP   and DOWN   button and select “PC” to enter PC mode

7.  Press UP   and DOWN   button to select “PC CAM” to the PC Camera on

8.  Press 

 to confirm 

MENU

OK

Press 

OK

  to  select 

the  item  and  return 

to view.

PC-CAM

MENU

OK

• Setting up PC Camera

1.  Connect your camera to the USB Cable on one end.

2.  Connect your USB Cable to USB Port on your PC on the other end.

3.  Put your camera on the flat surface.

4.  Open a PC Camera software then you can enjoy the conference.

Содержание SPYPEN AIAS

Страница 1: ...SPYPEN AIAS VIVA DV1 User s Manual...

Страница 2: ...A DIGIT A L C A M E R A F 3 5 f 8 5m m 1 3 2 1 Power On Off button 2 Confirm button 3 Left button 4 Down Zoom out button 5 Right button 6 Up Zoom in button 7 Mode button 8 LCD ICON On Off button 9 Vid...

Страница 3: ...the Software onto a Computer 17 Install the software 17 Software included with your camera 17 Computer system requirements 18 6 Transferring Pictures to Your Computer 18 Before you transfer pictures 1...

Страница 4: ...Video clips Playback Playback video clips on a computer using the Arcsoft Software supplied Save Save video clips to the computer memory by Mass Storage interface Communicate Send the video clips ove...

Страница 5: ...Capture Mode 2 Pull left to open the LCD panel 3 Press the Power On Off button until the LCD on 4 Press UP and DOWN button to select VIDEO on the LCD Display 5 Press OK Button to confirm 6 Press UP a...

Страница 6: ...r activated 11 Press LEFT button to resume capture mode Start A Press Shutter down fully to record press shutter down fully to stop Press to pop out the menu Press to return to the previous screen Def...

Страница 7: ...AT 8 Press RIGHT button 9 Press UP and DOWN button and select YES to format card SD MMC card or format memory internal 10 Press to confirm Format Start A Press Shutter down fully to record press shutt...

Страница 8: ...top Press to view the files Default video Press to select item MENU OK Press to show thumbnail VIDEO Press or OK to Start A ERROR MESSAGE Playback still image on camera LCD 1 Select the Capture playba...

Страница 9: ...fault video It will return to view files TV OUTPUT OK Press to select item MENU OK Press to show thumbnail VIDEO Press or OK to Start A ERROR MESSAGE Playback Still image on TV 1 Connect the SPYPEN AI...

Страница 10: ...K to Start A Play Slideshow 1 Select the Capture playback selector to playback Mode 2 Pull left to open the LCD panel 3 Press the Power On Off button until the LCD on 4 Press UP and DOWN button to sel...

Страница 11: ...t item Press to show thumbnail VIDEO Press or OK to Start A ERROR MESSAGE Press OK to lock this file and go to next file It will UNLOCK THIS file by pressing OK again LOCK THIS Start B Lock ALL files...

Страница 12: ...s to select item Press to show thumbnail VIDEO Press or OK to Start A ERROR MESSAGE Press OK to erase this file and go to next file ERASE THIS Start B Delete ALL file 1 Select the Capture playback sel...

Страница 13: ...ltage detected Preview Still Image Icon Function Default Counter to show remaining number of pictures can be taken Subject to the memory space left Image Quality Setting 1280X1024 Super Fine 1280x1024...

Страница 14: ...top Press to pop out the menu Press to return to the previous screen Default video Press OK to select the item and return to main menu Press to select item Press to select item MENU OK Main Menu Setti...

Страница 15: ...or MMC Card is inserted All DPOF files are protected Users cannot delete them using the erase function 1 Select the Capture playback selector to playback Mode 2 Pull left to open the LCD panel 3 Pres...

Страница 16: ...nd DOWN button to select the number of copy to 00 14 Press OK Button to confirm and reutn to main menu Set anti Flicker 1 Select the Capture playback selector to Capture Mode 2 Pull left to open the L...

Страница 17: ...ed on your computer 2 Insert the CD supplied into the computer CD ROM Drive 3 Double click the CD ROM icon Digital Video 4 Install the software included Software included with your camera The SPYPEN A...

Страница 18: ...g with the USB Cable OK VIDEO OUT USB Transferring Picture s Audio Clip s and Movie Clip s From Camera to PC PC 1 Turn on the camera 2 Change to Capture mode if your camera is in Playback mode 3 Chang...

Страница 19: ...ure to enter Capture Video mode 6 User can get a live view from the screen Click this button to get a live view 7 Make sure that WWL 601 Camera is selected in the pull down menu 8 Click Record button...

Страница 20: ...tMeeting select the Help under the menu bar and choose the topic you need You can also visit the website http www microsoft com windows netmeeting VIVA DIGIT A L C A M E R A F 3 5 f 8 5m m 8 Using the...

Страница 21: ...the LCD on 4 Press UP and DOWN button to select PC MAC on the LCD Display 5 Press OK Button to confirm 6 Press UP and DOWN button and select MAC to enter MAC mode 7 Press to confirm MENU OK Press OK...

Страница 22: ...er Please insert PLAWA CD and click Digital Video Manager to install the driver My CD installation wizard does not work The auto installation file is switched to off Go to the computer desktop Right c...

Страница 23: ...soft com Visit http www arcsoft com for technical support and frequently asked questions FAQ s 13 Appendix Technical Specifications Sensor Size 1 2 1 3M pixel 1280 X 1024 Focus Range 1 1m Infinity Len...

Страница 24: ...stains with a soft cloth dampened with water or neutral detergent NEVER place hot items on the surface of the Camera NEVER attempt to open or disassemble Camera as this will affect any warranty claim...

Отзывы: