background image

18 

Set the time of the relevant channel. Time can be set in the range from 0 to 99 seconds. 

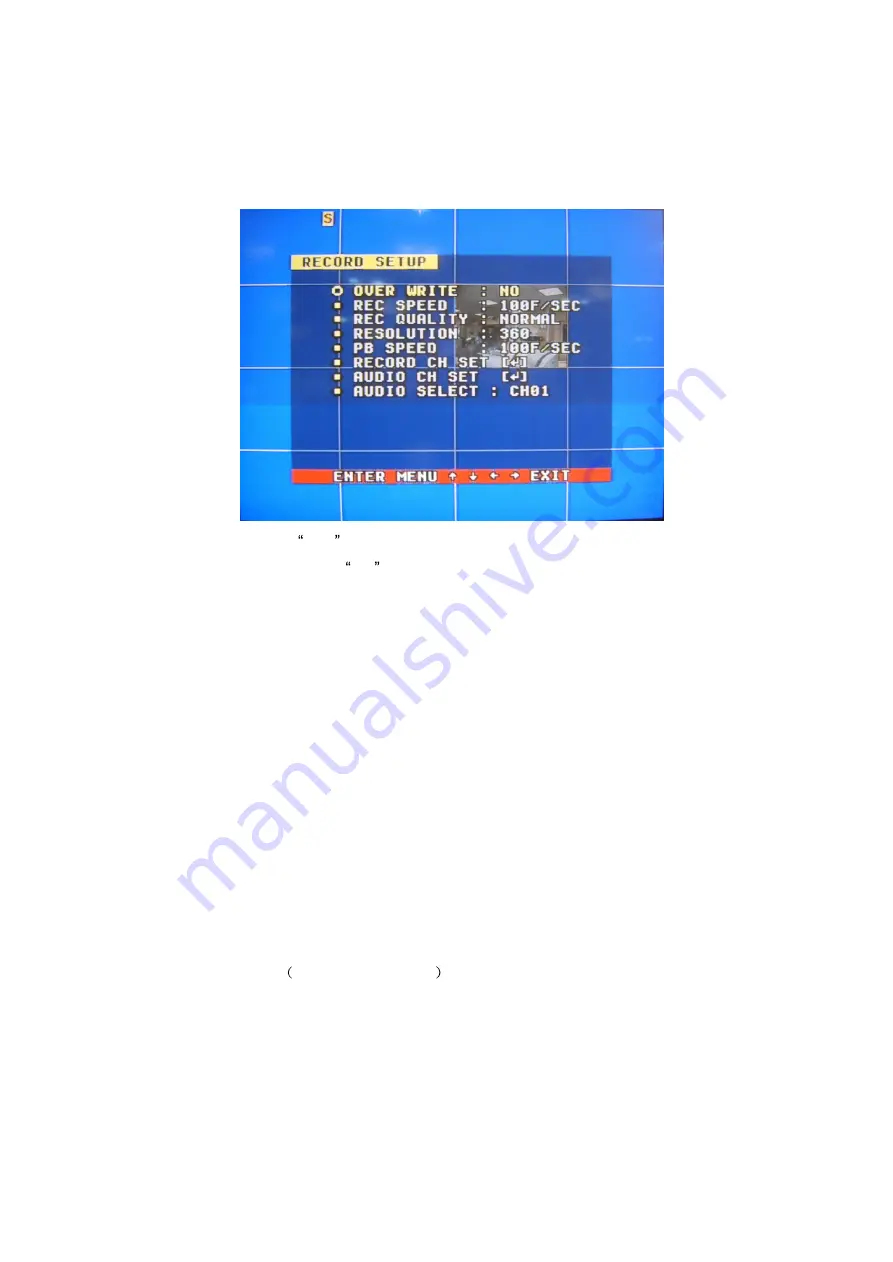
5.4 RECORD  SETUP                


OVER WRITE: if set to  YES , the DVR will automatically overwrite the HDD from the beginning 

when the HDD is full. If set to  NO , the DVR will automatically stop recording when the HDD is 

full. If there are two HDD in the DVR, when the MASTER HDD is full, the video will store to the 

SLAVE HDD, and when the SLAVE HDD is also full, the DVR will overwrite the MASTER HDD if 

set this to yes, otherwise it will stop recording is set to no. 

REC SPEED: the recording frame rate of the DVR, factory default setting is 30F/SEC for NTSC 

(25F/1SEC  for  PAL),  Which  means  DVR  records  the  events  at  the  speed  of  30  shots  of  frames 

per  second,  The  higher  the  record  frame  rate,  the  more  natural  look  will  be  displayed  on  the 

screen when you playback. The lower the record frame rate, the more you can save the space on 

the hard disk. The highest frame rate is 120F/SEC (PAL us 100F/SEC) when the resolution is in 

320 sizes. 

REC  QUALITY:  There  are  four  different  video  quality  settings:  VERY  LOW,  LOW,  NORMAL, 

HIGH and VERY HIGH. The higher the video quality, the clearer images when you playback. The 

lower the video quality, the more you can save the space on the hard disk drive. 

RESOLUTION: The record picture size of the DVR, there are two modes: 360 and 720, default is 

360.  In  720  mode,  the  record  picture  is  twice  bigger  than  is  360  mode,  in  320  mode  the  REC 

speed  is  120F/SEC

PAL  is  100F/SEC

and  the  maximal  REC  speed  in  720  mode  is 

60F/SEC(PAL is 50F/SEC). 

PB SPEED: The frame rate of playback, default is NO USE, which means the same as record.     

Содержание DVR-3600

Страница 1: ...CCTV com With IR Remote Control USB Backup All Models With Network Remote Viewing All Models With CDRW Drive for CD Backup Please read instructions completely before operation and retain manual for fu...

Страница 2: ...s in the literature accompanying the appliance Attention installation should be performed by qualified service Personnel only in accordance with the National Electrical Code or applicable local codes...

Страница 3: ...lace you want to install the DVR unit is stable and meets our electricity requirements Unstable electricity will cause malfunction of the unit or give critical damage to the unit 2 Several chips on th...

Страница 4: ...T SET 15 5 2 3 FACTORY RESET 15 5 3 DISPLAY SETUP 16 5 3 1 CAMERA NAME SET 16 5 3 2 COLOR SET 17 5 3 3 AUTO SEQUENCE SET 17 5 4 RECORD SETUP 18 5 4 1 AUDIO CH SET 19 5 4 2 REC CH SET 19 5 5 NETWORK SE...

Страница 5: ...k frame rate changeable for recording Support alarm recording time recording Support loss and motion detection functions Multi function searches be able to distinguish different alarm records and time...

Страница 6: ...ing video and stopping playing operations Play and stop will work simultaneously on 16 channels This button doesn t work while time recording and alarming recording 3 REW fast backward button Push thi...

Страница 7: ...on to see big picture of channel 5 While inputting numbers this button is used as number key of 5 6 WM 10 Watermark button In shift mode if the DVR is playing video you can push this button to see the...

Страница 8: ...he cursor 4 Nine pictures left Push this button to see nine pictures display re push this button to see eight pictures While select menu items push this button to move the cursor left ward 5 Enter Whi...

Страница 9: ...inal is suitable for displaying the image The figure above shows the video and audio signal line connection Note at one time you can only connect one audio input which means if you connect a n audio t...

Страница 10: ...tage alarm Please refer to the picture below channel 2 to channel 16 are the same as channel 1 1 2 4 3 7 8 6 5 10 11 13 12 9 21 24 25 23 22 17 18 20 19 15 16 14 Switch Ch1 Alarm output There are three...

Страница 11: ...h a HDD skip the following steps 1 Push out the hard drive rack from the DVR side panel 2 Open the top cover of the drawer 3 Jump HDD to Master Jump to Master 4 Connect the ribbon cable IDE cable powe...

Страница 12: ...ol Speed dome 5 SYSTEM SETUP Before using the video recorder the first step is to set up the system according to user s needs otherwise the machine will run with the default settings 5 1 SETUP MENU Wh...

Страница 13: ...button to return to previous menu Long press the menu search button on the keyboard or press the remote controller to enter the Setup Main Menu You can show password input box according setting of pas...

Страница 14: ...k Repeat VIDEO SYSTEM Set the NTSC PAL BUZZER SOUND Set the Buzzer On Off 5 2 1 TIME DATA SET Set the date and time DATE Set the date TIME Set the time FORMAT Set the time display format USA EURO and...

Страница 15: ...Video Recorder User s Manual 15 5 2 2 HDD FORMAT SET Format the hard disk Select YES to format the hard disk And all video on the HDD will loss 5 2 3 FACTORY RESET Initialize all the setup the DVR wil...

Страница 16: ...AME SET When the cursor moves to camera name please push enter button the camera name setup window will appear which is illustrated as below Each channel s name is the combination of eight characters...

Страница 17: ...er button the Color setup window will appear which is illustrated as below CON picture contrast BRI picture brightness HUE picture hue SAT picture saturation 5 3 3 AUTO SEQUENCE SET Set the Display Ti...

Страница 18: ...frames per second The higher the record frame rate the more natural look will be displayed on the screen when you playback The lower the record frame rate the more you can save the space on the hard...

Страница 19: ...an only record one channel s audio at the same time so for the right audio set you have to select one channel in these four channels in the Record Setup menu 5 4 2 REC CH SET When the cursor moves to...

Страница 20: ...the digits you can push rightward or leftward button to modify the digits also when select a digit you can push enter button then push leftward or rightward button to select each bit of the digit and...

Страница 21: ...then push enter button The MAC set window will appear which is illustrated as below If you have more than one DVR in a local area network you have to set each DVR to have an exclusive MAC address but...

Страница 22: ...ION LEVEL motion sensitivity level if the figure in the picture id small please set to high of very high the default is normal BUZZER TIME buzzer sound time when there is a sensor or motion alarm SENS...

Страница 23: ...sh enter button to change long push enter change all value the same as you selected 5 7 SCHEDULE SET When the cursor moves to Schedule Set please push enter button the schedule setup window will appea...

Страница 24: ...are two types of backup mode STILL and MOVIE in STILL mode you can backup Picture and in MOVIE mode you can backup video 5 9 STORAGE INFO Storage information shows the information on hard disk MODEL...

Страница 25: ...ntrol speed dome include PELCO P PELCO D NEON LILIN default is PELCO P 6 USER S GUIDELINE 6 1 start the machine Before starting the machine please make sure all the items in the Safety Precautions at...

Страница 26: ...it will stop recording 6 4 Alarm Recording Alarm recording is not started by manually pushing record button the entire recording started by manually pushing the record button are normal record Alarm r...

Страница 27: ...ystem must be set on schedule In time record state you can push again schedule button the enter password to stop time recording Because time recording is correlated closely with time so before using t...

Страница 28: ...Push upward and downward button to move the cursor among the event list push leftward and rightward button to see previous or next page push enter button to play the segment you select Push search but...

Страница 29: ...roller the DVR will be in zoom mode which is illustrated as below Press upward downward leftward or rightward to move the zoom area then push enter button to zoom press zoom button again to cancel zoo...

Страница 30: ...o information on the HDD through a computer Open the software you will see the window below 7 1 Setting Please click button you will see the window below enter the IP address and click O b u t t o IP...

Страница 31: ...iveplay You can select this button to see live picture just click the play button 7 4 Playback Click Playback net search window will display First you have to select the HDD of the DVR Click the Get r...

Страница 32: ...in the DVR to a PC and then select Scandisk Scandisk window will display click and select one HDD then you can play all the video on the HDD Scandisk Menu 7 6 FilePlay Press F il eP l a button you ca...

Страница 33: ...termine the file name the location and channels to save Then AVI saving will start Click the Save to AVI once more will stop saving Pressing the button you can record the video by you computer Pressin...

Страница 34: ...b 3K RCA connector 2 Alarm input 16 Alarm output 1 Record time 18 1680 hours 40G Electron clock Year Month Day Hour Minute Second Secrete function Password protection Update USB Power source DC12V 5A...

Отзывы: