background image

A1

This unit has been engineered and manufactured to ensure your personal
safety, however improper use may result in electrical shock or fire hazards.
In order to allow the proper operation of all safeguards incorporated in this
display, observe the following basic rules for its installation, use, and
servicing.

On Safety

Use only the power cord supplied with the unit. In case you use another power
cord, make sure that it is certified by the applicable national standards if not being
provided by the supplier. If the power cable is faulty in any way, please contact the
manufacturer or the nearest authorized repair service provider for a replacement.

The power supply cord is used as the main disconnection device. Ensure that the
socket-outlet is easily accessible after installation.

Operate the display only from a power source indicated in the specifications of
this manual or listed on the display. If you are not sure what type of power supply
you have in your home, consult with your dealer.

Overloaded AC outlets and extension cords are dangerous. So are frayed power
cords and broken plugs. They may result in a shock or fire hazard. Call your service
technician for replacement.

Do not Open the Display.

There are no user serviceable components inside. 
There are Dangerous High Voltages inside, even when the power is OFF. 
In case of difficulty, refer first to the Troubleshooting section of this manual.

To Avoid Personal Injury :

Do not place the display on a sloping shelf unless properly secured.
Use only a stand recommended by the manufacturer.

To Prevent Fire or Hazards:

Always turn the display OFF if you leave the room for more than a short period
of time. Never leave the display ON when leaving the house.
Keep children from dropping or pushing objects into the display's cabinet
openings. Some internal parts carry hazardous voltages.
Do not add accessories that have not been designed for this display.
During a lightning storm or when the display is to be left unattended for an
extended period of time, unplug it from the wall outlet.

Important Precautions

Содержание PQ191

Страница 1: ...PLANAR LCD MONITOR PQ191MMANUAL www planar com...

Страница 2: ...of power supply you have in your home consult with your dealer Overloaded AC outlets and extension cords are dangerous So are frayed power cords and broken plugs They may result in a shock or fire ha...

Страница 3: ...Active Matrix LCD with anything hard as this may scratch mar or damage the Active Matrix LCD permanently Do not press the LCD screen with your finger for a long time as this may cause some afterimages...

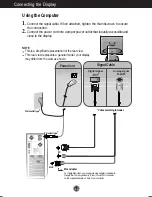
Страница 4: ...display Macadapter ForAppleMacintoshuse aseparateplugadapterisneededto changethe15pinhighdensity 3row D subVGAconnector onthesuppliedcabletoa15pin2rowconnector Wall outlettype NOTE This is a simplifi...

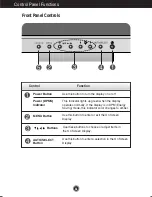
Страница 5: ...o enter or exit the On Screen Display Use this button to turn the display on or off This Indicator lights up green when the display operates normally If the display is in DPM Energy Saving mode this i...

Страница 6: ...n Display OSD This will automatically adjust your display image to the ideal settings for the current screen resolution size display mode The best display mode is 1280x1024 This function allows you to...

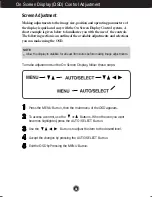
Страница 7: ...ble adjustments and selections you can make using the OSD To make adjustments in the On Screen Display follow these steps Press the MENU Button then the main menu of the OSD appears To access a contro...

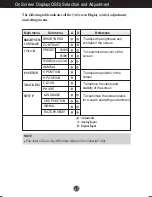
Страница 8: ...lowing table indicates all the On Screen Display control adjustment and setting menus PRESET 9300K 6500K R G B User Color GAMMA To adjust the position of the screen To customize the color of the scree...

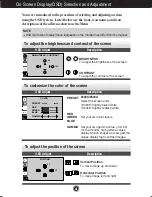
Страница 9: ...and right To adjust the brightness and contrast of the screen To adjust the position of the screen OSD Adjust Description BRIGHTNESS CONTRAST 88 100 PRESET RED GREEN BLUE GAMMA 9300K 6500K Select the...

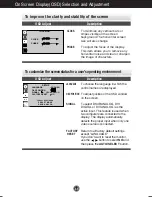
Страница 10: ...OG 1280x1024 60Hz PRESET MODE DSUB ANALOG To customize the screen status for a user s operating environment OSD Adjust Description To choose the language in which the control names are displayed To ad...

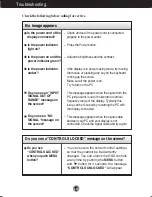
Страница 11: ...ower saving mode try moving the mouse or pressing any key on the keyboard to bring up the screen Make sure if the power is on Try to turn on the PC This message appears when the signal from the PC vid...

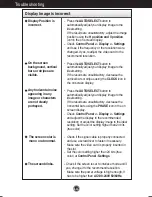
Страница 12: ...l setting If the results are unsatisfactory decrease the vertical bars or stripes using the CLOCK icon in the on screen display Press the AUTO SELECT button to automatically adjust your display image...

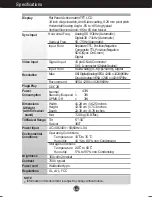
Страница 13: ...g 0 7Vp p 75ohm Digital Max DVI Digital Analog VESA 1280 x 1024 60Hz D sub Analog VESA 1280 x 1024 75Hz Recommend VESA 1280 x 1024 60Hz DDC 2B Normal 43W Stand by Suspend 3W DPMS Off 3W Width 41 28 cm...

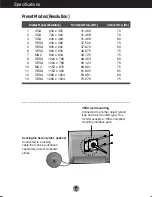
Страница 14: ...280 x 1024 31 469 31 468 31 469 37 500 37 879 46 875 49 725 48 363 60 123 68 681 61 805 63 981 79 976 70 70 60 75 60 75 75 60 75 75 65 60 75 VGA VGA VGA VESA VESA VESA MAC VESA VESA MAC VESA VESA VESA...

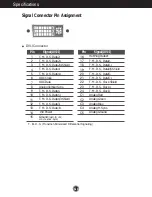
Страница 15: ...D S Data1 T M D S Data1 T M D S Data1 3 Shield T M D S Data3 T M D S Data3 5V Power Ground return for 5V H Sync and V Sync Pin Signal DVI I 16 17 18 19 20 21 22 23 24 C1 C2 C3 C4 C5 Hot Plug Detect T...

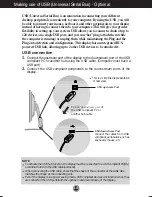
Страница 16: ...ed it USB connection 1 Connect the upstream port of the display to the downstream port of the USB compliant PC or another hub using the USB cable Computer must have a USB port 2 Connect the USB compli...

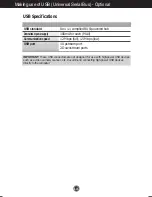
Страница 17: ...h power USB devices such as a video camera scanner etc Recommend connecting high power USB devices directly to the computer Rev 1 1 complied BUS powered hub 100mA for each MAX 12 Mbps full 1 5 Mbps lo...

Страница 18: ...anar com phone 1 866 PLANAR 1 1 866 752 6271 hours M F 8am 9pm EST 2003 Planar Systems Inc Planar is a registered trademark of Planar Systems Inc Other brands and names are the property of their respe...

Отзывы: