background image


14 

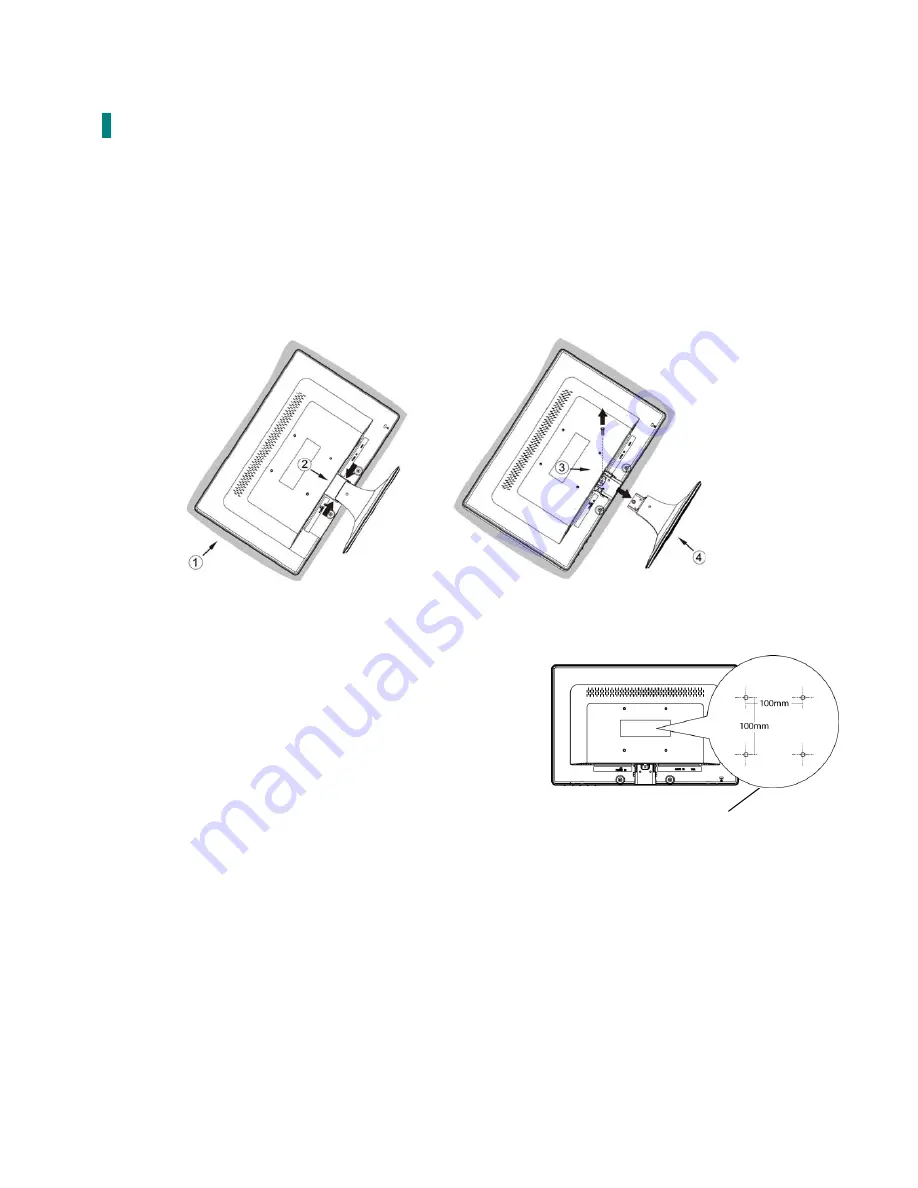
Wall-mount instruction 

Preparing To Install The Optional Wall Mount Arm (not included) 

This LED Monitor can be attached to a wall mounting arm you can purchase separately. 
Turn the power OFF then disconnect the cables from the LED Monitor before performing the 
procedure below. 
1.


Lay the LED Monitor face down on a soft surface. 

2.


Remove the hinge cover. 

3.


Remove the one screw holding the stand to the hinge. 

4.


Remove the stand. 


Attaching The Optional Wall Mount Arm (not supplied) 

Follow these steps to finish installing the wall mounting arm:   

1.


Place the wall mounting arm onto the back of the LED 

Monitor. Line up the holes of the arm with the holes in the 

back of the monitor.   

2.


Insert the 4 screws into the holes and tighten.   

3.


Reconnect the cables. Refer to the User’s Guide that came 

with the optional wall mounting arm for instructions on 
attaching it to the wall. 


NOTE  


100mmx100mm VESA high hole (n=4), M4, pitch =0.7 mm 
screw mounting kit not included.     


4mm, 0.7 pitch 
threaded holes x 4 

100mm x 100mm Screw 

Mounting Options 

Содержание PLL1900MW

Страница 1: ...www planar com USER S GUIDE LED Monitor PLL1900MW...

Страница 2: ...of the Product 4 Rear View of the Product 5 Quick Installation 6 Basic Operation 7 Advanced Operation OSD Menu 9 Supporting Timing Modes 12 Technical Information 13 Wall mount instruction 14 Care and...

Страница 3: ...radio or television reception resetting the LED Monitor may determine it Moreover users are encouraged to correct interference by doing one or more of the following Reorient or relocate the receiving...

Страница 4: ...There is high voltage parts inside that may cause electric shock to human bodies even when the power cord is disconnected Stop using the LED Monitor if the cabinet is damaged Have it checked by a ser...

Страница 5: ...tor Power Cable User s Guide Audio Cable VGA Cable Installing the Stand Base 1 Place the monitor face down on a soft cloth or cushion on a table 2 Install the stand base to the monitor Disconnecting t...

Страница 6: ...4 Front View of the Product OSD Menu On Off Volume Adjust Scroll Down Adjust Decrease Preset Mode Scroll Up Adjust Increase Confirm Select Auto adjust Power ON OFF LED Indicator...

Страница 7: ...5 Rear View of the Product Power input AC input Audio Input VGA input D Sub 15 pin...

Страница 8: ...Connect the power cord to a properly grounded AC outlet then to the monitor 3 Connect Audio cable Connect the Audio cable from Audio output of computer to the Audio input of the monitor 4 Power ON com...

Страница 9: ...the image when not in OSD menu 2 Confirm the selection Select the desired item when in OSD menu When not in OSD menu directly enters Volume adjust Select the desired item when in OSD menu When not in...

Страница 10: ...cluding the POWER button are locked Press and hold the 1 button and the button for 3 seconds to lock all 5 buttons The LED Monitor will show an Lock Out message for 5 10 seconds and the message will d...

Страница 11: ...foreground white level of screen image increase contrast decrease contrast Brightness To adjust the luminance of the video increase brightness decrease brightness ECO Mode Allows the user to turn the...

Страница 12: ...e right move screen to the left V Position move screen up move screen down Fine Tune To adjust the delay time of data and clock Press or to adjust to your preference Sharpness To adjust the clarity of...

Страница 13: ...ve OSD to the left V Position To vertically adjust the OSD position move OSD up move OSD down OSD Time Out To automatically turn off On Screen Display OSD after a preset period of time OSD Background...

Страница 14: ...5Hz VESA 1024 x 768 60Hz VESA 1024 x 768 70Hz VESA 1024 x 768 75Hz MAC 1152 x 870 75Hz VESA 1366 x 768 60Hz Note Simultaneously press 1 and 2 keys on monitor panel to switch between similar PC timings...

Страница 15: ...Standby Mode 0 5 Watt Off 0 5 Watt Displayable Resolution WXGA 1366 x 768 max Vertical Frequency 60Hz max Pixel Dimension 0 3 x 0 3 mm Display Color 16 7M Tilt 0 0 2 20 2 Active Display Area 409 8 mm...

Страница 16: ...Remove the stand Attaching The Optional Wall Mount Arm not supplied Follow these steps to finish installing the wall mounting arm 1 Place the wall mounting arm onto the back of the LED Monitor Line u...

Страница 17: ...remove the rear cover of your LED Monitor cabinet The display unit inside contains high voltage parts and may cause electric shock to human bodies Never try to repair your LED Monitor yourself Always...

Страница 18: ...LED monitor touch screen or other Planar products visit our online store at www PlanarOnline com or find other stores who carry Planar products at http www planar com howtobuy Technical Support Visit...

Страница 19: ...2001171038P...

Отзывы: