background image

16

 Product Registration and Technical Support 

Register Your Planar Products Today 

Thank you choosing Planar. To assure you receive all the benefits of your Planar product 

and services, register your Planar product today. Visit our website to register your product 

at http://www.planar.com/support/registration/

Cables, Replacement Lamps, Accessories 

To find cables, replacement lamps and accessories for your Planar projector, LCD monitor, 

touch screen or other Planar products visit our online store at www.PlanarOnline.com or 

find other stores who carry Planar products at http://www.planar.com/howtobuy

Technical Support

Visit Planar at http://www.planar.com/support for product registration, operations manuals,  

touch screen drivers, warranty information and access to Planar's Technical Library for 

online troubleshooting. To speak with Planar Customer Support please have you model 

and serial number available and dial: 

Planar Support  

Tel: 1-866-PLANAR1 (866-752-6271) or +1 503-748-5799 outside the US.  

Hours: 24 hours a day, 7 days a week.  

Toll or long distance charges may apply.

Содержание PL2210W

Страница 1: ...www planar com USER S GUIDE LCD Monitor PL2210W...

Страница 2: ...of the Product 5 Rear View of the Product 6 Quick Installation 7 Basic Operation 8 Advanced Operation OSD Menu 10 Supporting Timing Modes 12 Technical Information 13 Wall mount instruction 14 Care and...

Страница 3: ...the receiving antenna Move the TFT LCD Monitor and the receiver further away from each other Connect the TFT LCD Monitor into an outlet on a circuit different from that to which the receiver is connec...

Страница 4: ...only be repaired by a qualified technician Do not remove the TFT LCD Monitor cabinet There is high voltage parts inside that may cause electric shock to human bodies even when the power cord is disco...

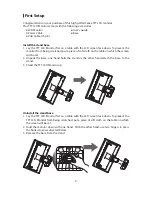
Страница 5: ...on the table on which the screen will be set 2 Unpack the base one hand hold the monitor the other hand attach the base to the stand 3 Stand the TFT LCD Monitor up Uninstall the stand base 1 Lay the...

Страница 6: ...Front View of the Product 1 Auto Image Adjust OSD Exits 2 OSD Turn On Confirm Selection 3 Scroll Down Adjust Decrease 4 Scroll UP Adjust Increase Source select 5 Power On Off 6 LED Indicator 2 1 3 4 5...

Страница 7: ...6 Rear View of the Product 7 Power Input 8 VGA Input D Sub 15 pin 9 DVI Input DVI 24 pin 7 8 9...

Страница 8: ...sure both monitor and computer are powered OFF 2 Connect power cord to a properly grounded AC outlet and then to the monitor 3 Power ON computer and then POWER ON the monitor 4 Set the timing mode on...

Страница 9: ...SD menu Exits from OSD menu Menu Displays main menu and enter items in OSD menu Select the desired item when in OSD menu When not in OSD menu directly enters Volume adjust Select the desired item when...

Страница 10: ...e POWER button are locked Press and hold the button for 5 seconds to lock all 5 buttons The TFT LCD Monitor will show an Locking Power Button message for 2 4 seconds and the message will disappear aut...

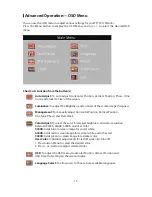
Страница 11: ...ion Vertical Position Fine Tune Phase and Pixel Clock Color Adjust To select the color for desired brightness and color saturation between 9300K 6500K 5400K and User Color 9300K Adds blue to screen im...

Страница 12: ...ngs You can select recall color only or recall all settings Information To display the information regarding the current input signal coming from the graphic card in your computer Aspect Ratio To sele...

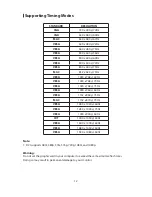
Страница 13: ...VESA 1024 x 768 70Hz VESA 1024 x 768 75Hz VESA 1280 x 960 60Hz VESA 1152 x 864 75Hz MAC 1152 x 870 75Hz VESA 1280 x 1024 60Hz VESA 1280 x 1024 75Hz VESA 1440 x 900 60Hz CVT 1400 x 1050 60Hz VESA 1600...

Страница 14: ...1 Watt Off 1 Watt Displayable Resolution 1920 x 1080 max Vertical Frequency 60Hz max Pixel Dimension 0 24825 x 0 24825 mm LCD Display Color 16 7M Tilt 5 0 2 20 2 Active Display Area 476 64 mm x 268 11...

Страница 15: ...taching The Optional Wall Mount Arm not supplied Follow these steps to finish installing the wall mounting arm 1 Place the wall mounting arm onto the back of the TFT LCD Monitor Line up the holes of t...

Страница 16: ...e the rear cover of your TFT LCD Monitor cabinet The display unit inside contains high voltage parts and may cause electric shock to human bodies Never try to repair your TFT LCD Monitor yourself Alwa...

Страница 17: ...ouch screen or other Planar products visit our online store at www PlanarOnline com or find other stores who carry Planar products at http www planar com howtobuy Technical Support Visit Planar at htt...

Страница 18: ...E030055094...

Отзывы: