background image

 ~ 27 ~


Die  Einstellung  der  Kühltemperatur  kann  manuell  vorgenommen  werden. 

Drehen  Sie  dazu  den  Thermostat  für  die  Temperatureinstellung  auf  die 

gewünschte Einstellung. 


Wenn Sie eine Temperatur einstellen, stellen Sie einen Durchschnittswert für das 

gesamte  Gerät  ein.  Die  Temperaturen  innerhalb  der  einzelnen  Bereiche  des 

Gerätes können von dem eingestellten Wert abweichen, abhängig von der Menge 
und der Lagerstelle der eingelagerten Lebensmittel. Die Umgebungstemperatur 

kann die eingestellte Temperatur ebenfalls beeinflussen. Diese Faktoren sollten 

bei der Temperatureinstellung des Gerätes berücksichtigt werden. 


T

EMPERATUREINSTELLUNG 

(T

HERMOSTATEINSTELLUNG


Die  Kühltemperatur  kann  durch  den  dazugehörigen 

Thermostat

  reguliert 

werden. 


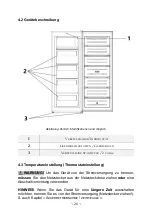
Der Thermostat befindet sich mittig im Rahmen des Gerätes; s. Abb. unten / 

siehe auch Abb. in Kapitel 4.2 G

ERÄTE

-

BESCHREIBUNG


Abbildung. ähnlich: Modifikationen sind möglich.


D

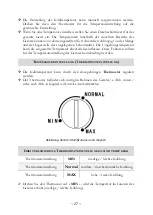
REI VERSCHIEDENE 

T

HERMOSTATEINSTELLUNGEN SIND VERFÜGBAR


Thermostateinstellung 

MIN 

niedrige / leichte Kühlung 

Thermostateinstellung


Normal 

mittlere / durchschnittliche Kühlung 

Thermostateinstellung


MAX 

hohe / starke Kühlung 


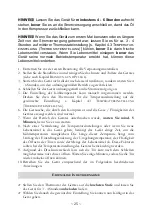
Drehen Sie den Thermostat auf « 

MIN 

», wird die Temperatur im Inneren des 

Gerätes erhöht (niedrige / leichte Kühlung). 

Содержание GS168-M

Страница 1: ...TECHNOLOGIE FÜR DEN HAUSHALT TECHNOLOGY FOR DOMESTIC USE 24 02 2021 Bedienungsanleitung Instruction Manual GEFRIERSCHRANK FREEZER GS168 M Deutsch Seite 2 English Page 47 www pkm online de ...
Страница 2: ...itsanweisungen 5 2 Klimaklassen 10 3 Installation 11 3 1 Entpacken und Wahl des Standortes 11 3 2 Raumbedarf und Belüftung 12 3 2 1 Raumbedarf 12 3 2 2 Belüftung 13 3 3 Ausrichtung des Gerätes 16 3 4 Wechsel des Türanschlags 17 4 Bedienung 24 4 1 Vor der ersten Benutzung 24 4 2 Gerätebeschreibung 26 4 3 Temperatureinstellung Thermostateinstellung 26 4 4 Der Gefrierbereich 30 4 4 1 Gefrierschublade...

Страница 3: ...ntsorgen Sie das Verpackungsmaterial entsprechend den örtlichen Vorschriften Ihres Wohnorts Das von Ihnen gekaufte Gerät wurde möglicherweise inzwischen verbessert und weist somit vielleicht Unterschiede zur Bedienungsanleitung auf Dennoch sind die Funktionen und Betriebsbedingungen identisch sodass Sie die Bedienungsanleitung im vollen Umfang nutzen können Technische Änderungen bzw Druckfehler bl...

Страница 4: ...n Das Gerät ist ausschließlich zur privaten Nutzung bestimmt sowie zur Nutzung 1 in Personalküchen von Geschäften Büros und ähnlichen Arbeitsumgebungen 2 durch Gäste von Beherbergungsbetrieben wir Hotels Motels B B 3 beim Catering oder ähnlichen nicht wiederverkaufenden Anwendern Das Gerät ist ausschließlich zum Kühlen von Lebensmitteln bestimmt Das Gerät ist ausschließlich zum Betrieb innerhalb g...

Страница 5: ...n die Stromversorgung an wenn das Gerät das Netzkabel oder der Netzstecker sichtbare Beschädigungen aufweisen 3 Die Stromspannung und die Leistungsfrequenz der Stromversorgung muss den auf dem Typenschild angegebenen Werten entsprechen 4 Verändern Sie niemals den mit dem Gerät mitgelieferten Netzstecker Falls dieser nicht für Ihre Netzsteckdose geeignet sein sollte lassen Sie die Netzsteckdose imm...

Страница 6: ...gen aufweisen darf sich das Gerät auf keinen Fall in der Nähe von Feuer offenem Licht und Funkenbildungen befinden Nehmen Sie in einem solchen Fall sofort Kontakt zu Ihrem Kundendienst oder dem Geschäft auf in dem Sie das Gerät erworben haben 2 3 Falls es im Aufstellungsraum zum Austritt eines brennbaren Gases kommen sollte a Öffnen Sie alle Fenster zur Belüftung b Ziehen Sie nicht den Stecker aus...

Страница 7: ...mals tragbare Mehrfachsteckdosen oder tragbare Netzteile hinter das Gerät BRANDGEFAHR 13 Schließen Sie das Gerät nicht an elektronische Energiesparstecker z B Sava Plug und an Wechselrichter die Gleichstrom in Wechselstrom umwandeln an z B Solaranlagen Schiffsstromnetze 14 Sie benötigen eine dem Netzstecker entsprechende ordnungsgemäß geerdete und ausschließlich dem Gerät zugewiesene Sicherheitsst...

Страница 8: ...en oder zu reinigen Der Dampf kann in Kontakt mit elektrischen Teilen kommen und so einen Kurzschluss auslösen STROMSCHLAGGEFAHR 29 Benutzen Sie niemals mechanische Gegenstände ein Messer oder andere scharfe Gegenstände um Eisablagerungen zu entfernen Durch dadurch resultierende Beschädigungen des Innenraums droht STROMSCHLAGGEFAHR 30 Kinder dürfen niemals mit dem Gerät spielen 31 Achten Sie auch ...

Страница 9: ...recht stehen bevor Sie es an die Stromversorgung anschließen damit das Öl in den Kompressor zurückfließen kann 7 Wenn Sie das Gerät zum ersten Mal benutzen oder es längere Zeit von der Stromversorgung getrennt war lassen Sie es für ca 3 4 Stunden auf mittlerer Thermostateinstellung kühlen bevor Sie darin frische Lebensmittel verstauen Wenn Sie Lebensmittel einlagern bevor das Gerät seine normale B...

Страница 10: ...UNG UND PFLEGE ff 20 Das Typenschild darf niemals unleserlich gemacht oder gar entfernt werden Falls das Typenschild unleserlich gemacht oder entfernt wurde entfällt jeglicher Garantieanspruch LESEN SIE DIESE ANLEITUNG GRÜNDLICH DURCH UND BEWAHREN SIE DIESE SICHER AUF Bei Nichtbeachtung dieser Anweisungen wird keinerlei Haftung für Personen oder Materialschäden übernommen 2 Klimaklassen Welcher KL...

Страница 11: ...ngsmittel um Reste der Transportsicherungen zu entfernen 5 Bauen Sie das Gerät an einer geeigneten Stelle mit einem angemessenen Abstand zu extremen Hitze oder Kältequellen auf 6 Wenn das Aufstellen neben einer Wärmequelle unvermeidbar ist verwenden Sie eine geeignete Isolierplatte oder halten Sie folgende Mindestabstände zur Wärmequelle ein zu anderen Kühlgeräten mindestens 20 mm zu Elektroherden...

Страница 12: ...Raumbedarf und Belüftung Beachten Sie die Angaben für eine ordnungsgemäße Belüftung des Gerätes 3 2 1 Raumbedarf RAUMBEDARF DES GERÄTES BEI GESCHLOSSENER TÜR A HÖHE B BREITE C TIEFE A B C 1426 mm 544 mm 571 mm ...

Страница 13: ...chend des Türöffnungswinkels Ihres Gerätes s Abb unten B 1 BREITE C 1 TIEFE B 1 C 1 TÜRÖFFNUNGSWINKEL mind 948 mm mind 1115 mm mind 135 3 2 2 Belüftung Achten Sie auf eine ordnungsgemäße Belüftung des Gerätes MINDESTABSTÄNDE FÜR EINE ORDNUNGSGEMÄßE BELÜFTUNG Rückseite Wand mind 20 mm Beide Seiten Möbelstück Wand mind 20 mm Kopffreiheit mind 100 mm ...

Страница 14: ... 14 RAUMBEDARF DES GERÄTES INKL DER MINDESTABSTÄNDE FÜR EINE ORDNUNGSGEMÄßE BELÜFTUNG BEI GESCHLOSSENER TÜR A HÖHE B BREITE C TIEFE A B C D mind 1526 mm mind 564 mm mind 591 mm Wand ...

Страница 15: ...mm mind 1165 mm mind 135 Beachten Sie bitte den zusätzlichen vorderen und seitlichen Platzbedarf der geöffneten Tür en entsprechend des Türöffnungswinkels Ihres Gerätes Um eine optimale Effizienz des Gerätes zu ermöglichen empfiehlt der Hersteller folgende Mindestabstände Rückseite Wand mind 50 mm Beide Seiten Möbelstück Wand mind 50 mm Kopffreiheit mind 100 mm ...

Страница 16: ... per Hand einstellen Abb ähnlich Abb dient ausschließlich als Beispiel A STANDFÜßE IM UHRZEIGERSINN DREHEN rechtsherum Das Gerät wird abgesenkt B STANDFÜßE ENTGEGEN DEM UHRZEIGERSINN DREHEN linksherum Das Gerät wird angehoben Für den ordnungsgemäßen Betrieb muss sich das Gerät in einer stabilen und ebenen Position befinden Damit das Gerät nicht wackelt müssen die Standfüße fest auf dem Boden stehe...

Страница 17: ...u die Scharniere fest anziehen Die Dichtung muss ordnungsgemäß anliegen HINWEIS Kippen Sie das Gerät nicht über einen Winkel von 45 hinaus VORBEREITENDE MAßNAHMEN Leeren Sie das Gerät vorher Entfernen Sie wenn möglich alle Türablagen Glasablagen und Schubladen5 aus dem Gerät damit diese nicht beschädigt werden Sie müssen das Gerät kippen um die Tür abnehmen zu können Lehnen Sie dabei das Gerät imm...

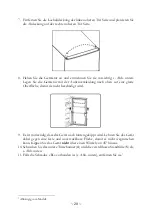
Страница 18: ...zstecker ziehen 2 Öffnen Sie die Gerätetür während das Gerät aufrecht steht und entnehmen Sie soweit möglich die Glasablagen Türablagen Schubladen etc 6 aus dem Gerät 3 Schließen Sie die Gerätetür 4 Um Zugriff auf das obere Türscharnier zu erhalten müssen Sie die obere Scharnierabdeckung 1 entfernen s Abb unten Legen Sie die Abdeckung beiseite 1 OBERE GERÄTEABDECKUNG 6 Ausstattung abhängig vom Mod...

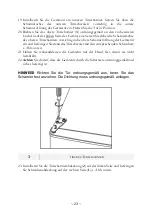
Страница 19: ...ichtig ab s Abb unten Halten Sie währenddessen die Gerätetür mit der Hand fest damit sie nicht herabfällt 3 OBERES TÜRSCHARNIER 6 Entfernen Sie die linke obere Schraubenabdeckung s Abb unten Legen Sie die Abdeckung beiseite 4 OBERES SCHRAUBENABDECKUNG ...

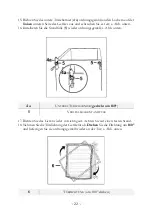
Страница 20: ...en auf eine glatte Oberfläche damit sie nicht beschädigt wird 9 Es ist notwendig dass das Gerät nach hinten gekippt wird Lehnen Sie das Gerät dabei gegen eine feste und unverrückbare Fläche damit es nicht wegrutschen kann Kippen Sie das Gerät nicht über einen Winkel von 45 hinaus 10 Schrauben Sie das untere Türscharnier 4 und die verstellbaren Standfüße 5 ab s Abb unten 11 Falls die Schraube X vor...

Страница 21: ...e 6 des unteren Türscharniers 4 ab gegen den Uhrzeigersinn und entnehmen Sie sie s Abb unten 13 Drehen Sie das untere Türscharnier um 180 s Abb unten 14 Installieren Sie nun die Scharnierachse 6 wieder am unteren Türscharnier 4 a mit dem Uhrzeigersinn s Abb unten 4 UNTERES TÜRSCHARNIER 4 a UNTERES TÜRSCHARNIER gedreht um 180 6 SCHARNIERACHSE ...

Страница 22: ...en Sie die Standfüße 5 wieder ordnungsgemäß s Abb unten 4 a UNTERES TÜRSCHARNIER gedreht um 180 5 VERSTELLBARE STANDFÜßE 17 Richten Sie das Gerät wieder vorsichtig auf Achten Sie auf einen festen Stand 18 Nehmen Sie die Türdichtung der Gerätetür ab Drehen Sie die Dichtung um 180 und befestigen Sie sie ordnungsgemäß wieder an der Tür s Abb unten 6 TÜRDICHTUNG um 180 drehen ...

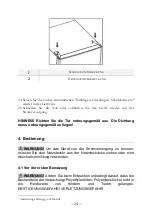
Страница 23: ...n die obere Scharnieröffnung der Gerätetür ein und befestigen Sie dann das Türscharnier mit den entsprechenden Schrauben s Abb unten 21 Halten Sie währenddessen die Gerätetür mit der Hand fest damit sie nicht herabfällt 22 Achten Sie darauf dass die Gerätetür durch die Scharniere ordnungsgemäß und sicher befestigt ist HINWEIS Richten Sie die Tür ordnungsgemäß aus bevor Sie das Scharnier fest anzie...

Страница 24: ...Die Dichtung muss ordnungsgemäß anliegen 4 Bedienung WARNUNG Um das Gerät von der Stromversorgung zu trennen müssen Sie den Netzstecker aus der Netzsteckdose ziehen oder eine Abschaltvorrichtung verwenden 4 1 Vor der ersten Benutzung WARNUNG Achten Sie beim Entpacken unbedingt darauf dass die Bestandteile der Verpackung Polyethylentüten Polystyrenstücke nicht in die Reichweite von Kindern und Tier...

Страница 25: ...e dazu den Thermostat für die Temperatureinstellung auf die gewünschte Einstellung s Kapitel 4 3 TEMPERATUREINSTELLUNG THERMOSTATEINSTELLUNG 6 Die Geräusche die durch den Kompressor und die Gase Flüssigkeiten des Gerätes erzeugt werden sind normal 7 Wenn der Betrieb des Gerätes unterbrochen wurde warten Sie mind 5 Minuten bevor Sie es neu starten 8 Nach einer Veränderung der Temperatureinstellunge...

Страница 26: ...3 Temperatureinstellung Thermostateinstellung WARNUNG Um das Gerät von der Stromversorgung zu trennen müssen Sie den Netzstecker aus der Netzsteckdose ziehen oder eine Abschaltvorrichtung verwenden HINWEIS Wenn Sie das Gerät für eine längere Zeit ausschalten möchten trennen Sie es von der Stromversorgung Netzstecker ziehen S auch Kapitel AUßERBETRIEBNAHME ZEITWEILIGE ...

Страница 27: ...eeinflussen Diese Faktoren sollten bei der Temperatureinstellung des Gerätes berücksichtigt werden TEMPERATUREINSTELLUNG THERMOSTATEINSTELLUNG Die Kühltemperatur kann durch den dazugehörigen Thermostat reguliert werden Der Thermostat befindet sich mittig im Rahmen des Gerätes s Abb unten siehe auch Abb in Kapitel 4 2 GERÄTE BESCHREIBUNG Abbildung ähnlich Modifikationen sind möglich DREI VERSCHIEDE...

Страница 28: ...hres Gerätes im Kapitel TECHNISCHE DATEN kann das Thermostat nach Bedarf auf eine kältere Einstellung Thermostateinstellungen Normal oder MAX gestellt werden Dadurch kann der Energieverbrauch steigen Stellen Sie im Falle sehr starker Eisbildung den Thermostat wieder auf eine wärmere Einstellung zurück Thermostateinstellungen Normal Sehr hohe Umgebungstemperaturen bei gleichzeitigem Betrieb der käl...

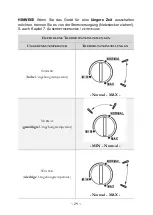
Страница 29: ...Stromversorgung Netzstecker ziehen S auch Kapitel 7 AUßERBETRIEBNAHME ZEITWEILIGE EMPFOHLENE THERMOSTATEINSTELLUNGEN UMGEBUNGSTEMPERATUR THERMOSTATEINSTELLUNGEN SOMMER hohe Umgebungstemperatur Normal MAX NORMAL gemäßigte Umgebungstemperatur MIN Normal WINTER niedrige Umgebungstemperatur Normal MAX ...

Страница 30: ...gefrorenen oder angetaute Lebensmittel nicht wieder ein Verpacken Sie einzufrierende Lebensmittel in Aluminiumfolie Frischhaltefolie luftdichte und wasserdichte Plastikbeutel Polyäthylen Behälter oder sonstige zum Einfrieren geeignete Kunststoffbehälter mit Deckel Lassen Sie zur Aufrechterhaltung der Luftzirkulation genügend Freiraum zwischen den einzelnen Gefriergut Einheiten Lebensmittel sind na...

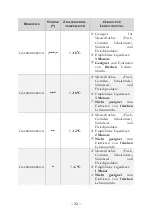
Страница 31: ...schubladen auf oben gezeigte Weise entnommen und wieder eingesetzt werden abhängig vom Modell 4 5 Stromausfall Im Falle eines Stromausfalls Reduzieren Sie die Öffnungshäufigkeit der Türen Geben Sie keine neuen Lebensmittel in das Gerät um einen schnellen Temperaturanstieg im Inneren des Gerätes zu vermeiden 4 6 Bedeutung der Kennzeichnung von Gefrierbereichen 1 2 und 3 Sterne Gefrierbereiche eigne...

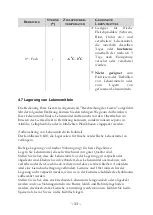
Страница 32: ...Garnelen Schalentiere Süßwasser und Fleischprodukte Empfohlene Lagerdauer 3 Monate Nicht geeignet zum Einfrieren von frischen Lebensmitteln GEFRIERBEREICH 12 0 C Meeresfrüchte Fisch Garnelen Schalentiere Süßwasser und Fleischprodukte Empfohlene Lagerdauer 2 Monate Nicht geeignet zum Einfrieren von frischen Lebensmitteln GEFRIERBEREICH 6 0 C Meeresfrüchte Fisch Garnelen Schalentiere Süßwasser und F...

Страница 33: ...uftdichten Plastikboxen eingepackt werden Aufbewahrung von Lebensmitteln im Kühlteil Der Kühlbereich hilft die Lagerzeiten für frische verderbliche Lebensmittel zu verlängern Richtige Lagerung von frischer Nahrung sorgt für beste Ergebnisse Lagern Sie Lebensmittel die sehr frisch und von guter Qualität sind Stellen Sie sicher dass die Lebensmittel vor der Lagerung gut verpackt oder abgedeckt sind ...

Страница 34: ...r gelegt werden Geflügelstücke sollten auf die gleiche Weise gelagert werden Ganzes Geflügel erst unmittelbar vor dem Kochen füllen um Lebensmittelvergiftungen zu vermeiden Fisch und Meeresfrüchte Fisch und Fischfilets sollten am Tag des Kaufs verwendet werden Bis zu ihrer endgültigen Verwendung sollten sie auf einem Teller aufbewahrt werden der lose mit Plastikfolie Wachspapier oder Folie bedeckt...

Страница 35: ...chten Sie auf das Mindesthaltbarkeitsdatum oder das zu verwenden bis Datum Tiefkühlkost möglichst in einem isolierten Beutel transportieren und schnell in das Gefrierfach legen Tiefkühlkost lagern Bei 18 C oder kälter aufbewahren Vermeiden Sie unnötiges Öffnen der Gefrierraumtür Einfrieren frischer Lebensmittel Nur frische und unbeschädigte Lebensmittel einfrieren Um den bestmöglichen Nährwert Ges...

Страница 36: ...h Art des Essens Die Lebensmittel die Sie einfrieren können 1 bis 12 Monate aufbewahrt werden Mindestens bei 18 C Lebensmittel Aufbewahrungszeit Speck Aufläufe Milch 1 Monat Brot Eiscreme Würste Pasteten zubereitete Schalentiere öliger Fisch 2 Monate Nicht fettiger Fisch Schalentiere Pizza Gebäck und Muffins 3 Monate Schinken Kuchen Kekse Rinder und Lammkoteletts Geflügelstücke 4 Monate Butter Gem...

Страница 37: ...halten werden Lassen Sie es dazu vorher auf Zimmertemperatur abkühlen Verwenden Sie zum Verpacken farblose geruchslose luftundurchlässige und widerstandsfähige Materialien Andere Lebensmittel wie Fleisch Fisch usw neigen dazu trocken zu werden und Gerüche freizusetzen Um dies zu verhindern können Sie diese Lebensmittel in Aluminiumfolie einwickeln in geeignete Frischhaltebeutel geben oder luftdich...

Страница 38: ...iebsparameter Das Gerät kann die entsprechenden Temperaturen nur dann erzeugen wenn 1 die durchschnittliche Umgebungstemperatur der Klimaklasse entspricht 2 die Türen ordnungsgemäß schließen 3 Sie die Türen nicht oft und zu lange öffnen 4 sich die Türdichtungen in einem ordnungsgemäßen Zustand befinden 5 Sie einen geeigneten Standort gewählt haben 6 Sie das Gerät nicht überfüllen 7 Sie kein warmes...

Страница 39: ...n sowie allen Armschmuck ab ansonsten beschädigen Sie die Oberflächen des Gerätes REINIGUNGSMITTEL Benutzen Sie niemals raue aggressive und ätzende Reinigungsmittel Benutzen Sie niemals Lösungsmittel Benutzen Sie keine Scheuermittel Benutzen Sie keine organischen Reinigungsmittel 14 Benutzen Sie keine ätherischen Öle Diese Anweisungen gelten für sämtliche Oberflächen Ihres Gerätes AUßENREINIGUNG 1...

Страница 40: ...eunigen STROMSCHLAGGEFAHR HINWEIS Tauen Sie das Gerät mindestens einmal im Monat ab ABTAUEN DES GEFRIERSCHRANKS 1 Nehmen Sie das Gefriergut heraus und lagern Sie es in einer Kühlbox 2 Trennen Sie das Gerät von der Stromversorgung Um das Gerät von der Stromversorgung zu trennen müssen Sie den Netzstecker aus der Netzsteckdose ziehen oder eine Abschaltvorrichtung verwenden 3 Legen Sie das Gerät mit ...

Страница 41: ...he Steckdose indem Sie ein anderes Gerät daran anschließen 4 Die entsprechende Sicherung ist ausgeschaltet 4 Überprüfen Sie die Haussicherung 5 Die Spannung ist zu niedrig 5 Vergleichen Sie die Angaben auf dem Typenschild mit den Angaben Ihres Stromanbieters KOMPRESSOR ARBEITET NICHT 1 Fehlerhafte Energieversorgung 1 Überprüfen Sie die Energieversorgung KOMPRESSOR LÄUFT ZU LANGE 1 Gerät war kürzli...

Страница 42: ...FAHR Versuchen Sie niemals selbst das Gerät zu reparieren Falls Ihr Gerät nicht ordnungsgemäß funktioniert kontaktieren Sie das Geschäft in dem Sie das Gerät erworben haben DIE FOLGENDEN BETRIEBSVORGÄNGE SIND NORMAL UND KEIN ANZEICHEN EINER FEHLFUNKTION Die Kühlflüssigkeit erzeugt ein Geräusch ähnlich fließenden Wassers Gelegentlich sind Geräusche zu hören die durch den Einspritzvorgang in das Küh...

Страница 43: ...der wie im Abschnitt oben oder 2 lassen Sie das Gerät in Betrieb und a entfernen Sie alle verderblichen Lebensmittel aus dem Kühlbereich b reinigen Sie den Kühlbereich c lagern Sie alle dafür geeigneten Lebensmittel im Gefrierbereich WENN SIE DAS GERÄT BEWEGEN WOLLEN 1 Sichern Sie alle herausnehmbaren Teile und den Inhalt des Gerätes Verpacken Sie diese getrennt falls nötig 2 Transportieren Sie da...

Страница 44: ...hlmittel R600a Wechselbarer Türanschlag ja Arbeitsplatte nein Griff integriert Innenbeleuchtung nein Gefrierfach 1 Gefrierschubladen 4 Höhenverstellbare Standfüße ja 2 vorne Abtauverfahren Kühlen manuell Abmessungen Gerät H B T in cm 142 60 54 40 57 10 Gewicht netto brutto in kg 45 00 49 00 Technische Änderungen vorbehalten Gemäß Verordnung EU Nr 2019 2016 Auf einer Skala von A höchste Effizienz b...

Страница 45: ...achen Sie dieses vorher unbedingt funktionsuntüchtig Das bedeutet immer den Netzstecker ziehen und danach das Stromanschlusskabel am Gerät abschneiden und direkt mit dem Netzstecker entfernen und entsorgen Demontieren Sie immer die komplette Tür damit sich keine Kinder einsperren und in Lebensgefahr geraten können 5 Entsorgen Sie Papier und Kartonagen in den dafür vorgesehenen Behältern 6 Entsorge...

Страница 46: ...chswert des Produkts keinen Einfluss haben 3 Schäden infolge Betriebs und Bedienungsfehler 4 Schäden durch aggressive Umgebungseinflüsse Chemikalien Reinigungsmittel 5 Schäden am Produkt die durch nicht fachgerechte Installation oder Transport verursacht wurden 6 Schäden infolge nicht haushaltsüblicher Nutzung 7 Schäden die außerhalb des Gerätes durch ein PKM Produkt entstanden sind soweit eine Ha...

Страница 47: ...n 55 3 1 Unpacking and positioning 55 3 2 Space and ventilation requirements 56 3 2 1 Space requirement 56 3 2 2 Ventilation 57 3 3 Levelling 60 3 4 Change of the hinge position 61 4 Operation 66 4 1 Before initial operation 66 4 2 Description of the appliance 68 4 3 Temperature setting thermostat setting 68 4 4 Power failure 71 4 5 The freezer 71 4 5 1 Freezer drawers 72 4 6 Meaning of the labell...

Страница 48: ... by the manufacturer Please dispose of the packaging with respect to your current local and municipal regulations The appliance you have purchased may be an enhanced version of the unit this manual was printed for Nevertheless the functions and operating conditions are identical This manual is therefore still valid Technical modifications as well as misprints shall remain reserved EU DECLARATION O...

Страница 49: ...e appliance is intended for private use only as well as to be used 1 in staff kitchen areas of shops offices and other working environments 2 by clients in hotels motels B B and other residential type environments 3 for catering and similar non retail applications The appliance is intended for cooling food only The appliance is intended for indoor use only The appliance is not intended to be opera...

Страница 50: ... 4 Do not modify the plug provided with the appliance if it will not fit the outlet have a proper outlet installed by a qualified electrician not covered by the guarantee 5 Never try to repair the appliance yourself If the appliance does not operate properly please contact the aftersales service or the shop you purchased the appliance at 15 Original spare parts should be used only 6 Always check t...

Страница 51: ...nce 5 Do not install the appliance near of volatile or combustible materials e g gas fuel alcohol paints and in rooms which may have poor air circulation e g garage 6 EXPLOSION HAZARD Do not store any explosive materials or sprays which contain flammable propellants in your appliance Explosive mixtures can explode there 7 While unpacking the packaging materials polythene bags polystyrene pieces et...

Страница 52: ...r plug must always be accessible after installation 24 Do not use any electric appliances inside the food storage compartments of your appliance unless they are recommended by the manufacturer of your appliance 25 Do not put any heat radiating appliances onto your appliance 26 Do not install the appliance in a place where it may come in contact with water rain otherwise the insulation of the elect...

Страница 53: ...ion can damage the appliance and floor seriously 4 Do not tilt the appliance more than 45 5 If the appliance is transported in a horizontal position some oil may flow from the compressor into the refrigerant circuit 6 Leave the appliance in an upright position for 4 6 hours before you switch it on to ensure that the oil has flowed back into the compressor 7 If you use the appliance for the first t...

Страница 54: ...he appliance is not suitable for the freezing of food or the storing of frozen food 19 Clean the appliance at least once a month s chapter CLEANING AND MAINTENANCE 20 The rating plate must not be removed or made illegible otherwise all terms of the warranty become invalid SAVE THESE INSTRUCTIONS The manufacturer and distributor are not responsible for any damage or injury in the event of failure t...

Страница 55: ...ith a damp cloth using lukewarm water and a mild detergent see also chapter CLEANING AND MAINTENANCE Never remove any components of the back of the appliance 5 Install the appliance in a suitable position with an adequate distance from sources of heat and cold 6 If installation near a heat source is unavoidable use a suitable insulation plate or keep the following minimum distances to the heat sou...

Страница 56: ...entilation requirements Observe the required minimum distances for proper ventilation 3 2 1 Space requirement SPACE REQUIREMENT OF THE APPLIANCE WHEN THE DOOR IS CLOSED A HEIGHT B WIDTH C DEPTH A B C 1426 mm 544 mm 571 mm ...

Страница 57: ... s relevant to the door opening angle of your appliance s fig below B 1 WIDTH C 1 DEPTH B 1 C 1 DOOR OPENING ANGLE min 948 mm min 1115 mm min 135 3 2 2 Ventilation Observe the required minimum distances for proper ventilation MINIMUM DISTANCES REQUIRED FOR PROPER VENTILATION Back wall min 20 mm Sides wall min 20 mm Free space above min 100 mm ...

Страница 58: ... 58 SPACE REQUIREMENT OF THE APPLIANCE WHEN THE DOOR IS CLOSED INCL MINIMUM DISTANCES FOR PROPER VENTILATION A HEIGHT B WIDTH C DEPTH A B C D min 1526 mm min 594 mm min 621 mm Wall ...

Страница 59: ...in 1165 mm min 135 Please observe the additional front and lateral space requirement of the open door s relevant to the door opening angle of your appliance The following minimum distances are recommended by the manufacturer to ensure optimum efficiency of the appliance back wall min 50 mm right left any piece of furniture wall min 50 mm free space above min 100 mm ...

Страница 60: ...lar fig serves as an example only A TURN THE SUPPORTING FEET CLOCKWISE The appliance is lowered B TURN THE SUPPORTING FEET ANTICLOCKWISE The appliance is lifted The appliance must stand in a stable and level position to ensure proper operation The supporting feet must stand firmly on the ground so that the appliance does not wobble Adjust the supporting feet accordingly The firm contact of the sup...

Страница 61: ...close properly NOTICE Do not tilt the appliance more than 45 PREPARATORY MEASURES Empty the appliance If possible remove all door trays glass shelves and drawers18 from the appliance so that they cannot be damaged It is necessary to tilt the appliance backwards while removing the door Lean the appliance against a solid and immovable surface so it will not slip while changing the hinge positions Do...

Страница 62: ... door trays drawers etc 19 of the appliance if possible 3 Close the door of the appliance 4 To gain access to the top door hinge 3 you must remove the top cover of the appliance 2 s fig below Set the cover aside carefully 1 HINGE COVER 5 Unscrew the top door hinge 3 carefully and remove it s fig below Meanwhile hold the door with your hand so it cannot drop down 19 Depending on model ...

Страница 63: ...E 6 Remove the left screw cover 4 SCREW COVER 7 Move the core cover from left side to right side 8 Lift the door and remove it carefully s fig below Place the door on a smooth surface with the external cladding facing up ...

Страница 64: ...inge 4 and the adjustable feet 5 s fig below 11 If the screw X is present s fig below remove it 4 BOTTOM DOOR HINGE 5 ADJUSTABLE FEET X IF THIS SCREW IS PRESENT REMOVE IT 12 Unscrew anti clockwise the hinge pin 6 of the bottom door hinge 4 and remove it s fig below 13 Turn the bottom door hinge through 180 s fig below 14 Reinstall clockwise the hinge pin 6 on the bottom door hinge 4 a s fig below ...

Страница 65: ...les on the bottom left side of the appliance properly and screw it tight s fig below 16 Reinstall the adjustable feet 5 properly s fig below 4 a BOTTOM DOOR HINGE turned through 180 5 ADJUSTABLE FEET 17 Place the appliance in an upright position again carefully Ensure that the appliance stands in a stable and level position ...

Страница 66: ... the top door hinge into the top hinge hole of the door Screw the hinge tightly s fig below 21 Meanwhile hold the door of the appliance with your hand so it cannot drop down 22 Ensure that the door of the appliance is installed safely and properly by the hinges NOTICE Adjust the door properly before you finally tighten the screws of the hinge The seal must close properly 4 Operation WARNING To dis...

Страница 67: ...re can be adjusted manually by turning the thermostat to the desired setting s chapter 4 3 TEMPERATURE SETTING THERMOSTAT SETTING 6 The noise generated by the compressor and the gases liquids of the appliance is normal 7 If operation was interrupted wait 5 minutes before restart 8 The appliance needs some time to balance temperatures when you have changed the settings before or when you have store...

Страница 68: ...BLE FEET 2 in front 4 3 Temperature setting thermostat setting WARNING To disconnect the appliance from the mains you must unplug the appliance or use a cut off device NOTICE If you want to switch off the appliance for a longer period of time disconnect it from the mains unplug S also chapter DECOMMISSIONING TEMPORARILY ...

Страница 69: ...adjusted manually by using the relevant thermostat The thermostat is on the illumination unit inside the appliance s fig below see also fig in chapter 4 2 DESCRIPTION OF THE APPLIANCE Figure similar modifications are possible THREE DIFFERENT THERMOSTAT SETTINGS ARE AVAILABLE Thermostat setting MIN lower slight cooling Thermostat settings Normal medium average cooling Thermostat settings MAX highes...

Страница 70: ...ded thermostat settings MAX the energy consumption may be increased If the colder setting should cause strong formation of encrusted ice please select a lower setting thermostat settings MIN Extremely high ambient temperatures and simultaneously operating at the coldest setting may make the compressor operate permanently to keep the temperature constant inside the appliance Please observe the clim...

Страница 71: ...ax 4 4 Power failure In the event of a power failure reduce the opening frequency of the doors do not put any new food in the appliance to avoid a rapid rise of the temperature inside the appliance 4 5 The freezer WARNING Do not eat food which is still frozen Children should not eat ice cream straight from the freezer The coldness can cause injuries in the mouth ...

Страница 72: ...uitable plastic containers with a lid Leave some free space between the single pieces of frozen food as proper air circulation is required The food is frozen completely after 24 hours you find the relevant information about the maximum freezing capacity within 24 hours in chapter TECHNICAL DATA Only buy frozen food when its packaging is not damaged Damaged packaging may indicate an interruption of...

Страница 73: ...PARTMENTS STARS TARGET STORAGE TEMPERATURE SUITABLE FOOD Freezer 18 0 C Suitable for seafood fish shrimps shellfish freshwater and meat products Recommended storage period 3 months Suitable for freezing fresh food Freezer 18 0 C Suitable for seafood fish shrimps shellfish freshwater and meat products Recommended storage period 3 months Not suitable for freezing fresh food Freezer 12 0 C Suitable f...

Страница 74: ...our skin may stick on these surfaces 4 7 Storage of food Your appliance has the accessories as the Description of the appliance showed in general with this part instruction you can have the right way to storage your food Food is not allowed to touch directly all surfaces inside the appliance It has to be wrapped separately in aluminium sheet or in cellophane sheet or in airtight plastic boxes Stor...

Страница 75: ...meat from contaminating the cooked product Poultry Fresh whole birds should be rinsed inside and out with cold running water dried and placed on a plate Cover loosely with plastic wrap or foil Poultry pieces should also be stored this way Whole poultry should never be stuffed until just before cooking otherwise food poisoning may result Fish and seafood Whole fish and fillets should be used on the...

Страница 76: ...e freezer compartment door unnecessarily Freezing fresh food Freeze fresh and undamaged food only To retain the best possible nutritional value flavour and colour vegetables should be blanched before freezing Aubergines peppers zucchini and asparagus do not require blanching Note Keep food to be frozen away from food which is already frozen The following foods are suitable for freezing Cakes and p...

Страница 77: ...utter vegetables blanched eggs whole and yolks cooked crayfish minced meat raw pork raw 6 months Fruit dry or in syrup egg whites beef raw whole chicken lamb raw fruit cakes 12 months Never forget When you freeze fresh foods with a use by best before best by date you must freeze them before this date expires Check that the food was not already frozen Indeed frozen food that has thawed completely m...

Страница 78: ... a loss of water and a mingling of odours Let warm or hot food cool down to room temperature before you put it into your appliance Otherwise the energy consumption will increase and encrusted ice will be generated If you buy frozen food the packaging must not be damaged and the product must be stored properly sales container 18 C or lower Put the frozen food you want to defrost into the cooling co...

Страница 79: ...CK WARNING Disconnect the appliance from the mains before you clean or maintain it RISK OF ELECTRIC SHOCK WARNING To disconnect the appliance from the mains you must unplug the appliance or use a cut off device WARNING Remove possible dust accumulation at the power plug at the safety power socket and at all plug connectors regularly RISK OF FIRE NOTICE Clean the appliance at least once a month 1 A...

Страница 80: ...d surfaces with a cloth 4 Check the water drain and clean it if needed DOOR SEALS Clean with warm water and a mild non acidic detergent Do not restart the appliance until the door seals have dried completely DRAIN HOLE Clean the drain hole at the back of the cooling compartment periodically otherwise defrost water can get into the cooling compartment Use a suitable device such as a pipe cleaner 6 ...

Страница 81: ...fridge to hold the water back 4 Do not use hot water to accelerate the defrosting operation 5 Remove the big pieces of ice first 6 Afterwards remove the small pieces of ice 7 Wipe and dry the appliance and door seals with dry and soft cloths 8 After cleaning leave the door open for some time to ventilate the appliance NOTICE If the appliance has been disconnected from the mains for a longer period...

Страница 82: ...OR DOES NOT WORK AT ALL 1 Incorrect energy supply 1 Check the energy supply THE COMPRESSOR OPERATES FOR TOO LONG 1 The appliance has been switched off for a while 1 The appliance needs some time to reach the preset temperature 2 Too much or too hot food in the appliance 2 Remove any hot food 3 Doors opened too often or too long 3 Do not open the door too often too long FORMATION OF ENCRUSTED ICE 1...

Страница 83: ... the compressor depot may not be properly positioned to direct water into this pan or the waterspout is blocked 1 You may need to pull the appliance away from the wall to check the pan and spout THE INTERNAL LIGHT IS NOT WORKING 1 The internal light may be damaged 1 See chapter CLEANING AND MAINTENANCE et seq 2 The control system has disabled the internal light due to the door being kept open too ...

Страница 84: ...de the appliance by high humidity or very warm ambient temperatures CLICKING You will hear the compressor click if it is activated or deactivated HUM is caused by the compressor while running KNOCKING SNAPPING may be generated by sequential expansion and shrinkage of the components of the cooling system It is caused by variation of temperature before and after the compressor is activated or deacti...

Страница 85: ...cessary 2 transport the appliance in an upright position only All other positions can cause damage to the compressor 3 do not damage the feet of the appliance DECOMMISSIONING ULTIMATE 1 Disconnect the appliance from the mains To disconnect the appliance from the mains you must unplug the appliance or use a cut off device 2 Cut off the power cord at the appliance 3 Completely remove every door of t...

Страница 86: ...grated Internal light no Freezer Drawer 4 Freezer Trays 1 Adjustable supporting feet yes 2 in front Defrosting process fridge automatic Dimensions of the appliance H W D in cm 142 60 54 40 57 10 Weight net gross in kg 45 00 49 00 Technical modifications reserved According to regulation EU No 2019 2016 On a scale from A highest efficiency to G lowest efficiency according to the new EU standard Base...

Страница 87: ... Unplug the appliance and cut off the entire power cord Dispose of the power cord and the plug immediately Remove the door completely so children are not able to get into the appliance as this endangers their lives 5 Dispose of any paper and cardboard into the corresponding containers 6 Dispose of any plastics into the corresponding containers 7 If suitable containers are not available at your res...

Страница 88: ...o not influence the utility value of the product 3 damage caused by handling errors or false operation 4 damage caused by aggressive environmental conditions chemicals detergents 5 damage caused by non professional installation and haulage 6 damage caused by non common household use 7 damages which have been caused outside the appliance by a PKM product unless a liability is forced by legal regula...

Страница 89: ...OR DOMESTIC USE Sie finden alle Informationen zum Kundendienst auf der Einlage in dieser Bedienungsanleitung Aftersales service information on the leaflet inside this instruction manual Änderungen vorbehalten Subject to alterations STAND UPDATED 15 04 2021 04 15 2021 ...

Отзывы: