Pixel Magic Plasma Enchancer PE1000 Скачать руководство пользователя страница 11


Spouse Friendly  Remote Control 


The Spouse Friendly™ remote control provides a simple and user-friendly 

interface for you and your family members to control and navigate the common 

functions of your home theatre device(s). From now on, members of your family 

can operate a 

Plasma Enhancer

 as easily as operating a TV. 

®


The Spouse Friendly

remote also allows direct source selection without first 

calling up the OSD menu. See section 4, Input Select setup for the initial 

configuration for this function.   


Spouse Friendly

®

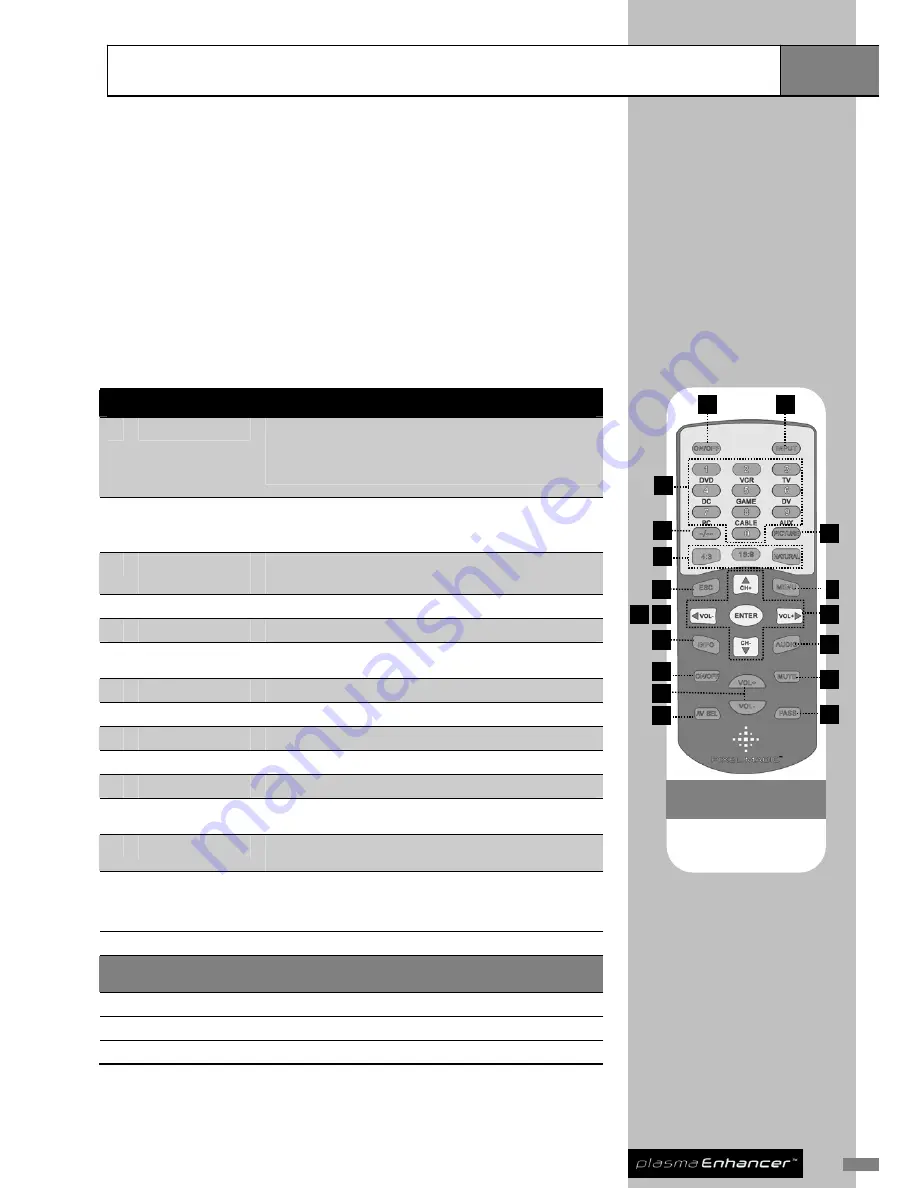
 Remote Control Features 

ON/OFF button 

Press ON to switch on your 

Plasma Enhancer

®

 & press OFF to 

switch it to standby mode.   

Note: There will be a few seconds delay if switching immediately 
between ON and OFF. 

2 INPUT 

button 

Select from different video input sources. 

E.g. Press <INPUT> followed by <1> for DVD input. The DVD 
stands for user defined input source on spouse remote function. 

0 – 9 buttons /   

Input Select buttons 

Select and switch to a TV channel using 0-9 buttons 


4 -/-- 

button 

Switch between 1-digit & 2-digit TV channel number 

PICTURE button 

Directly call up Picture adjustment menu 

6 Aspect 

Ratio 

buttons 

Directly switch to 4:3, 16:9, Natural NLS aspect ratio 

CH+ / CH- buttons 

Scan up and down through channels 

VOL+ / VOL- buttons 

Adjust audio volume (same as item 17) 

MENU button 

Call up and exit OSD setup menu 

10 ENTER 

button 

Select item or confirm setting 

11 

ESC button 

Exit and go back up one menu level 

12 INFO 

button 

Display current INFOrmation & status of 

Plasma Enhancer 

on 

4-digit LED   

13 

AUDIO button 

Select multi-channel TV sound (NICAM) options: stereo, dual, & 
mono


14 PASS 

Note: Not applicable 
to this model


Applicable to HDMI1, HDMI2, and VGA 

Passthrough ON: no processing on input video 

Passthrough OFF: processing applied to input video 

15 MUTE 

Mute and restore 

Plasma Enhancer®

 audio output 

TV Commander 

(only applicable


when you have programmed the buttons to the Plasma 

Enhancer and a remote module is connected to the back of the device)


16 ON/OFF 

button


Switch ON & OFF your display device 

17 

VOL+ / VOL- buttons 

Adjust display device audio volume 

18 AV 

SEL 

button 

Switch between the available video inputs of your display device. 

Remote Controls 

Overview 

11 

13 

12 

10 

16 

14 

17 

18 

15 

Note

: Insert batteries to the 

remote control before use 


Содержание Plasma Enchancer PE1000

Страница 1: ...PRODUCT MANUAL Video Processor Scaler PE1000...

Страница 2: ......

Страница 3: ...re Installation 10 Compatible Equipment 10 Power Connection 11 Display Device Connection 11 AV Device Connection 12 Antenna Connection 12 Alternative AV Receiver Processor Connection 13 Audio Out Conn...

Страница 4: ...g 21 AV1 Config 21 Analog Output 21 Audio Channel 21 Information 21 TV Commander 22 Show Advanced Option 22 Factory Setting 22 5 Important Information 23 26 Troubleshooting 23 Technical Specifications...

Страница 5: ...and 6 Audio and Video Cable 7 Plasma Enhancer PE1000 Product Manual Please contact your Plasma Enhancer retailer immediately if any of the above items are missing This product manual will help to fami...

Страница 6: ...ansmission processing scaling and format conversion technologies to deliver unprecedented high quality video in home theaters Major technologies including Genesis Microchip s Emmy award winning DCDi a...

Страница 7: ...2 Hardware Installation 3 TV Setup Connect a TV cable or antenna to your Plasma Enhancer with reference to section 2 Hardware Installation and section 3 Basic System Setup 4 Plasma Enhancer Configurat...

Страница 8: ...D Green running mode Red standby mode 2 IR indicator LED Red Receiving signal from remote control 3 Film indicator LED Blue Film mode enabled 4 4 Digit LED display Display current status of the system...

Страница 9: ...eo Composite with stereo audio 4 AV2 video audio input S Video with stereo audio VIDEO AUDIO OUTPUTS 5 DVI Out DVI D digital video out 6 Analog Out Analog video out via DB15 connector The DB15 analog...

Страница 10: ...el number 7 CH CH buttons Scan up and down through channels 8 VOL VOL buttons Adjust audio volume sound system from audio out 9 AUDIO button Select multi channel TV sound NICAM options stereo dual mai...

Страница 11: ...mber 5 PICTURE button Directly call up Picture adjustment menu 6 Aspect Ratio buttons Directly switch to 4 3 16 9 Natural NLS aspect ratio 7 CH CH buttons Scan up and down through channels 8 VOL VOL b...

Страница 12: ...ts the improved signals to your display device s Plasma Enhancer PE1000 is compatible with Display Devices Analog or digital display device s capable of accepting input in the form of z Digital video...

Страница 13: ...n your display device that corresponds with the Plasma Enhancer connection Ensure the On Screen Display OSD menu of your Plasma Enhancer is displayed properly For best result select the digital connec...

Страница 14: ...r AV device s and display device s Set up your Plasma Enhancer according to the next section Basic System Setup Deciding which video input to use for your AV device s Best quality first 1 AV1 Componen...

Страница 15: ...provide a component video input connect your DVD player directly to the Plasma Enhancer 2 Allocation Connection Ensure all devices are powered OFF if source components are connected via a mixture of...

Страница 16: ...o Out Connection 1 Ensure all devices are powered OFF connect your Plasma Enhancer with a stereo audio cable to your sound system 2 Switch ON both your Plasma Enhancer and sound system and set up your...

Страница 17: ...ource 1 Press MENU button of your remote control to call up OSD menu 2 From the SETUP page use and buttons to highlight IMAGE SETUP press ENTER button to continue 3 Choose INPUT SELECT press ENTER but...

Страница 18: ...to establish the correct resolution and aspect ratio settings Setting Resolution RESO Resolution refers to the number of columns and rows of pixels your display device has for example 1280 x 720 1 Pr...

Страница 19: ...RCH ALL BAND SELECTION ENTER CONFIRM ESC CANCEL 3 Choose TUNER SETUP press ENTER button to continue 4 Set the TV channels following the instructions shown on screen Tuner Gain Turner gain can be emplo...

Страница 20: ...y check with your sound systems user manual or consult your AV retailer for this information System Setup SYS System Setup is used for detailed configuration of your Plasma Enhancer You can configure...

Страница 21: ...and Gain are advanced settings and should be used with care They allow you to individually adjust the gain relative warmth of the color and the offset the amount of black in the color of the primary...

Страница 22: ...tails enhancement V Luma Edge Thd sets threshold point for introduction of Vertical Detail enhancement Note Whilst the SUPER level is very effective at reducing video noise you may also notice some fi...

Страница 23: ...Audio Mapping AUDI This function is used to map appropriate audio out terminal to different video sources AV1 Config AVCO The AV1 Config is used to configure AV1 video terminal as YPbPr Component Vid...

Страница 24: ...your Plasma Enhancer remote controls Note a wired Infrared transmitter is required to be installed at the back of your Plasma Enhancer to perform this function Show Advanced Option ADOP Show Advanced...

Страница 25: ...ur display device z Press MENU button from the remote control and check whether the OSD can be correctly shown on your display device z Check whether correct resolution is set for your display device...

Страница 26: ...io Resolutions supported z 480p 540p 576p 720p 1080i 1080p 640x480 800x600 848x480 852x480 856x480 1024x576 1024x768 1024x1024 ALiS 1280x720 1280x768 1280x1024 1360x1024 1366x768 1368x768 1400x788 140...

Страница 27: ...n a well ventilated area to prevent fire and damage z Be sure to allow a space of at least 30 cm behind 20 cm on the both sides and 10 cm above the top panel of the unit to prevent fire and damage z T...

Страница 28: ...e beyond the terms of this one year warranty The one year warranty offered by Pixel Magic Systems Ltd herein may not be modified by any oral representations made by any employee agent or representativ...

Страница 29: ...27 Notes...

Страница 30: ...s com Website http www pixelmagicsystems com DCDi by Faroudja and TrueLife are registered trademarks of Genesis Microchip Off Air Noise Terminator Spouse Friendly and TV Commander are registered trade...

Отзывы: