Pix-link LV-WR07 Скачать руководство пользователя страница 4

4

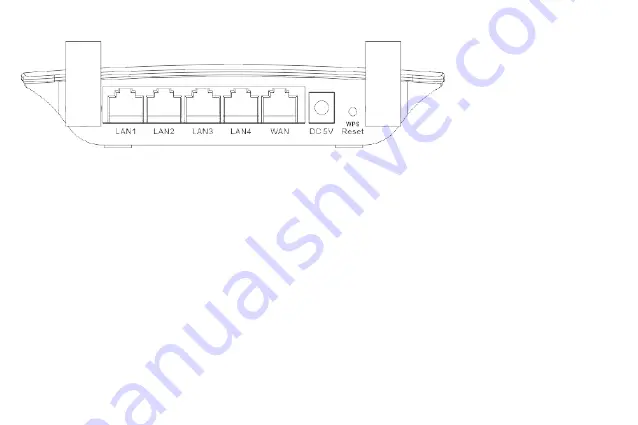
1.4.2 The Rear Panel

The following parts are located on the rear panel (View from left to right).

POWER:

The Power socket is where you will connect the power adapter. Please use the power adapter provided with

this Wireless N Router.

WAN:

This WAN port is where you will connect the DSL/cable Modem, or Ethernet.

LAN:

These ports connect the Router to the local PC(s).

RESET:

This button is used for both WPS and Reset function. To use the WPS function, press it for less than five

seconds; to use the RESET function, press it for more than five seconds.

Used as RESET button:

There are two ways to reset to the Router's factory defaults:

Use the Factory Defaults function on System Tools -> Factory Defaults page in the Router's Web-based Utility.

2) Use the WPS/RESET button: With the router powered on, press and hold the WPS/Reset button for approximately 8

seconds. And then release the button and wait the router to reboot to its factory default settings.

Used as WPS button:

If you have client devices, such as wireless adapters, that support Wi-Fi Protected Setup, then you can press this button

to quickly establish a connection between the Router and client devices and automatically configure wireless security for

your wireless network.

Wireless antenna:

To receive and transmit the wireless data.

Содержание LV-WR07

Страница 1: ...1...

Страница 2: ...RJ45 WAN port four 10 100M Auto Negotiation RJ45 LAN ports supporting Auto MDI MDIX Provides WPA WPA2 WPA PSK WPA2 PSK encryption security Shares data and Internet access for users supporting Dynamic...

Страница 3: ...reless function is disabled On The router is booting or upgrading Flash The router has finished booting or the Wireless function is enabled LAN Off There is no device linked to the corresponding port...

Страница 4: ...Used as RESET button There are two ways to reset to the Router s factory defaults Use the Factory Defaults function on System Tools Factory Defaults page in the Router s Web based Utility 2 Use the W...

Страница 5: ...r or heating vent Avoid direct irradiation of any strong light such as sunlight Keep at least 2 inches 5 cm of clear space around the router Operating Temperature 0 40 32 104 Operating Humidity 10 90...

Страница 6: ...6 5 Verify that the hardware connection is correct by checking these LEDs...

Страница 7: ...abel at the bottom of the router 3 2 TCP IP Configuration The default domain name of the Wireless N Router is http 192 168 1 1 the default IP address is 192 168 1 1 and the default Subnet Mask is 255...

Страница 8: ...Windows Macintosh or UNIX OS with a Web browser such as Microsoft Internet Explorer Mozilla Firefox or Apple Safari 1 To access the configuration utility open a web browser and type in the default add...

Страница 9: ...L2TP and PPTP to connect to the Internet But here only provides three Modes Dynamic IP Static IP PPPoE If your ISP provides connection type is L2TP or PPTP Please go to Advance Internet Wan Settings p...

Страница 10: ...255 0 Gateway Enter the gateway IP address into the box if required Primary DNS Enter the DNS Server IP address into the box if required Secondary DNS option If your ISP provides another DNS server en...

Страница 11: ...key Wireless Password When WPA WPA2PSK is set as the Security Type You can enter ASCII characters between 8 and 63 characters or 8 to 64 Hexadecimal characters Click the Apply button to save your set...

Страница 12: ...Considering your wireless network security the default SSID is set to be Wireless N Broadcast SSID When wireless clients survey the local area for wireless networks to associate with they will detect...

Страница 13: ...firmware Choose menu System Upgrade firmware you can update the latest version of firmware for the router on the following screen To upgrade the router s firmware follow these instructions below 1 Ty...

Страница 14: ...tings you can save the current configuration of the router as a backup file and restore the configuration via a backup file as shown below Click the Save button to save all configuration settings as a...

Страница 15: ...TCP IP correctly in Windows 7 First make sure your Ethernet Adapter is working refer to the adapter s manual if needed Install TCP IP component 1 On the Windows taskbar click the Start button and then...

Страница 16: ...Setting IP address manually 1 Select Use the following IP address radio button And the following items available 2 If the router s LAN IP address is 192 168 0 1 specify the IP address as 192 168 0 x...

Отзывы: