6
Clearly Solar Car User Guide 60024 V0413
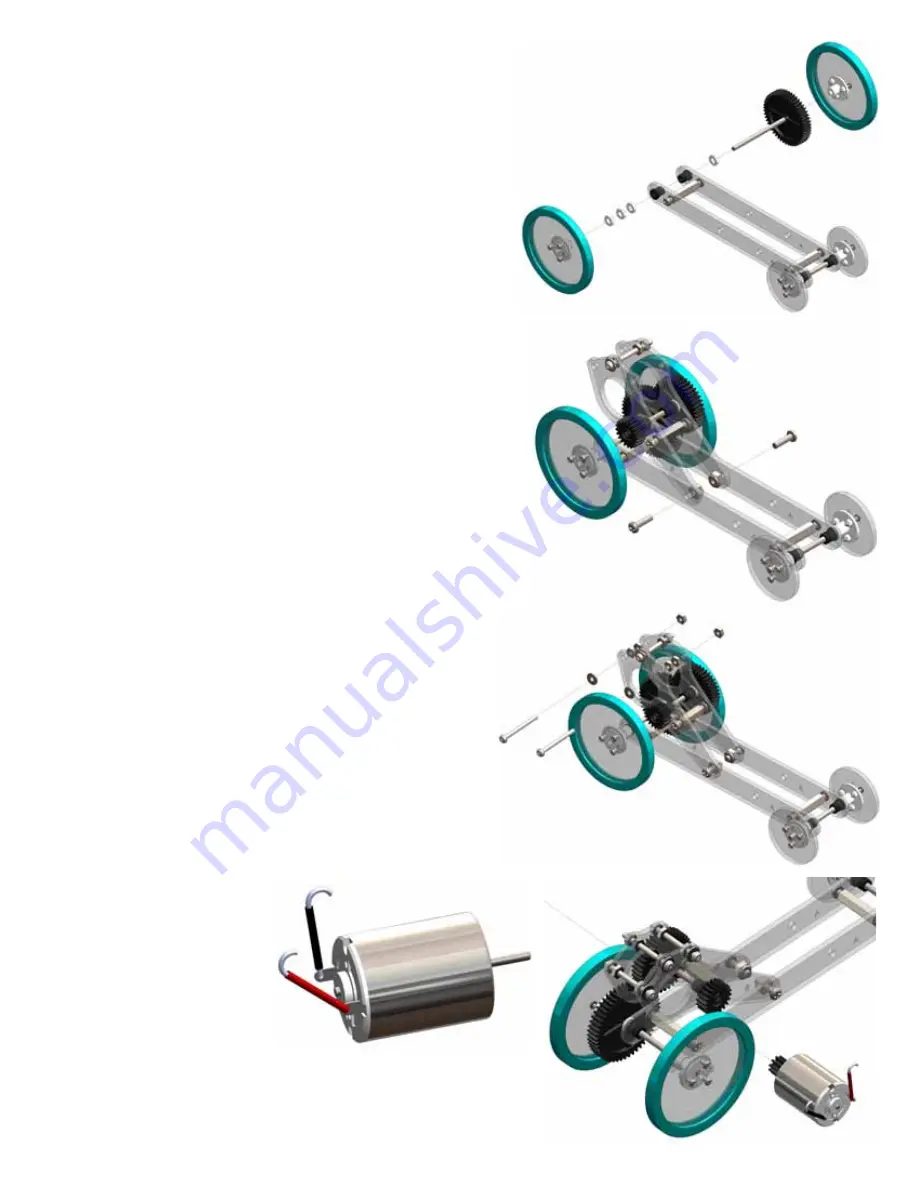
8. Carefully push one of the back wheels on the short end of
the axle.
9. Add a spacer and insert the axle through the bushings on
the back of the chassis so the gear is on the right side.
10. Add three spacers to the end of the axle and then push on
the other back wheel.
Putting It All Together
1. Gather the motor mount (with Parts B), chassis, two #6 x 1/2"
screws, and two locknuts. With the 40-tooth gear on the left,
set the narrow end of the motor mount between the chassis
near the hole close to the back wheels.
2. Insert a screw on each side and place a locknut on each
screw. Using pliers, hold the locknut and tighten the screw
just to hold on the part – the assembly should be able to
move.
3. Find the motor, two #4 x 1-1/4" screws, two washers, and
six nuts. Place a washer over one of the screws. On top of
the motor mount, insert the screw just through one side
of a remaining hole and place a nut on the screw end
and turn it a few times. Add a second nut and turn it a
few times. Push the screw through the other side of the
assembly and place the third nut on the end, but do not
tighten it yet.
4. Repeat Step 3 for the remaining hole at the top of the
motor mount.
5. Twist the motor’s wire ends.
6. Wrap a piece of tape around the motor. Note: If you are
not going to take apart and reuse the car, you can use
cool-melt glue after the motor is in the mount. The glue
or tape hold the motor in place.
7. Insert the motor in the
motor mount so the
pinion gear is on the
same side as the 40-tooth
gear.
Step 5
Step 7
Steps 8-10
Spacers
Spacer
Steps 1-2
#6 x 1/2"
screw
#6 x 1/2"
screw
Steps 3-4
Nuts
#4 x 1-1/4"
screws
Washers
Содержание Clearly Solar Car
Страница 1: ...Clearly SolarCar UserGuide 60024 V0413...


