DA80F/DA95F AddressRight™ Printers Service Manual (SV61962 Rev. A)
5-37
Removal and Replacement • 5
DA80F (WF81) Parts Removal
5.20 Power
Supply
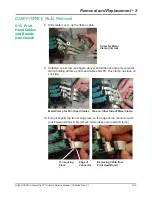
4. Unfasten power supply harnesses from tie wraps/twist ties. Gently re-
move power supply and hold with hand (do not let hang).
1. Turn off power and unplug printer.
2. Remove the front bottom cover (see section 5.8) to prevent the chance of
damaging the cover when laying the printer on its side.
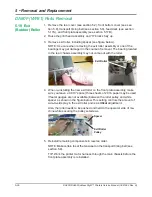
3. Turn the printer onto its side. Unfasten the six screws securing the power
supply mounting panel.
Screws for Power Supply
Mounting Panel (Circled)
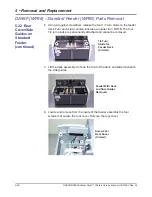
5. Remove power supply cover fastened with four screws. NOTE: The fan
comes off with the cover.
7. Unfasten four screws holding power supply to mounting panel and re-
move supply.
8. Reinstall in reverse order.
Power Supply
Power Supply Cover
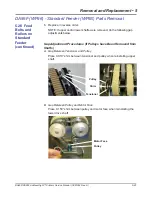
Cover Removed,
Harness Connectors
Circled
6. Unplug two harnesses (see below) to separate power supply from chassis.
Содержание DA80F
Страница 1: ...Service Manual DA80F and DA95F AddressRight Fixed Head Printers DA80F WF81 DA95F WF96 ...
Страница 26: ...3 6 DA80F DA95F AddressRight Printers Service Manual SV61962 Rev A 3 Theory ...
Страница 50: ...4 24 DA80F DA95F AddressRight Printers Service Manual SV61962 Rev A 4 Troubleshooting Diagnostics ...
Страница 134: ...6 8 DA80F DA95F AddressRight Printers Service Manual SV61962 Rev A 6 Adjustments ...
Страница 178: ...B 8 DA80F DA95F AddressRight Printers Service Manual SV61962 Rev A Appendix B Printer Communications ...
Страница 181: ...DA80F DA95F AddressRight Printers Service Manual SV61962 Rev A C 3 Schematics Appendix C Block Diagram for DA80F WF81 ...
Страница 182: ...C 4 DA80F DA95F AddressRight Printers Service Manual SV61962 Rev A Appendix C Schematics Block Diagram for DA95F WF96 ...
Страница 192: ...E 4 DA80F DA95F AddressRight Printers Service Manual SV61962 Rev A Appendix E Printing Standards ...

