5-12
DA80F/DA95F AddressRight™ Printers Service Manual (SV61962 Rev. A)
5 • Removal and Replacement
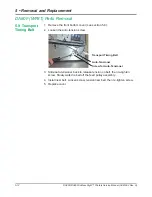
3. Slide auto-tensioner back to release tension on belt, then re-tighten
screw. Slowly walk the belt off the feed pulley assembly.
4. Install new belt. Loosen screw, tension new belt, then re-tighten screw.
5. Replace cover.
Screw for Auto-Tensioner
Transport Timing Belt
Auto-Tensioner
DA80F (WF81) Parts Removal
5.9 Transport
Timing Belt
1. Remove the front bottom cover (see section 5.8).
2. Loosen the auto-tension screw.
Содержание DA80F
Страница 1: ...Service Manual DA80F and DA95F AddressRight Fixed Head Printers DA80F WF81 DA95F WF96 ...
Страница 26: ...3 6 DA80F DA95F AddressRight Printers Service Manual SV61962 Rev A 3 Theory ...
Страница 50: ...4 24 DA80F DA95F AddressRight Printers Service Manual SV61962 Rev A 4 Troubleshooting Diagnostics ...
Страница 134: ...6 8 DA80F DA95F AddressRight Printers Service Manual SV61962 Rev A 6 Adjustments ...
Страница 178: ...B 8 DA80F DA95F AddressRight Printers Service Manual SV61962 Rev A Appendix B Printer Communications ...
Страница 181: ...DA80F DA95F AddressRight Printers Service Manual SV61962 Rev A C 3 Schematics Appendix C Block Diagram for DA80F WF81 ...
Страница 182: ...C 4 DA80F DA95F AddressRight Printers Service Manual SV61962 Rev A Appendix C Schematics Block Diagram for DA95F WF96 ...
Страница 192: ...E 4 DA80F DA95F AddressRight Printers Service Manual SV61962 Rev A Appendix E Printing Standards ...


