


OPERATIONS
Sept-2018
56
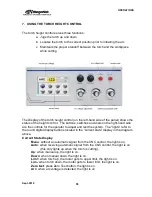
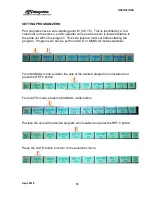
Prior to cutting, the operator must set the initial pierce height, pierce delay and the
arc voltage which establishes the cutting height:
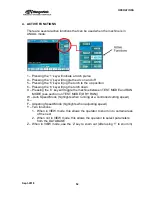
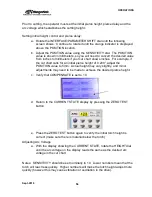
Setting initial height control and pierce delay:
a. Rotate the INTERFACE/PARAMETER SHIFT dial until the following
screen shows. Continue to rotate it until the orange indicator is displayed
above the POSITION location.
b. Adjust the POSITION value using the SENSITIVITY dial. The POSITION
value is shown in millimeters, so you will need to convert the desired value
from inches to millimeters if your cut chart shows inches. For example, if
the cut chart calls for an initial pierce height of
0.200”, adjust the
POSITION value to 5mm. Actual height may vary slightly, and minor
adjustments may need to be made to achieve the desired pierce height.
c. Verify that COMPENSATE is set to 10.
d. Return to the CURRENT STATE display by pressing the ZERO TEST
button.
e. Press the ZERO TEST button again to verify the initial torch height is
correct (make sure there is material below the torch)
Adjusting Arc Voltage
a. With the display showing the CURRENT STATE, rotate the HEIGHT dial
until the arc voltage on the display reads the same as the desired arc
voltage in the cut chart
Notes: SENSITIVITY should be set nominally to 10. Lower numbers mean that the
torch will react less quickly. Higher numbers will make the torch height adjust more
quickly (however this may cause vibration or oscillation in the drive).
Содержание CNC Plasma Cutting Table
Страница 1: ...CNC Plasma Cutting System Operating Manual Revised September 14 2018 www piranhafab com 800 338 5471...
Страница 2: ......
Страница 4: ...TABLE OF CONTENTS Sept 2018 4...
Страница 22: ...SAFETY Sept 2018 22...
Страница 24: ...INSTALLATION Sept 2018 24...
Страница 88: ...PROGRAMMING Sept 2018 88...
Страница 116: ...PIPE CUTTING ATTACHMENT Sept 2018 116 Components Pipe Plate Selector Switch Headstock Headstock Wrench...
Страница 117: ...PIPE CUTTING ATTACHMENT Sept 2018 117 Pipe Supports Pipe Cutter Base...
Страница 124: ...PIPE CUTTING ATTACHMENT Sept 2018 124...
Страница 128: ...PIPE CUTTING ATTACHMENT Sept 2018 128 j Then press F2 SYSTEM to see the following...
Страница 136: ...PIPE CUTTING ATTACHMENT Sept 2018 136...
Страница 140: ...WATER MIST CHILLER Sept 2018 140...
Страница 144: ...APPENDIX A FastCAM SETUP Sept 2018 144 4 Choose the functions you need and Enter...
Страница 154: ...APPENDIX A FastCAM SETUP Sept 2018 154...
Страница 159: ...APPENDIX A FastCAM SETUP Sept 2018 159...
Страница 164: ...APPENDIX A FastCAM SETUP Sept 2018 164...
Страница 167: ...APPENDIX B Parametric Shape Library Sept 2018 167 13 Sector Ri 14 Circular 15 Quadrate 16 U Shape...
Страница 170: ...APPENDIX B Parametric Shape Library Sept 2018 170 9 Fla X 10 Lad 11 Rec 12 Rec8...
Страница 171: ...APPENDIX B Parametric Shape Library Sept 2018 171 13 Tria 14 Rec 15 Rec c 16 Rec H 17 Circle2 18 Circle3...
Страница 172: ...APPENDIX B Parametric Shape Library Sept 2018 172 19 Rec 20 Rec c 21 Circle4 22 Rec...
Страница 173: ...APPENDIX B Parametric Shape Library Sept 2018 173 23 Rec 24 Pol 25 Hole Circle 26 Pol Do not use...
Страница 174: ...APPENDIX B Parametric Shape Library Sept 2018 174...
Страница 176: ...APPENDIX C Manual Revisions Sept 2018 176...


