background image

65

OPERA

TION

Using Other Functions

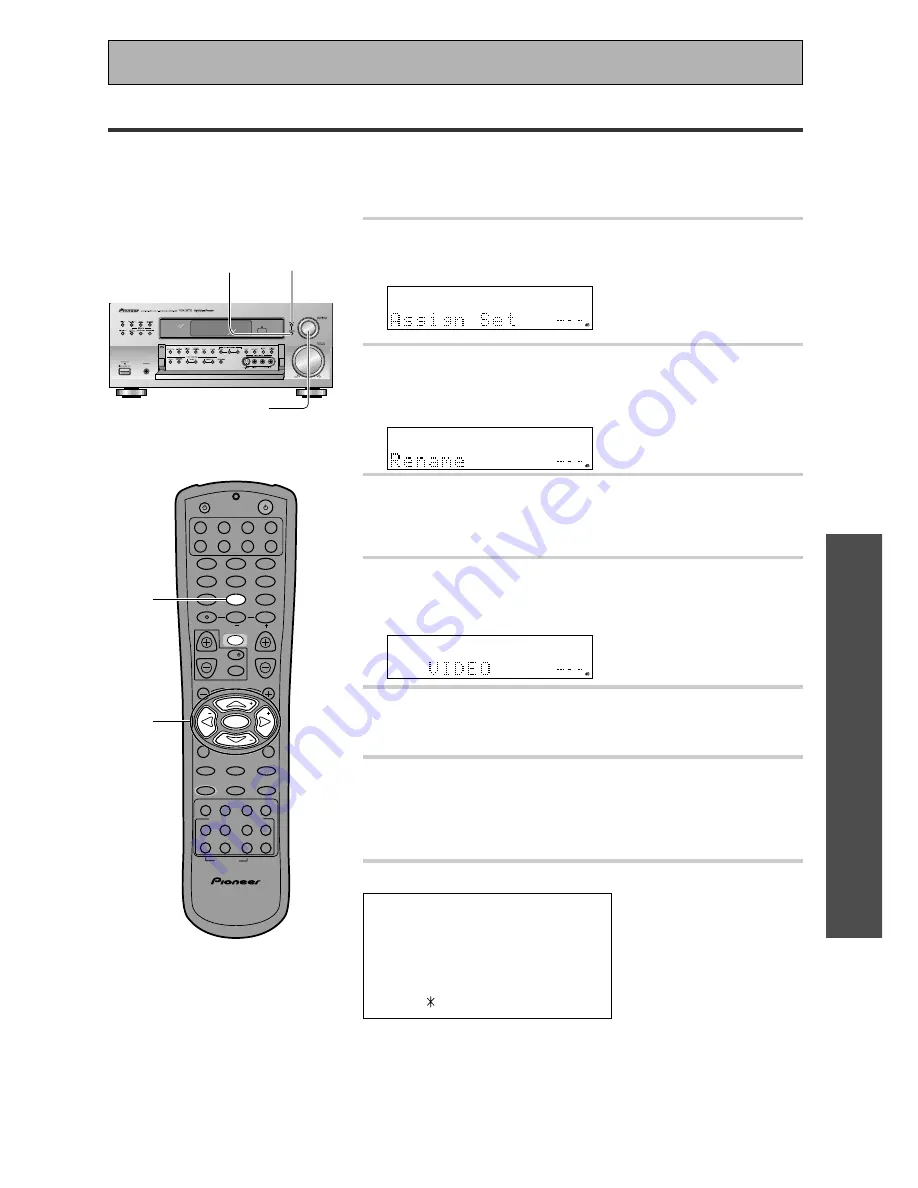
Function Rename

Use the FUNCTION RENAME capability to rename the functions, like DVD/LD, CD, etc., in the display. You
might want to do this in order to personalize the display on the receiver or if your components are different than
the names preset in the receiver (for example if you connect a video camera to the VIDEO jacks on the front of
the receiver). Follow the display on the receiver to carry out this task.

SETUP

MULTI JOG

(Turn to select / Push to enter)

RETURN

Î

SOURCE

ENTER

LOUDNESS

INPUT ATT

DIGITAL NR

FL DIMMER

REMOTE SETUP SYSTEM SETUP SIGNAL SELECT

TV  VOL

TV

TVFUNC

D.ACCESS

BAND

GUIDE

MENU

CLASS

RETURN

MIDNIGHT

DSP

STEREO

FUNCTION

ADVANCED STANDARD

MUTE

S.MODE

CLEAR DTV INFO

AV PRE-PROGRAMMED AND LEARNING

REMOTE CONTROL UNIT

/ DTS

RECEIVER DIRECT CONTROL

MPX

DTV ON / OFF

DTV MENU

CHANNEL

EFFECT/CH SEL

RECEIVER

TV CONTROL

MASTER VOLUME

DISC

+10

VIDEO SELECT

MULTI CONTROL

MULTI CH INPUT

DVD

CD

CD-R

TUN

TVC

RECEIVER

1

2

3

4

5

6

7

8

9

!

0

*

&

2

TV

VCR
   1

VCR
   2

4

¢

ENTER

TUNE

TUNE

ST

ST

2-6

THX

RDM

1

Here are all the possible characters
you can input:

ABCDEFGHIJKLMNOPQRSTUVWXYZ

abcdefghijklmnopqrstuvwxyz

0123456789

!”#%&’()   +,–./:;<=>?_

1 Press the SETUP button (SYSTEM SETUP

button on the remote control).

2 Use the MULTI JOG dial (

5¥∞

 buttons on

the remote control) to select FUNCTION
RENAME.

3 Press the MULTI JOG dial (ENTER on the

remote control).

4 Use the  MULTI JOG dial (

5¥∞

 buttons) to

select the function that you want to
rename.

5 Press the MULTI JOG dial (press ENTER).

6 Use the MULTI JOG dial (

5¥∞

 buttons) to

choose the first character.

The  MULTI JOG dial scrolls through the letters, numbers

and symbols you can input.

Содержание VSX-33TX

Страница 1: ...VSX 33TX Operating Instructions AUDIO VIDEO MULTI CHANNEL RECEIVER ...

Страница 2: ...the receiving antenna Increase the separation between the equipment and receiver Connect the equipment into an outlet on a circuit different from that to which the receiver is connected Consult the dealer or an experienced radio TV technician for help For Canadian model This Class B digital apparatus complies with Canadian ICES 003 Pour le modèle Canadien Cet appareil numérique de la classe B est ...

Страница 3: ...nt where they exit from the product OUTDOOR ANTENNA GROUNDING If an outside antenna or cable system is connected to the product be sure the antenna or cable system is grounded so as to provide some protection against voltage surges and built up static charges Article 810 of the National ElectricalCode ANSI NFPA70 provides information with regard to proper grounding of the mast and supporting struc...

Страница 4: ... need the proper cable For coaxial connections you can use a regular RCA stereo cord or the specially made coaxial cords they have the same type of plugs For optical connections you will need a special optical cord which you can buy at your local stereo store Also hook up the video connection of your DVD player the analog audio for recording the audio on DVDs use regular RCA stereo cords and your ...

Страница 5: ...igital soundtracks you won t hear any dialog Use the instructions on page 31 32 in order to do this Make sure you connect the speaker on the right to the right terminal and the speaker on the left to the left terminal Also make sure the positive and negative terminals on the amplifier match those on the speakers not a PCM only output DVD player OUTPUT DIGITAL STEREO L R ANALOG VIDEO OUT VIDEO VIDE...

Страница 6: ... settings the receiver will revert back to its prevoius state after three minutes 3 Assgin Set should be selected if it isn t use the 5 buttons to select it Press ENTER You should see the following display on your receiver 4 Digital In should be selected if it isn t use the 5 buttons to select it Press ENTER You should see the following display on your receiver 5 Choose the Digital 3 with 5 button...

Страница 7: ...hook up any other conmponents with digital audio or do so following the default settings of the receiver see page 13 you won t have to assign any more digital inputs but many other adjust ments will improve the sound tremendously 2 Experiment with the different sound settings offered with the 2 DTS and DSP buttons For more information see pages 39 42 3 As mentioned above you should go through the ...

Страница 8: ...to allow you to enjoy movie soundtracks with the same level of power and realism you experience in well designed movie theaters This receiver has the ability to decode Dolby Digital Dolby Pro Logic and DTS Digital Theater Systems sources which are the standards of home theater today Advanced Theater Modes DSP Surround Modes Advanced Theater modes enhance the sound of either film or music so a more...

Страница 9: ...put 44 Reducing Noise During Playback 45 Listening in Midnight Mode 46 Listening the Loudness Mode 46 Adjusting Bass and Treble 47 MULTI CHANNEL IN Playback 48 96 kHz 24 bit Performance 48 Direct Playback 49 Adjusting the Brightness of the Display 49 DUAL MONO Setting 50 Using the Tuner 51 Automatic and Manual Tuning 51 Direct Access Tuning 52 Memorizing Frequently Used Stations 53 Recalling Memor...

Страница 10: ...able to take advantage of the receiver s surround sound systems p 13 14 To learn about a specific button control or indicator see Displays Controls starting on p 22 SET UP Performing the tasks in Initial Setup from p 27 is essential to get proper surround sound OPERATION To play some music or soundtrack refer to Basic Playback on p 39 Using the Tuner p 51 explains how to use the radio of this unit...

Страница 11: ... 9 0 2 TV VCR 1 VCR 2 4 THX 30 30 23 feet 7m The PIONEER SR System Operating other PIONEER components Connecting an optional control cord allows you to operate other PIONEER components simply by pointing the receiver s remote control at the remote sensor on the front panel of the receiver The receiver then sends the remote control signals to the other devices via the CONTROL OUT terminal Opening t...

Страница 12: ...NPUT REC L R ANALOG Recorder 1 Recorder 2 CD R TAPE1 MD etc CD R TAPE1 MD etc Coaxial cord or standard video cord Optical cable Audio Components To begin set up connect your audio components to the jacks as shown below These are all analog connections and your analog audio components cassette deck use these jacks Remember that for components you want to record with you need to hook up four plugs a...

Страница 13: ...der currently these include MD DAT and CD R you can make direct digital recordings with this unit Before making or changing the connections switch off the power and disconnect the power cord from the AC wall outlet The arrows indicate the direction of the audio signal Connecting Your Equipment CD recorder OUTPUT PLAY INPUT REC DIGITAL TV Satellite tuner DVD player OUTPUT DIGITAL OUTPUT DIGITAL CD ...

Страница 14: ...king or changing the connections switch off the power and disconnect the power cord from the AC wall outlet The arrows indicate the direction of the audio signal Connecting Your Equipment memo DVD LD player or LD player RF demodulator RFD 1 1 2 3 DIGITAL OUT AC 3 LD RF OUT 2 DIGITAL IN PCM OPT PCM RF IN AC 3 LD DIGITAL OUT PCM OPT PCM OPTICAL COAXIAL DIGITAL IN STEREO L R ANALOG VIDEO OUT VIDEO S ...

Страница 15: ... the power and disconnect the power cord from the AC wall outlet The arrows indicate the direction of the video signal Connecting DVD players Connecting VCRs or DVRs Connecting Your Equipment Front video connections are accessed via the front panel input selector as VIDEO DVD LD player VIDEO OUT VIDEO AUDIO OUT L R DIGITAL ANALOG PCM 2 DTS DIGITAL S VIDEO S VIDEO AV IN OUT VCR 1 DVR VCR 2 VIDEO S ...

Страница 16: ...digital soundtracks sometimes broadcast over digital satellite TV you must hook up a digital input Use either a coaxial or optical cables it doesn t matter which you don t need to use both It s also a good idea to hook up your audio with analog cables see below This connection is called STEREO AUDIO OUT in the diagram Before making or changing the connections switch off the power and disconnect th...

Страница 17: ... power cord from the AC wall outlet Multi Channel Input External Decoder In some cases you may want to have you source material DVD etc decoded externally If you find you need a multi channel external decoder hook one up as shown below but for most people this component is unnecessary For more on this see p 48 Before making or changing the connections switch off the power and disconnect the power ...

Страница 18: ...ntennas Connecting Your Equipment 3 8 in 10mm 7 AM loop antenna 1 Assemble the antenna 2 Twist exposed wire strands together and insert 3 Attach to a wall etc if desired and face toward the direction providing the best reception 7 To improve AM reception Connect a 15 18 feet 5 6 meter length of vinyl coated wire to the AM antenna terminal in addition to the supplied AM loop antenna For best possib...

Страница 19: ... complement of surround sound speakers If you switch on both A B speaker systems only front speakers and the subwoofer will be audible No sound will come from the center or surround speakers but multi channel sources will be down mixed to the active speakers so no sound will be lost Similarly if you choose just the B system you ll only hear the front speakers connected to the B system and multi ch...

Страница 20: ...ening position than the front and center speakers Speaker placement If you have a multiple speaker arrangement the placement of the speakers is extremely important To achieve the best possible surround sound install your speakers as shown below Make sure all speakers are installed securely to prevent accidents and improve sound quality Be sure to consult your speaker manuals for the best placement...

Страница 21: ...h off the power and disconnect the power cord from the AC wall outlet After connecting all your components plug the receiver s power cord into a standard wall power outlet Caution Power consumption of any equipment connected to the switched power outlets should not exceed 100W 0 8 A To avoid overheating fire risk and possible malfunction do not connect high wattage appliances such as heaters irons...

Страница 22: ...urce DTS buttons See p 39 71 72 THX CINEMA Use when listening THX certified sources if you have THX certified speaker setup or want to re create a THX style sound environment It is also appropriate for Dolby Digital Dolby Pro Logic or DTS sources Those with surround back speakers can use all three THX modes those without should use the THX CINEMA mode ADVANCED Use to select one of the four Advance...

Страница 23: ... 16 MULTI JOG dial You can use this dial for three purposes In normal mode turn it to select a source component Press it to switch the display between function mode and sound mode When you press the SETUP button 15 you can use it to perform SETUP operations turn to select push to enter The source indicators show the current component DVD LD DVD player or LaserDisc player TV SAT TV or satellite tun...

Страница 24: ...For other sound modes use to select individual channels to increase or decrease channel level EFFECT buttons Use to add or subtract the amount of effect in different DSP advanced listening sound modes or the level of individual channels ENTER button DISC Use to enter commands into TVs or DTVs For CD players use to change discs 1 SOURCE button Use to turn on off other components connected to the re...

Страница 25: ...a DSP sound mode HALL 1 HALL 2 JAZZ DANCE THEATER 1 or THEATER 2 5 CH STEREO Use these modes to produce surround sound from standard two channel stereo sources and create different listening environments ADVANCED button Use to select one of the four Advanced Theater modes Use to create certain types of sound environments when listening to Dolby Digital Dolby Pro Logic or DTS sources STEREO button ...

Страница 26: ...en ATT is used to reduce the level of the analog source signal 1 Speaker indicators Light to indicate the current speaker system A and or B 2 SIGNAL SELECT indicators Light to indicate the input signal you selected AUTO Lights when the receiver is set to select the input signal automatically ANALOG Lights when analog signals are assigned DIGITAL Lights when digital audio signals are selected 3 Pro...

Страница 27: ...TI JOG dial There are three second tier setup modes ASSIGN SETUP SURROUND SETUP and FUNCTION RENAME The first of these ASSIGN SETUP is for telling the receiver which compo nents are hooked up to which terminals and how they are connected In the ASSIGN SETUP menu you must make the DIGITAL IN SELECT adjustments if you didn t follow the default settings when you hooked up your DVD LD player We sugges...

Страница 28: ...e lets you select which bass frequencies will be sent to the subwoofer or front speakers Bass Level See p 37 Dolby Digital and DTS audio sources include ultra low bass tones Set the bass peak level as needed to prevent the ultra low bass tones from distorting the sound from the speakers D Range Control See p 38 This feature makes possible excellent surround sound effects when listening to Dolby Di...

Страница 29: ...go to Multi In Set If you want to change a setting before proceeding use the arrow buttons to go back ASSIGN SETUP MENU Digital In Select In order to be able to use your digital equipment properly you need to assign digital inputs for each of the digital components you connected Match the Digital 1 4 settings with the digital jacks 1 4 in accordance with what is connected to each digital jack Chec...

Страница 30: ...hen you want to be able to control each channel level individually BYPASS This setting is good for getting the cleanest possible signal In this setting you won t be able to change each channel individu ally We recommend using BYPASS and the default setting is BYPASS 3 Press the ENTER button You will go to Assign End 4 Press ENTER again and move on to Surround Set the Surround Setup Menu RETURN MUL...

Страница 31: ...ion 1 Select Speaker Set from the SURROUND SETUP MENU with the 5 buttons or MULTI JOG dial if continuing from the last set up it should already be selected then press the ENTER button See Setting Up for Surround Sound on the page 27 if you are unsure how to do this 2 Speaker Set will appear in the display press ENTER again to move to the settings 3 Select either the FREE or THX speaker setting mod...

Страница 32: ...he bass frequencies are output from the front or surround speakers Choose the PLUS setting if you want stronger reproduction of deep bass sounds If you select PLUS the bass frequencies that would normally come out the front and center speakers are all routed to the subwoofer 5 Select Sp Set End with the 5 buttons or MULTI JOG dial and press ENTER to go to Channel Delay Next proceed to Channel Dela...

Страница 33: ...h speaker using the commands below 1 Use the 5 buttons to adjust the speaker distance in half foot increments from 0 5 to 45 feet The default setting is 10 feet 2 Press ENTER 3 Repeat steps 2 and 3 for the rest of the speaker settings Sound takes about 1 millisecond to travel 1 foot 4 When you ve finished the last setup and pressed ENTER Ch Delay End should be selected Press ENTER button again to ...

Страница 34: ...omatic TEST TONE This mode switches the test tone between each speaker automatically The test tone is output in the following order MANUAL manual TEST TONE This mode lets you switch the test tone between each speaker manually You can use this mode when you want to balance the speaker levels at a more leisurely pace 3 After pressing ENTER it will take a moment for the volume to get to the reference...

Страница 35: ... returns to its original position 6 Press ENTER again to return to go to the Crossover settings Next proceed to Crossover Network on the next page If you want to change a setting before proceeding use the 5 buttons or the MULTI JOG dial to go back memo Î SOURCE ENTER LOUDNESS INPUT ATT DIGITAL NR FL DIMMER REMOTE SETUP SYSTEM SETUP SIGNAL SELECT TV VOL TV TVFUNC D ACCESS BAND GUIDE MENU CLASS RETU...

Страница 36: ...h frequencies will be sent to the subwoofer or LARGE speakers 1 Use the 5 buttons or the MULTI JOG dial to select 80 Hz 100 Hz or 150 Hz 80Hz Sends bass frequencies below 80 Hz to the subwoofer or LARGE speakers 100Hz Sends bass frequencies below 100 Hz to the subwoofer or LARGE speakers 150Hz Sends bass frequencies below 150 Hz to the subwoofer or LARGE speakers Experiment with the different sett...

Страница 37: ...ar in the display Press the ENTER button to go to D Range Cont Next proceed to D Range Control on the next page If you want to change a setting before proceeding use the 5 buttons or the MULTI JOG dial to go back Bass Level The LFE Low Frequency Effect channel in Dolby Digital or DTS program sources can produce heavy ultra low bass tones that may exceed the capabilities of your speaker system The ...

Страница 38: ...pletes the surround setup D Range Control Dynamic Range This feature makes it possible to enjoy full surround sound effects on Dolby Digital sources even at low volumes It does this by compressing the dynamic range Dynamic Range is the difference between the loudest and the softest sounds in any given signal Compressing the range plays sounds so the quieter ones are audible and the louder ones don...

Страница 39: ...D I G I T A L logo There are four Advanced Theater settings that use DSP Digital Signal Processing to create different types of sound environments MUSICAL This mode is primarily for music and adds a spacious feeling to the sound A long delay time of reflected sounds provides resonant tones which emulate a concert hall DRAMA This mode is designed for movies with a lot of dialog The elements of dial...

Страница 40: ...ay time is virtually below 50 msec for the listener to enjoy the visceral power of dance music THEATER 1 Reproduces theater sound field effects without losing the localization of each channel Theater effects can be enjoyed without losing Dolby Digital Pro Logic Surround effects when used in combination those formats with movies bearing the DOLBY SURROUND trademark THEATER 2 Simulates the acoustic ...

Страница 41: ...s changes the STEREO mode as follows STEREO DIRECT The effects of ADVANCED THEATER mode can be adjusted in the range of 10 to 90 by pressing EFFECT The default setting is 70 Also the effect level can be set in each ADVANCED THE ATER mode by pressing the EFFECT button The amount of effect of each DSP mode can be adjusted in the range of 10 to 90 the default setting value is 70 by pressing EFFECT 5C...

Страница 42: ...ecommend using different modes for different types of DTS material For watching movies the THX or ADVANCED THEATER setting should provide the best results For listening to music the STANDARD DIRECT STEREO or DSP modes should serve the listener best Make sure you connect your DVD LD or LD player with the RF demodulator If your player has an 2 RF output this will ensure you can use all LDs Refer to ...

Страница 43: ...6 3 5 3 4 8 1 Turn on the power of the playback component 2 Turn on the power of the receiver Be sure that the standby indicator turns off on the front panel 3 Press the MULTI CONTROL buttons or the FUNCTION button to select the source you want to playback The FUNCTION button cycles through the sources in the following order 4 Press the STEREO DIRECT button to select the stereo mode The STEREO ind...

Страница 44: ...o ANALOG When an LD or CD with DTS is played back with the SIGNAL SELECT set in ANALOG digital noise caused by playing back the DTS directly with no decoding is output To prevent noise you need to make digital connections See pages 13 and 14 and set SIGNAL SELECT to DIGITAL or AUTO Some DVD players don t output DTS signals For more details refer to the instruction manual supplied with your DVD pla...

Страница 45: ...an t use the DIGITAL NR mode with the THX or MULTI CH IN modes If you press DIGITAL NR when in DIRECT mode the receiver switches to STEREO mode Reducing Noise During Playback To reduce extraneous noise switch on DIGITAL NR This noise reduction can be used with every mode except THX MULTI CHANNEL IN and DIRECT Basic Playback Î SOURCE ENTER LOUDNESS INPUT ATT DIGITAL NR FL DIMMER REMOTE SETUP SYSTEM...

Страница 46: ...istening the Loudness Mode The LOUDNESS mode allows you to boost the bass in a signal It is useful for listening to music at low volumes 1 Press RECEIVER This switches the remote to the receiver control mode 2 Press the LOUDNESS button Each press switches LOUDNESS mode between on and off You can t use the LOUDNESS mode with the MULTI CH IN or THX modes If you press LOUDNESS in DIRECT mode the rece...

Страница 47: ... Press the CHANNEL SELECT button on the front panel to cycle through the different tone adjust modes The button cycles though the possibilities in the following order TONE Front TONE Center TONE Surround 3 Use the BASS or TREBLE buttons to adjust the low or high frequencies of each channel A few seconds after you finish adjusting the tone the receiver will revert to the sound mode it was in at the...

Страница 48: ...available in STEREO mode LOUDNESS MIDNIGHT TONE controls etc see p 46 47 With 96 kHz 24 bit discs you are able to use MULTI CH IN playback and the TAPE 2 MONITOR In 96 kHz 24 bit mode you can t use the STANDARD ADVANCED THEATER THX or DSP modes 1 Press RECEIVER This switches the remote to the receiver control mode 2 Press the MULTI CH INPUT button on the remote control or the front panel Each pres...

Страница 49: ...ss RECEIVER This switches the remote to the receiver control mode 2 Press the FL DIMMER button Four levels of brightness ranging from very dim to very bright can be selected Each press changes the brightness of the display When rotating through the options the default bright ness can also be selected Please note it is a feature of this unit that the fluorescent display will be brighter for a few s...

Страница 50: ...tting DUAL ch1 ch2 setting Basic Playback 2 1 When DUAL MONO is playing with ch 1 selected the L will light When playing with ch 2 selected the R will light When playing with ch 1 2 selected the L and R will light 1 Turn the receiver ON 2 Hold down the RETURN button for 3 or 4 seconds The receiver will cycle through the three different dual mono settings for as long as you hold the button down Tak...

Страница 51: ...cies quickly hold down TUNING and release when you reach the frequency you desire 4 Adjust the MASTER VOLUME buttons on the remote control or the MASTER VOLUME on the front panel MPX Mode If the TUNED or STEREO indicators do not light when tuning an FM station because the station is too far away or the broadcast signal is weak press MPX on the remote control or front panel to switch to MONO recept...

Страница 52: ... 6 0 0 To cancel before inputting the frequency Press D ACCESS button and enter the frequency again 5 Adjust the MASTER VOLUME buttons on the remote control or the MASTER VOLUME on the front panel Using the Tuner Î SOURCE ENTER LOUDNESS INPUT ATT DIGITAL NR FL DIMMER REMOTE SETUP SYSTEM SETUP SIGNAL SELECT TV VOL TV TVFUNC D ACCESS BAND GUIDE MENU CLASS RETURN MIDNIGHT DSP STEREO FUNCTION ADVANCED...

Страница 53: ... or Direct Access Tuning on p 51 and 52 2 Press the MEMORY button to activate the memory function 3 Press the CLASS button repeatedly to select a class number Each press switches the display CLASS A CLASS B CLASS C 4 Press the STATION buttons repeatedly to select a channel 0 9 within the respective class The station is memorized automatically after 5 seconds If you want to escape from MEMORY mode ...

Страница 54: ...elect the TUNER function 2 Press the CLASS button repeatedly to select a class number 3 Press the STATION buttons repeatedly to select the channel you want Using the Tuner 1 3 2 Î SOURCE ENTER LOUDNESS INPUT ATT DIGITAL NR FL DIMMER REMOTE SETUP SYSTEM SETUP SIGNAL SELECT TV VOL TV TVFUNC D ACCESS BAND GUIDE MENU CLASS RETURN MIDNIGHT DSP STEREO FUNCTION ADVANCED STANDARD MUTE S MODE CLEAR DTV INF...

Страница 55: ...he 4 digit setup code The LED will blink after each digit is input and will blink twice to confirm a valid code has been input If the LED shows one long blink it means an invalid code has been input Check the preset code list and try again If you are not able to input a preset code you can refer to page 56 to teach the remote control individual commands Repeat steps 3 through 5 to assign preset co...

Страница 56: ...previous operation mode It will also return to the previous mode after ten seconds of inactivity The Receiver button cannot be preset You can only input a code for the component type written on each MULTI CONTROL button See page 58 for infor mation on how to program a different type of component than specified on the button If you recall a preset code for the tuner TUN MULTI CON TROL you will not ...

Страница 57: ...eps 3 and 4 To program operations for another component Repeat steps 2 through 4 7 Press REMOTE SETUP to exit the LEARNING setup mode After ten seconds of inactivity the remote control will automati cally leave the LEARNING mode and revert to its previous mode Some commands from other remote controls cannot be learned but in most cases the remotes just need to be moved closer together a farther ap...

Страница 58: ...digits for example 1329 Each digit will be represented by a series of blinks on the remote s LED 3 blinks to represent the digit 3 etc 4 Press 1 The blinking LED indicates the left most digit of the preset code 1 in the example above 5 Press 2 The blinking LED indicates the next digit of the preset code 3 in the example above 6 Press 3 The blinking LED indicates the next digit of the preset code 2...

Страница 59: ...ice thus four times to indicate the button has been cleared Î SOURCE ENTER LOUDNESS INPUT ATT DIGITAL NR FL DIMMER REMOTE SETUP SYSTEM SETUP SIGNAL SELECT TV VOL TV TVFUNC ENTER TUNE TUNE D ACCESS BAND GUIDE MENU CLASS RETURN MIDNIGHT DSP STEREO FUNCTION ADVANCED STANDARD MUTE S MODE CLEAR DTV INFO AV PRE PROGRAMMED AND LEARNING REMOTE CONTROL UNIT DTS RECEIVERDIRECTCONTROL MPX DTV ON OFF DTV MENU...

Страница 60: ... REMOTE SETUP SYSTEM SETUP SIGNAL SELECT EFFECT CH SEL DISC 10 VIDEO SELECT MULTI CH INPUT 1 2 3 4 5 6 7 8 9 0 THX 4 3 9 1 7 0 2 8 5 6 9 Number Buttons Used to directly access tracks on a program source 0 10 Button Use this button to select tracks higher than 10 Press this button and the remaining number to get the track 10 Button 3 track 13 ENTER DISC Button For a multiple CD player use this butt...

Страница 61: ...recording this button must be pressed twice to take effect the second press must be within 10 seconds of the first 0 THESE CONTROLS CAN BE USED FOR DECK ONE OF A DUAL TAPE DECK 5 Press to pause the tape Press to stop the tape ENTER Press to start playback 2 Press to rewind the tape 3 Press fast forward the tape Use MULTI CONTROL buttons to put the remote control in the stated mode memo Î SOURCE EN...

Страница 62: ... LEARNING REMOTE CONTROL UNIT DTS RECEIVERDIRECTCONTROL MPX DTV ON OFF DTV MENU ST ST CHANNEL RECEIVER TV CONTROL MASTERVOLUME MULTI CONTROL DVD CD CD R TUN TVC RECEIVER 2 TV VCR 1 VCR 2 4 ENTER LOUDNESS INPUT ATT DIGITAL NR FL DIMMER REMOTE SETUP SYSTEM SETUP SIGNAL SELECT EFFECT CH SEL DISC 10 VIDEO SELECT MULTI CH INPUT 1 2 3 4 5 6 7 8 9 0 THX 4 0 3 5 1 8 2 9 6 7 7 1 Hold down for fast reverse ...

Страница 63: ...h some models 0 TV VOL Use to adjust the TV volume DTV MENU Use to select different menus from the DTV functions DTV INFO Use to get INFO on the DTV program RETURN Use to return channels 7 Use to choose the BLUE commands on a DTV menu 3 Use to choose the GREEN commands on a DTV menu Use to choose the YELLOW commands on a DTV menu 8 Use to choose the RED commands on a DTV menu CLEAR Press to clear ...

Страница 64: ...l can control these components after entering the proper codes or teaching the receiver the commands see p 55 59 Use MULTI CONTROL buttons to put the remote control in the stated mode 1 SOURCE Press to switch the TV or CATV between STANDBY and ON 2 TV FUNC TV only Press to switch the TV input Not possible with all models If it doesn t work with the preset code use the learning feature 3 TV VOL Use...

Страница 65: ...R DTV INFO AV PRE PROGRAMMED AND LEARNING REMOTE CONTROL UNIT DTS RECEIVERDIRECTCONTROL MPX DTV ON OFF DTV MENU CHANNEL EFFECT CH SEL RECEIVER TV CONTROL MASTERVOLUME DISC 10 VIDEO SELECT MULTI CONTROL MULTI CH INPUT DVD CD CD R TUN TVC RECEIVER 1 2 3 4 5 6 7 8 9 0 2 TV VCR 1 VCR 2 4 ENTER TUNE TUNE ST ST 2 6 THX RDM 1 Here are all the possible characters you can input ABCDEFGHIJKLMNOPQRSTUVWXYZ a...

Страница 66: ...characters however these will be entered 9 Use the MULTI JOG dial 5 buttons to select Rename End 10 Press the MULTI JOG dial press ENTER Setup End will appear in the display 11 Press the MULTI JOG dial again press ENTER You will return to the previous mode the receiver was in SETUP MULTI JOG Turn to select Push to enter RETURN Using Other Functions Î SOURCE ENTER LOUDNESS INPUT ATT DIGITAL NR FL D...

Страница 67: ...switches the remote to the receiver control mode 2 Select the source component Set SIGNAL SELECT according to the source component s signal ANALOG or DIGITAL Press the SIGNAL SELECT button on the remote control or use the button on the front panel and choose ANALOG 3 Start recording with a recorder 4 Playback the source to be recorded Record monitor TAPE 2 MONITOR If you connect a cassette deck wi...

Страница 68: ...ponents you want to record all need to be connected to the receiver with digital inputs as well See p 13 if you have not made these connections The receiver s volume channel level tone BASS TREBLE and LOUDNESS and surround effects have no effect on the recorded signal Using Other Functions 1 Press RECEIVER This switches the remote to the receiver control mode 2 Prepare the source you want to recor...

Страница 69: ...ink twice 3 Press MULTI CONTROL button which you want to set to OFF 4 Press 9 8 then 3 The LED blinks twice to indicate the button has been cleared To set a MULTI CONTROL button to DIRECT ON 1 Press RECEIVER This switches the remote to the receiver control mode 2 Press REMOTE SETUP and hold for three seconds The LED will blink twice 3 Press MULTI CONTROL button which you want to set to ON 4 Press ...

Страница 70: ...h the possibili ties in the following order The OFF setting means that no video signal is output After choosing a video input the display on the receiver will show that input for about 5 seconds and then revert to showing the sound mode the receiver is in The VIDEO SELECT remains set to the input you chose until you change the audio input If you change audio functions the receiver will reset itsel...

Страница 71: ...s that the recording of different format audio signals on the laser disc raises the important question of compatibility with existing laser discs Dolby Digital tracks on laser discs record signals using the space of one analog audio channel so it will maintain compatibility with existing discs and players As shown in the following figure the digital audio sounds of Dolby Digital discs can be playe...

Страница 72: ...recise way Adaptive Decorrelation When a sound track sends mono sound to the surround speakers it often seems to be coming come from one side instead of from all around you as it would in a theater Adaptive Decorrelation helps to correct this inaccuracy Timbre Matching When recording a sound track it is very important that the surround sounds move smoothly and seamlessly around the theater It is v...

Страница 73: ...0 1 0 0 0 9 3 0 0 7 3 0 0 0 3 0 0 8 7 1 0 6 5 0 0 s n a m d o o G 5 3 0 0 e t n e i d a r G 0 7 1 0 6 5 0 0 3 5 0 0 a d a n a r G 9 3 3 0 8 0 1 0 g i d n u r G 7 3 0 0 y p n u r G 0 8 1 0 9 7 1 0 k r a m l l a H 8 7 1 0 n o s d i v a D y e l r a H 9 7 1 0 n o d r a K n a m r a H 4 5 0 0 d r a v r a H 0 8 1 0 8 6 0 0 d o o w r a H 2 1 4 0 M C H 8 1 4 0 2 1 4 0 i h c a t i H 6 5 0 0 8 3 0 0 6 1 0 0 ...

Страница 74: ... a S 9 3 0 0 i e s n a S 1 5 4 0 i u s n a S 3 6 4 0 o y n a S 8 0 2 0 4 5 1 0 8 0 1 0 9 3 3 0 u s t i m i c S 9 1 0 0 h c t o c S 8 7 1 0 t t o c S 9 7 1 0 8 7 1 0 9 1 0 0 6 3 2 0 0 8 1 0 e n y d u n i S 0 1 0 0 x o v i m e S 0 8 1 0 p m e S 6 5 1 0 s r a e S 6 5 0 0 4 5 0 0 7 4 0 0 1 7 1 0 6 5 1 0 4 5 1 0 9 7 1 0 8 7 1 0 I E S 0 1 0 0 a r t n e S 5 3 0 0 p r a h S 5 6 1 0 3 9 0 0 9 3 0 0 n u g o...

Страница 75: ...0 0 s s a B c i m a n y D 9 7 1 0 n o s r e m E 5 0 3 0 a c i o r E 3 6 5 0 2 6 5 0 a i s a t n a F 5 2 5 0 r e h s i F 9 7 1 0 4 7 1 0 d r a r r a G 0 2 4 0 3 9 3 0 a x x e n e G 5 0 3 0 2 3 0 0 r a t S d l o G 5 2 5 0 3 8 3 0 n o d r a K n a m r a H 3 7 1 0 7 5 1 0 i h c a t i H 2 3 0 0 l e k n I 7 3 4 0 0 8 1 0 4 1 1 0 C V J 2 7 0 0 d o o w n e K 0 9 1 0 7 3 0 0 8 2 0 0 6 2 8 0 1 8 6 0 6 2 6 0 ...

Страница 76: ... i H 2 4 0 0 1 4 0 0 0 0 0 0 5 3 2 0 6 6 1 0 k r o w t e N s e h g u H s m e t s y S 2 4 0 0 C V J 7 6 0 0 1 4 0 0 8 0 0 0 n e s n e J 1 4 0 0 C E K 8 7 2 0 7 3 0 0 H L K 2 7 0 0 d o o w n e K 7 6 0 0 1 4 0 0 8 3 0 0 k a d o K 7 3 0 0 5 3 0 0 G L 0 8 4 0 I X L 7 3 0 0 s d y o l L 8 0 2 0 0 0 0 0 k i g o L 2 7 0 0 I E M 5 3 0 0 A G M 0 4 2 0 3 4 0 0 y g o l o n h c e T N G M 0 4 2 0 C T M 0 4 2 0 0...

Страница 77: ...t c a f u n a M e d o C S R E V I E C E R C D A 1 3 5 0 a w i A 9 8 0 1 1 0 3 0 1 2 1 0 5 0 4 1 i a k A 5 1 1 0 m a n A 9 0 6 0 2 1 1 0 c i n o r t e p a C 1 3 5 0 r e v r a C 9 8 1 1 9 8 0 1 s e h t a M s i t r u C 0 8 0 0 o o w e a D 7 0 4 0 n o n e D 0 6 1 1 4 0 1 1 l a u D 2 1 5 0 a c i o r E 1 5 0 0 a i s a t n a F 6 6 4 0 o i d u A P G 3 2 4 0 d r a r r a G 3 6 4 0 0 4 4 0 7 0 4 0 r a t S d ...

Страница 78: ...function is selected Considerable noise in radio broadcasts Broadcast stations cannot be selected automatically Subwoofer output is very low When playing an LD the SIGNAL SELECT is on DIGITAL but there is still no sound When playing a Dolby Digital DTS source the 5 1 Channel indicator doesn t light Remedy Connect the power plug to the wall outlet Plug in again If it still doesn t work call a servi...

Страница 79: ...check the speaker levels Connect the speakers see p 19 Set SIGNAL SELECT to AUTO or according to the type of connections made see p 44 Set the digital input settings correctly see p 29 Make digital connections see p 13 and set SIGNAL SELECT to AUTO see p 44 Refer to the instruction manual supplied with the DVD player Set the digital volume level of the player to full or to the neutral position Tur...

Страница 80: ...the track is not a Dolby Digital DTS track Symptom You can t get DIGITAL to come up when using the SIGNAL SELECT button The Dolby Digital DTS indicator doesn t light up even when playing a Dolby Digital DTS source If the unit does not operate normally due to external effects such as static electricity Disconnect the power plug from the outlet and insert again to return to normal operating conditio...

Страница 81: ...gnal C 0 286 Vp p 75 Ω Frequency Response VCR 1 DVR VCR 2 VIDEO DVD LD TV SAT Luminance signal Y 5 Hz to 10 MHz dB Signal to Noise Ratio Luminance signal Y 65 dB VIDEO Section Composite Input Sensitivity Impedance VCR 1 DVR VCR 2 VIDEO DVD LD TV SAT 1 Vp p 75 Ω Output Level Impedance VCR 1 DVR VCR 2 MONITOR OUT 1 Vp p 75 Ω Frequency Response VCR 1 DVR VCR 2 TV SAT DVD LD VIDEO MONITOR OUT 5 Hz to ...

Страница 82: ...e your hearing comfort level adapts to higher volumes of sound So what sounds normal can actually be loud and harmful to your hearing Guard against this by setting your equipment at a safe level BEFORE your hearing adapts To establish a safe level Start your volume control at a low setting Slowly increase the sound until you can hear it comfortably and clearly and without distortion Once you have ...

Страница 83: ...83 ...

Страница 84: ...the above listed number for assistance PIONEER ELECTRONICS SERVICE INC CUSTOMER SERVICE DEPARTMENT P O BOX 1760 LONG BEACH CA 90801 1760 U S A For warranty information please see the Limited Warranty sheet included with your product Si ce produit doit être réparé au Canada veuillez vous adresser à un distributeur autorisée Pioneer au Canada pour obtenir le nom de la Société de Service Autorisée Pi...

Отзывы: