background image

− 

26

 −

English

 Play / Protect / Unprotect / 

Delete Files

Put the Dash Camera into playback mode, if there is a lot of data on the microSD memory card, the 

download may take at least one minute.

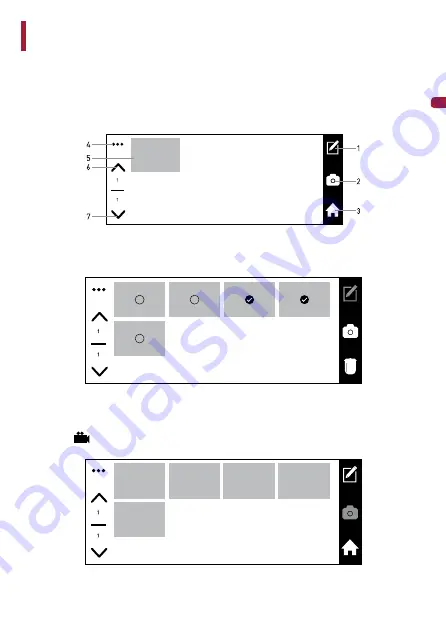
1. Selecting Objects

Press the Select button to highlight folders or files to lock / unlock / delete.

If you want to deselect the selection, press the Select button again.

2. Media Type

To select folders or files (videos, photos, locked files) for viewing / locking / unlocking / deleting, press 

the Media Type button.

Video files: 

Содержание VREC-150MD

Страница 1: ...English Owner s Manual VREC 150MD DASH CAMERA ...

Страница 2: ...lation 12 Specified Installation Position on Front Windscreen 12 Install this product 13 Part Names 15 Function Buttons 16 Inserting and Ejecting the microSD Card 17 Inserting the microSD Card 17 Ejecting the microSD Card 17 Backing Up Recorded Files 18 Folder and File Structure 18 Using this product 19 This product Power 19 Manually Turning the Power On and Off 19 System Indicator Display 19 How ...

Страница 3: ...luable resources and prevent any potential negative effects on human health and the environment which could otherwise arise from inappropriate waste handling For more information about collection and recycling of old products and batteries please contact your local municipality your waste disposal service or the point of sale where you purchased the items These symbols are only valid in the Europe...

Страница 4: ...accordingly professional installation is required We recommend that this product be set up and installed by a technician who has special training and experience in mobile electronics Important safety information WARNING Do not allow this product to come into contact with liquids Electrical shock could result Also damage to the product smoke and overheating could result from contact with liquids If...

Страница 5: ...sure to install this product its cables and wiring away in such so that they will not obstruct or hinder driving Make sure that the cables and wires will not interfere with or become caught in any of the vehicle s moving parts especially the steering wheel gearstick handbrake sliding seat tracks doors or any of the vehicle s controls Do not route wires where they will be exposed to high temperatur...

Страница 6: ...r or pillar from which one of your vehicle s airbags would deploy Please refer to your vehicle s owner s manual for reference to the deployment area of the frontal airbags Consult with your nearest dealer if installation requires drilling holes or other modifications of the vehicle Before making a final installation of this product temporarily connect the wiring to confirm that the connections are...

Страница 7: ... on the road may appear as flashing or flickering when recorded with this product The colour may also not be correctly identifiable Pioneer Corporation accepts no responsibility whatsoever for these phenomena This product saves video before and after an accident occurs by detecting the impact acceleration with the G sensor accelerometer However this product is not guaranteed to save video in all s...

Страница 8: ...t features Square brackets are used to indicate selectable items displayed on the screen Quotation marks are used to indicate references and settings The illustrations and example screens used in this manual may differ from the actual product The actual screens of the product may be changed without prior notification for the purpose of improvements to product performance and features In this manua...

Страница 9: ... type of recording Note that files will be overwritten when there is insufficient free space in the file storage areas We recommend that you back up any important files you want to keep Backing Up Recorded Files To ensure that important files such as files containing records of accidents are not overwritten always turn the power off before removing the microSD card and store the card in a safe pla...

Страница 10: ...y you may no longer be able to write data to the card or erase data from the card normally The service life of the microSD card is not covered under the warranty The microSD card is a consumable part We recommend that you regularly replace the microSD card with a new card If you use the microSD card for a long period of time this product may no longer be able to save data to the card correctly due...

Страница 11: ...in Unit 1 Mounting Attachments 2 USB Cigarette Lighter Power Cable 5 m 1 Quick Start Guide 1 Warranty 1 Rear Camera Cable 6 m 1 PC USB mini USB 1 m 1 Note All images in this document are for illustrative purpose only and subject to change ...

Страница 12: ...earview mirror install it in one of the specified positions within the specified limits On some vehicles installation at the specified location within the specified range may not be possible For details contact your dealer Do not cover the main unit or get the lens dirty Do not place reflective objects near the lens Take care when handling the main unit that it does not drop and you do not touch t...

Страница 13: ...is within the wiping range of the wiper A position where the lens part of this product does not hang over the sunshade and black ceramic lines black ceramic pattern A position where this product faces in the horizontal direction to the front and side to side A position where the power cable can be routed without unnecessary force Installation Direction Horizontal Direction This product Front Winds...

Страница 14: ...the rear camera to the AV IN port of the main unit 5 Connect the red cable of the rear camera to the 12V terminal of your vehicle reverse light Rear Camera Cable Cigarette lighter Rear Camera Reverse light 12 В CAUTION Install firmly so that it does not come off Incorrect installation may cause this to drop while driving and cause an accident Inspect the installation state from time to time Always...

Страница 15: ...to the passenger seat side Fully insert this into the vehicle accessory socket to make a good connection The location of the accessory socket will differ depending on the vehicle IIKYYUX_ YUIQKZ OMGXKZZK ROMNZKX VU KX IGHRK CAUTION The accessory socket will be extremely hot immediately after using the cigarette lighter The tip of the cigarette lighter power cable may melt or short circuit if it is...

Страница 16: ... this product 4 Lens 5 Speaker 6 Mounting Attachments Attaching Dash Camera to interior mirror 7 Microphone 8 Power Button Long press and hold a few seconds to turn on off the Dash Camera Short press to enable disable the screen saver 9 Mini USB Port Designed to connect the Dash Camera to PC a Rear Camera AV IN Used to connect the rear view camera b microSD Card slot 8 GB to 64 GB microSD Card cap...

Страница 17: ...e mode After connecting the Rear Camera to the Dash Camera the picture from it will be displayed in main screen The front camera image will be displayed in the upper left corner of the screen picture in picture The mode switch button allows you to change the appearance of the image on the screen 50 50 Mode A mode in which one half of the screen is occupied by an image from the front camera and the...

Страница 18: ...this mode the rear view camera is not displayed on the screen of the Dash Camera w w Rear view camera mode In this mode the screen displays an image only from the rear view camera At this point recording from the front camera continues w w ...

Страница 19: ...the product and slowly insert it into the microSD Card slot until it clicks SD CAUTION Do not insert the microSD card at an angle Doing so may cause damage Do not insert and eject microSD card repeatedly in a short period Always insert eject the microSD card slowly Ejecting the microSD Card Slowly push in the top edge of the microSD card until it clicks 1 The lock will be released Pull out the mic...

Страница 20: ...his product power eject the microSD card and replace it with a spare microSD card 2 Copy or move the files to a PC Insert the microSD card into a PC using a commercially available SD card adapter if necessary Copy or move the videos and photo files to back up to a suitable location on the PC Folder and File Structure The structure of folders and files in a microSD card is as follows ROOT Front Vid...

Страница 21: ... manually turned on and off from the side of the main unit The Cigar Charger cable must be connected and the vehicle ACC ON at all times to power the main unit ON OFF When the main unit power is off Long press ON OFF Button for 3 seconds to start up When the main unit power is on Long press ON OFF Button for 3 seconds to shut down How to View the Recording Screen The status display shows the opera...

Страница 22: ...ll be 720 p If this function is disabled video from the rear camera will not be saved Default setting On Loop Video Recording Video Clip Length 1 min 3 min 5 min In this mode the Dash Camera will cyclically record new video files at specified time intervals If loop recording is enabled when the microSD Card is full the old data will be overwritten with the new one If the loop recording function is...

Страница 23: ...When enabled the system will include your license plate stamp in the video If this function is disabled the video is recorded without specifying the license plate Default setting Off SOS Event Recording Automatic Recording by Detecting Impacts Event Recording The video recording file when an impact is detected by this product the Dash Camera such as an impact with another vehicle is recorded as an...

Страница 24: ...ws when connected with power 6 ISO Shows the ISO setting you have selected for photographing 7 White Balance Shows your chosen white balance option for photography 8 Image Quality Allows you to view the value specified in the settings for the image quality when photographing 9 Resolution Allows you to view the value specified in the settings for the image resolution when photographing 10 Delay All...

Страница 25: ...off between brightness and image noise Noise refers to the amount of grain in the image In low light high ISO values produce a brighter image but with increased noise Low values produce less noise but a darker image After changing this setting the effect is immediately visible on the screen Default setting Auto Exposure 3 2 1 0 1 2 3 By default the system determines the optimal exposure for the en...

Страница 26: ...ownload may take at least one minute 1 Selecting Objects Press the Select button to highlight folders or files to lock unlock delete If you want to deselect the selection press the Select button again 2 Media Type To select folders or files videos photos locked files for viewing locking unlocking deleting press the Media Type button Video files ...

Страница 27: ... button to return to the previous item 5 Folder Press the Folder button to quickly jump to albums Note Folder1 All files recorded by the front camera Folder2 All files recorded by the rear camera 6 Previous Page Click the Previous Page button to go to the previous page 7 Next Page Press the Next Page button to go to the next page ...

Страница 28: ... file you want is a video file click the Play button to view its contents 2 Tap the screen while the video is playing and the Pause button will appear in the middle of the screen To pause playback click the Pause button Note To return to the previous step while in video photo playback mode press the Return button During video playback all operations are stopped ...

Страница 29: ...by pressing the select button and highlighting the file s To protect remove protection from the selected files click the Protect button If the file is protected the protection symbol will be present on its icon Delete Files Cancel Ok 3 Make sure the album contains protected files press the select button and highlight one or more files To remove protection from the selected files click the Protect ...

Страница 30: ... delete unneeded files press the Select button and highlight the files then press the Delete button to delete them If the files are locked unlock them before deleting them Delete Selected Files Delete Selected Files Cancel Ок Cancel Ок 3 Switch to playback mode To delete the current file click the Delete button If the current file is locked unlock it before deleting it Delete Selected Files Delete...

Страница 31: ... record sound To enable disable sound recording push the Sound recording Microphone on screen button w Sound Recording Camera Tuesday Rear Camera Playback Settings 2 Camera 1 To switch from front to back camera or vice versa press the Toggle button 2 Click the Start button to start recording video To stop recording video press the Start button again 3 To enter recording settings 4 Press the Photo ...

Страница 32: ...e button to open the main menu In each of the screens displayed from here on the Monitor Display screen automatically goes black if you do not perform any operation for approximately 60 seconds This is the Monitor Display default setting The video recording is not continuous while the MENU screen is displayed 2 Press Function Buttons to select the desired option In each menu setting you can change...

Страница 33: ...an French Italian Spanish Polish Default setting English Format To keep the microSD card in good condition it is recommended to reformat it regularly In this case the contents of the card are lost so first upload the recorded files a PC Date and Time Default setting YYYY MM DD 00 00 00 Reset This function returns all settings to their original state Version Check the firmware version of the device...

Страница 34: ...in 3 min Headlight Reminder Reminds you to turn on headlights OFF Exposure Value Sets the exposure of video recording 3 to 3 0 WDR Automatically adapts the image where there is significant contrast between light and dark areas ON or OFF ON Time Stamp Adds a date time stamp in the recorded video or photo ON or OFF ON G Sensor Sets the sensitivity for detecting vibration or impact This can also be s...

Страница 35: ...flicker Frequency Sets the frequency of the lens 50Hz Beep Sound Sets beep tones ON or OFF ON Language Sets the language used to display the screen English French Spanish German Italian Polish English Format All files on the microSD card can be deleted Date Time Sets the time manually Year Month day Hour Min Default Reset to the default settings Version Allows you to check the product model number...

Страница 36: ...r 8 1080 p No of Photos Approx 500 Guide to Recording Time with a 64 GB microSD Card Resolution Video type 32 GB 1080p Video Recording Approx 2 4 hours 1080p SOS EVENT Recording Approx 8 videos Front 64 Rear 64 1080p No of Photos Approx 500 Notes Default Video Clip Length is 3 min recording time The recording times are estimates The actual recording times will depend on the scenery being recorded ...

Страница 37: ... detection This Product Settings Configurable Features Recording Setting G Sensor There s no sound when I play a video file The sound recording setting may be OFF Check the sound recording setting again This Product Settings Configurable Features Recording Setting Microphone An error occurred during the display and operation of this product The microcomputer in this product is malfunctioning Press...

Страница 38: ...m use a new SD Card Video is output without sound The microphone is OFF in the system setting Turn ON the microphone from the system settings The device gets very hot during operation It is normal to generate some heat at normal temperature If smoke or odor appears turn off the unit immediately and contact an authorised Pioneer service center for assistance Traffic light signals are not recorded L...

Страница 39: ...ing Event recording Photo recording Video File Structure 1 min 3 min 5 min Display 6 7 inch IPS LCD touchscreen Sound Recording Can be set to ON or OFF OFF as default Frame Rate Main unit 30 fps 2nd camera 25 fps Compression Method Video MOV H 264 Photo JPG Video Playback Method On Dash Camera or microSD card in PC Power Supply Voltage Main Unit DC 5 V 12 V 24 V cigarette lighter power cable incl ...

Страница 40: ... 40 English Trademarks Copyrights SD microSD microSDHC and microSDXC Logo are trademarks of SD 3LLC EU Conformity marking UK Conformity marking ...

Страница 41: ...0021 Japan PIONEER EUROPE NV Haven 1087 Keetberglaan 1 9120 Melsele Belgium Belgique Tel 32 0 3 570 05 11 Fax 32 0 3 570 08 86 Salamanca Wellington Street Slough SL1 1YP UK Tel 44 0 208 836 35 00 https www pioneer car eu eur Visit www pioneer car eu uk or www pioneer car eu eur to register your product ...

Отзывы: