7
En
En
gl
is
h
1
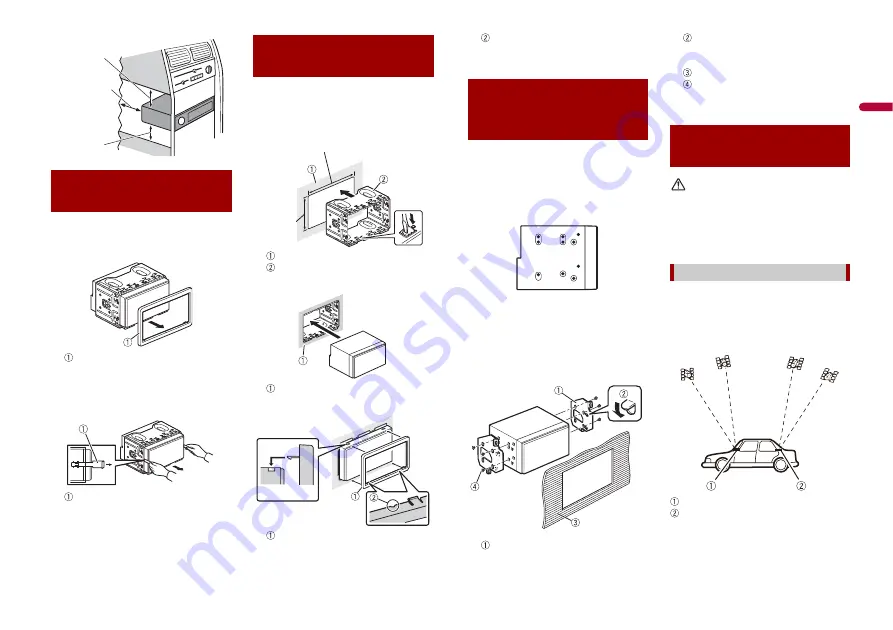
Remove the trim ring.
Extend top and bottom of the trim ring
outwards to remove the trim ring.
Trim ring
2
Insert the supplied extraction keys
into both sides of the unit until they
click into place.
3
Pull the unit out of the holder.
Extraction key
1
Install the holder into the dashboard.
2
Secure the mounting sleeve by using a
screwdriver to bend the metal tabs
(90°) into place.
Dashboard
Holder
3
Install this product into the holder.
Dashboard
4
Attach the trim ring.
Trim ring
Before installing this
product
Leave ample
space
5 cm
5 cm
Installation with the
holder
112 mm
182 mm
Groove
Attach the trim ring with the side
with a groove facing downward.
1
Fastening this product to the factory
radio-mounting bracket.
Position this product so that its screw
holes are aligned with the screw holes
of the bracket, and tighten the screws at
three locations on each side.
TIP
The amount of this unit's protrusion from
the dashboard/console can be adjusted by
shifting the position of the screw hole of
this unit to the factory radio-mounting
bracket.
Factory radio-mounting bracket
If the pawl interferes with
installation, you may bend it down
out of the way.
Dashboard or console
Flush surface screw
Be sure to use the screws supplied
with this product.
CAUTION
Do not cut the GPS aerial lead to shorten it
or use an extension to make it longer.
Altering the aerial cable could result in a
short circuit or malfunction and
permanent damage to this product.
•
The aerial should be installed on a level
surface where radio waves will be
blocked as little as possible. Radio waves
cannot be received by the aerial if
reception from the satellite is blocked.
Dashboard
Rear shelf
•
Take care not to pull the aerial lead when
removing the GPS aerial. The lead may
become detached.
Installation using the screw
holes on the side of this
product
Installing the GPS
aerial
Installation notes
Содержание SPH-DA360DAB
Страница 43: ...11 De Deutsch ...
Страница 52: ... 2022 PIONEER CORPORATION INSTM_SPHDA360DABEU_A EU ...


