background image


7


En


Important User Guidance Information

 01


English

CAUTION


PIONEER bears no responsibility for any damage arising from 
incorrect use of the product by you or other people, 
malfunctions when in use, other product related problems, 
and use of the product except in cases where the company 
must be liable.


Plasma Display protection function


When still images (such as photos and computer images) stay 
on the screen for an extended period of time, the screen will be 
slightly dimmed. This is because the protection function of the 
Plasma Display automatically adjusts the brightness to protect 
the screen when detecting still images; so this does not 
designate malfunction. The screen is dimmed when a still 
image is detected for about three minutes.


Information of cell defect


Plasma screens display information using cells. Pioneer 
Plasma Display panels contain a very large number of cells. 
(Depending on the panel size; over 6.2 million cells.) All 
Pioneer display panels are manufactured using a very high 
level of ultra-precision technology and undergo individual 
quality control.

In rare cases, some cells can be permanently switched off, or 
on, resulting in either a black or colored cell permanently fixed 
on the screen.

This effect is common to all Plasma Displays because it is a 
consequence of the technology.

If the defective cells are visible at a normal viewing distance of 
between 2.5 and 3.5 meters whilst viewing a normal broadcast 
(i.e. not a test card, still image or single color display) please 
contact the supplying dealer. 

If, however, they can only be seen close up or during single 
color displays then this is considered normal for this 
technology.


Infrared rays


The Plasma Display releases infrared rays because of its 
characteristics. Depending on how the Plasma Display is in 
use, the remote controls of nearby equipment may be 
adversely affected or wireless headphones using infrared rays 
are interfered by noise. If this is the case, place that equipment 
at a location where its remote control sensor is not affected.


Radio interference


While this product meets the required specifications, it emits 
a small amount of noise. If you place such equipment as an AM 
radio, personal computer, and VCR close to this product, that 
equipment may be interfered. If this happens, place that 
equipment far enough from this product.


Plasma Display driving sound


The screen of the Plasma Display is composed of extremely 
fine pixels and these pixels emit light according to received 
video signals. This principle may make you hear buzz sound or 
electrical circuit hamming from the Plasma Display.


Do not attach such items as labels and tape to the 
product


• This may result in the discolouration or scratch of the 

cabinet.


When not using the product for a long period of 
time


• If you do not use the product for a long period of time, the 

functions of the product may be adversely affected. Switch 
on and run the product occasionally.


Condensation


• Condensation may take place on the surface or inside of the 

product when the product is rapidly moved from a cold place 
to a warm place or just after a heater is switched on in winter 
morning, for example. When condensation takes place, do 
not switch on the product and wait until condensation 
disappears. Using the product with condensation may result 
in malfunction.


Cleaning the surface of the screen and the glossy 
surface of the front cabinet


• When cleaning the surface of the screen or the glossy 

surface of the front cabinet, gently wipe it with a dry soft 
cloth; the supplied cleaning cloth or other similar cloths 
(e.g., cotton and flannel). If you use a dusty or hard cloth or 
if you rub the screen hard, the surface of the product will be 
scratched.

• If you clean the surface of the screen with a wet cloth, water 

droplets on the surface may enter into the product, resulting 
in malfunction.


Cleaning the cabinet


• When cleaning the cabinet of this product, gently wipe it 

with a clean soft cloth (e.g., cotton and flannel). If you use a 
dusty or hard cloth or if you rub the cabinet hard, the surface 
of the cabinet will be scratched.

• The cabinet of this product is mostly composed of plastic. Do 

not use chemicals such as benzene or thinner to clean the 
cabinet. Using these chemicals may result in quality 
deterioration or coating removal. 

• Do not expose the product to volatile gas or fluid such as 

pesticide. Do not make the product contact with rubber or 
vinyl products for a long period of time. The effect of 
plasticizer in the plastic may result in quality deterioration or 
coating removal.

• If you clean the surface of the cabinet with a wet cloth, water 

droplets on the surface may enter into the product, resulting 
in malfunction.


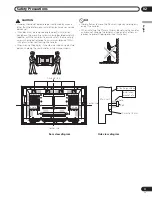
Handles at the rear of the Plasma Display


• Do not remove the handles from the rear of the Plasma 

Display.

• When moving the Plasma Display, ask another person for 

help and use the handles attached to the rear of the Plasma 
Display. Do not move the Plasma Display by holding only a 
single handle. Use the handles as shown.

• Do not use the handles to hang the product when installing 

or carrying the product, for example. Do not use the handles 
for the purpose of preventing the product from tilting over.

Содержание PDP-5000EX

Страница 1: ...erts en enregistrant votre produit en ligne maintenant sur www pioneer fr ou www pioneer eur com Bitte nutzen Sie die Möglichkeit zur Registrierung Ihres Produktes unter www pioneer de oder www pioneer eur com Registra il tuo prodotto su www pioneer it o www pioneer eur com e scopri subito quali vantaggi puoi ottenere Ontdek nu de voordelen van online registratie Registreer uw Pioneer product via ...

Страница 2: ...ely There is a danger of severe electrical shock if the cut off plug is inserted into any 13 amp socket If a new plug is to be fitted please observe the wiring code as shown below If in any doubt please consult a qualified electrician WARNING THIS APPARATUS MUST BE EARTHED IMPORTANT The wires in this mains lead are coloured in accordance with the following code Green Yellow Earth Blue Neutral Brow...

Страница 3: ...nsert the plug into an outlet contact a licensed electrician to replace the outlet with a properly grounded one Do not defeat the safety purpose of the grounding plug D3 4 2 1 6_A_En WARNING This symbol refers to a hazard or unsafe practice which can result in personal injury or property damage CAUTION This symbol refers to a hazard or unsafe practice which can result in severe personal injury or ...

Страница 4: ...autions regarding the remote control unit 20 07 Operation Plasma Display status indicators 21 Changing the volume and sound 21 Use the multiscreen functions 22 Splitting the screen 22 Confirming current status 22 AV Selection 22 Selecting a screen size manually 23 08 Menu Setup Using the menu 24 AV mode menus 24 PC mode menus 24 Menu operations 24 09 Basic Adjustment Settings Language setting 25 B...

Страница 5: ... DVD image 35 Connecting a DVD player 35 Displaying a DVD image 36 Enjoying a game console or watching camcorder images 36 Connecting a game console or camcorder 36 Displaying an image from the game console or camcorder 36 Watching an image from a personal computer 36 Connecting a personal computer 36 Displaying an image from a personal computer 36 Computer compatibility chart 37 Connecting contro...

Страница 6: ...ease limit its use to less than 2 hours at a time After playing a game or displaying a PC image or any still image it is best to view a normal moving picture in the WIDE or FULL screen setting for more than 3 times the length of the previous still moving image After using the Plasma Display always switch the display to STANDBY mode Installation guidelines The Pioneer PureVision PDP 5000EX Plasma D...

Страница 7: ...deo signals This principle may make you hear buzz sound or electrical circuit hamming from the Plasma Display Do not attach such items as labels and tape to the product This may result in the discolouration or scratch of the cabinet When not using the product for a long period of time If you do not use the product for a long period of time the functions of the product may be adversely affected Swi...

Страница 8: ...th black bands at top bottom or right left If the same image is displayed continuously for several hours or for shorter periods of time over several days a permanent after image may remain on the screen due to burning of the fluorescent materials Such images may become less noticeable if moving images are later displayed but they will not disappear completely The energy save function can be set to...

Страница 9: ...be routed properly to prevent people from stepping on them or objects from resting on them Check the cords at the plugs and product 13 The Plasma Display used in this product is made of glass Therefore it can break when the product is dropped or applied with impact Be careful not to be injured by broken glass pieces in case the Plasma Display breaks 14 Overloading Do not overload AC outlets or ext...

Страница 10: ...t installation etc The installation holes provided are shown in the accompanying illustration Be sure to attach in 4 or more locations above and below left and right of the center line Use bolts that are long enough to be inserted 12 mm to 18 mm into the main unit from the attaching surface Refer to the side view diagram in the accompanying illustration As this unit is constructed with glass be su...

Страница 11: ...mum torque of 2N m 20 kgf cm when reattaching the handles When moving the display it should always be carried by two persons holding the rear handles in the manner shown NO Never attempt to move the Plasma Display by holding only one of the handles When installing the Plasma Display do not use the handles as means of hanging the display also do not use them as devices to prevent tipping over see i...

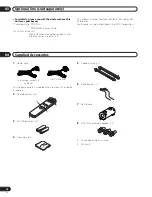
Страница 12: ...ing the unit This product includes FontAvenue fonts licensed by NEC Corporation FontAvenue is a registered trademark of NEC Corporation Supplied Accessories 1 Power cord Only the power cord that is appropriate in your country or region is supplied 2 Remote control unit 3 AA R6 batteries x 2 4 Cleaning cloth 5 Speed clamps x 2 6 Bead bands x 2 7 Ferrite core 8 BNC Pin conversion adaptor x 3 These O...

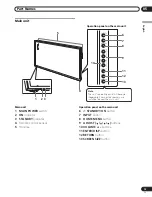
Страница 13: ...el on the main unit 6 STANDBY ON button 7 INPUT button 8 HOME MENU button 9 ADJUST buttons 10 VOLUME buttons 11 ENTER DISP button 12 RETURN button 13 SCREEN SIZE button POWER ON STANDBY 7 6 8 9 11 12 13 10 1 2 3 4 5 Note The unit s operating panel will become inoperable if connected speakers are installed too near the main unit Operation panel on the main unit ...

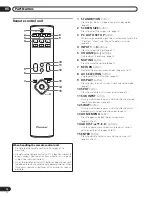
Страница 14: ...uts to subscreens page 22 12 SWAP button During multi screen display use this button to switch between main screen and subscreen page 22 13 HOME MENU button Press to open and close the on screen menu pages 24 to 37 14 ADJUST buttons Use to navigate menu screens and to adjust various settings on the unit pages 24 to 37 15 ENTER button Press to adjust or enter various settings on the unit pages 24 t...

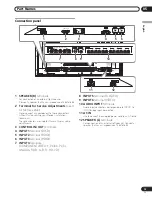
Страница 15: ...PUT4 terminals COMPONENT VIDEO Y Pb Cb Pr Cr ANALOG RGB G B R HD VD 8 INPUT5 terminal S VIDEO 9 INPUT6 terminal VIDEO 10 AUDIO INPUT terminals Audio input connectors corresponding to INPUT1 to INPUT6 video input connectors 11 AC IN Use to connect the supplied power cord to an AC outlet 12 SPEAKER L terminals For connection of an external left speaker Connect a speaker that has an impedance of 8 Ω ...

Страница 16: ...nvironment Operating environment temperature and humidity 0 C to 40 C less than 85 RH cooling vents not blocked Do not install this unit in a poorly ventilated area or in locations exposed to high humidity or direct sunlight or strong artificial light CAUTION The lower left section of the display unit shown in the illustration above is the location of the MAIN POWER switch and certain parts requir...

Страница 17: ...s or of accidents If you do not take these precautions the Plasma Display could fall down and cause injury The screws hooks chains and other fittings that you use to secure the Plasma Display to prevent it from overturning will vary according to the composition and thickness of the surface to which it will be attached Select the appropriate screws hooks chains and other fittings after first inspec...

Страница 18: ...ill not be produced if the and polarities are not connected correctly This unit supports the use of speakers with 8 Ω to 16 Ω impedance AC IN L SPEAKER 8Ω 16Ω Europe except UK and Eire UK and Eire Attaching the ferrite core To help prevent noise attach the supplied ferrite core to the connector end of the power cord as shown Use the supplied cable tie to prevent the ferrite core from slipping on t...

Страница 19: ...o undo once in place Please attach carefully 2 Bunch separated cables together and secure them with the provided bead bands Do not allow excessive stress to be placed on the ends of cables NOTE Cables can be routed to the right or left To attach the speed clamps to the main unit Connect the speed clamps using the 6 holes marked with o below depending on the situation As viewed from the rear of the...

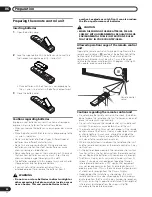
Страница 20: ...e remote control unit while pointing it toward the remote control sensor located at the bottom right of the front panel of the Plasma Display The distance from the remote control sensor must be within 7 m and the angle relative to the sensor must be within 30 degrees in the right left upward or downward direction Cautions regarding the remote control unit Do not expose the remote control unit to s...

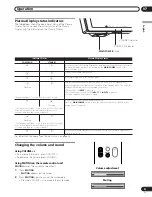
Страница 21: ...s off Power to the Plasma Display is on The Plasma Display is in the standby mode Flashing With the Power Management function page 29 set to On no signal was detected with the result that the unit switched to the standby mode The unit will turn back ON under one of the following conditions The main unit s INPUT is pressed One of the remote control unit s INPUT 1 to INPUT 6 is pressed An input sign...

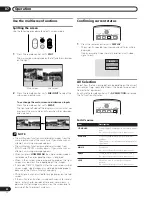
Страница 22: ...suited for image display on the Sub screen If the multiscreen function is used continuously for several hours or for shorter periods of time over several days a permanent after image may remain on the screen due to burning of the fluorescent materials Confirming current status 1 Press the remote control unit s DISPLAY The currently selected input source and settings will be displayed Display examp...

Страница 23: ...ivity or when exhibiting images publicly using the screen size function to compress or stretch the image may result in infringement of the copyrights of the image owners AV mode PC mode Item Description STANDARD For a highly defined image in a normally bright room USER Allows the user to customize settings as desired You can set the mode for each input source Item Description 4 3 For 4 3 standard ...

Страница 24: ... INPUT 1 to INPUT 6 INPUT to exit the menu NOTE You can return to the upper menu levels by pressing RETURN Home Menu Item Page Picture Contrast 25 Brightness 25 Color 25 Tint 25 Sharpness 25 Pro Adjust 25 Reset 25 Sound Treble 28 Bass 28 Balance 28 Front Surround 28 FOCUS 28 Reset 28 Power Control Energy Save 29 No Signal off 29 Power Management 29 Option Position 30 Auto Size 32 4 3 Mode 32 Drive...

Страница 25: ...mation screen appears Press to select Yes and then press ENTER ENTER DISP Advanced picture adjustments The Plasma Display provides various advanced functions for optimising the picture quality For details on these functions see the tables Several functions are not available when 1080p 50 Hz or 1080p 60 Hz signals are input Using PureCinema 1 Press HOME MENU 2 Select Picture then ENTER ENTER DISP 3...

Страница 26: ... exit the menu Using Color Management 1 Press HOME MENU 2 Select Picture then ENTER ENTER DISP 3 Select Pro Adjust then ENTER ENTER DISP 4 Select Color Detail then ENTER ENTER DISP 5 Select Color Management then ENTER ENTER DISP 6 Select an item to be adjusted then ENTER ENTER DISP 7 Select the desired level Selections Off Deactivates the PureCinema Standard Produces smooth and vivid moving images...

Страница 27: ...red Closer to green G Closer to yellow Closer to cyan C Closer to green Closer to blue B Closer to cyan Closer to magenta M Closer to blue Closer to red DNR Reduces video noise for clean crisp images The DNR stands for Digital Noise Reduction Selections Off Deactivates the DNR High Enhanced DNR Mid Standard DNR Low Moderate DNR MPEG NR Reduces mosquito noise from video image when a digital TV chan...

Страница 28: ...t the menu NOTE The effect of this function differs depending on signals Front Surround This provides three dimensional sound effects and or deep rich bass 1 Press HOME MENU 2 Select Sound then ENTER ENTER DISP 3 Select Front Surround 4 Select the desired parameter 5 Press HOME MENU INPUT 1 to INPUT 6 INPUT to exit the menu NOTE WOW designates a status where the FOCUS is on and TruBass SRS has bee...

Страница 29: ...play enters standby mode Power Management The Plasma Display will be automatically placed into the standby mode when no signal is received 1 Press HOME MENU 2 Select Power Control then ENTER ENTER DISP 3 Select Power Management 4 Select Enable 5 Press HOME MENU INPUT 1 to INPUT 6 INPUT to exit the menu NOTE INPUT1 and INPUT4 only are enabled However when Signal Type is set to AV they are disabled ...

Страница 30: ...ing image positions and clock automatically PC mode only Use Auto Setup to automatically adjust the positions and clock of images coming from a personal computer 1 Press PC AUTO SET UP on the remote control unit Auto Setup starts 2 Press HOME MENU INPUT 1 to INPUT 6 INPUT to exit the menu NOTE When Auto Setup is finished Auto Setup completed appears Even when Auto Setup completed appears Auto Setu...

Страница 31: ...or AUTO can be selected with the XGA WXGA setting 5 Press HOME MENU INPUT 1 to INPUT 6 INPUT to exit the menu NOTE If no image appears or images appear in inappropriate colors specify another video signal type For the signal types to be specified check the operation manual that came with the connected equipment Color system setting If an image does not appear clearly select another color system e ...

Страница 32: ...deo signal contains no aspect ratio information the function will not work even with On selected Selecting a screen size for received 4 3 aspect ratio signals AV mode only Specify whether the Plasma Display should choose the 4 3 mode or WIDE mode when 4 3 aspect ratio signals are received with the Auto Size function activated 1 Press HOME MENU 2 Select Option then ENTER ENTER DISP 3 Select 4 3 Mod...

Страница 33: ... or VCR operation manual for the signal type Using HDMI Input This Plasma Display is equipped with two HDMI terminals INPUT2 and 3 which accept digital video and audio signals To use the HDMI terminal activate the terminal and specify the types of video and audio signals to be received from the connected equipment For the types of these signals see the operation manual that came with the connected...

Страница 34: ... came with the connected equipment To specify the type of audio signals When you use the INPUT2 or INPUT3 HDMI terminal use the following procedure to specify the type of audio signals 1 Repeat steps 1 to 2 provided for To activate the HDMI terminal 2 Select Audio 3 Select the type of audio signals If you select Auto an attempt will be made to identify the type of audio signals when audio signals ...

Страница 35: ... disabled when Signal Type is set to PC For details on setting the signal type see the section To activate the DVI terminal If the images do not come in crearly specify another digital video signal type For the digital video signal types to be specified check the operation manual that came with the connected equipment Watching a DVD image Connecting a DVD player Use the INPUT4 5 or 6 terminal when...

Страница 36: ...ly used Watching an image from a personal computer Connecting a personal computer Use the INPUT1 or INPUT4 terminals to connect a personal computer When using the INPUT1 terminal When using the INPUT4 terminal Displaying an image from a personal computer To watch an image coming from the personal computer press INPUT 1 or INPUT 4 INPUT When connecting to a personal computer the correct input signa...

Страница 37: ...ections About SR The CONTROL OUT terminal on the rear of the Plasma Display supports SR that allows linked operations with a PIONEER AV receiver SR presents functions such as the input switch linkage operation function and the DSP surround mode display function For more information see the instruction manual that came with the PIONEER AV receiver supporting SR 1 Press HOME MENU 2 Select Setup then...

Страница 38: ...ble from either speaker has been disconnected See page 15 Has the balance been correctly adjusted See page 28 Picture is cut off Is the image position correct See page 30 Has the correct screen size been selected See pages 23 and 32 Strange color light color dark or color misalignment Adjust the picture tone See pages 25 to 27 Is the room too bright The picture may look dark in a room that is too ...

Страница 39: ... Corporation FontAvenue is a registered trademark of NEC Corporation HDMI the HDMI logo and High Definition Multimedia Interface are trademarks or registered trademarks of HDMI Licensing LLC The names of companies or institutions are trademarks or registered trademarks of the respective companies or institutions Published by Pioneer Corporation Copyright 2006 Pioneer Corporation All rights reserve...

Страница 40: ......

Страница 41: ...VERTISSEMENT Cet appareil est muni d une fiche de mise à la terre masse à trois fils Comme la fiche présente une troisième broche de terre elle ne peut se brancher que sur une prise de courant prévue pour une mise à la terre Si vous n arrivez pas à insérer la fiche dans la prise de courant contactez un électricien qualifié pour faire remplacer la prise par une qui soit mise à la terre N annulez pa...

Страница 42: ...de 20 07 Utilisation Témoins d état de l écran plasma 21 Modification du niveau sonore 21 Utilisation des fonctions multiécrans 22 Partage d écran 22 Vérification de l état actuel 22 Sélection AV 22 Sélection manuelle d un format d écran 23 08 Configuration du menu Utilisation du menu 24 Menus des modes AV 24 Menus des modes PC 24 Opérations du menu 24 09 Réglages de base Choix de la langue 25 Rég...

Страница 43: ...es d un lecteur de DVD 35 Branchement d un lecteur de DVD 35 Affichage des images d un DVD 36 Utilisation d une console de jeu et visionnement des images d un caméscope 36 Raccordement d une console de jeu ou d un caméscope 36 Affichage de l image d une console de jeu ou d un caméscope 36 Affichage des images d un ordinateur personnel 36 Branchement d un ordinateur personnel 36 Affichage de l imag...

Страница 44: ...est souhaitable de passer des images animées avec les réglages LARGE ou PLEIN pendant une période supérieure à 3 fois la durée de l image fixe précédemment affichée Après avoir utilisé l écran plasma passez toujours en mode veille STANDBY Instructions d installation L écran plasma Pioneer PureVision PDP 5000EX a un design très mince Pour des raisons de sécurité et pour éviter la chute de l apparei...

Страница 45: ...composé de pixels extrêmement fins et ces pixels émettent de la lumière en fonctions des signaux vidéo reçus Ce principe peut faire que l écran plasma donne lieu à un son de bourdonnement ou de ronflement de circuit électrique Ne collez aucune étiquette ni aucun ruban sur l appareil Cela peut décolorer ou rayer la carrosserie Si vous n utilisez pas l appareil pendant une longue période Si vous con...

Страница 46: ...ge demeure sur l écran pendant plusieurs heures ou encore apparaît tous les jours au cours d une période plus courte mais répétée une image rémanente peut être produite par brûlage de la couche fluorescente de l écran Cette image rémanente devient moins visible après l affichage d images animées mais elle ne disparaît jamais complètement La fonction d économie d énergie peut être employée pour évi...

Страница 47: ...iner ni qu il soit écrasé par un meuble ou un objet lourd Examinez soigneusement le cheminement du câble d alimentation près de la prise secteur et au point de sortie de l appareil 13 Le panneau de l écran plasma est en verre Il peut donc être brisé par la chute de l appareil ou par un choc En cas de casse du panneau veillez à ne pas être blessé par les débris 14 Surcharge Ne surchargez pas les pr...

Страница 48: ... fournie L écran plasma doit être maintenu en 4 points minimum placés au dessus et au dessous de l axe horizontal et à droite et à gauche de l axe vertical Utilisez des boulons d une longueur suffisante pour pénétrer de 12 mm à 18 mm au moins dans l écran plasma à partir de sa surface de fixation Reportez vous à la vue de côté sur l illustration fournie L écran plasma est muni d une vitre qui inte...

Страница 49: ...le minimum de 2 N m 20 kgf cm lors de la remise en place des poignées Lors du déplacement de l écran il doit toujours être transporté par deux personnes saisissant les poignées arrière comme illustré ici NON N essayez jamais de déplacer l écran plasma en ne le tenant que par une de ses poignées Lors de l installation de l écran plasma n utilisez pas ses poignées pour le suspendre à une paroi ni co...

Страница 50: ...doté des polices FontAvenue sous licence NEC Corporation FontAvenue est une marque déposée par NEC Corporation Accessoires fournis 1 Cordon d alimentation Seul le cordon d alimentation convenant pour le pays ou la région de distribution est fourni 2 Télécommande 3 Piles AA R6 x 2 4 Chiffon de nettoyage 5 Colliers rapides x 2 6 Serre câble x 2 7 Noyau en ferrite 8 Adaptateur de conversion BNC broch...

Страница 51: ...é principale 6 Touche STANDBY ON 7 Touche INPUT 8 Touche HOME MENU 9 Touches ADJUST 10 Touches VOLUME 11 Touche ENTER DISP 12 Touche RETURN 13 Touche SCREEN SIZE POWER ON STANDBY 7 6 8 9 11 12 13 10 1 2 3 4 5 Remarque Le panneau de commande de l appareil ne sera plus utilisable si les haut parleurs raccordés sont installés trop près de l unité principale Panneau de commande de l unité principale ...

Страница 52: ...UT Pendant l affichage multiécrans elle permet de changer les entrées aux écrans secondaires page 22 12 Touche SWAP Pendant l affichage multiécrans elle permet d alterner entre l écran principal et l écran secondaire page 22 13 Touche HOME MENU Sa pression permet d ouvrir et de fermer la page de menu sur écran page 24 à 37 14 Touches ADJUST Pour naviguer sur les pages de menu et effectuer les dive...

Страница 53: ...INPUT4 COMPONENT VIDEO Y Pb Cb Pr Cr ANALOG RGB G B R HD VD 8 Prise INPUT5 S VIDEO 9 Prise INPUT6 VIDEO 10 Prises AUDIO INPUT Connecteurs d entrée audio correspondant aux connecteurs d entrée vidéo INPUT1 à INPUT6 11 Prise d entrée secteur AC IN Pour le branchement du cordon d alimentation fourni sur une prise secteur 12 Prises SPEAKER L Pour le branchement d un haut parleur gauche externe Branche...

Страница 54: ...montre l illustration ci dessus certaines pièces faisant saillie telles que l interrupteur principal MAIN POWER et des commandes requises pour l affichage sont regroupées dans le coin inférieur gauche de l écran Par conséquent lors du transport et de l installation de l appareil veillez à ne pas soumettre cette partie à des chocs ou à une pression indue car ces pièces pourraient en être endommagée...

Страница 55: ...ccident Si vous ne prenez pas ces précautions l écran plasma risque de tomber ou de se renverser et de causer des blessures Les vis crochets chaînes et autres ferrures que vous utilisez pour fixer l écran plasma pour l empêcher de se renverser diffèreront suivant la composition et l épaisseur de la surface sur laquelle il sera fixé Sélectionnez les vis crochets chaînes et autres ferrures qui convi...

Страница 56: ...ront pas produits si les bornes et ne sont pas raccordées correctement Cet appareil prend en compte des enceintes d une impédance de 8 Ω à 16 Ω AC IN L SPEAKER 8Ω 16Ω Fixation du noyau de ferrite Pour éviter les parasites fixez le noyau de ferrite fourni au côté connecteur du cordon d alimentation comme montré Utilisez le collier pour câble fourni pour empêcher le noyau de ferrite de glisser sur l...

Страница 57: ...oit difficile Fermez les soigneusement 2 Liez les câbles et assurez leur maintien au moyen des serre câble fournis Veillez à ce que les bouts des câbles ne subissent pas une tension excessive REMARQUE Les câbles peuvent cheminer d un côté ou de l autre Fixation des colliers rapides à l écran plasma Engagez les colliers rapides dans les trous 6 repérés par o sur l illustration ci dessous Vue de l a...

Страница 58: ...des piles DANGER LORSQUE VOUS DISPOSEZ DE PILES BATTERIES USÉES VEUILLEZ VOUS CONFORMER AUX NORMES GOUVERNEMENTALES OU ENVIRONNEMENTALES EN VIGUEUR DANS VOTRE PAYS OU RÉGION Portée du boîtier de télécommande Agissez sur le boîtier de télécommande en le dirigeant vers le capteur qui est placé à la partie inférieure droite de l écran plasma La distance du boîtier au capteur doit être inférieure à 7 ...

Страница 59: ...s l interrupteur MAIN POWER de celui ci est désactivé L écran plasma est sous tension L écran plasma est en mode Veille Clignotant La fonction Gestion d alimentation page 29 étant en service Marche aucun signal n est détecté et l appareil se place donc en mode Veille L appareil se remettra à nouveau sous tension dans un des cas suivants INPUT de l unité principale est actionnée Une des INPUT 1 à I...

Страница 60: ...ran secondaire Si la fonction multiécrans est utilisée de façon continue pendant plusieurs heures ou pendant une durée plus courte mais étalée sur plusieurs jours une image rémanente peut subsister de façon permanente sur l écran par suite d une brûlure des matières fluorescentes Vérification de l état actuel 1 Appuyez sur la touche DISPLAY de la télécommande La source d entrée et les réglages act...

Страница 61: ... en public l emploi de la fonction Format d écran pour comprimer ou élargir une image peut entraîner une violation des copyrights des détenteurs des images Mode AV Mode PC Paramètre Description STANDARD Pour obtenir une image très bien définie dans une pièce de luminosité normale UTILISATEUR Ce paramètre vous donne le moyen de personnaliser les réglages Vous pouvez définir le mode pour chaque sour...

Страница 62: ...puyez sur HOME MENU INPUT 1 à INPUT 6 INPUT pour quitter le menu REMARQUE Vous pouvez revenir au menu de niveau supérieur en appuyant sur RETURN Home Menu Paramètre Page Image Contraste 25 Luminos 25 Couleur 25 Teinte 25 Netteté 25 Réglage pro 25 Réinitial 25 Son Aigus 28 Graves 28 Balance 28 FOCUS 28 Surround avant 28 Réinitial 28 Commande alimentation Économie d énergie 29 Gestion de l énergie A...

Страница 63: ...tres utilisez pour sélectionner Réinitial au cours de l opération 3 puis appuyez sur ENTER ENTER DISP Une page de confirmation s affiche Utilisez pour sélectionner Oui puis appuyez sur ENTER ENTER DISP Réglages avancés de l image L écran plasma est doté de diverses fonctions avancées permettant d optimiser la qualité de l image Pour les détails sur ces fonctions consultez les tableaux Certaines fo...

Страница 64: ...TER DISP 3 Sélectionnez Réglage pro puis ENTER ENTER DISP 4 Sélectionnez Infos couleur puis ENTER ENTER DISP 5 Sélectionnez Gestion coul puis ENTER ENTER DISP 6 Sélectionnez le paramètre à définir puis ENTER ENTER DISP PureCinema Cette fonction détecte automatiquement toute source de film initialement le codage est de 24 images secondes l analyse puis recrée chaque image fixe du film pour obtenir ...

Страница 65: ... Magenta Tire vers le bleu Tire vers le rouge DNR Cette fonction réduit le bruit vidéo ce qui fournit des images nettes et propres DNR signifie Réduction du bruit numérique Sélections Arrêt DNR n est pas actif Haut DNR accentuée Moyen DNR standard Bas DNR modérée Gestion coul 0 0 0 0 0 0 Y R G C B M MPEG NR Cette fonction réduit le bruit de moustique des images vidéo produit parfois quand on regar...

Страница 66: ...r Réinitial au cours de l opération 3 puis appuyez sur ENTER ENTER DISP Une page de confirmation s affiche Utilisez pour sélectionner Oui puis appuyez sur ENTER ENTER DISP FOCUS Ce paramètre déplace vers le haut le point d où proviennent les sons image sonore et produit des contours sonores très définis 1 Appuyez sur HOME MENU 2 Sélectionnez Son puis ENTER ENTER DISP 3 Sélectionnez FOCUS 4 Sélecti...

Страница 67: ...est invalidé pendant l affichage du HOME MENU Un message sera affiché immédiatement avant que l écran plasma ne se place en mode Veille Gestion de l énergie PC L écran plasma se met automatiquement en mode Veille si aucun signal n est capté 1 Appuyez sur HOME MENU 2 Sélectionnez Commande alimentation puis ENTER ENTER DISP 3 Sélectionnez Gestion de l énergie PC 4 Sélectionnez Activer 5 Appuyez sur ...

Страница 68: ...égler automatiquement la position et l horloge des images provenant de l ordinateur personnel 1 Appuyez sur la touche PC AUTO SET UP de la télécommande Autoinstallation démarre 2 Appuyez sur HOME MENU INPUT 1 à INPUT 6 INPUT pour quitter le menu REMARQUE Lorsque les réglages sont terminés Réglage automatique terminé s affiche sur l écran Même si Réglage automatique terminé s affiche l auto install...

Страница 69: ... ou AUTO par le réglage XGA WXGA 5 Appuyez sur HOME MENU INPUT 1 à INPUT 6 INPUT pour quitter le menu REMARQUE Si aucune image n apparaît ou si les couleurs sont inhabituelles choisissez un autre type de signal Pour de plus amples détails concernant les types de signal reportez vous au mode d emploi qui accompagne l appareil relié Choix du standard couleur Si les images ne sont pas nettes sélectio...

Страница 70: ...aspect la fonction est inopérante même si Marche est sélectionné Sélection d un format d écran pour des signaux de ratio d aspect 4 3 reçus mode AV seulement Spécifiez si l écran plasma doit choisir le mode 4 3 ou le mode LARGE quand des signaux de ratio d aspect 4 3 sont reçus avec la fonction Taille Auto activée 1 Appuyez sur HOME MENU 2 Sélectionnez Options puis ENTER ENTER DISP 3 Sélectionnez ...

Страница 71: ... signal d entrée en vous servant du menu Reportez vous à la page 31 En ce qui concerne le type de signal reportez vous au mode d emploi de votre décodeur ou de votre magnétoscope Utilisation de l entrée HDMI Cet écran plasma est muni de deux bornes HDMI INPUT2 et 3 qui acceptent des signaux vidéo et audio numériques Pour utiliser la borne HDMI mettez celle ci en service et précisez les types de si...

Страница 72: ... type des signaux audio 1 Répétez les opérations 1 à 2 de la partie Pour mettre en service la prise HDMI 2 Sélectionnez Audio 3 Sélectionnez le type de signaux audio Si vous sélectionnez Auto l appareil tente d identifier les signaux audio lorsqu ils sont reçus 4 Appuyez sur HOME MENU INPUT 1 à INPUT 6 INPUT pour quitter le menu REMARQUE Si aucun son n est produit sélectionner un autre type pour l...

Страница 73: ...e du type de signal reportez vous à la section Pour mettre en service la prise DVI Si les images ne semblent pas nettes spécifiez un autre type de signal vidéo numérique En ce qui concerne les types de signaux vidéo numériques à spécifier consultez le mode d emploi fourni avec l appareil raccordé Affichage des images d un lecteur de DVD Branchement d un lecteur de DVD Utilisez la borne INPUT4 5 ou...

Страница 74: ...l qu aux prises qui seront effectivement utilisées Affichage des images d un ordinateur personnel Branchement d un ordinateur personnel Utilisez les prises INPUT1 ou INPUT4 pour raccorder un ordinateur personnel A l emploi de la prise INPUT1 A l emploi de la prise INPUT4 Affichage de l image d un ordinateur personnel Pour regarder les images provenant d un ordinateur personnel appuyez sur la touch...

Страница 75: ...ommande À propos de SR La prise CONTROL OUT à l arrière de l écran plasma est conforme à la spécification SR qui autorise une liaison fonctionnelle avec un récepteur audiovisuel PIONEER SR assure diverses fonctions telles la sélection de l entrée et l affichage de la correction d ambiance DSP Pour plus d informations reportez vous au mode d emploi qui accompagne le récepteur AV de PIONEER prenant ...

Страница 76: ...as débranchée Reportez vous à la 15 La balance est elle correctement réglée Reportez vous à la 28 L image est tronquée La position de l image est elle correcte Reportez vous à la 30 Le format d image est il correct Reportez vous aux pages 23 et 32 Couleurs surprenantes couleurs délavées couleurs sombres ou mal alignées Réglez la tonalité de l image Reportez vous aux pages 25 à 28 La pièce est elle...

Страница 77: ...tAvenue sous licence NEC Corporation FontAvenue est une marque déposée par NEC Corporation HDMI le logo HDMI et High Definition Multimedia Interface sont des marques de commerce ou des marques déposées de HDMI Licensing LLC Les noms de société ou d organisme sont des marques de commerce ou des marques déposées de leur société ou organisme respectif Publication de Pioneer Corporation 2006 Pioneer C...

Страница 78: ......

Страница 79: ...te Schuko Steckdose vorgesehen ist Falls der Netzstecker aufgrund einer abweichenden Ausführung nicht an die Netzsteckdose angeschlossen werden kann muss ein Elektriker mit der Installation einer vorschriftsmäßigen Netzsteckdose beauftragt werden Beim Erdungsstift handelt es sich um eine Sicherheitsvorrichtung die auf keinen Fall umgangen oder außer Kraft gesetzt werden darf D3 4 2 1 6_A_Ge WARNUN...

Страница 80: ...der Fernbedienung zu beachten 20 07 Bedienung Plasma Display Statusanzeigen 21 Lautstärke und Toneinstellungen 21 Gebrauch der Mehrbildfunktionen 22 Aufteilen des Bildschirms unter zwei Bilder 22 Überprüfen des aktuellen Status 22 AV Wahl 22 Manuelles Wählen einer Bildschirmgröße 23 08 Menü Steuerung Menü Übersicht 24 AV Modus Menüs 24 PC Modus Menüs 24 Menü Bedienung 24 09 Grundeinstellungen Eins...

Страница 81: ...ines DVI Gerätes 35 Anzeigen eines DVD Bilds 35 Anschließen eines DVD Spielers 35 Anzeigen eines DVD Bilds 36 Wiedergabe von Spielekonsole oder Camcorder 36 Anschließen einer Spielekonsole oder eines Camcorders 36 Bildwiedergabe von einer Spielekonsole oder einem Camcorder 36 Wiedergabe von einem Personal Computer 36 Anschließen eines Personalcomputers 36 Anzeigen eines Computerbilds 37 Computer K...

Страница 82: ...andbilds empfiehlt es sich in Bildschirm Einstellung BREITBILD oder VOLL über mindestens die dreifache Dauer der vorherigen Standbildwiedergabe ein normales bewegtes Bild wiederzugeben Schalten Sie das Display nach dem Betrieb des Plasma Displays stets auf den Bereitschaftsmodus STANDBY Richtlinien zur Aufstellung Das Pioneer Plasma Display PureVision PDP 5000EX weist eine sehr flache Bauweise auf...

Страница 83: ...hlen Hierbei können Summgeräusche oder Stromkreisbrummen vom Plasma Display wahrgenommen werden Haften Sie keine Gegenstände wie z B Etiketten oder Klebebänder am Produkt an Hierdurch könnte das Gehäuse verfärbt oder verkratzt werden Bei längerem Nichtgebrauch des Produkts Durch längerzeitigen Nichtgebrauch können Funktionen des Produkts beeinträchtigt werden Schalten Sie das Produkt gelegentlich ...

Страница 84: ...ber mehrere Tage hinweg angezeigt wird kann es am Plasma Display einbrennen und ein permanentes Nachbild hinterlassen Derartige Nachbilder fallen zwar nicht so stark auf wenn bewegte Bilder wiedergegeben werden sie lösen sich jedoch nicht mehr vollständig auf Die Energiesparfunktion kann auch zur Vorbeugung gegen Einbrenner eingesetzt werden siehe Seite 29 Mischen Sie dieses Produkt wenn Sie es en...

Страница 85: ...eschützt sind und keine schweren Gegenstände darauf abgestellt werden Kontrollieren Sie die Kabel insbesondere an den Steckern und am Produkt 13 Das Plasma Display enthält Glasteile Es kann brechen wenn es fallen gelassen oder Druck darauf ausgeübt wird Im Falle des Falles ist Vorsicht geboten um sich nicht an Scherben oder Splittern zu verletzen 14 Überlastung Netzsteckdosen und Verlängerungskabe...

Страница 86: ...lasma Display an mindestens 4 Stellen oberhalb und unterhalb der Mittellinie sowie links und rechts daneben zu befestigen Verwenden Sie Schrauben die lang genug sind um von der Montagefläche aus um 12 mm bis 18 mm in das Gerät eingeführt werden zu können Siehe die Seitenansicht des beigefügten Schemas Da dieses Plasma Display Bauteile aus Glas enthält muss es an einer flachen ebenen Oberfläche mon...

Страница 87: ...cm anzuziehen Das Display muss stets von zwei Personen getragen werden wobei die Tragegriffe an der Rückseite wie unten gezeigt zu ergreifen sind VERBOTEN Das Plasma Display darf auf keinen Fall getragen werden indem es nur an einem einzigen Tragegriff ergriffen wird Bei der Aufstellung des Plasma Displays dürfen die Tragegriffe auf keinen Fall zum Aufhängen des Displays verwendet werden sie dürfe...

Страница 88: ...ue Fonts unter Lizenz von NEC Corporation integriert FontAvenue ist ein eingetragenes Warenzeichen der NEC Corporation Mitgeliefertes Zubehör 1 Netzkabel Nur das für Ihr Land bzw Gebiet geeignete Netzkabel ist mitgeliefert 2 Fernbedienung 3 Mignonzelle R6 Größe AA x 2 4 Reinigungstuch 5 Schnellverschluss Kabelband x 2 6 Kugelband x 2 7 Ferritkern 8 BNC Cinch Wandleradapter x 3 Vorliegende Bedienun...

Страница 89: ...ste STANDBY ON 7 Eingangswahltaste INPUT 8 Hauptmenü Taste HOME MENU 9 Einstelltasten ADJUST 10 Lautstärke Regeltasten VOLUME 11 Eingabe Anzeigetaste ENTER DISP 12 Rückkehrtaste RETURN 13 Bildschirmgrößen Wahltaste SCREEN SIZE POWER ON STANDBY 7 6 8 9 11 12 13 10 1 2 3 4 5 ZUR BEACHTUNG Wenn die angeschlossenen Lautsprecher in zu großer Nähe des Plasma Displays aufgestellt werden kann dies einen Z...

Страница 90: ...e SPLIT Drücken Sie diese Taste um auf Mehrbildanzeige umzuschalten Seite 22 11 Nebeneingangstaste SUB INPUT Betätigen Sie diese Taste bei Mehrbildanzeige um die Eingänge auf Nebenbilder umzuschalten Seite 22 12 Bildtausch Taste SWAP Betätigen Sie diese Taste bei Mehrbildanzeige um zwischen Haupt und Nebenbild umzuschalten Seite 22 13 Hauptmenü Taste HOME MENU Betätigen Sie diese Taste für Ein und...

Страница 91: ...hsen INPUT4 COMPONENT VIDEO Y Pb Cb Pr Cr ANALOG RGB G B R HD VD 8 Eingangsbuchse INPUT5 S VIDEO 9 Eingangsbuchse INPUT6 VIDEO 10 Audio Eingangsbuchsen AUDIO INPUT Audio Eingangsbuchsen jeweils für die Video Eingangsbuchsen INPUT1 bis INPUT6 11 Netzeingang AC IN Verbinden Sie diesen Netzeingang über das mitgelieferte Netzkabel mit einer Netzsteckdose 12 Lautsprecherklemmen für linken Kanal SPEAKER...

Страница 92: ...ldung gezeigten Display Einheit umfasst den MAIN POWER Schalter sowie bestimmte für Anzeige benötigteTeile und die Kontur involviert eine erhöhte Projektion Bitte treffen Sie daher bei Transport und Installation des Plasma Displays geeignete Maßnahmen um diesen Bereich vor Stößen oder übermäßiger Kraftanwendung zu schützen da die betreffenden Teile anderenfalls beschädigt werden können Über 50 cm ...

Страница 93: ... kann Wenn derartige Vorkehrungen unterlassen werden könnte das Plasma Display herunterfallen und Verletzungen verursachen Die Wahl der Sicherungsmittel gegen Umkippen wie z B Schrauben Haken Ketten usw hängt von der Beschaffenheit und Dicke der Montagefläche ab Bevor Sie sich für eine Sicherungsmethode und die entsprechenden Befestigungsteile entscheiden sollten Sie zunächst die Dicke und Beschaf...

Страница 94: ...nschluss der Lautsprecherkabel mit vertauschter Polarität und wird keine einwandfreie Tonwiedergabe erhalten Dieses Gerät ist auf den Anschluss von Lautsprechern mit einer Impedanz von 8 Ω bis 16 Ω ausgelegt AC IN L SPEAKER 8Ω 16Ω Anbringen des Ferritkerns Um Störungen zu unterdrücken bringen Sie den mitgelieferten Ferritkern wie gezeigt am Steckerende des Netzkabels an Verwenden Sie den mitgelief...

Страница 95: ...r bei der Befestigung sorgfältig vor 2 Bündeln Sie getrennt verlaufende Kabel und sichern Sie sie mit den mitgelieferten Kugelbändern Sorgen Sie dafür dass die Kabelenden keiner starken Belastung ausgesetzt sind ZUR BEACHTUNG Kabel können wahlweise auf der rechten oder linken Seite verlegt werden Befestigen der Schnellverschluss Kabelbänder am Plasma Display Verwenden Sie die 6 in der nachstehende...

Страница 96: ...bedienung Zur Benutzung der Fernbedienung ist diese auf den Fernbedienungssensor unten rechts an der Vorderseite des Plasma Displays zu richten Der Abstand der Fernbedienungseinheit vom Fernbedienungssensor sollte 7 m nicht überschreiten und ihr Winkel zum Sensor sollte nach rechts links oben und unten innerhalb von 30 Grad liegen Beim Umgang mit der Fernbedienung zu beachten Setzen Sie die Fernbe...

Страница 97: ...fuhr des Plasma Displays ist eingeschaltet Das Plasma Display befindet sich im Bereitschaftsmodus Blinkt Da bei Einstellung der Energiemanagement Funktion Seite 29 auf Ein kein Signal erfasst wurde wird das Plasma Display automatisch auf den Bereitschaftsmodus geschaltet Unter folgenden Bedingungen schaltet sich das Gerät erneut ein INPUT am Plasma Display wird gedrückt INPUT 1 bis INPUT 6 an der ...

Страница 98: ...rden Videobilder nicht korrekt angezeigt dies ist auf die Leistung des Plasma Displays zurückzuführen Signale im Format PAL 60 eignen sich nicht zur Anzeige als Nebenbilder Wenn die Mehrbildfunktion mehrere Stunden lang ununterbrochen oder über jeweils kürzere Zeiträume hinweg an mehreren Tage hintereinander verwendet wird kann aufgrund von Einbrennen der fluoreszierenden Stoffe ein permanentes Na...

Страница 99: ...g des Bildschirmformats komprimiert oder ausgedehnt wird AV Modus PC Modus SPIELE Senkt die Bildhelligkeit um das Betrachten angenehmer zu machen Sie können den Modus für jede Eingangsquelle einstellen ANWENDER Ermöglicht es dem Anwender die Einstellungen wunschgemäß vorzunehmen Sie können den Modus für jede Eingangsquelle einstellen Gegenstand Beschreibung STANDARD Für ein Bild mit hoher Auflösun...

Страница 100: ...INPUT 1 bis INPUT 6 INPUT um das Menü zu verlassen ZUR BEACHTUNG Mit RETURN können Sie zur nächsthöheren Menüebene zurückkehren Home Menu Gegenstand Seite Bild Kontrast 25 Helligkeit 25 Farbsättigung 25 Tint 25 Schärfe 25 Profi Einstellungen 25 Rückstellen 25 Ton Höhen 28 Bass 28 Balance 28 FOCUS 28 Front Surround 28 Rückstellen 28 Energiesparmodi Energiesparmodus 29 Kein Signal aus 29 Energiemana...

Страница 101: ...tellen und drücken dann ENTER ENTER DISP Die Bestätigungsanzeige erscheint Wählen Sie Ja mit und drücken Sie dann ENTER ENTER DISP Erweiterte Bildeinstellungen Das Plasma Display stellt Ihnen verschiedene fortschrittliche Funktionen zur Optimierung der Bildqualität zur Verfügung Einzelheiten zu diesen Funktionen entnehmen Sie bitte den Tabellen Bei Zuführung von 1080p 50 Hz oder 1080p 60 Hz Signal...

Страница 102: ...U 2 Bild wählen dann ENTER ENTER DISP 3 Profi Einstellungen wählen dann ENTER ENTER DISP 4 Wählen Sie Color Detail dann ENTER ENTER DISP 5 Farbmanagement wählen dann ENTER ENTER DISP 6 Wählen Sie den einzustellenden Menüpunkt dann ENTER ENTER DISP PureCinema Erkennt automatisch Quellen die auf Kinofilmen basieren ursprünglich 24 Bilder Sekunde analysiert die Signale und bereitet die einzelnen Bild...

Страница 103: ...R ENTER DISP Gegenstandm Taste Taste R Rot Näher an Magenta Näher an Gelb Y Gelb Näher an Rot Näher an Grün G Grün Näher an Gelb Näher an Cyan C Cyan Näher an Grün Näher an Blau B Blau Näher an Cyan Näher an Magenta M Magenta Näher an Blau Näher an Rot DNR Zum Reduzieren von Videorauschen für ein sauberes besser konturiertes Bild DNR steht für Digital Noise Reduction digitale Rauschunterdrückung W...

Страница 104: ... 1 bis INPUT 6 INPUT um das Menü zu verlassen ZUR BEACHTUNG Die Auswirkung dieser Funktion ist signalabhängig Front Surround Liefert dreidimensionale Klangeffekte und oder tiefe satte Bässe 1 Drücken Sie HOME MENU 2 Ton wählen dann ENTER ENTER DISP 3 Front Surround wählen 4 Wählen Sie den gewünschten Parameter 5 Drücken Sie HOME MENU oder INPUT 1 bis INPUT 6 INPUT um das Menü zu verlassen ZUR BEAC...

Страница 105: ...ngezeigt Energiemanagement Das Plasma Display wird automatisch auf den Bereitschaftsmodus umgeschaltet wenn kein Signal empfangen wird 1 Drücken Sie HOME MENU 2 Energiesparmodi wählen dann ENTER ENTER DISP 3 Energiemanagement wählen 4 Aktiviert wählen 5 Drücken Sie HOME MENU oder INPUT 1 bis INPUT 6 INPUT um das Menü zu verlassen ZUR BEACHTUNG Nur INPUT1 und INPUT4 sind freigegeben Bei Einstellung...

Страница 106: ... der Lage und Bildbreite Clock von Bildern von einem Personal Computer 1 Drücken Sie PC AUTO SET UP an der Fernbedienung Automatische Einstellung beginnt 2 Drücken Sie HOME MENU oder INPUT 1 bis INPUT 6 INPUT um das Menü zu verlassen ZUR BEACHTUNG Wenn Automatische Einstellung beendet ist wird Auto Setup abgeschlossen angezeigt Unter bestimmten Bedingungen kann Automatische Einstellung gescheitert...

Страница 107: ...nn für die XGA WXGA Einstellung gewählt werden 5 Drücken Sie HOME MENU oder INPUT 1 bis INPUT 6 INPUT um das Menü zu verlassen ZUR BEACHTUNG Wenn kein Bild erscheint oder die Bildfarben nicht stimmen geben Sie einen anderen Videosignaltyp vor Bezüglich der anzugebenden Signaltypen siehe Bedienungsanleitung für das entsprechende angeschlossene Gerät Einstellen des Farbsystems Wenn das Bild nicht kl...

Страница 108: ...verhältnis enthält ist diese Funktion wirkungslos auch wenn Ein gewählt worden ist Wählen einer Bildschirmgröße für empfangene 4 3 Bildseitensignale nur AV Modus Geben Sie bei Empfang von 4 3 Bildseitensignalen und aktivierter Funktion Auto Größe an ob das Plasma Display den 4 3 Modus oder den BREITBILD Modus wählen soll 1 Drücken Sie HOME MENU 2 Weiterführende Einstellungen wählen dann ENTER ENTE...

Страница 109: ...ter Umständen die Einstellung des Eingangssignaltyps über das Menü ändern Siehe Seite 31 Näheres zum Signaltyp des Decoders oder Videorecorders finden Sie in der dazugehörigen Bedienungsanleitung Verwendung des HDMI Eingangs Dieses Plasma Display ist mit zwei HDMI Anschlüssen INPUT2 und 3 für digitale Video und Audiosignale ausgestattet Zur Verwendung aktivieren Sie den HDMI Anschluss und geben Si...

Страница 110: ...prechende angeschlossene Gerät Vorgeben des Typs der Audiosignale Bei Verwendung des HDMI Anschlusses INPUT2 oder INPUT3 gehen Sie wie nachfolgend beschrieben vor um den Typ der Audiosignale vorzugeben 1 Wiederholen Sie die Schritte 1 bis 2 für Aktivieren des HDMI Anschlusses 2 Ton wählen 3 Den Typ der Audiosignale wählen Wenn Sie Auto gewählt haben versucht das System bei Empfang von Audiosignale...

Страница 111: ...signale wählen 4 Drücken Sie HOME MENU oder INPUT 1 bis INPUT 6 INPUT um das Menü zu verlassen ZUR BEACHTUNG Bei Einstellung von Signaltyp auf PC ist diese Einstellung gesperrt Näheres zur Einstellung des Signaltyps finden Sie im Abschnitt Aktivieren des DVI Anschlusses Wenn das Bild nicht sauber wiedergegeben wird geben Sie einen anderen digitalen Videosignaltyp vor Näheres zu den digitalen Video...

Страница 112: ...PUT um EINGANG 5 oder 6 zu wählen ZUR BEACHTUNG Verbinden Sie externe Geräte nur mit Anschlüssen die auch tatsächlich verwendet werden Wiedergabe von einem Personal Computer Anschließen eines Personalcomputers Verwenden Sie den Anschluss INPUT1 oder 4 zum Anschließen eines Personalcomputers Bei Verwendung des Anschlusses INPUT1 Bei Verwendung des Anschlusses INPUT4 INPUT4 R L INPUT4 COMPONENT VIDE...

Страница 113: ...UR BEACHTUNG Bevor Sie Anschlüsse herstellen vergewissern Sie sich dass die Stromversorgung ausgeschaltet ist Stellen Sie alle Gerätenanschlüsse her bevor Sie Steuerkabel anschließen Zu SR Der Anschluss CONTROL OUT an der Rückseite des Plasma Displays unterstützt SR so dass Verbundbetrieb mit einem PIONEER AV Receiver möglich ist SR bietet Funktionen wie Eingangsumschalt Verbundbetrieb und DSP Sur...

Страница 114: ...Bild ist verstümmelt Stimmt die Bildpositionierung Siehe Seite 30 Ist die richtige Bildschirmgröße gewählt Siehe Seiten 23 und 32 Verfärbung Farbe blass oder dunkel schlechter Farbabgleich Stellen Sie den Bildton ein Siehe Seiten 25 bis 27 Ist der Raum zu hell In einem zu hellen Raum kann das Bild dunkel aussehen Prüfen Sie die Farbsystem Einstellung Siehe Seite 31 Nachbild bleibt zurück Wenn nach...

Страница 115: ...ntAvenue Fonts unter Lizenz von NEC Corporation integriert FontAvenue ist ein eingetragenes Warenzeichen der NEC Corporation HDMI das HDMI Logo und High Definition Multimedia Interface sind Warenzeichen oder eingetragene Warenzeichen von HDMI Licensing LLC Namen der erwähnten Firmen oder Institutionen sind Warenzeichen oder eingetragene Warenzeichen der jeweiligen Inhaber Veröffentlicht von Pionee...

Страница 116: ......

Страница 117: ... messa a terra Se non si riesce ad inserire la spina nella presa di corrente di casa rivolgersi ad un elettricista qualificato per far sostituire la presa alla parete con una dotata di attacco per la messa a terra Non annullare la scopo di sicurezza della spina con messa a terra D3 4 2 1 6_A_It ATTENZIONE Per evitare il pericolo di incendi non posizionare sull apparecchio dispositivi con fiamme vi...

Страница 118: ... del suono 21 Uso delle funzioni multischermo 22 Divisione dello schermo 22 Conferma dello stato operativo attuale 22 Selezione AV 22 Selezione manuale delle dimensioni dello schermo 23 08 Impostazione del menu Utilizzo del menu 24 Menu della modalità AV 24 Menu della modalità PC 24 Operazioni del menu 24 09 Impostazioni di base Impostazione della lingua 25 Regolazione di base dell immagine 25 Reg...

Страница 119: ...DVD 35 Visualizzazione di immagini DVD 36 Utilizzo di una consolle per giochi e visualizzazione di immagini provenienti da una videocamera 36 Collegamento di una consolle per giochi o di una videocamera 36 Visualizzazione delle immagini provenienti da una consolle per giochi o una videocamera 36 Visualizzazione di immagini provenienti da un personal computer 36 Collegamento con un personal compute...

Страница 120: ... esecuzione di un videogioco oppure alla visualizzazione di un immagine proveniente da un PC o di qualsiasi immagine fissa è consigliabile vedere normali immagini dinamiche con l impostazione di schermo WIDE o FULL di durata superiore a tre volte la durata della precedente immagine fissa Dopo avere usato lo schermo al plasma ricordatevi di portarlo nella modalità STANDBY Consigli sull installazion...

Страница 121: ...evuti Questa condizione può rendere udibile un certo ronzio proveniente dai circuiti elettrici dello schermo Non affiggete sull apparecchio etichette o nastri adesivi In caso contrario se ne potrebbe ottenere lo scolorimento o la graffiatura del mobile Inutilizzo prolungato dell apparecchio Lasciando l apparecchio inutilizzato per lungo tempo esso potrebbe dar luogo a malfunzionamenti Vi suggeriam...

Страница 122: ...ivo sono 1920x1080 ed immagini con barre nere sotto e sopra o a destra e sinistra Se un immagine viene visualizzata in modo continuo per alcune ore ovvero per periodi più brevi ma per alcuni giorni consecutivi sullo schermo può rimanere un effetto post immagine permanente dovuto alla bruciatura del materiale fluorescente di cui lo schermo stesso è composto Le immagini residue possono divenire meno...

Страница 123: ...ocietà elettrica 12 Protezione del cavo di alimentazione Il cavo di alimentazione deve essere disposto in modo adeguato evitandone il calpestio da parte delle persone e lo schiacciamento da parte di oggetti Controllate inoltre il cavo nei punti di collegamento sull apparecchio e di connessione alla presa di rete 13 Il display al plasma utilizzato in questo apparecchio è realizzato in vetro Di cons...

Страница 124: ...lmeno quattro punti sopra e sotto e a destra e a sinistra delle linee centrali orizzontale e verticale Usare bulloni lunghi a sufficienza da poter venire inseriti da 12 mm a 18 mm nell unità principale dalla superficie di inserimento Vedere in proposito il diagramma laterale dell illustrazione Dal momento che l apparecchio è di vetro deve essere installato su una superficie perfettamente piana sen...

Страница 125: ...sano devono essere serrate ad una coppia minima di 2N m 20 kgf cm L eventuale trasporto del pannello deve sempre essere effettuato da due persone che tengono le manopole per il trasporto nel modo indicato nell illustrazione NO Non tentare MAI per nessun motivo di trasportare il pannello tenendolo per una sola delle manopole Per l installazione del pannello al plasma non utilizzare le manopole come...

Страница 126: ...tAvenue su licenza di NEC Corporation FontAvenue è un marchio registrato di NEC Corporation Accessori forniti in dotazione 1 Cavo di alimentazione Viene fornito solamente il cavo di alimentazione appropriato al Paese o alla Regione in cui l apecchio e stato fornito 2 Telecomando 3 Batterie tipo AA o R6 x 2 4 Panno per la pulizia 5 Fermacavi ad uso rapido x 2 6 Fascette fermacavo a catenella x 2 7 ...

Страница 127: ...telecomando 5 Maniglie Pannello comandi dell unità principale 6 Tasto STANDBY ON 7 Tasto INPUT 8 Tasto HOME MENU 9 Tasti ADJUST 10 Tasti VOLUME 11 Tasto ENTER DISP 12 Tasto RETURN 13 Tasto SCREEN SIZE POWER ON STANDBY 7 6 8 9 11 12 13 10 1 2 3 4 5 NOTA Il pannello comandi dell unità principale non funzionerà più se i diffusori collegati gli sono troppo vicini Pannello comandi dell unità principale...

Страница 128: ...rmo questo tasto permette di cambiare il segnale in ingresso agli schermi secondari pagina 22 12 Tasto SWAP Durante la visualizzazione multi schermo questo tasto permette di passare dalla schermata principale a una secondaria pagina 22 13 Tasto HOME MENU Consente di fare comparire e sparire il menu sullo schermo pagine dalla 24 alla 37 14 Tasti ADJUST Consentono di navigare le schermate dei menu e...

Страница 129: ...ali INPUT4 COMPONENT VIDEO Y Pb Cb Pr Cr ANALOG RGB G B R HD VD 8 Terminale INPUT5 S VIDEO 9 Terminale INPUT6 VIDEO 10 Terminali AUDIO INPUT Connettori di ingresso audio corrispondenti ai connettori di ingresso da INPUT1 a INPUT6 11 Ingresso di corrente alternata AC IN Consente il collegamento del cavo di alimentazione in dotazione ad una presa di corrente alternata 12 Terminali SPEAKER L Per il c...

Страница 130: ...orto ATTENZIONE ATTENZIONE La sezione inferiore sinistra del display mostrata nell illustrazione qui sopra contiene l interruttore MAIN POWER e certe parti necessarie per la visualizzazione ed il contorno sporge Per questo quando si trasporta o installa quest unità prendere le precauzioni necessarie per proteggere quest area da urti o impiego di forza eccessiva dato che altrimenti si possono avere...

Страница 131: ...ento dell apparecchio con conseguente pericolo di lesioni per le persone Le viti i ganci le catene e gli altri elementi di fissaggio usati per bloccare il schermo al plasma in modo da impedirne il ribaltamento devono possedere caratteristiche diverse in funzione della superficie che lo accoglierà Vi raccomandiamo pertanto di selezionare queste viti ganci catene ed elementi di fissaggio solamente d...

Страница 132: ...mpresa fra gli 8 Ω e i 16 Ω AC IN L SPEAKER 8Ω 16Ω Per l Europa ad eccezione del Regno Unito e dell Irlanda Per il Regno Unito e l Irlanda Installazione del nucleo di ferrite Installando nel modo indicato in figura il nucleo di ferrite fornito in dotazione sull estremità del cavo di alimentazione prossima al connettore dell apparecchio si contribuisce alla prevenzione dei disturbi Per impedire che...

Страница 133: ... posizione Fare attenzione alla chiusura 2 Allineare insieme i cavi separati e fissarli adeguatamente per mezzo delle fascette a pallini fornite Evitare che le estremità dei cavi siano sottoposte ad una tensione eccessiva NOTA I cavi possono essere istradati sia verso sinistra sia verso destra Montaggio dei fermacavi ad uso rapido al pannello a plasma Montare i fermacavi ad uso rapido inserendoli ...

Страница 134: ...TALI RELATIVE AL PAESE O ALL AREA PERTINENTE Raggio di azione del telecomando Il telecomando deve essere puntato in direzione del corrispondente sensore situato nell angolo inferiore destro del pannello frontale dello schermo al plasma La distanza massima entro la quale il telecomando funziona è di 7 metri mentre l angolo di puntamento massimo è di 30 gradi nella direzione destra sinistra in alto ...

Страница 135: ... ma l interruttore MAIN POWER si trova su off Lo schermo al plasma è acceso Lo schermo al plasma si trova in modalità di attesa Lampeggia Con la funzione di gestione alimentazione pagina 29 impostata su Acceso nessun segnale è stato rilevato e per questo quest unità si è portata in modalità di attesa L unità si riaccende in uno dei seguenti casi Viene premuto INPUT dell unità principale Viene prem...

Страница 136: ...i PAL 60 non sono adatti alla visualizzazione nella schermata secondaria Se la funzione multischermo viene usata continuamente per varie ore o per periodi più brevi ma per qualche giorno consecutivo sullo schermo può rimanere una traccia dell immagine dovuta al bruciarsi dei materiali fluorescenti di cui è composto lo schermo Conferma dello stato operativo attuale 1 Premete il tasto DISPLAY del te...

Страница 137: ...autore del detentore dei diritti dell immagine stessa Modalità AV Modalità PC UTENTE Consente all utente di personalizzare le impostazioni secondo le proprie necessità La modalità può essere impostata per ciascuna sorgente di ingresso Opzione Descrizione STANDARD Per immagini ad alta definizione in luoghi normalmente illuminati UTENTE Consente all utente di personalizzare le impostazioni secondo l...

Страница 138: ...INPUT per uscire dal menu NOTA Premete RETURN per ritornare ai livelli superiori del menu Home Menu Opzione Pagina Immagine Contrasto 25 Luminosità 25 Colore 25 Sfumatura 25 Definizione 25 Regolazione avanzata 25 Reset 25 Suono Alti 28 Bassi 28 Bilanciamento 28 FOCUS 28 Surround anteriore 28 Reset 28 Comando di accensione Risparmio energia 29 Gestione dell energia AV 29 Gestione dell energia PC 29...

Страница 139: ...ta di conferma Premete sino a selezionare Sì e quindi premete ENTER ENTER DISP Regolazione avanzata dell immagine Lo schermo al plasma offre svariate funzioni avanzate di ottimizzazione della qualità delle immagini Per maggiori informazioni in merito a queste funzioni consultate le relative tabelle Alcune funzioni non sono disponibili con segnali in ingresso 1080p a 50 Hz o 1080p a 60 Hz Utilizzo ...

Страница 140: ...HOME MENU INPUT 1 su INPUT 6 INPUT per uscire dal menu Utilizzo della funzione Gestione colore 1 Premete HOME MENU 2 Selezionate Immagine e poi ENTER ENTER DISP 3 Selezionate Regolazione avanzata e poi ENTER ENTER DISP 4 Selezionate Dettaglio colore e poi ENTER ENTER DISP 5 Selezionate Gestione colore e poi ENTER ENTER DISP Selezioni Spento Disattiva la funzione PureCinema Standard Produce immagin...

Страница 141: ...ossimo al verde Più prossimo al blu B Blu Più prossimo al ciano Più prossimo al magenta M Magenta Più prossimo al blu Più prossimo al rosso DNR Riduce il rumore video rendendo le immagini più nitide L acronimo DNR è usato per Digital Noise Reduction ovvero riduzione digitale del rumore Selezioni Spento Disattiva la funzione DNR Alto Funzione DNR potenziata Medio Funzione DNR standard Basso Funzion...

Страница 142: ...re quindi la schermata di conferma Premete sino a selezionare Sì e quindi premete ENTER ENTER DISP FOCUS Questa funzione sposta verso l alto la direzione di provenienza del suono immagini sonore in modo da produrre un suono dai contorni più nitidi 1 Premete HOME MENU 2 Selezionate Suono e poi ENTER ENTER DISP 3 Selezionate FOCUS 4 Selezionate il parametro desiderato 5 Premete HOME MENU INPUT 1 su ...

Страница 143: ...o non avviene durante la visualizzazione del menu sullo schermo HOME MENU Subito prima che lo schermo al plasma si porti in modalità di attesa viene visualizzato un messaggio Gestione dell energia PC Lo schermo al plasma viene automaticamente portato in modalità di attesa se non viene ricevuto alcun segnale 1 Premete HOME MENU 2 Selezionate Comando di accensione e poi ENTER ENTER DISP 3 Selezionat...

Страница 144: ...isponibile Regolazione automatica della posizione dell immagine e dell orologio solo modalità PC Per regolare automaticamente la posizione dell immagine e le informazioni sull ora provenienti da un personal computer utilizzate funzione Setup automatico 1 Premete il tasto PC AUTO SET UP del telecomando Si avvia quindi la procedura di impostazione automatica 2 Premete HOME MENU INPUT 1 su INPUT 6 IN...

Страница 145: ...ecodifica del colore component o RGB Con l impostazione XGA WXGA potete scegliere XGA WXGA o AUTO 5 Premete HOME MENU INPUT 1 su INPUT 6 INPUT per uscire dal menu NOTA Se non appare alcuna immagine oppure i colori dell immagine che appare non sono corretti specificate un tipo diverso di segnale Per quanto riguarda i tipi di segnale che si possono specificare consultate il manuale di istruzioni del...

Страница 146: ...nando Acceso Selezione di un formato di visualizzazione dello schermo per segnali con rapporto di aspetto 4 3 solo modalità AV Specificate se il schermo al plasma deve selezionare la modalità 4 3 oppure la modalità WIDE quando mentre è attivata la funzione Dimens Automatic si ricevono segnali con rapporto d aspetto 4 3 1 Premete HOME MENU 2 Selezionate Opzioni e poi ENTER ENTER DISP 3 Selezionate ...

Страница 147: ...il tipo di segnale in ingresso impostato usando questo menu Vedere pagina 31 Per quanto riguarda il tipo di segnale usato consultare il manuale del decoder o videoregistratore Uso dell ingresso HDMI Questo schermo al plasma possiede due terminali HDMI INPUT2 e 3 che accettano segnali video ed audio digitali Per fare uso di un terminale HDMI attivatelo e specificate i tipi di segnale video ed audio...

Страница 148: ... 2 riportati nella sezione Per attivare il terminale HDMI 2 Selezionate Audio 3 Selezionate il tipo di segnali audio Se si seleziona Automatico il sistema cerca di identificare il tipo di segnale audio digitali qualora questo vengano effettivamente ricevuto 4 Premete HOME MENU INPUT 1 su INPUT 6 INPUT per uscire dal menu NOTA Se non viene emesso alcun suono specificate un tipo diverso di segnale a...

Страница 149: ...ostazione del tipo di segnale vedere la sezione Per attivare il terminale DVI Se le immagini non sono chiare specificare un altro formato di segnale video digitale Per quanto riguarda i tipi di segnale video digitale da specificare controllare il manuale del componente collegato Visione di immagini provenienti da un lettore DVD Collegamento di un lettore DVD Per il collegamento di un lettore DVD o...

Страница 150: ...NGRESSO6 NOTA Collegate le unità esterne solamente ai terminali che vanno effettivamente utilizzati Visualizzazione di immagini provenienti da un personal computer Collegamento con un personal computer Per collegarsi con un personal computer fare uso dei terminali INPUT1 o INPUT4 Se si usa il terminale INPUT1 Se si usa il terminale INPUT4 Visualizzazione di immagini provenienti da un personal comp...

Страница 151: ... terminale CONTROL OUT del retro dello schermo al plasma supporta la funzione SR che permette di eseguire operazioni in sincronia con un ricevitore AV PIONEER SR possiede funzioni come quella di cambiamento di ingresso sincronizzata e la funzione di visualizzazione della modalità DSP Surround Per ulteriori informazioni consultate il manuale d istruzioni in dotazione al ricevitore AV PIONEER che su...

Страница 152: ... Vedere a pagina 28 L immagine si presenta tagliata La posizione dell immagine è corretta Vedere a pagina 30 Per l immagine sono state selezionate le corrette dimensioni Vedere alle pagine da 23 a 32 Appaiono colori anomali i colori sono deboli o scuri oppure non sono allineati Regolate le tonalità dell immagine Vedere alle pagine da 25 a 28 L ambiente è eccessivamente luminoso In ambienti eccessi...

Страница 153: ...i FontAvenue su licenza di NEC Corporation FontAvenue è un marchio registrato di NEC Corporation HDMI il logo HDMI e High Definition Multimedia Interface sono marchi commerciali o marchi registrati di HDMI Licensing LLC I nomi delle società o delle istituzioni sono marchi di fabbrica oppure marchi di fabbrica registrati delle rispettive società ed istituzioni stesse Pubblicato da Pioneer Corporati...

Страница 154: ......

Страница 155: ...contact steekt WAARSCHUWING Dit apparaat is uitgerust met een drie draden geaarde stekker de stekker heeft dus een derde pen aardpen Deze stekker past alleen in een geaard stopcontact Als u de stekker niet in het stopcontact kunt steken moet u contact opnemen met een bevoegde elektricien om het stopcontact te laten vervangen door een geaard stopcontact Verwijder nooit de aardbeveiliging van de ste...

Страница 156: ...t plasmascherm 21 Veranderen van het volume en de geluidsweergave 21 Gebruik van de multibeeldfuncties 22 Het beeld splitsen 22 Controleren van de huidige status 22 AV Selectie 22 Handmatig instellen van schermafmetingen 23 08 Menu instellingen Gebruik van het menu 24 AV functiemenu s 24 PC functiemenu s 24 Menu bediening 24 09 Basisinstellingen Instellen van de taal 25 Basis beeldinstellingen 25 ...

Страница 157: ... een DVD speler 35 Aansluiten van een DVD speler 35 Weergeven van beelden van een DVD speler 36 Gebruik van een spelcomputer en kijken naar beelden van een camcorder 36 Aansluiten van een spelcomputer of camcorder 36 Weergeven van beelden van een spelcomputer of camcorder 36 Kijken naar beelden van een personal computer 36 Aansluiten van een personal computer 36 Weergeven van beelden van een perso...

Страница 158: ... het beste een normaal bewegend beeld laten weergaven met de BREEDBEELD of VOLLEDIG instelling gedurende terminste 3 maal zo lang als het eerdere spelletje of het stilstaande beeld was weergegeven Zet uw plasmascherm altijd uit STANDBY na gebruik Richtlijnen voor de opstelling Uw Pioneer PureVision PDP 5000EX plasmascherm heeft een uiterst dun ontwerp Om veiligheidsredenen moet u ervoor zorgen dat...

Страница 159: ...estaat uit allemaal heel kleine beeldpuntjes die licht produceren aan de hand van de ontvangen videosignalen Vanwege de manier waarop deze beeldpunten of cellen licht produceren is het mogelijk dat u een gezoem kunt horen uit het scherm of een gebrom uit de elektrische schakelingen die de beeldpunten aansturen Plak geen labels stickers of plakband op dit product Hierdoor kan de behuizing verkleure...

Страница 160: ...echts links Als u hetzelfde beeld gedurende meerdere uren op het scherm laat staan of gedurende een kortere tijd meerdere dagen achter elkaar kan er een permanent nabeeld op het scherm achterblijven als gevolg van inbranding van de fluorescerende materialen Het nabeeld zal minder zichtbaar zijn wanneer er naderhand bewegende beelden worden weergegeven maar het zal niet meer volledig verdwijnen Geb...

Страница 161: ...p gaat staan en zorg ervoor dat de snoeren niet door een voorwerp worden platgedrukt Let hier vooral goed op bij de stekkers en waar het snoer op het product is aangesloten 13 Het plasmascherm van dit product is gemaakt van glas Dit betekent dat het scherm kan breken wanneer het product valt of wanneer er grote druk op het scherm wordt uitgeoefend Wees voorzichtig dat u geen letsel oploopt door de...

Страница 162: ...jbehorende afbeelding U moet het toestel op tenminste 4 punten vastmaken boven en onder links en rechts Gebruik bouten die lang genoeg zijn om 12 mm tot 18 mm in het toestel te steken vanaf oppervlak waarop of waaraan het toestel bevestigd wordt Zie het zijaanzicht in de bijbehorende afbeelding Aangezien dit toestel is gemaakt met en van glas moet u het installeren op of aan een vlak niet vervormd...

Страница 163: ...20 kgf cm worden vastgedraaid wanneer de handgrepen opnieuw bevestigd worden Bij het verplaatsen van het plasmascherm moet dit altijd door twee personen gedragen worden die de achterste handgrepen op de afgebeelde wijze vasthouden NEE Probeer het plasmascherm nooit te verplaatsen door slechts een van de handgrepen vast te pakken Hang het plasmascherm nooit aan de handgrepen op en gebruik de handgr...

Страница 164: ...t product maakt gebruik van FontAvenue fonts onder licentie van NEC Corporation FontAvenue is een gedeponeerd handelsmerk van NEC Corporation Meegeleverde accessoires 1 Netsnoer Alleen het netsnoer dat geschikt is voor gebruik in het land of gebied van aanschaf wordt meegeleverd 2 Afstandsbediening 3 AA R6 batterijen x 2 4 Reinigingsdoekje 5 Snelklemmen x 2 6 Kraalbinders x 2 7 Ferrietkern 8 BNC t...

Страница 165: ...eningspaneel op het hoofdapparaat 6 STANDBY ON toets 7 INPUT toets 8 HOME MENU toets 9 ADJUST toetsen 10 VOLUME toetsen 11 ENTER DISP toets 12 RETURN toets 13 SCREEN SIZE toets POWER ON STANDBY 7 6 8 9 11 12 13 10 1 2 3 4 5 Opmerking Het bedieningspaneel van dit apparaat kan niet gebruikt worden als de aangesloten luidsprekers te dicht bij het apparaat zijn opgesteld Bedieningspaneel op het hoofda...

Страница 166: ...eergave kunt u deze toets gebruiken om het ingangssignaal voor het subscherm te kiezen blz 22 12 SWAP toets Tijdens multibeeldweergave kunt u deze toets gebruiken om het hoofdbeeld en het subbeeld te verwisselen blz 22 13 HOME MENU toets Druk op deze toets om het beeldschermmenu te openen en te sluiten blz 24 t m 37 14 ADJUST toetsen Gebruik deze toetsen om door de menuschermen te navigeren en div...

Страница 167: ...nsluiting HDMI 7 INPUT4 aansluitingen COMPONENT VIDEO Y Pb Cb Pr Cr ANALOG RGB G B R HD VD 8 INPUT5 aansluiting S VIDEO 9 INPUT6 aansluiting VIDEO 10 AUDIO INPUT aansluitingen Dit zijn de audio ingangen die bij de INPUT1 tot INPUT6 video ingangen horen 11 AC IN Verbind deze netstroomingang met het bijgeleverde netsnoer met een stopcontact 12 SPEAKER L aansluitingen Voor het aansluiten van een exte...

Страница 168: ... beeldscherm die in de bovenstaande afbeelding wordt getoond is de plaats van de MAIN POWER schakelaar en van bepaalde onderdelen die vereist zijn voor de weergave Dit gedeelte steekt enigszins uit Let er bij het vervoeren en de installatie van het apparaat op dat dit gedeelte niet aan stoten of te grote druk wordt blootgesteld want dit kan resulteren in beschadigingen Meer dan 50 cm Meer dan 10 c...

Страница 169: ...n kan het Plasmascherm vallen en iemand verwonden De schroeven haken draden en andere bevestigingsmaterialen die u dient te gebruiken om het Plasmascherm zo vast te zetten dat het niet om kan vallen hangen mede af van de samenstelling en de dikte van het materiaal waaraan u het toestel wilt vastzetten Kies de juiste schroeven haken draden en andere bevestigingsmaterialen nadat u het materiaal in k...

Страница 170: ...al er geen goede geluidsweergave zijn Dit toestel is geschikt voor luidsprekers met een impedantie van 8 Ω tot 16 Ω AC IN L SPEAKER 8Ω 16Ω Voor Europa behalve het V K en Ierland Voor het V K en Ierland Bevestigen van de ferrietkern Om ruis en storing te voorkomen dient u de meegeleverde ferrietkern te bevestigen aan het uiteinde van het stroomsnoer dat in het toestel gestoken wordt zoals u kunt zi...

Страница 171: ...cht zijn Wees daarom voorzichtig bij het bevestigen van de klemmen 2 Bundel de losse kabels samen en houd ze bij elkaar met de meegeleverde kraalbinders Zorg dat de uiteinden van de kabels niet te strak gespannen staan OPMERKING De kabels kunnen zowel naar links als naar rechts geleid worden Vastmaken van de snelklemmen aan het plasmascherm Bevestig de snelklemmen afhankelijk van de situatie in de...

Страница 172: ...LAND GEBIED WAAR U BENT Bereik van de afstandsbediening Gebruik de afstandsbediening terwijl u deze op de sensor rechts onderaan het voorpaneel van het Plasmascherm richt De afstand tussen de afstandsbediening en het toestel mag maximaal 7 m bedragen en de hoek ten opzichte van de sensor mag maximaal 30 graden naar rechts links boven of beneden zijn Voorzorgen betreffende de afstandsbediening Stel...

Страница 173: ...n het plasmascherm staat uit De stroom voor het plasmascherm is ingeschakeld Het plasmascherm staat in de ruststand standby Knippert Terwijl de Kleurbeheerfunctie blz 29 op Aan stond werd er geen signaal gedetecteerd waardoor het apparaat in de ruststand standby kwam te staan Het apparaat zal inschakelen wanneer een van de volgende dingen gebeurt INPUT op het apparaat wordt ingedrukt Een van de IN...

Страница 174: ...zijn niet geschikt voor weergave als subbeeld Als de multibeeldfunctie gedurende enkele uren ononderbroken wordt gebruikt of voor kortere perioden enkele dagen achter elkaar kan er een permanent nabeeld op het scherm achterblijven als gevolg van inbranding van de fluorescerende materialen Controleren van de huidige status 1 Druk op DISPLAY van de afstandsbediening De gekozen ingangsbron en de inst...

Страница 175: ... beeld een inbreuk betekenen op de auteursrechten van de beeldeigenaars AV functie PC functie GEBRUIKER Voor uw eigen voorkeursinstellingen U kunt deze stand apart voor elke signaalbron instellen Onderdeel Omschrijving STANDAARD Voor een goed gedetailleerd beeld in een normaal verlichte ruimte GEBRUIKER Voor uw eigen voorkeursinstellingen U kunt deze stand apart voor elke signaalbron instellen Ond...

Страница 176: ...an op 5 Druk op HOME MENU INPUT 1 tot INPUT 6 INPUT om het menu te sluiten OPMERKING U kunt terugkeren naar een hoger menu niveau met een druk op RETURN Home Menu Onderdeel Bladzijde Beeld Contrast 25 Helderheid 25 Kleur 25 Tint 25 Scherpte 25 Professionele instelling 25 Reset 25 Geluid Hoge tonen 28 Lage tonen 28 Balans 28 FOCUS 28 Surround voor 28 Reset 28 Stroomvoorziening Stroombesparing 29 Ui...

Страница 177: ...TER ENTER DISP Geavanceerde beeldinstellingen Het Plasmaschermsysteem biedt u diverse geavanceerde functies voor het optimaliseren van de beeldkwaliteit Zie de tabellen voor details omtrent deze functies Diverse functies zijn niet beschikbaar wanneer 1080p 50 Hz of 1080p 60 Hz signalen worden ingevoerd Gebruik van PureCinema 1 Druck op HOME MENU 2 Stel in op Beeld en dan ENTER ENTER DISP 3 Stel in...

Страница 178: ...luiten Gebruik van het Kleurbeheer 1 Druk op HOME MENU 2 Stel in op Beeld en dan ENTER ENTER DISP 3 Stel in op Professionele instelling en dan ENTER ENTER DISP 4 Stel in op Kleurdetail en dan ENTER ENTER DISP 5 Stel in op Kleurbeheer en dan ENTER ENTER DISP Keuzemogelij kheden Uit Schakelt de PureCinema functie uit Standaard Produceert levendige en vloeiende beelden afhankelijk van de film door au...

Страница 179: ...cyaan C Cyaan Dichter bij groen Dichter bij blauw B Blauw Dichter bij cyaan Dichter bij magenta M Magenta Dichter bij blauw Dichter bij rood DNR Vermindert beeldstoring voor heldere scherpe beelden De afkorting DNR staat voor Digital Noise Reduction digitale storingsonderdrukking Keuzemogelij kheden Uit Schakelt de DNR functie uit Hoog Verhoogd DNR niveau Midden Standaard DNR niveau Laag Gematigd ...

Страница 180: ... DISP drukt Er zal een bevestiging op het scherm verschijnen Druk op selecteer Ja en druk op ENTER ENTER DISP FOCUS Deze functie verschuift de richting van waaruit het geluid lijkt te komen geluidsbeeld naar boven voor een duidelijker geprononceerde weergave 1 Druk op HOME MENU 2 Stel in op Geluid en dan ENTER ENTER DISP 3 Stel in op FOCUS 4 Kies de gewenste parameter 5 Druk op HOME MENU INPUT 1 t...

Страница 181: ...d op PC Tijdens weergave van het HOME MENU is er geen bediening mogelijk Even voordat het plasmascherm wordt uitgeschakeld zal er een melding verschijnen Stroombeheer Het plasmascherm wordt automatisch uitgeschakeld wanneer er geen signaal wordt ontvangen 1 Druk op HOME MENU 2 Stel in op Stroomvoorziening en dan ENTER ENTER DISP 3 Stel in op Stroombeheer 4 Stel in op Inschakelen 5 Druk op HOME MEN...

Страница 182: ...tellen wanneer het ingangssignaal afkomstig is van een PC 1 Druk op PC AUTO SET UP van de afstandsbediening De Automatische instelling zal nu opstarten 2 Druk op HOME MENU INPUT 1 tot INPUT 6 INPUT om het menu te sluiten OPMERKING Wanneer de Automatische Instelling klaar is zal De Automatische instelling is voltooid op het scherm verschijnen Ook al verschijnt de aanduiding De Automatische instelli...

Страница 183: ...O kunnen gekozen worden bij de XGA WXGA instelling 5 Druk op HOME MENU INPUT 1 tot INPUT 6 INPUT om het menu te sluiten OPMERKING Als er geen beeld verschijnt of beelden in de verkeerde kleuren probeer dan een ander type videosignaal Voor het juiste type signalen dient u de handleiding van de aangesloten apparatuur te raadplegen Instellen van het kleursysteem If an image does not appear clearly se...

Страница 184: ...at kan deze functie niet werken ook al heeft u Aan ingesteld Selecteren van schermafmetingen voor ingangssignalen met een beeldverhouding van 4 3 alleen in de AV functie U kunt bepalen of uw Plasmascherm de 4 3 instelling of BREEDBEELD moet gebruiken wanneer er signalen binnenkomen met een beeldverhouding van 4 3 terwijl Auto Formaat is ingeschakeld 1 Druk op HOME MENU 2 Stel in op Optie en dan EN...

Страница 185: ...pe met behulp van het menu wijzigen Zie blz 31 Zie de gebruiksaanwijzing van de decoder of videorecorder voor het signaaltype Gebruik van de HDMI ingang Dit plasmascherm is uitgerust met twee HDMI aansluitingen INPUT2 en 3 die geschikt zijn voor digitale video en audiosignalen Om de HDMI aansluitingen te kunnen gebruiken dient u deze te activeren en moet u de typen video en audiosignalen instellen...

Страница 186: ...gen Instellen van het type audiosignalen Wanneer u de INPUT2 of INPUT3 HDMI aansluiting gebruikt dient u via de volgende procedure het type audiosignalen in te stellen 1 Herhaal de stappen 1 t m 2 onder Activeren van de HDMI aansluitingen 2 Stel in op Audio 3 Kies het type audiosignalen Als u Auto kiest zal er worden geprobeerd het type audiosignaal te herkennen wanneer er een dergelijk signaal bi...

Страница 187: ...igitale videosignalen 4 Druk op HOME MENU INPUT 1 tot INPUT 6 INPUT om het menu te sluiten OPMERKING Deze selectie is uitgeschakeld wanneer Signaaltype is ingesteld op PC Zie het gedeelte Activeren van de DVI aansluiting voor verdere informatie over de instelling van het signaaltype Als het beeld niet duidelijk wordt weergegeven moet u een ander type digitaal videosignaal instellen Raadpleeg de ge...

Страница 188: ... kunnen bekijken op INPUT 5 of INPUT 6 INPUT om INGANG5 of INGANG6 te kiezen OPMERKING Verbind externe apparatuur alleen met aansluitingen die u daadwerkelijk gebruikt Kijken naar beelden van een personal computer Aansluiten van een personal computer U kunt een personal computer aansluiten op de INPUT1 of INPUT4 aansluitingen Bij gebruik van de INPUT1 aansluiting Bij gebruik van de INPUT4 aansluit...

Страница 189: ...cherm richten OPMERKING U moet de stroom uitschakelen voor u aansluitingen gaat maken Maakeerstallenormaleaansluitingentussendecomponenten en sluit dan pas de bedieningssignaalsnoeren aan Over SR De CONTROL OUT aansluiting aan de achterkant van het plasmascherm ondersteunt SR hetgeen doorgeschakelde bediening in combinatie met een PIONEER AV receiver mogelijk maakt SR biedt u functies zoals het do...

Страница 190: ...dpositie correct ingesteld Zie blz 30 Zijn de correcte schermafmetingen ingesteld Zie blz 23 en 32 Vreemde kleuren te licht te donker of kleurverschuiving Stel de kleuren van het beeld bij Zie blz 25 tot 28 Is de kamer te fel verlicht Het beeld kan te donker lijken in een te fel verlichte ruimte Controleer de instelling voor het kleursysteem Zie blz 31 Weergave van een nabeeld Als een stilstaand b...

Страница 191: ...er licentie van NEC Corporation FontAvenue is een gedeponeerd handelsmerk van NEC Corporation HDMI het HDMI logo en High Definition Multimedia Interface zijn handelsmerken of gedeponeerde handelsmerken van HDMI licensing LLC Overige namen van bedrijven of instellingen zijn handelsmerken of gedeponeerde handelsmerken van hun respectievelijke rechthebbenden Uitgegeven door Pioneer Corporation Copyri...

Страница 192: ......

Страница 193: ...indicada en el panel posterior D3 4 2 1 4_A_Sp Antes de enchufar el aparato a la corriente lea la sección siguiente con mucha atención ADVERTENCIA Este producto está provisto de una clavija de tres conductores con toma de tierra puesta a tierra cuya tercera patilla es la de toma de tierra Esta clavija sólo se adapta en una toma de corriente del tipo de toma de tierra Si no puede insertar la clavij...

Страница 194: ...es de estado de la pantalla de plasma 21 Cambio del volumen y sonido 21 Empleo de las funciones de pantallas múltiples 22 División de la pantalla 22 Confirmación del estado actual 22 Selección AV 22 Selección manual de un tamaño de pantalla 23 08 Menú de configuración Utilización de los menús 24 Menús del modo AV 24 Menús del modo PC 24 Operaciones con los menús 24 09 Configuraciones básicas Confi...

Страница 195: ...ación de la imagen de un DVD 35 Conexión de un reproductor de DVD 35 Visualización de la imagen del DVD 36 Reproducción con consola de videojuegos o videocámara 36 Conexión de una consola de videojuegos o una videocámara 36 Visualización de la imagen de una consola de videojuegos o de una videocámara 36 Visualización de la imagen de un ordenador 36 Conexión de un ordenador 36 Visualización de la i...

Страница 196: ...ión de ese modo a menos de 2 horas cada vez Después de jugar con una consola de videojuegos visualizar una imagen de PC o cualquier imagen fija lo mejor es ver una imagen en movimiento normal en la pantalla PANORÁMICA o COMPLETA durante un tiempo 3 veces superior al que dura la imagen fija anterior Después de haber utilizado la pantalla de plasma establezca siempre la pantalla en el modo de ESPERA...

Страница 197: ... extremamente finos y estos píxeles emiten luz de acuerdo con las señales de vídeo recibidas Este principio puede hacerle oír un sonido de zumbido o zumbido del circuito eléctrico de la pantalla de plasma No fije ítems como etiquetas y cintas al producto Esto puede causar la decoloración o arañazo de la caja Cuando no utilice el producto durante un largo período de tiempo Si no utiliza el producto...

Страница 198: ...erior o derecha izquierda Si se visualiza la misma imagen continuamente durante varias horas o por periodos de tiempo más cortos durante varios días en la pantalla quedará una imagen remanente permanente debido a que se han quemado materiales fluorescentes Es posible que tales imágenes se noten menos si luego se visualizan imágenes en movimiento pero no desaparecerán continuamente La función de ah...

Страница 199: ...olocarse objetos pesados encima de ellos Compruebe los cables en las clavijas de alimentación y donde se enchufan al producto 13 La pantalla de plasma utilizada en este producto está hecha de cristal Por lo tanto podrá romperse cuando el producto se caiga o reciba un impacto fuerte En el caso de que se rompa la pantalla de plasma tenga cuidado para no herirse con las piezas de cristal rotas 14 Sob...

Страница 200: ...la ilustración adjunta Asegúrese de colocar pernos en 4 o más lugares de las partes superior inferior izquierda y derecha de la línea central Utilice pernos que sean lo suficientemente largos como para poder insertarse de 12 mm a 18 mm en la unidad principal desde la superficie de montaje Consulte el diagrama de la vista lateral de la ilustración incluida Puesto que esta unidad está hecha con cris...

Страница 201: ...van a montar los asideros Cuando desplace de lugar la pantalla siempre deberá ser transportada por dos personas tomándola de los asideros traseros de la forma mostrada NO No intente nunca desplazar la pantalla de plasma sosteniéndola sólo por uno de los asideros Cuando instale la pantalla de plasma no emplee los asideros como medio para colgar la pantalla no los emplee tampoco como dispositivos pa...

Страница 202: ...ste producto incluye fuentes FontAvenue bajo licencia de NEC Corporation FontAvenue es una marca registrada de NEC Corporation Accesorios suministrados 1 Cable de alimentación Sólo se suministra el cable de alimentación que es apropiado para su país o región 2 Mando a distancia 3 Pilas AA R6 x 2 4 Paño de limpieza 5 Abrazaderas rápidas x 2 6 Bandas de cuentas x 2 7 Núcleo de ferrita 8 Adaptador de...

Страница 203: ...incipal 6 Botón STANDBY ON espera encendido 7 Botón INPUT entrada 8 Botón HOME MENU menú inicial 9 Botones de ajuste ADJUST 10 Botones VOLUME volumen 11 Botón ENTER DISP introducción visualización 12 Botón RETURN retorno 13 Botón SCREEN SIZE tamaño de pantalla POWER ON STANDBY 7 6 8 9 11 12 13 10 1 2 3 4 5 Nota El panel de operación de la unidad no podrá operarse si los altavoces conectados se ins...

Страница 204: ...ntrada secundaria Durante la visualización de pantallas múltiples emplee este botón para cambiar las entradas de las pantallas secundarias página 22 12 Botón SWAP intercambio Durante la visualización de pantallas múltiples emplee este botón para cambiar entre la pantalla principal y la pantalla secundaria página 22 13 Botón HOME MENU menú inicial Púlselo para abrir y cerrar el menú en pantalla pág...

Страница 205: ...HDMI 7 Terminales INPUT4 entrada 4 COMPONENT VIDEO Y Pb Cb Pr Cr ANALOG RGB G B R HD VD 8 Terminal INPUT5 entrada 5 S VIDEO 9 Terminal INPUT6 entrada 6 VIDEO 10 Terminales AUDIO INPUT entrada de audio Conectores de entrada de audio correspondientes a los conectores de entrada de vídeo INPUT1 a INPUT6 11 AC IN entrada de CA Se emplea para conectar el cable de alimentación suministrado a una toma de...

Страница 206: ...ción inferior izquierda de la pantalla mostrada en la ilustración de arriba es la posición del interruptor MAIN POWER y de ciertas partes necesarias para la visualización y el contorno tiene un saliente elevado Como resultado cuando se transporte e instale la unidad deberán tomarse las precauciones adecuadas para que no se apliquen golpes ni fuerza excesiva a esta área porque podrían dañarse sus c...

Страница 207: ... estas precauciones la pantalla de plasma podría caer y causar lesiones Los tornillos ganchos cadenas y otros accesorios que se utilice para fijar la pantalla de plasma para prevenir que se vuelque varían de acuerdo con la composición y espesor de la superficie donde se instala la pantalla Seleccione los tornillos ganchos cadenas y otros accesorios adecuados después de inspeccionar la superficie c...

Страница 208: ...onido no se producirá correctamente Esta unidad es compatible con altavoces de 8 Ω a 16 Ω de impedancia AC IN L SPEAKER 8Ω 16Ω Europa excepto el Reino Unido e Irlanda Reino Unido e Irlanda Fijación del núcleo de ferrita Para ayudar la prevención contra ruidos fije el núcleo de ferrita suministrado al extremo del conector del cable de alimentación como se muestra Utilice el enlace de cable suminist...

Страница 209: ...das Colóquelas por lo tanto con cuidado 2 Una los cables separados y asegúrelos con las bandas de cuentas suministradas No permita que se produzca tensión excesiva en los extremos de los cables NOTA Los cables podrán instalarse a la derecha o a la izquierda Para colocar las abrazaderas rápidas en la pantalla Dependiendo de la situación conecte las abrazaderas rápidas utilizando los 6 orificios mar...

Страница 210: ...O ÁREA Rango de operación permisible del mando a distancia Opere el mando a distancia apuntándolo al sensor de mando a distancia ubicado en la derecha inferior del panel frontal de la pantalla de plasma La distancia desde el sensor de mando a distancia debe estar dentro de 7 m y el ángulo relativo al sensor debe estar dentro de 30 grados en la dirección derecha izquierda hacia arriba o hacia abajo...

Страница 211: ...nectado La alimentación de la pantalla de plasma está conectada La pantalla de plasma está en el modo de espera Parpadeando Con la función de gestión de energía página 29 ajustada en Encendido no se detectó señal por lo que la unidad se estableció en el modo de espera La unidad volverá a encenderse con una de las condiciones siguientes Se ha pulsado INPUT de la unidad principal Se ha pulsado uno d...

Страница 212: ...osible que las imágenes de vídeo no se visualizan correctamente debido a las posibilidades de la pantalla de plasma Las señales PAL 60 no son adecuadas para la visualización de imágenes en la pantalla secundaria Si se utiliza continuamente la función de pantallas múltiples durante varias horas o durante períodos más cortos de tiempo durante varios días puede quedar en la pantalla una imagen remane...

Страница 213: ... de autor de los propietarios de la imagen Modo AV Modo PC JUEGO Reduce el brillo de la imagen para una visualización más fácil Puede configurar el modo para cada fuente de entrada USUARIO Permite al usuario personalizar las configuraciones que desee Puede configurar el modo para cada fuente de entrada Ítem Descripción ESTÁNDAR Para una imagen altamente definida en una sala con brillo normal USUAR...

Страница 214: ...5 Pulse HOME MENU INPUT 1 a INPUT 6 INPUT para salir del menú NOTA Usted podrá volver a niveles superiores del menú pulsando RETURN Home Menu Ítem Página Imagen Contraste 25 Brillo 25 Color 25 Matiz 25 Nitidez 25 Ajuste profesional 25 Reponer 25 Sonido Agudos 28 Graves 28 Balance 28 FOCUS 28 Surround frontal 28 Reponer 28 Control de la alimentación Ahorro de energía 29 Gestión de energía AV 29 Ges...

Страница 215: ...nfirmación aparece Pulse para seleccionar Sí y a continuación pulse ENTER ENTER DISP Ajustes de imagen avanzados La pantalla de plasma provee varias funciones avanzadas para optimizar la calidad de la imagen Para los detalles sobre estas funciones consulte las tablas Algunas funciones no están disponibles durante la entrada las señales 1080p 50 Hz o 1080p 60 Hz Utilización de PureCinema 1 Pulse HO...

Страница 216: ... continuación ENTER ENTER DISP 7 Pulse HOME MENU INPUT 1 a INPUT 6 INPUT para salir del menú Utilización de la gestión del color 1 Pulse HOME MENU 2 Seleccione Imagen y a continuación ENTER ENTER DISP 3 Seleccione Ajuste profesional y a continuación ENTER ENTER DISP 4 Seleccione Detalle color y a continuación ENTER ENTER DISP 5 Seleccione Gestión de color y a continuación ENTER ENTER DISP Seleccio...

Страница 217: ...cerca del amarillo Más cerca del azul verdoso C Azul verdoso Más cerca del verde Más cerca del azul B Azul Más cerca del azul verdoso Más cerca del magenta M Magenta Más cerca del azul Más cerca del rojo DNR Reduce el ruido de vídeo para ofrecer imágenes nítidas DNR son las siglas de Digital Noise Reduction Reducción de ruido digital Selecciones Apagado Desactiva la función DNR Alta DNR mejorado M...

Страница 218: ... a continuación pulse ENTER ENTER DISP Una pantalla de confirmación aparece Pulse para seleccionar Sí y a continuación pulse ENTER ENTER DISP FOCUS Desplaza el sonido que viene de arriba imágenes del sonido y produce contornos de sonido claros 1 Pulse HOME MENU 2 Seleccione Sonido y a continuación ENTER ENTER DISP 3 Seleccione FOCUS 4 Seleccione el parámetro deseado 5 Pulse HOME MENU INPUT 1 a INP...

Страница 219: ...inhabilita durante la visualización de HOME MENU Se visualizará un mensaje inmediatamente antes de que la pantalla de plasma se establezca en el modo de espera Gestión de energía PC La pantalla de plasma se establecerá automáticamente en el modo de espera cuando no se reciba ninguna señal 1 Pulse HOME MENU 2 Seleccione Control de la alimentación y a continuación ENTER ENTER DISP 3 Seleccione Gesti...

Страница 220: ...ice la autoconfiguración para ajustar automáticamente las posiciones y reloj de las imágenes a partir de un ordenador 1 Pulse PC AUTO SET UP en el mando a distancia La autoconfiguración comienza 2 Pulse HOME MENU INPUT 1 a INPUT 6 INPUT para salir del menú NOTA Una vez que se finalice la autoconfiguración se visualiza Ajuste automático completado Aunque aparezca Ajuste automático completado es pos...

Страница 221: ...XGA 5 Pulse HOME MENU INPUT 1 a INPUT 6 INPUT para salir del menú NOTA Si no aparece ninguna imagen o si las imágenes aparecen en colores incorrectos especifique otro tipo de señales de vídeo Para el tipo de señales que se debe especificar consulte el manual de instrucciones que acompaña al equipo conectado Configuración del sistema de color Si una imagen no aparece claramente seleccione otro sist...

Страница 222: ...e aspecto la función no funcionará aunque Encendido esté seleccionado Selección de un tamaño de pantalla para las señales de relación de aspecto 4 3 recibidas sólo el modo AV Especifique si la pantalla de plasma debe seleccionar el modo 4 3 o modo PANORÁMICA cuando se reciben señales de relación de aspecto 4 3 con la función de tamaño automático activada 1 Pulse HOME MENU 2 Seleccione Opción y a c...

Страница 223: ...trada empleando el menú Vea la página 31 En cuanto al tipo de señal consulte el manual de instrucciones del decodificador o de la videograbadora Empleo de la entrada HDMI Esta pantalla de plasma está provista de dos terminales HDMI INPUT2 y 3 que aceptan señales de vídeo y audio digitales Para emplear el terminal HDMI active el terminal y especifique los tipos de señales de vídeo y de audio que de...

Страница 224: ...s de audio Cuando emplee el terminal HDMI INPUT2 o INPUT3 realice el procedimiento siguiente para especificar el tipo de señales de audio 1 Repita los pasos de 1 a 2 descritos en Para activar el terminal HDMI 2 Seleccione Audio 3 Seleccione el tipo de señales de audio Si se selecciona Auto se hará un intento para identificar el tipo de señales de audio cuando se reciben las señales de audio 4 Puls...

Страница 225: ... Pulse HOME MENU INPUT 1 a INPUT 6 INPUT para salir del menú NOTA Esta selección se inhabilitará cuando se ajusta el Tipo de señal a PC Para ver los detalles sobre el tipo de señal consulte la sección Para activar el terminal DVI Si las imágenes no se ven con claridad especifique otro tipo de señal de vídeo digital En cuanto a los tipos de señales de vídeo digital consulte el manual de instruccion...

Страница 226: ... un equipo externo sólo a los terminales que realmente se utilizarán Visualización de la imagen de un ordenador Conexión de un ordenador Emplee los terminales INPUT1 o INPUT4 para conectar un ordenador Cuando se emplee el terminal INPUT1 Cuando se emplee el terminal INPUT4 INPUT4 R L INPUT4 COMPONENT VIDEO ANAROG RGB Pb Cb Y G Pr Cr VD HD B R Cable de audio de venta en los establecimientos del ram...

Страница 227: ...apagados Complete todas las conexiones entre los componentes antes de hacer las conexiones de los cables de control Acerca de SR El terminal CONTROL OUT de la parte posterior de la pantalla de plasma es compatible con SR lo que permite realizar operaciones enlazadas con un receptor de audio vídeo de PIONEER SR ofrece funciones tales como la función de operación de enlace del selector de entrada y ...

Страница 228: ... 15 Se ha ajustado el balance correctamente Consulte la página 28 La imagen queda cortada Es correcta la posición de la imagen Consulte la página 30 Se ha seleccionado el tamaño de pantalla correcto Consulte las páginas 23 y 32 El color no está normal color claro u oscuro el color no está bien alineado Ajuste el tono de la imagen Consulte las páginas 25 a 28 Está demasiado brillante la habitación ...

Страница 229: ...ia de NEC Corporation FontAvenue es una marca registrada de NEC Corporation HDMI el logotipo de HDMI y la interfaz High Definition Multimedia Interface son marcas comerciales o marcas comerciales registradas de HDMI licensing LLC Los nombres de las compañías o instituciones son los nombres comerciales o marcas registradas de las respectivas compañías o instituciones Publicado por Pioneer Corporati...

Страница 230: ...7 283 5901 PIONEER EUROPE NV Haven 1087 Keetberglaan 1 B 9120 Melsele Belgium TEL 03 570 05 11 PIONEER ELECTRONICS ASIACENTRE PTE LTD 253 Alexandra Road 04 01 Singapore 159936 TEL 65 6472 7555 PIONEER ELECTRONICS AUSTRALIA PTY LTD 178 184 Boundary Road Braeside Victoria 3195 Australia TEL 03 9586 6300 PIONEER ELECTRONICS DE MEXICO S A DE C V Blvd Manuel Avila Camacho 138 10 piso Col Lomas de Chapu...

Отзывы: