36
HTP-072
1
2
3
4
A
B
C
D
E
F
1
2
3
4
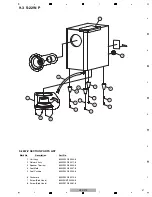
7.3 S-11A-P
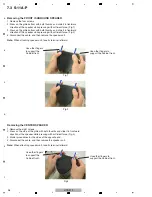
1. Remove the four screws.
2. Press on the grille bottom with both thumbs and slide it in frontward
direction of the speaker while pressing with sufficient force. (Fig.1)
3. Press on the grille bottom with both thumbs and slide it in frontward
direction of the speaker while pressing with sufficient force. (Fig.2)
4. Disconnect the cable, and then remove the speaker unit.
Note:
When attaching speaker unit, face its terminal leftward.
Use other fingers
to support the
Cabinet front.
Use other fingers to
support the Cabinet front.
Removing the FRONT / SURROUND SPEAKER
Fig.1
Fig.2
Use other fingers
to support the
Cabinet front.
Use other fingers to
support the Cabinet front.
Fig.3
1. Remove the eight screws.
2. Press on the side of the grille with both thumbs and slide it in frontward
direction of the speaker while pressing with sufficient force. (Fig.3)
3. Similar procedures for the sides of the opposite end.
4. Disconnect the cable, and then remove the speaker unit.
Note:
When attaching speaker unit, face its terminal leftward.
Removing the CENTER SPEAKER
Содержание HTP-072
Страница 9: ...9 HTP 072 5 6 7 8 5 6 7 8 A B C D E F ...
Страница 44: ...44 HTP 072 1 2 3 4 A B C D E F 1 2 3 4 9 2 VSX 324 K P K H I G F DLXE only Nut Clamp HP plate Nut ...
Страница 48: ...48 HTP 072 1 2 3 4 A B C D E F 1 2 3 4 9 4 S 11A P Center speaker Front L R Surround L R speaker ...
Страница 73: ...73 HTP 072 5 6 7 8 5 6 7 8 A B C D E F ...
Страница 77: ...77 HTP 072 5 6 7 8 5 6 7 8 A B C D E F A B B OPTCO ASSY SIDE B CP108 CP1 109 CP3 CP5 CN1 IC1201 Q14 Q16 Q2 Q5 ...
Страница 80: ...80 HTP 072 1 2 3 4 A B C D E F 1 2 3 4 C SIDE B CP2001 CP2000 Q2043 Q2041 IC2018 Q2038 ...
Страница 81: ...81 HTP 072 5 6 7 8 5 6 7 8 A B C D E F C C D MAIN ASSY SIDE B CP2003 CP2006 CP2005 CP2200 ...

