background image

02

02

Connecting your equipment

15

En

English

ϜН

Español

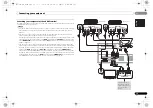
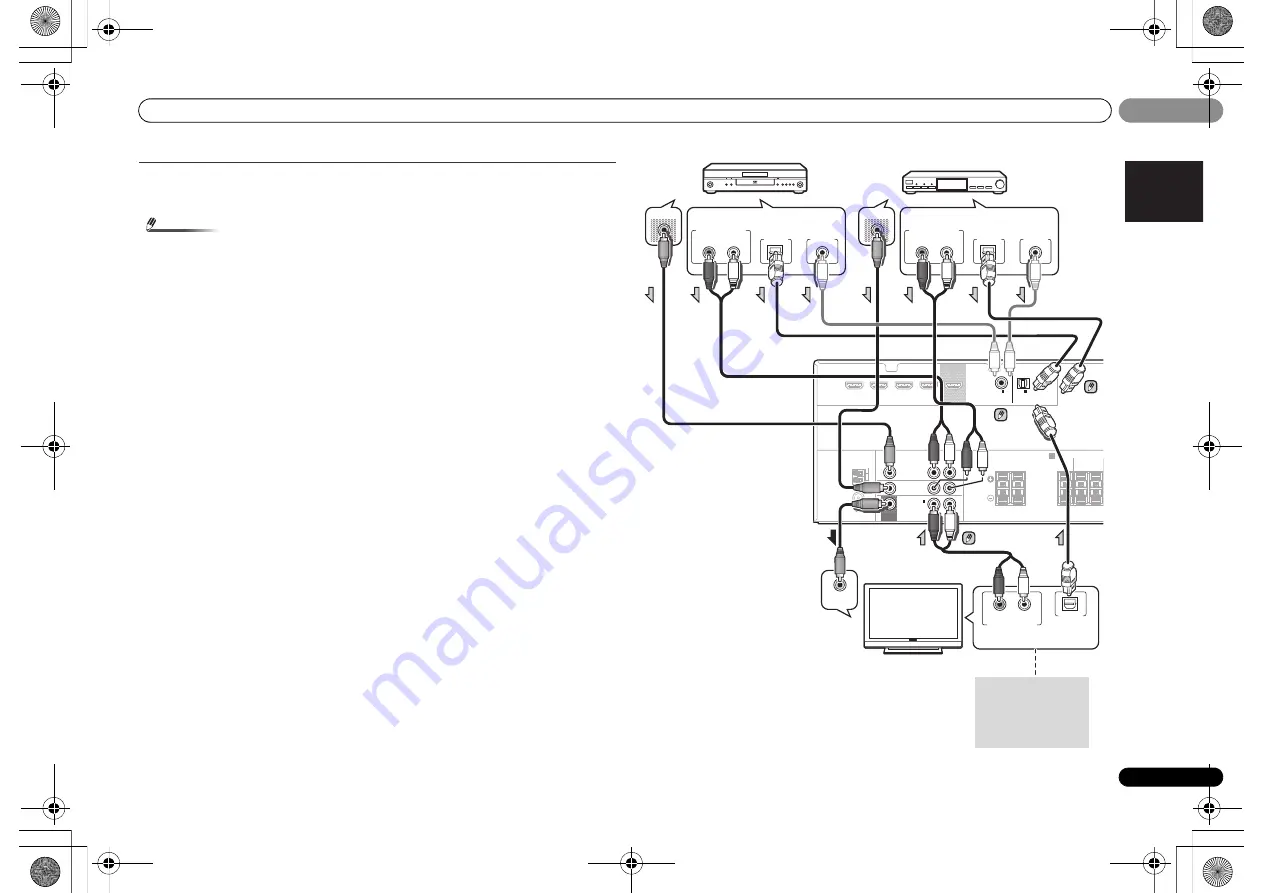
Connecting your component with no HDMI terminal

This diagram shows connections of a TV and DVD player (or other playback component) with 

no HDMI terminal to the receiver.

Note

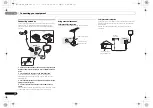
• In order to listen to the audio from the TV that is connected to this receiver using a analog 

audio cables, set-up for analog audio input is required (see 

The Input Assign menu

 on 

page 31).

• You can only connect one component to the optical input terminal. If connecting other 

devices, please use a different method to connect the audio.

In order to listen to the audio from the source component that is connected to this receiver 

using an optical cable, first, switch to the 

DVD

 (DVD player) or 

SAT/CBL

 (set-top box), then 

press 

SIGNAL SEL

 to choose the audio signal 

O1

 (OPTICAL1) (see 

Selecting the audio input 

signal

 on page 20).

• You can only connect one component to the coaxial input terminal. If connecting other 

devices, please use a different method to connect the audio. In order to listen to the audio 

from the source component that is connected to this receiver using a coaxial cable, first, 

switch to the 

DVD

 (DVD player) or 

SAT/CBL

 (set-top box), then press 

SIGNAL SEL

 to 

choose the audio signal 

C1

 (COAXIAL1) (see 

Selecting the audio input signal

 on page 20).

In order to listen to the audio from the DVD player that is connected to this receiver using 

a coaxial cable, first, switch to the 

DVD

 input, then press 

SIGNAL SEL

 to choose the audio 

signal 

C1

 (COAXIAL1) (see 

Selecting the audio input signal

 on page 20).

HDMI

VIDEO

AUDIO

COAXIAL

SPEAKERS

ANTENNA

OPTICAL

ASSIGNABLE

ASSIGNABLE

ASSIGNABLE

OUT

IN

IN

A

(

CD

)

MONITOR

OUT

DVD IN

ANALOG IN

(CD)

SAT/CBL

IN

DVD

SAT/CBL

GAME

BD

(

TV

)

IN

1

1

IN

1

FM UNBAL

75

AM LOOP

FRONT

CENTER

SURROUND

R

L

R

L

R

L

OPTICAL

R

L

DIGITAL AUDIO OUT

ANALOG AUDIO OUT

OPTICAL

R

L

DIGITAL AUDIO OUT

ANALOG AUDIO OUT

COAXIAL

VIDEO IN

VIDEO OUT

R

L

DIGITAL AUDIO OUT

ANALOG AUDIO OUT

OPTICAL

COAXIAL

VIDEO OUT

Select one

TV

DVD player

This connection is 

required in order to 

listen to the sound of 

the TV over the 

receiver.

Select one

Set-top box

Select one

VSX-324-K-P_DLXE.book  15 ページ  2013年3月21日 木曜日 午前9時17分

Содержание HTP-072

Страница 1: ...perating Instructions ᐈձКь Manual de instrucciones Home Cinema Package ঢ় ቒଲ ၇ Conjunto Home Theater HTP 072 AV Reciever AV ᕘᙔᘘτᐡ Receptor AV VSX 324 K P VSX 324 K P_DLXE book 1 ページ 2013年3月21日 木曜日 午前9時17分 ...

Страница 2: ... 1 3_A1_En VENTILATION CAUTION When installing this unit make sure to leave space around the unit for ventilation to improve heat radiation at least 20 cm at top 10 cm at rear and 10 cm at each side WARNING Slots and openings in the cabinet are provided for ventilation to ensure reliable operation of the product and to protect it from overheating To prevent fire hazard the openings should never be...

Страница 3: ...ff all power from the AC outlet Since the power cord serves as the main disconnect device for the unit you will need to unplug it from the AC outlet to shut down all power Therefore make sure the unit has been installed so that the power cord can be easily unplugged from the AC outlet in case of an accident To avoid fire hazard the power cord should also be unplugged from the AC outlet when left u...

Страница 4: ...hanging the TV format setting 19 04 Basic playback Playing a source 20 Selecting the audio input signal 20 Playing an iPod 21 Playing back files stored on an iPod 22 Basic playback controls 22 Switches between the iPod controls and the receiver controls 22 Playing a USB device 22 Basic playback controls 23 Compressed audio compatibility 23 Listening to the radio 23 Changing the radio frequency ste...

Страница 5: ...s of the steps indicate the following Required setting item Setting to be made as necessary 1 Connecting the speakers Where you place the speakers will have a big effect on the sound Placing the speakers page 10 Connecting the speakers page 11 2 Connecting the components For surround sound you ll want to hook up using a digital connection from the Blu ray Disc DVD player to the receiver About vide...

Страница 6: ...cting an HDMI equipped component lights when the component is connected page 14 7 iPod iPhone indicator Lights when an iPod iPhone is connected and iPod USB input is selected page 21 8 MASTER VOLUME dial 9 STANDBY ON 10 PHONES jack Use to connect headphones When the headphones are connected there is no sound output from the speakers The listening mode when the sound is heard from the headphone can...

Страница 7: ...eset number of the tuner or the input signal type etc 21 Character display Displays various system information 22 DTS indicators DTS Lights when a source with DTS encoded audio signals is detected HD Lights when a source with DTS EXPRESS or DTS HD encoded audio signals is detected 96 24 Lights when a source with DTS 96 24 encoded audio signals is detected NEO 6 When one of the NEO 6 modes of the r...

Страница 8: ...en ECO Mode 1 ECO Mode 2 When ECO Mode is turned ON the display will go dark page 25 9 Receiver and component control buttons The following button controls can be accessed after you have selected the corresponding input function button BD DVD etc Press first to access AUDIO PARAMETER Use to access the Audio options page 27 HOME MENU Press to access the Home Menu page 29 RETURN Confirm and exit the...

Страница 9: ...ut signal CH Use to select channels VOL Use to adjust the volume on your TV 15 VOLUME Use to set the listening volume 16 MUTE Mutes unmutes the sound 17 DISP Switches the display of this unit The listening mode sound volume or input name can be checked by selecting an input source Loading the batteries The batteries included with the unit are to check initial operations they may not last over a lo...

Страница 10: ...ce from your CRT TV If you re using a center speaker place the front speakers at a wider angle If not place them at a narrower angle Place the center speaker above or below the TV so that the sound of the center channel is localized at the TV screen Also make sure the center speaker does not cross the line formed by the leading edge of the front left and right speakers It is best to angle the spea...

Страница 11: ...CAUTION These speaker terminals carry HAZARDOUS LIVE voltage To prevent the risk of electric shock when connecting or disconnecting the speaker cables disconnect the power cord before touching any uninsulated parts Make sure that all the bare speaker wire is inserted fully into the speaker terminal If any of the bare speaker wire touches the back panel it may cause the power to cut off as a safety...

Страница 12: ... Video CD Super VCD and CD This receiver incorporates High Definition Multimedia Interface HDMI technology This receiver supports the functions described below through HDMI connections Digital transfer of uncompressed video contents protected by HDCP 1080p 24 1080p 60 etc 3D signal transfer Deep Color signal transfer x v Color signal transfer Audio Return Channel see The HDMI Setup menu on page 32...

Страница 13: ...for coaxial digital connections Standard RCA video cables These cables are the most common type of video connection and are used to connect to the composite video terminals The yellow plugs distinguish them from cables for audio About video outputs connection This receiver is not loaded with a video converter When you use HDMI cables for connecting to the input device the same cables should be use...

Страница 14: ...on the TV When the ARC function is ON and the receiver is connected to a compatible TV with an HDMI cable and you switch the input of the TV to composite the input of the receiver may automatically switch to TV If this happens switch the receiver s input back to the original input or turn OFF the ARC function see The HDMI Setup menu on page 32 Note In order to listen to the audio from the TV that ...

Страница 15: ...nt method to connect the audio In order to listen to the audio from the source component that is connected to this receiver using a coaxial cable first switch to the DVD DVD player or SAT CBL set top box then press SIGNAL SEL to choose the audio signal C1 COAXIAL1 see Selecting the audio input signal on page 20 In order to listen to the audio from the DVD player that is connected to this receiver ...

Страница 16: ... a direction giving the best reception 4 Connect the FM wire antenna into the FM antenna socket For best results extend the FM antenna fully and fix to a wall or door frame Don t drape loosely or leave coiled up Using external antennas To improve FM reception Connect an external FM antenna as show below To improve AM reception Connect a 5 m to 6 m length of vinyl coated wire to the AM antenna term...

Страница 17: ...only when the unit s power is turned on For instructions on playing the iPod see Playing an iPod on page 21 Note When the ARC function is ON and the receiver is connected to a compatible TV with an HDMI cable and you switch the input of the TV when the receiver s selection is iPod USB input the receiver may automatically switch to TV If this happens switch the receiver s input back to the original...

Страница 18: ...h that they are not likely to be stepped on A damaged power cord can cause a fire or give you an electrical shock Check the power cord once in a while When you find it damaged ask your nearest PIONEER authorized service center or your dealer for a replacement The receiver should be disconnected by removing the mains plug from the wall socket when not in regular use e g when on vacation Note After ...

Страница 19: ...site video cable For example if you connected this receiver to the VIDEO jacks on your TV make sure that the VIDEO input is now selected 3 Press on the remote control then press the HOME MENU button The Home Menu of the OSD screen will be displayed on the TV If nothing appears on the screen try to change the TV format setting on the receiver see below Changing the TV format setting If the OSD scre...

Страница 20: ...96 kHz PCM 2 channel audio and if there is an MPEG audio option set this to convert the MPEG audio to PCM Depending on your DVD player or source discs you may only get digital 2 channel stereo and analog sound In this case the receiver must be set to a multichannel listening mode if you want multichannel surround sound 5 Use VOLUME to adjust the volume level Turn down the volume of your TV so that...

Страница 21: ...e version of iPod iPhone indicated on the website of Pioneer http pioneer jp homeav support ios ao Installing software versions other than indicated on the website of Pioneer to your iPod iPhone may result in incompatibility with this receiver iPod and iPhone are licensed for reproduction of noncopyrighted materials or materials the user is legally permitted to reproduce Features such as the equal...

Страница 22: ...1 Press iPod CTRL to switch to the iPod controls Press iPod CTRL again to switch back to the receiver controls when you re done Tip Change the receiver s input to the iPod in one action by pressing iPod iPhone DIRECT CONTROL on the front panel to enable iPod operations on the iPod Playing a USB device It is possible to listen to two channel audio using the USB interface on the front of this receiv...

Страница 23: ...s of the MPEG 4 audio compression technology The file format and extension used depend on the application used to encode the AAC file This receiver plays back AAC files encoded by iTunes bearing the extension m4a DRM protected files will not play and files encoded with some versions of iTunes may not play Apple and iTunes are trademarks of Apple Inc registered in the U S and other countries About ...

Страница 24: ...ver a month the station memories will be lost and will have to be reprogrammed Stations are stored in stereo When the station is stored in the FM MONO mode it shows as ST when recalled Listening to station presets You will need to have some presets stored to do this See Saving station presets above if you haven t done this already 1 Press PRESET to select the station preset you want You can also u...

Страница 25: ...nd right speakers and possibly your subwoofer depending on your speaker settings Dolby Digital and DTS multichannel sources are downmixed to stereo The following modes provide basic surround sound for stereo and multichannel sources Explanatory notes No No connected Yes Connected Two Two speakers are connected Whether connected or no a You can also adjust the C WIDTH DIMEN and PNRM effect see Sett...

Страница 26: ...ble sound image will be produced If your subwoofer has a phase control switch set it to the plus sign or 0º However the effect you can actually feel when Phase Control is set to ON on this receiver depends on the type of your subwoofer Set your subwoofer to maximize the effect It is also recommended you try changing the orientation or the place of your subwoofer Set the built in lowpass filter swi...

Страница 27: ...Both channels heard from front speakers F PCM Fixed PCM This is useful if you find there is a slight delay before OFF recognizes the PCM signal on a CD for instance When ON is selected noise may be output during playback of non PCM sources Please select another input signal if this is a problem OFF ON DRC Dynamic Range Control Adjusts the level of dynamic range for movie soundtracks optimized for ...

Страница 28: ...dio video synchronizing capability lip sync for HDMI If you find the automatically set delay time unsuitable set A DLY to OFF and adjust the delay time manually For more details about the lip sync feature of your display contact the manufacturer directly h Only available with 2 channel sources in DOLBY PLII MUSIC mode i Only when listening to 2 channel sources in NEO 6 CINEMA and NEO 6 MUSIC mode ...

Страница 29: ... The HDMI Setup menu on page 32 Manual speaker setup This receiver allows you to make detailed settings to optimize the surround sound performance You only need to make these settings once unless you change the placement of your current speaker system or add new speakers Speaker Setting Use this setting to specify your speaker configuration size number of speakers 1 Select Manual SP Setup from the...

Страница 30: ...ass sounds playing back from those selected as SMALL It also decides where the cutoff will be for bass sounds in the LFE channel For more on selecting the speaker sizes see Speaker Setting on page 29 1 Select Manual SP Setup from the Home Menu 2 Select X Over from the Manual SP Setup menu 3 Choose the frequency cutoff point Frequencies below the cutoff point will be sent to the subwoofer or LARGE ...

Страница 31: ... finished press RETURN You return to the Manual SP Setup menu The Input Assign menu ANALOG IN1 audio input terminal is assigned to CD under factory settings but this can be changed to TV input 1 Select Input Assign from the Home Menu 2 Select Analog Input from the Input Assign menu 3 Select the desired input option for the ANALOG IN1 audio input terminal 4 When you re finished press RETURN You ret...

Страница 32: ... listen to the TV audio after connecting this unit and the TV with an audio cable The CEC Consumer Electronic Control function may activate when the ARC function is turned ON causing power to turn ON and OFF and the input to switch from one to another Since this unit does not guarantee synchronized operation based on the CEC function we recommend that you turn OFF the HDMI CONTROL setting on the c...

Страница 33: ... allowable value Try moving the unit for better ventilation page 2 Lower the volume level No sound is output when an input function is selected Use VOLUME to turn up the volume Press MUTE on the remote control to turn muting off Set the SIGNAL SEL to H HDMI C1 O1 digital or A analog according to the type of connections made page 20 Make sure the component is connected correctly see Connecting your...

Страница 34: ...eck that the HDMI setting is set to AMP page 27 If the component is a DVI device use a separate connection for the audio HDMI format digital audio transmissions require a longer time to be recognized Due to this interruption in the audio may occur when switching between audio formats or beginning playback Turning on off the device connected to this unit s HDMI OUT terminal during playback or disco...

Страница 35: ...pe with a soft cloth dipped in some neutral cleanser diluted five or six times with water and wrung out well and then wipe again with a dry cloth Do not use furniture wax or cleansers Never use thinners benzine insecticide sprays or other chemicals on or near this unit since these will corrode the surface Specifications Audio section Rated power output Front Center Surround 100 W per channel 1 kHz...

Страница 36: ...nse under U S Patent Nos 5 956 674 5 974 380 6 226 616 6 487 535 7 212 872 7 333 929 7 392 195 7 272 567 other U S and worldwide patents issued pending DTS HD the Symbol DTS HD and the Symbol together are registered trademarks of DTS Inc Product includes software DTS Inc All Rights Reserved 2013 PIONEER CORPORATION All rights reserved VSX 324 K P_DLXE book 36 ページ 2013年3月21日 木曜日 午前9時17分 ...

Страница 37: ...Additional information 37 En 07 07 English ϜН Español VSX 324 K P_DLXE book 37 ページ 2013年3月21日 木曜日 午前9時17分 ...

Страница 38: ...Ґᐡဋܺ ܼӉե ၇షᡞ ޠ ৡᏣȞԄ߇౮ ࣶ߇ܗ ȟߤߗ ܗ ڐ ኹ ܼᅔЬȃᘱЬȃߧϜ ܗ ዙᕇᕘძϜȄ D3 4 2 1 3_A1_Zhtw ॴ ݨ ཏ ٲ ԋ၇ҐᐡਣȂ ጃۢӶҐᐡѳ ڻ Ⴒ ޫޠ пւ ॴȞദഌijıġŤŮȃन८IJıġŤŮȃІ ڎ IJıġŤŮпαȟȄ ឍ ᐡ෧α ڏ ԥϟᖂራІ πңܼ ॴȂпጃߴҐ ࠣϟҔ ளᐈձ ٯ ЦႇዦȄ ᗘռЭ د Ȃ Ͻஈ π ܗ ң ޑ ࠣȞԄൣિȃ ҁȃᛩᄎȟ ڐ ᇑȂη ϽӶࠕ෨ ܗ ט αᐈձҐᐡȄ D3 4 2 1 7b _A1_Zhtw Anki XXX 00_cover_anki_VSX 324 K P_DLXE fm Page 2 Thursday March 21 2013 9 10 AM ...

Страница 39: ...ଷпϹᘟႬྜȄ D3 4 2 2 2a _A1_Zhtw K041_A1_Zhtw Ґ ࠣѬᎍۤΚૢঢ় ңഋȄԄ ݏ ҦܼᔗңӶ ڐ у ߩঢ় ңഋĩԄ ୧ཿңഋՅߞ ٻ ңܼᓢᢉϜȂ ܗ ٻ ңܼ آ ٚ ܗ ϜĪՅᏳयึҢࢉሬ ٯ ሰ ঔ౪ȂӶ ߴң ܜ ᐋঔ౪ຳңȄ ٳ ಓဵ Ӷዊ ϜԥਞȄ K058c_A1_Zhtw ȞႬԲ ޠ ጓ پ ಓဵȟ Pb ឍ ϊႮӈԇܺӶϊࡇᇅᔊ ڌ ณ ݳ ڦ ϟ Ȅ सཏѵ ΤȂ Ҵ ଛᚃȄ D41 6 4_A1_Zhtw ឍ ЦЭ د Ȃ Ͻ ЭྜȞԄᘉᐾ ޠ ᕏȟܺဋܼҐ ᐡαȄ D3 4 2 1 7a_A1_Zhtw ᐈձᕘძ ᐈձᕘძྤ ᇅྡྷ Ȉ ĬĶġʨġՎġĬĴĶġʨȞĬĵIJġʩġՎġĬĺĶġʩȟ ȇϊܼĹĶġĦœʼn ȞϽஈ տࠔЍȟ ϽӶ ॴϛً ȃኹ ܼାྡྷ ܗ ӏ ৣޣ Ȟ ܗ ੩ ޠ ആӏྜȟ ޠ ൠ ܛ ԋ၇ҐᐡȄ D3 4 ...

Страница 40: ...設定值 19 04 基本播放功能 播放來源 20 選擇音訊輸入訊號 20 播放 iPod 21 播放儲存在 iPod 上的檔案 22 基本播放控制 22 在 iPod 控制與接收器控制之間切換 22 播放 USB 裝置 22 基本播放控制 23 壓縮音訊之相容性 23 收聽收音機 23 切換無線電頻率間隔 24 改善 FM 音質 24 儲存預設電台 24 收聽預設電台 24 命名預設電台 24 05 聆聽您的系統 選擇聆聽模式 25 自動播放 25 使用環繞音效聆聽 25 使用先進環繞聲 25 使用直流 26 使用聲音修正器功能 26 使用相位控制獲得更佳音效 26 設定音訊選項 27 06 Home Menu 使用 Home Menu 29 手動揚聲器設定 29 揚聲器設定 29 X Over 30 聲道位準 30 揚聲器距離 31 輸入指定選單 31 自動電源關閉選單 31 HDMI ...

Страница 41: ... 步驟的顏色指示下列事項 需設定項目 視需要設定 1 連接揚聲器 揚聲器的位置對音效產生極大的影響 揚聲器之擺設 第 10 頁 連接揚聲器 第 11 頁 2 連接設備 要產生環繞音效 需將 Blu ray Disc 播放機 DVD 播放器 利用數位接線連接至接收器上 關於連接視訊輸出 第 13 頁 連接電視機及播放設備 第 14 頁 連接天線 第 16 頁 插上接收器電源 第 18 頁 3 開啟電源 確定已設定好電視機的視訊輸入 若不知如何設定 請參 閱電視機隨附手冊 4 輸入指定選單 第 31 頁 使用建議的連接方式以外的連接方式時 HDMI 設定選單 第 32 頁 連接的電視支援 HDMI 音訊返回通道功能時 5 基本播放功能 第 20 頁 選擇音訊輸入訊號 第 20 頁 播放 iPod 第 21 頁 播放 USB 裝置 第 22 頁 選擇聆聽模式 第 25 頁 6 調整所需要的聲音 ...

Страница 42: ...9 STANDBY ON 10 PHONES 插孔 用於連接耳機 耳機接上時 不會有聲音從揚聲器輸出 只 有在從耳機聽到聲音時 才能使用 PHONES SURR STEREO 或 STEREO ALC 模式選擇聆聽模式 11 聆聽模式按鍵 AUTO SURROUND STREAM DIRECT 在自動環繞聲 模式 第 25 頁 與直流播放 第 26 頁 之間切換 ALC STANDARD SURR 按下可進行標準解碼 並能在 2 Pro Logic和 NEO 6模式 以及自動音量控制立體聲模 式 第 25 頁 間切換 ADVANCED SURROUND 可於各種環繞模式中進行切 換 第 25 頁 12 ECO 切換 ECO 模式 1 ECO 模式 2 開啟 ECO 模式 ON 時 顯示幕將變暗 第 25 頁 AV RECEIVER MASTER VOLUME 5V 1A STANDBY O...

Страница 43: ...資訊或輸入訊號指示燈 顯示調諧器的預設號碼或輸入訊號類型等 21 字元顯示幕 顯示各種系統資訊 22 DTS 指示燈 DTS 偵測到有 DTS 編碼音訊訊號的來源時會亮起 HD 偵測到含 DTS EXPRESS 或 DTS HD 編碼音訊訊號 時會亮起 96 24 偵測到含 DTS 96 24 編碼音訊訊號時會亮起 NEO 6 當接收器其中一種 Neo 6 模式啟用 亮起表示 正在進行 Neo 6 處理 第 25 頁 23 Dolby Digital 指示燈 2D 偵測到 Dolby Digital 編碼訊號時會亮起 2D 偵測到含 Dolby Digital Plus 編碼音訊訊號時會 亮起 2HD 偵測到含 Dolby TrueHD 編碼音訊訊號時會亮 起 2PLII 此燈亮起表示在進行 2 Pro Logic II 解碼 詳 情請參閱第 25 頁的使用環繞音效聆聽 24 ADV S ...

Страница 44: ...下可存取 Home Menu 第 29 頁 RETURN 確認並退出目前的選單畫面 首先按下 BD DVD 以選取 TOP MENU 可顯示 Blu ray Disc DVD 的 頂層 選單 HOME MENU 顯示 HOME MENU 畫面 RETURN 確認並退出目前的選單畫面 MENU 可顯示 Blu ray Disc 播放機的 TOOLS 選單 首先按下 TUNER 以選取 TOOLS 記憶喚回的電台 也可用於變更名稱 第 24頁 BAND 切換 AM FM ST 立體聲 和 FM MONO 廣 播頻段 第 23 頁 首先按下 iPod USB 以選取 iPod CTRL 在 iPod 控制與接收器控制之間切換 第 22 頁 10 TUNE PRESET ENTER 可使用箭頭按鍵進行環繞音效系統的設定 第 29 頁 亦 用於控制 Blu ray Disc DVD 選單 選項 使用...

Страница 45: ...的步 驟有四個 13 SOURCE 使用輸入功能按鍵選取 BD DVD 或 CD 時 請開啟或關閉 先鋒 DVD DVR 裝置電源 14 TV CONTROL 按鍵 這些按鍵僅可使用先鋒電視控制 可用以開啟 關閉電視機電源 INPUT 可用以選擇電視機輸入訊號 CH 可用以選擇聲道 VOL 可用以調整電視機音量 15 VOLUME 用以設定聆聽的音量大小 16 MUTE 可進行靜音 取消靜音 17 DISP 切換本機的顯示幕 選擇輸入來源可檢查聆聽模式 音量或 輸入名稱 裝入電池 本機內附的電池可用於檢查初始操作 電池電量可能不夠長 時間使用 建議使用壽命較長的鹼性電池 注意 電池使用不當會導致滲漏及爆炸等危險 請遵守下列安全 注意事項 新舊電池切勿混合使用 裝入電池時 請正確對照電池匣內的正負極標示 電池形狀雖然相同 電壓可能不盡相同 不同電壓的電 池切勿混合使用 處理廢舊電池時 請遵守...

Страница 46: ...應相同 且離地板的距離也應相同 若您要將揚聲器放在 CRT 電視附近 請將揚聲器放置在離 CRT 電視一定距離的位置 若有使用中置揚聲器 請將前置揚聲器擺在較寬的角度上 若沒使用 則擺在較窄的角度 上 請將中置揚聲器擺在電視機上方或下方 以使中置聲道如同座落在電視機螢幕上一樣 另 外 請確定中置揚聲器並未超過左 右前置揚聲器前緣的連線上 揚聲器面對聆聽位置為最佳角度 此角度取決於房間的大小 房間越大 所使用的角度越 小 環繞及後環繞揚聲器應擺在高出您耳朵 60 cm 至 90 cm 的位置 並向下微傾 揚聲器請不 要面向彼此擺放 對於 DVD Audio 揚聲器要比家庭劇院播放時更直接放在聆聽者身後 請不要將環繞揚聲器擺在比前置及中置揚聲器距離聆聽位置更遠的地方 以免減弱環繞聲 的效果 注意 請確定所有揚聲器均已牢牢安裝 這不僅有助於改善音質 更可減少因地震等外力導致揚 聲器翻倒或掉落而造...

Страница 47: ...時發生電擊危險 在觸摸 任何未絕緣部分之前 請先將電源線插頭拔離 請確定所有裸露的揚聲器導線都已完全插入揚聲器端子中 若有任何裸露的揚聲器金屬線 接觸到背面面板 則可能導致電源切斷以策安全 1 推開端子 插入裸露的導線 2 鬆開端子 1 2 HDMI VIDEO AUDIO COAXIAL SPEAKERS ANTENNA OPTICAL ASSIGNABLE ASSIGNABLE ASSIGNABLE OUT IN IN A CD MONITOR OUT DVD IN ANALOG IN CD SAT CBL IN DVD SAT CBL GAME BD TV IN 1 1 IN 1 FMUNBAL 75 AMLOOP FRONT CENTER SURROUND SUBWOOFER R L R L R L VOLTAGE S 110 127 V 中置 右環繞 右前置 左前置 重低音 左環...

Страница 48: ...支援以下描述的透過 HDMI 連接的功能 數位傳送未壓縮的視訊 內容受到HDCP的保護 1080p 24 1080p 60 等 3D 訊號傳送 Deep Color 訊號傳送 x v Color 訊號傳送 音訊返回通道 請參閱第 32 頁的 HDMI 設定選單 輸入最多 8 個頻道的多頻道線性 PCM 數位音訊訊號 192 kHz 或以下 輸入下列數位音訊格式 Dolby Digital Dolby Digital Plus DTS 高位元率音 訊 Dolby TrueHD DTS HD Master Audio DVD Audio CD SACD 僅 DSD 雙聲道 VCD 超級 VCD 4K 訊號傳送 視連接的設備而定 操作有可能不正確 支援 4K 24p 4K 25p 及 4K 30p 訊號 附註 使用 High Speed HDMI Cable 若使用除 High Speed HD...

Страница 49: ...接線折 彎繞過尖角 可能會造成損壞 標準 RCA 視訊線也可用於同軸數位連接 標準 RCA 視訊線 此種連接線為最常用類型的視訊接線 主要是用來連接複合 視訊端子 黃色插頭則是用來區別視訊線與音訊線 關於連接視訊輸出 本接收器未搭載視訊轉換器 當您使用 HDMI 連接線來連接 至輸入裝置時 應使用相同的連接線連接至電視機 來自本機類比 複合 視訊輸入的訊號將不會從 HDMI OUT 輸出 L R AUDIO 白色 左 紅色 右 COAXIAL IN OPTICAL IN 同軸數位音訊線 光纖線 VIDEO 黃色 VIDEO VIDEO IN IN HDMI MONITOR OUT HDMI OUT 用於連接來源裝置的端子 用於連接電視機監視器的 端子 播放設備 電視機 可輸出視訊訊號 OSD 將不會出現 VSX 324 K P_DLXE zhtw book Page 13 Wednesda...

Страница 50: ...輸入會自動切換為電視 若出現此情況 請將接收器的輸入設回原始輸入 或關閉 OFF ARC 功能 請參閱第 32 頁的 HDMI 設定選單 附註 為聆聽使用類比音訊連接線連接的電視音訊 需設定類比音訊輸入 請參閱第 31 頁的輸 入指定選單 HDMI VIDEO AUDIO COAXIAL SPEAKERS ANTENNA OPTICAL ASSIGNABLE ASSIGNABLE ASSIGNABLE OUT IN IN A CD MONITOR OUT DVD IN ANALOG IN CD SAT CBL IN DVD SAT CBL GAME BD TV IN 1 1 IN 1 FMUNBAL 75 AMLOOP FRONT CENTER SURROUND R L R L R L HDMIIN HDMIOUT HDMIOUT HDMIOUT R L DIGITALAUDIOOUT A...

Страница 51: ...L1 請參閱第 20 頁的選擇音訊輸入訊號 若要聆聽使用同軸纜線連接此接收器的 DVD 播 放器音訊 請先切換至 DVD 輸入 然後按 SIGNAL SEL 以選擇音訊訊號 C1 COAXIAL1 請參閱第 20 頁的選擇音訊輸入訊號 HDMI VIDEO AUDIO COAXIAL SPEAKERS ANTENNA OPTICAL ASSIGNABLE ASSIGNABLE ASSIGNABLE OUT IN IN A CD MONITOR OUT DVD IN ANALOG IN CD SAT CBL IN DVD SAT CBL GAME BD TV IN 1 1 IN 1 FMUNBAL 75 AMLOOP FRONT CENTER SURROUND R L R L R L OPTICAL R L DIGITALAUDIOOUT ANALOGAUDIOOUT OPTICAL R L...

Страница 52: ...供最佳接收 效果的方向 4 將 FM 線型天線連接至 FM 天線插座 為了能獲得最佳的接收效果 請將 FM 天線完全展開並固定 到牆上或門框上 切勿將線鬆弛地垂掛或捲起 使用外部天線 改善 FM 接收效果 請依照下圖的方式將外部 FM 天線接上 改善 AM 接收效果 可連接一條 5 m 至 6 m 長的乙烯塗裝金屬線連接至 AM 天 線端子 無須將隨附的 AM 環型天線拆離 為了能獲得最佳的接收效果 請水平懸掛於室外 ANTENNA FM UNBAL 75 AM LOOP 2 1 3 4 圖 a 圖 b ANTENNA ANTENNA FMUNBAL 75 J 型插頭 未隨附 75 Ω 同軸連接線 ANTENNA AMLOOP 室外天線 5 m 至 6 m 室內天線 乙烯塗裝金屬線 VSX 324 K P_DLXE zhtw book Page 16 Wednesday March 20 ...

Страница 53: ...開啟時才會充電 關於播放 iPod 的操作方式 請參閱第 21 頁的播放 iPod 附註 當ARC功能為ON且用HDMI連接線連接接收器與相容的 電視時 以及在接收器選擇為 iPod USB 輸入切換電視輸 入時 接收器輸入會自動切換為電視 若出現此情況 請 將接收器的輸入設回原始輸入 或關閉 OFF ARC 功 能 請參閱第 32 頁的 HDMI 設定選單 連接 USB 裝置 您可利用本接收器前面板的 USB 介面 聆聽雙聲道音訊 1 將接收器切換至待機狀態 然後將您的 USB 裝置連接至 本接收器前面板的 iPod iPhone 端子 本接收器不支援 USB 集線器 關於播放USB裝置的操作方式 請參閱第22頁的播放USB 裝置 AV RECEIVER MASTER VOLUME ET ENTER iPod iPhone VSX 324 HDMI 5V 1A 本接收器 iPod 隨附的...

Страница 54: ...夾住電源線 電線 不可打結或與其他電線繫在一起 請妥善安排電源線以免 除被踩的疑慮 受損的電源線可能引發火災 或使人觸 電 您應偶爾查看電源線是否受損 請每隔一段時間檢查 一次電源線 如有發現損壞 請洽當地先鋒所授權的服務 中心或經銷商更換 不常使用時 例如 休假時 本機應把主電源插頭從牆 上插座拔掉將電源切斷 附註 連接此接收器至AC電源插座後 開始2秒至10秒的HDMI 初始化程序 在此程序期間無法執行任何操作 在此程序 期間 前面板顯示幕的 HDMI 指示燈閃爍 您可以在它 一停止閃爍時即開啟此接收器的電源 將 HDMI 設定 ARC 設定為 OFF 時 您可略過此程序 詳情請參閱第 32 頁的 HDMI 設定選單 VSX 324 K P_DLXE zhtw book Page 18 Wednesday March 20 2013 9 28 AM ...

Страница 55: ...切換電視輸入為透過對應複合視訊連接線連接此接收器 與電視的輸入 例如 若是您將本接收器接至電視機的 VIDEO 插孔 則請確 定現在所選取的是 VIDEO 輸入 3 按下遙控器上的 然後按下 HOME MENU 按 鍵 OSD 畫面的 Home Menu 選單會顯示在電視上 若畫面上 未顯示任何動靜 請嘗試變更接收器上的電視格式設定 請 參閱下文 切換電視機格式設定值 若 OSD 未能正確顯示 則可能是電視系統的設定不適用於所 在國家或地區 1 將接收器切換成待機 2 在按住 TUNE 按鍵時 同時按住 STANDBY ON 按 鍵約兩秒鐘 此時顯示幕會顯示新的設定值 PAL 或 NTSC RECEIVER VSX 324 K P_DLXE zhtw book Page 19 Wednesday March 20 2013 9 28 AM ...

Страница 56: ...UME 可調整音量 轉低您電視機的音量 如此才能讓所有音效能直接來自連接 本接收器的揚聲器 選擇音訊輸入訊號 可選擇各輸入來源使用的音訊輸入訊號 完成設定後 每當 您使用輸入功能按鍵選擇輸入來源時 就會套用已選擇的音 訊輸入 1 按下 SIGNAL SEL 按鍵選取相對於來源設備的音訊輸入 訊號 每次按下時可選取以下選項 H 選擇 HDMI 訊號 H 可選擇用於 BD DVD SAT CBL 及 GAME 輸入 至於其他輸入 則無法選用 H 當第27頁的設定音訊選項 中的HDMI選項設定為THRU 時 將會透過電視機而非本接收器聽到聲音 A 選取類比輸入 C1 O1 選取數位輸入 選擇同軸 1 輸入以用於 C1 選 擇光纖 1 音訊輸入以用於 O1 選擇 H HDMI 或 C1 O1 數位 且未提供選擇的音訊輸入 時 將自動選擇 A 類比 除 BD 以外的 DVR BDR 輸入 附註 BD...

Страница 57: ...已開發及測試先鋒網站上的iPod iPhone軟體版 本 http pioneer jp homeav support ios ao 安裝除先鋒網站指定版本以外的軟體版本至 iPod iPhone 可能會導致與本接收器不相容 iPod和 iPhone授權可重製未受著作權保護的材料或使用 者合法取得重製權的材料 等化器這類的功能無法利用本接收器來控制 因此我們建 議請在連接前先將等化器關閉 連接 iPod 時 即使耳機已連接至 PHONES 插孔 耳機仍不 會發出聲音 要拆離 iPod iPhone 時 請確定接收器為待機狀態 1 打開接收器及電視機 請參閱第 17 頁的連接 iPod 2 切換電視輸入以便連接至接收器 切換電視輸入為透過對應複合連接線連接此接收器與電 視的輸入 提示 為享受裝置的畫面及 或音效連接至各端子 再透過下列操作以選擇輸入 HDMI VIDEO AUDIO COAX...

Страница 58: ...d 上切換執行中的 iPod 操 作 1 按 iPod CTRL 可切換至 iPod 控制 在您觀賞完畢時可再按一次iPod CTRL來切換回接收器控 制功能 提示 按下前面板上的 iPod iPhone DIRECT CONTROL 按鍵來 變更接收器的輸入為 iPod 以啟用 iPod 上的 iPod 操作 播放 USB 裝置 您可利用本接收器前面板的 USB 介面 聆聽雙聲道音訊 重要 先鋒概不保證所有 USB 大量儲存裝置的相容性 操作及 或匯流排電源 以及承擔在連接至本接收器時可能造成資 料遺失的相關責任 附註 此項包含WMA MP3 MPEG 4 AAC檔案的播放 除防拷 或受限檔案的播放外 相容的 USB 裝置包括 FAT16 32 格式的磁碟機 可攜式快 閃記憶體 特殊隨身碟 及數位音訊播放器 MP3 播放 器 本接收器不能連接至個人電腦進行 USB 播放 對於大量的資料 ...

Страница 59: ...名需視進行 AAC 檔案編碼的應用程式而定 本機能播 iTunes 編碼為 m4a 副檔名的 AAC 檔案 DRM 保護檔案不能播放 同時某些版本的 iTunes 所編碼的檔案也可能無法播放 Apple 及 iTunes 均是 Apple Inc 於美國及其他國家註冊的 商標 關於 WMA WMA 是 Windows Media Audio 的首字母縮寫 是指由 Microsoft Corporation 所研發的一種音壓縮技術 本機可 播放利用 Windows Media Player 編碼為 wma 副檔 名的 WMA 檔案 請注意 DRM 保護檔案不能播放 同時 某些版本的 Windows Media Player 所編碼的檔案也可能 無法播放 收聽收音機 以下步驟為說明如何利用自動 搜索 及手動 間隔 調諧 功能調選 FM 及 AM 廣播節目的方法 在完成選台後 可記 憶頻率便於叫...

Страница 60: ... MONO 模式儲存電台後 在 喚回時會顯示為 ST 收聽預設電台 必須已儲存一些電台才可進行此項操作 若尚未儲存 則請 參閱上文的儲存預設電台 1 按下 PRESET 選取所要的預設電台 預設電台亦可使用遙控器的數字鍵叫出收聽 命名預設電台 為了能更容易識別 您可以將所有預設電台命名 1 選擇要命名的預設電台 請參閱上文的收聽預設電台 以便進行連接 2 按兩下 TOOLS 按鍵 第一個字元位置上的游標在顯示幕上閃爍 3 輸入想要的名稱 選擇最多八個字元長度的名稱 可用 PRESET 以選擇字元位置 可用 TUNE 以選擇字元 按下 ENTER 時會儲存名稱 提示 若要刪除電台名稱 請依照步驟 1 與 2 然後在顯示幕空 白時按下 ENTER 在顯示幕空白時按下 TOOLS 以保留之 前的名稱 將預設電台命名後 請按 DISP 以顯示名稱 要返回頻率顯 示時 按數次 DISP 以顯示頻率 ...

Страница 61: ... C IMG 音效 請參閱第 27 頁的設定音訊選 項 c 您可使用 STEREO 按鍵來選擇 STEREO 模式 聲音可配合環繞音效設定聆聽 同時還可使用午夜 響度 相位控制 聲音修正器及音調等功能 使用先進環繞聲 先進環繞聲效果可產生各種其他的環繞聲效果 請配合個人 喜好在各種音效上嘗試不同的設定 ADV SURR ECO AUTO DIRECT AUDIO PARAMETER TOOLS MENU VOLUME ALC STANDARD STEREO ECO iPod iPhone DIRECT CONTROL ADVANCED SURROUND DISPLAY BAND TUNER EDIT TUNE ALC STANDARD SURR AUTO SURROUND STREAM DIRECT AUTO DIRECT AUTO SURROUND STREAM DIRECT 環繞模式類...

Страница 62: ...果波峰與波谷相 會 則聲音將 超出相位 而且將產生不可靠的音像 如果您的重低音揚聲器有相位控制開關 請將它設定至正 號 或 0º 但是在此接收器上的相位控制設定為 ON 時 您可以實際感受到的效果視重低音揚聲器的類型 而定 設定您的重低音揚聲器以達到最大效果 此外 我 們也建議您嘗試變更重低音揚聲器的方向或位置 將重低音揚聲器的內建低通濾波器開關設定為 OFF 如果 無法在您的重低音揚聲器上完成這個動作 請將截止頻率 設定至更高的值 如果未適當設定揚聲器距離 可能無法得到最好的相位控 制效果 在下列情況中 相位控制模式無法設定為 ON 開啟 PURE DIRECT 模式時 連接耳機時 PHONES SURR 在透過耳機聆聽時 仍然可以享受到整體環 繞的效果 ECO MODE 1 減少耗電量 適合大部分為高音量的播放內 容 以音樂為主 ECO MODE 2 甚至能比 ECO MODE 1 減...

Страница 63: ...道 1 CH2 只能聽到 聲道 2 CH1 CH2 兩 個都能從前置揚 聲器聽到 F PCM 固定 PCM 此選項對於在 OFF 功能辨識 CD 上的 PCM 訊號之前即發現有些延遲的現象時相當有用 當已選取 ON 時 在播放非 PCM 來源期間即 可能會有雜訊輸出 在有問題時 請選取另 外的輸入訊號 OFF ON DRC 動態範圍控制 調整為 Dolby Digital DTS Dolby Digital Plus Dolby TrueHD DTS HD 和 DTS HD Master Audio 最佳化之電影原聲配樂的動態 範圍位準 小聲聆聽環繞音效時 可能需要 用到此功能 AUTOe MAX MID OFF LFE ATT LFE 衰減 有些 Dolby Digital 及 DTS 音源中含有超低頻 低音音調 請依需要設定 LFE 衰減器 以免 超低頻低音音調造成揚聲器的聲音失真 當...

Страница 64: ...SACD 碟片使用此設定應該是沒有問題 但若音效失 真 最好將增益設定切換回 0 dB g 只有當已連接的顯示幕支援 HDMI 的自動音訊 視訊同步功 能 唇形同步分析 lip sync 時 才可以使用此功 能 若發現自動設定的延遲時間不適合 請將 A DLY 設定至 OFF 並手動調整延遲時間 如需更多有關顯示幕之唇形同 步分析 lip sync 功能的詳細資訊 請直接洽詢製造商 h 僅適用於 DOLBY PLII MUSIC 模式下的雙聲道來源 i 僅限聆聽 NEO 6 CINEMA 與 NEO 6 MUSIC 模式的雙聲道來 源時 VSX 324 K P_DLXE zhtw book Page 28 Wednesday March 20 2013 9 28 AM ...

Страница 65: ... Manual SP Setup 2 從 Manual SP Setup 選單中選取 Speaker Setting 3 選擇要設定的揚聲器組 然後選取一揚聲器大小 使用 按鍵選取以下各揚聲器的大小 及數量 Front 若您的前置揚聲器能有效產生低音頻率 或未連 接重低音揚聲器時 選取 LARGE 選取 SMALL 以將低音 頻率傳送至重低音上 Center 所有中置揚聲器若能有效產生低音頻率 選取 LARGE 或可選取 SMALL 將低音頻率傳送至其他揚聲器 或重低音上 若未連接中置揚聲器 請選擇 NO 中置聲 道會傳送至其他揚聲器 Surr 若所有環繞揚聲器能有效產生低音頻率 選取 LARGE 或可選取 SMALL 將低音頻率傳送至其他揚聲器 或重低音上 若未連接環繞揚聲器 請選擇 NO 環繞聲 道的音效會傳送至其他揚聲器 Subwoofer 設定為SMALL的聲道的LFE訊號及低音頻...

Страница 66: ... Manual SP Setup 選單 聲道位準 使用聲道位準設定值 可調整揚聲器系統的整體平衡 這是 一項在設定家庭劇院時相當重要的設定值 注意 聲道位準設定中所用到的測試音均是以高音量輸出 1 從 Home Menu 中選擇 Manual SP Setup 2 從 Manual SP Setup 選單中選取 Channel Level 3 選取設定選項 Manual 可手動將測試音從一揚聲器移動至另一揚聲 器並調整個別聲道位準 Auto 可在測試音從一揚聲器移動至另一揚聲器時 自 動調整聲道位準 4 確認所選設定選項 此時測試音在按下 ENTER 後會開始運作 將音量提高至參考 等級 便會輸出測試音 5 使用 按鍵調整每一聲道的位準 若選擇 Manual 請使用 按鍵切換揚聲器 Auto 設定 會按螢幕操作畫面所示依序輸出測試音 1 Manual SP Setup Return a S...

Страница 67: ...ut Assign 選單中選取 Analog Input 3 為 ANALOG IN1 音訊輸入端子選擇所需的輸入選項 4 操作完成 按下 RETURN 此時會回到 Input Assign 選單 自動電源關閉選單 設定在經過指定時間後自動關閉接收器電源 當電源在數小 時未操作的情況下仍開啟時 預設值 OFF 1 從 Home Menu 中選擇 Auto Power Down 2 指定在關閉電源前允許的時間長度 在未操作的情況下 您可選擇 2 4 或 6 小時 或 OFF 若不需要自動關機 3 操作完成 按下 RETURN 此時您會回到 Home menu RECEIVER 1 Manual SP Setup Return a Speaker Setting b X Over c Channel Level d Speaker Distance 1d Speaker Distance Fr...

Страница 68: ...所需的輸入模式 然後您即 可選擇電視節目 重要 即使符合以上條件 也有可能無法操作 ARC 功能 若真是 如此 請在連接本機與音訊纜線後聆聽電視音訊 當 ARC 功能為 ON 時 CEC 消費電子控制 功能即會啟 動 並造成電源 ON 與 OFF 且輸入切換 因本機不保證 採 CEC 功能架構的同步操作 所以建議您將連接播放機 上的 HDMI CONTROL 設定為 OFF 若播放機上的 HDMI CONTROL 為 ON 則本機可能無法正確操作 有關詳細 資訊 請參閱相關裝置的操作手冊 若沒有作用 請將 ARC 功能為 OFF 若真是如此 請在連接本機與音訊纜 線後聆聽電視音訊 另外 本機不保證同步操作可讓電視 遙控器操作音量 包括靜音 使用本機來操作音量 包 括靜音 連接其他裝置或改變本機連線時 請將電源為 OFF 並取下 牆壁插座的電源線 完成所有連線後 請將電源線插入牆 壁插座 若...

Страница 69: ...著將本機移至通風良好的地 方 第 2 頁 降低音量 選取一輸入功能時沒有聲音傳出 使用 VOLUME 調高音量 按下遙控器上的 MUTE 按鍵將靜音功能關閉 根據所用接線類型將SIGNAL SEL設定為H HDMI C1 O1 數 位 或 A 類比 第 20 頁 請確定設備連接正確 請參閱第 10 頁的連接您的設備 檢查來源設備的音訊輸出設定 請參閱來源設備隨附操作手冊 選取輸入功能時沒有影像輸出 請確定設備連接正確 請參閱第 10 頁的連接您的設備 請使用適用於來源設備與電視的相同類型視訊連接線 以連接 此接收器 請參閱第 13 頁的關於連接視訊輸出 電視機選取的視訊輸入錯誤 請參閱電視機隨附的操作手冊 重低音沒有聲音 確定重低音已開啟 若重低音有音量調整鈕 請確定已有調高 所聆聽的 Dolby Digital 或 DTS 來源可能不含 LFE 聲道 在第 29頁的揚聲器設定 中將重低音...

Страница 70: ...出 現 設定系統時使用複合連線 無音效 或音效突然中止 檢查 HDMI 設定是否設為 AMP 第 27 頁 若設備是 DVI 裝置 則請將音訊連接至另外的端子上 HDMI 格式數位音訊傳輸需要更長的確認時間 正因為如此 在切換音訊格式或開始播放時 可能會發生音訊中斷 播放時開啟 關閉連接本機的 HDMI OUT 端子的裝置電源 或 在播放時脫離 連接 HDMI 連接線 都可能造成雜訊或音訊中 斷 關於 HDMI 連接線的重要資訊 以下為您可能無法透過本接收器傳送 HDMI 訊號的範例 此 取決於您連接的 HDMI 設備關於 HDMI 相容資訊 請洽詢設 備製造商 若無法透過本接收器從您的設備正確接收 HDMI 訊號 請在 連接時嘗試使用以下配置方式 配置 使用 HDMI 連接線直接將 HDMI 設備接上顯示器 然後最便 利的連接方式 建議使用數位連接 來傳送音訊至接收器 關於音訊連接的更多...

Страница 71: ...將中性清潔劑稀釋五至六倍 將軟布 沾濕擰乾後再擦拭 切勿使用傢俱蠟或清潔劑 嚴禁在本機或附近使用稀釋劑 乙醚 殺蟲劑或其他化學 藥劑 以免造成表面腐蝕 規格 音訊部分 額定功率輸出 前置 中置和環繞 每聲道 100 W 1 kHz 6 Ω 0 7 最大功率輸出 前置 中置和環繞 每聲道 120 W 1 kHz 6 Ω 10 總諧波失真 0 06 20 Hz 至 20 kHz 8 Ω 50 W 每聲道 保證揚聲器阻抗 6 Ω 至 16 Ω 輸入 靈敏度 阻抗 LINE 200 mV 47 kΩ 輸出 位準 阻抗 REC 200 mV 2 2 kΩ 訊噪比 IHF 短路 A 型網路 LINE 98 dB 視訊部分 訊號位準 複合 1 Vp p 75 Ω 調諧器部分 頻率範圍 FM 87 5 MHz 至 108 MHz 天線輸入 FM 75 Ω 非平衡 頻率範圍 AM 9 kHz 間隔 531 ...

Страница 72: ...6 67 785 6 85 491 ڸ ᚗEಓဵ Щᄃᡜࡊ ޠ ພь୧ዀȄ 7 337 727 7 598 646 8 323 983 8 444 3 8 4 3 2 6 8 383 678 ڸ ϑਰঠᇅҨ Ϝϟ ڐ уज ڸ зࣩ ւ ޠ ᇨആȄEUT IEȃಓဵІ ڸ ಓဵ EUT Jod ޠ ݨ ь୧ዀȄ ࠣϲ ᡞȄ EUT Jod ߴ ܛ ԥ ւȄ 2013 日本先鋒公司 版權所有 VSX 324 K P_DLXE zhtw book Page 36 Wednesday March 20 2013 9 28 AM ...

Страница 73: ...07 07 其他資訊 37 Zhtw English ϜН Español VSX 324 K P_DLXE zhtw book Page 37 Wednesday March 20 2013 9 28 AM ...

Страница 74: ...nstale este aparato asegúrese de dejar espacio en torno al mismo para la ventilación con el fin de mejorar la disipación de calor por lo menos 20 cm encima 10 cm detrás y 10 cm en cada lado ADVERTENCIA Las ranuras y aberturas de la caja del aparato sirven para su ventilación para poder asegurar un funcionamiento fiable del aparato y para protegerlo contra sobrecalentamiento Para evitar el peligro ...

Страница 75: ...las funciones de dispositivo de desconexión de la corriente para el aparato para desconectar toda la alimentación del aparato deberá desenchufar el cable de la toma de corriente de CA Por lo tanto asegúrese de instalar el aparato de modo que el cable de alimentación pueda desenchufarse con facilidad de la toma de corriente de CA en caso de un accidente Para evitar correr el peligro de incendio el ...

Страница 76: ...producción de una fuente 20 Selección de la señal de entrada de audio 20 Reproducción de un iPod 21 Reproducción de archivos guardados en un iPod 22 Controles de reproducción básica 22 Permite cambiar entre los controles del iPod y los del receptor 22 Reproducción de un aparato USB 22 Controles de reproducción básica 23 Compatibilidad de sonido comprimido 23 Recepción de radio 23 Cambio del paso d...

Страница 77: ... Los colores de los pasos indican lo siguiente Elemento de ajuste necesario Ajuste que debe realizarse si es necesario 1 Conexión de los altavoces El lugar donde coloque los altavoces tendrá un efecto importante en el sonido Disposición de los altavoces página 10 Conexión de los altavoces página 11 2 Conexión de los componentes Para disfrutar del sonido envolvente utilice una conexión digital entr...

Страница 78: ...nías página 24 5 Sensor del mando a distancia Recibe las señales del mando a distancia consulte Alcance operativo del mando a distancia en la página 9 6 Indicador HDMI Parpadea cuando se conecta un componente equipado con HDMI se ilumina cuando el componente está conectado página 14 7 iPod Indicador iPhone Se ilumina cuando se ha conectado un iPod iPhone y se ha seleccionado la entrada iPod USB pá...

Страница 79: ...a 8 20 Información de presintonía o indicador de señal de entrada Muestra el número de presintonía del sintonizador o el tipo de señal de entrada etc 21 Pantalla de visualización de caracteres Muestra diversos datos del sistema 22 Indicadores de DTS DTS Se ilumina cuando se detecta una fuente con señales de audio codificadas en DTS HD Se ilumina cuando se detecta una fuente con señales de sonido c...

Страница 80: ...I y NEO 6 y el modo estéreo de control de nivel Auto página 25 ADV SURR Alterna entre los diversos modos envolventes página 25 ECO Permite alternar entre Modo ECO 1 Modo ECO 2 Al ajustar el Modo ECO a ON el display se oscurecerá página 25 9 Botones de control de componentes y receptor Puede acceder a los controles de los botones siguientes después de seleccionar el botón de función de entrada corr...

Страница 81: ... la señal de entrada del televisor CH Utilice estos botones para seleccionar canales VOL Utilice estos botones para ajustar el volumen del televisor 15 VOLUME Úselos para ajustar el volumen de audición 16 MUTE Silencia restablece el sonido 17 DISP Activa la pantalla de esta unidad Puede comprobar el modo de escucha el volumen de sonido o el nombre de entrada seleccionando una fuente de entrada Col...

Страница 82: ...or distancia uno de otro En caso contrario instálelos más cerca el uno del otro Instale el altavoz central arriba o debajo del televisor de modo que el sonido del canal central quede localizado en la pantalla de televisor Asimismo asegúrese de que el altavoz central no supere la línea formada por el borde delantero de los altavoces frontales izquierdo y derecho Lo más apropiado es colocar los alta...

Страница 83: ...aje ACTIVO que es PELIGROSO Para evitar el riesgo de descargas eléctricas al conectar o desconectar los cables de altavoz desenchufe el cable de alimentación antes de tocar las partes de los cables que no están aisladas Asegúrese de que todos los cables desnudos de los altavoces se introducen completamente en los terminales de altavoz Si alguno de los cables desprotegidos del altavoz tocara el pan...

Страница 84: ...logía High Definition Multimedia Interface HDMI Este receptor es compatible con las funciones descritas más abajo a través de las conexiones HDMI Transferencia digital de vídeo sin comprimir contenido protegido por HDCP 1080p 24 1080p 60 etc Transferencia de señal 3D Transferencia de señal Deep Color Transferencia de señal x v Color Canal de retorno de audio consulte El menú HDMI Setup en la págin...

Страница 85: ...exiones digitales coaxiales Cables de vídeo RCA estándar Estos cables son el tipo de conexión de vídeo más común y deben utilizarse para las conexiones a los terminales de vídeo compuesto Los conectores amarillos los distinguen de los cables de audio Acerca de la conexión de salidas de vídeo Este receptor no incorpora un conversor de vídeo Cuando utilice cables HDMI para conectar el dispositivo de...

Страница 86: ...n el televisor Cuando la función ARC esté ajustada a ON y el receptor esté conectado a un televisor compatible mediante un cable HDMI si cambia la entrada del TV a vídeo compuesto es posible que la entrada del receptor se cambie automáticamente a televisor En tal caso restituya la entrada del receptor a la entrada original o ajuste la función ARC a OFF consulte El menú HDMI Setup en la página 32 N...

Страница 87: ...o para conectar el audio Para poder escuchar el audio desde el componente fuente conectado a este receptor mediante un cable coaxial primero deberá cambiar a DVD reproductor de DVD o SAT CBL descodificador y a continuación pulsar SIGNAL SEL para elegir la señal de audio C1 COAXIAL1 consulte Selección de la señal de entrada de audio en la página 20 Para escuchar el audio del reproductor de DVD que ...

Страница 88: ...or recepción 4 Conecte el cable de antena de FM en la toma de antena de FM Para obtener mejores resultados extienda la antena de FM por completo y fíjela en una pared o en el marco de una puerta No la cubra ni la deje enrollada Uso de antenas exteriores Para mejorar la recepción en FM Conecte una antena FM exterior según se indica más abajo Para mejorar la recepción en AM Conecte un cable con reve...

Страница 89: ... unidad esté encendida Para conocer instrucciones acerca de la reproducción del iPod consulte Reproducción de un iPod en la página 21 Nota Cuando la función ARC esté ajustada a ON y el receptor esté conectado a un televisor compatible mediante un cable HDMI si cambia la entrada del televisor cuando la selección del receptor es la entrada iPod USB es posible que el receptor cambie automáticamente a...

Страница 90: ... el tránsito Un cable de corriente dañado puede producir un incendio o provocar una descarga eléctrica Revise el cable de alimentación cada cierto tiempo Cuando el cable esté dañado pida un reemplazo a su centro de servicio autorizado o distribuidor PIONEER más cercano Cuando no utilice el receptor de forma continuada por ejemplo durante las vacaciones desenchúfelo de la toma de corriente Nota Des...

Страница 91: ...n el televisor a través del correspondiente cable de vídeo compuesto Por ejemplo si ha conectado este receptor a las tomas de VIDEO del TV asegúrese de que la entrada de VIDEO está seleccionada 3 Pulse en el mando a distancia y a continuación pulse el botón HOME MENU El Home Menu de la pantalla OSD se mostrará en el televisor Si no se muestra nada en la pantalla cambie el ajuste de formato de TV e...

Страница 92: ...PCM de 88 2 kHz 96 kHz 2 canales y si hay una opción para audio MPEG se debe ajustar para convertir el audio MPEG a PCM Dependiendo del reproductor de DVD o de los discos que utilice es posible que sólo obtenga sonido estéreo digital de 2 canales y sonido analógico En este caso si desea un sonido envolvente multicanal deberá ajustar el receptor a un modo de escucha multicanal 5 Use VOLUME para aju...

Страница 93: ...ringidas para algunos modelos Este receptor se ha desarrollado y comprobado con la versión de software de iPod iPhone indicada en la página web de Pioneer http pioneer jp homeav support ios ao Si instala versiones de software distintas de las indicadas en la página web de Pioneer en su iPod iPhone puede derivar en la incompatibilidad con este receptor iPod e iPhone tienen licencia para la reproduc...

Страница 94: ...de archivos guardados en un iPod Pulse iPod USB para poner el mando a distancia en el modo de operación iPod USB Durante la reproducción de libro de audio pulse para modificar la velocidad de reproducción Más rápido Normal Más lento Permite cambiar entre los controles del iPod y los del receptor De este modo puede cambiar entre realizar operaciones de iPod mediante el mando a distancia del recepto...

Страница 95: ...mienda 128 kbps o superior extensión de archivo m4a Codificación Apple sin pérdidas lossless No Información de otras compatibilidades Reproducción de VBR Variable Bit Rate MP3 WMA MPEG 4 AAC Sí Tenga en cuenta que en algunos casos puede que el tiempo de reproducción no aparezca correctamente Compatible con protección DRM gestión de derechos digitales Sí los archivos de sonido protegidos por DRM no...

Страница 96: ...ambién se pueden usar los botones numéricos 4 Pulse ENTER El número presintonizado deja de parpadear y el receptor guarda la emisora Nota Si el receptor permanece desconectado de la toma de corriente alterna durante un mes aproximadamente se perderán las memorias de emisoras y deberán volver a programarse Las estaciones se guardan en estéreo Cuando la estación se guarda en el modo FM MONO al recup...

Страница 97: ... fuente de música grabada en un reproductor de audio portátil Cuando seleccione STEREO escuchará la fuente solamente a través de los altavoces delanteros izquierdo y derecho y posiblemente a través del subwoofer dependiendo de la configuración de los altavoces Las fuentes multicanal Dolby Digital y DTS se mezclan a estéreo Los siguientes modos ofrecen sonido envolvente básico para fuentes estéreo ...

Страница 98: ...subwoofer cuenta con un interruptor de control de fase ajústelo al signo más o 0 No obstante el efecto que realmente se puede apreciar con este receptor cuando Phase Control se ajusta a ON depende del tipo de subwoofer Ajuste el subwoofer de modo que aproveche al máximo el efecto También se recomienda intentar cambiar la orientación o la ubicación del subwoofer Ajuste a OFF el filtro de paso bajo ...

Страница 99: ...y suavizando las irregularidades de sonido que aparecen tras la compresión OFFc ON DUAL MONOd Especifica cómo deben reproducirse las pistas de sonido monoaurales duales codificadas en Dolby Digital CH1 Sólo se escucha el canal 1 CH2 Sólo se escucha el canal 2 CH1 CH2 Se escuchan ambos canales por los altavoces frontales F PCM Fixed PCM Esto resulta útil si observa que se produce un ligero retardo ...

Страница 100: ...nc de su televisor póngase en contacto con el fabricante h Sólo disponible con fuentes de 2 canales en el modo DOLBY PLII MUSIC i Sólo al escuchar fuentes de 2 canales en modo NEO 6 CINEMA y NEO 6 MUSIC C WIDTH Amplitud central h sólo aplicable al utilizar un altavoz central Extiende el canal central entre los altavoces frontales derecho e izquierdo haciendo que el sonido sea más amplio ajustes má...

Страница 101: ...El menú HDMI Setup en la página 32 Configuración manual de los altavoces Este receptor permite hacer ajustes detallados para optimizar el sonido envolvente Sólo es necesario realizar estos ajustes una vez a menos que se cambie la ubicación del sistema de altavoces o se agreguen nuevos altavoces Ajuste de altavoz Seleccione esta opción para especificar la configuración de sus altavoces tamaño númer...

Страница 102: ...r defecto 200Hz Esta opción determina el corte entre los sonidos graves reproducidos desde los altavoces seleccionados como LARGE o el subwoofer y los sonidos graves reproducidos desde los altavoces seleccionados como SMALL También determina el punto de corte de los sonidos graves en el canal LFE Para obtener más información sobre cómo seleccionar tamaños de altavoces consulte Ajuste de altavoz en...

Страница 103: ... altavoz utilizando Puede ajustar la distancia de cada altavoz en intervalos de 0 1 m 4 Cuando termine pulse RETURN Volverá al menú Manual SP Setup El menú Input Assign El terminal de entrada de audio ANALOG IN1 está ajustado por defecto a CD pero puede cambiarse a entrada de TV 1 Seleccione Input Assign en el Home Menu 2 Seleccione Analog Input desde el menú Input Assign 3 Seleccione la opción de...

Страница 104: ...levisor después de haber conectado esta unidad y el televisor mediante un cable de audio El CEC Consumer Electronic Control podrá activarse cuando la función ARC se haya ajustado a ON permitiendo el encendido y apagado además de cambiar la entrada de un dispositivo a otro Puesto que esta unidad no garantiza el funcionamiento sincronizado basado en la función CEC es recomendable que desactive el aj...

Страница 105: ...pantalla y se apaga la alimentación La temperatura en el interior de la unidad ha superado el valor permisible Pruebe a mover la unidad para que se ventile mejor página 2 Baje el nivel de volumen Aparece TEMP en la pantalla y cae el nivel de volumen La temperatura en el interior de la unidad ha superado el valor permisible Pruebe a mover la unidad para que se ventile mejor página 2 Baje el nivel d...

Страница 106: ...iante las tomas de vídeo compuesto Según el componente fuente conectado es posible que no funcione con este receptor aunque sea compatible con HDCP En este caso conéctelo mediante las tomas de vídeo compuesto entre la fuente y el receptor Si no aparecen imágenes de vídeo en su TV pruebe a ajustar la resolución Deep Color u otros ajustes de su componente Para emitir señales en Deep Color use un cab...

Страница 107: ...BAND pulse y mantenga pulsado STANDBY ON durante unos dos segundos 3 Cuando en la pantalla aparezca el mensaje RESET pulse AUTO SURROUND STREAM DIRECT Aparece OK en la pantalla 4 Pulse ALC STANDARD SURR para confirmar OK aparece en la pantalla para indicar que el receptor ha sido puesto en los ajustes por defecto Importante Si la función ARC está activada es posible que no pueda inicializar la uni...

Страница 108: ...instrucciones Nota Las especificaciones son aplicables cuando la alimentación es de 230 V Las especificaciones y el diseño están sujetos a posibles modificaciones sin previo aviso debido a mejoras Fabricado con la licencia de Dolby Laboratories Dolby Pro Logic y el símbolo de la doble D son marcas comerciales de Dolby Laboratories Fabricado bajo licencia con patentes de los EE UU números 5 956 674...

Страница 109: ...Información adicional 37 Es 07 07 English ϜН Español VSX 324 K P_DLXE book 37 ページ 2013年3月21日 木曜日 午前11時19分 ...

Страница 110: ...Información adicional 38 Es 07 07 VSX 324 K P_DLXE book 38 ページ 2013年3月21日 木曜日 午前11時19分 ...

Страница 111: ...Información adicional 39 Es 07 07 English ϜН Español VSX 324 K P_DLXE book 39 ページ 2013年3月21日 木曜日 午前11時19分 ...

Страница 112: ...io L3R 2Z5 Canada TEL 1 877 283 5901 905 479 4411 PIONEER EUROPE NV Haven 1087 Keetberglaan 1 B 9120 Melsele Belgium TEL 03 570 05 11 PIONEER ELECTRONICS ASIACENTRE PTE LTD 253 Alexandra Road 04 01 Singapore 159936 TEL 65 6472 7555 PIONEER ELECTRONICS AUSTRALIA PTY LTD 5 Arco Lane Heatherton Victoria 3202 Australia TEL 03 9586 6300 PIONEER ELECTRONICS DE MEXICO S A DE C V Blvd Manuel Avila Camacho...

Отзывы: