background image

Expert System Settings

88

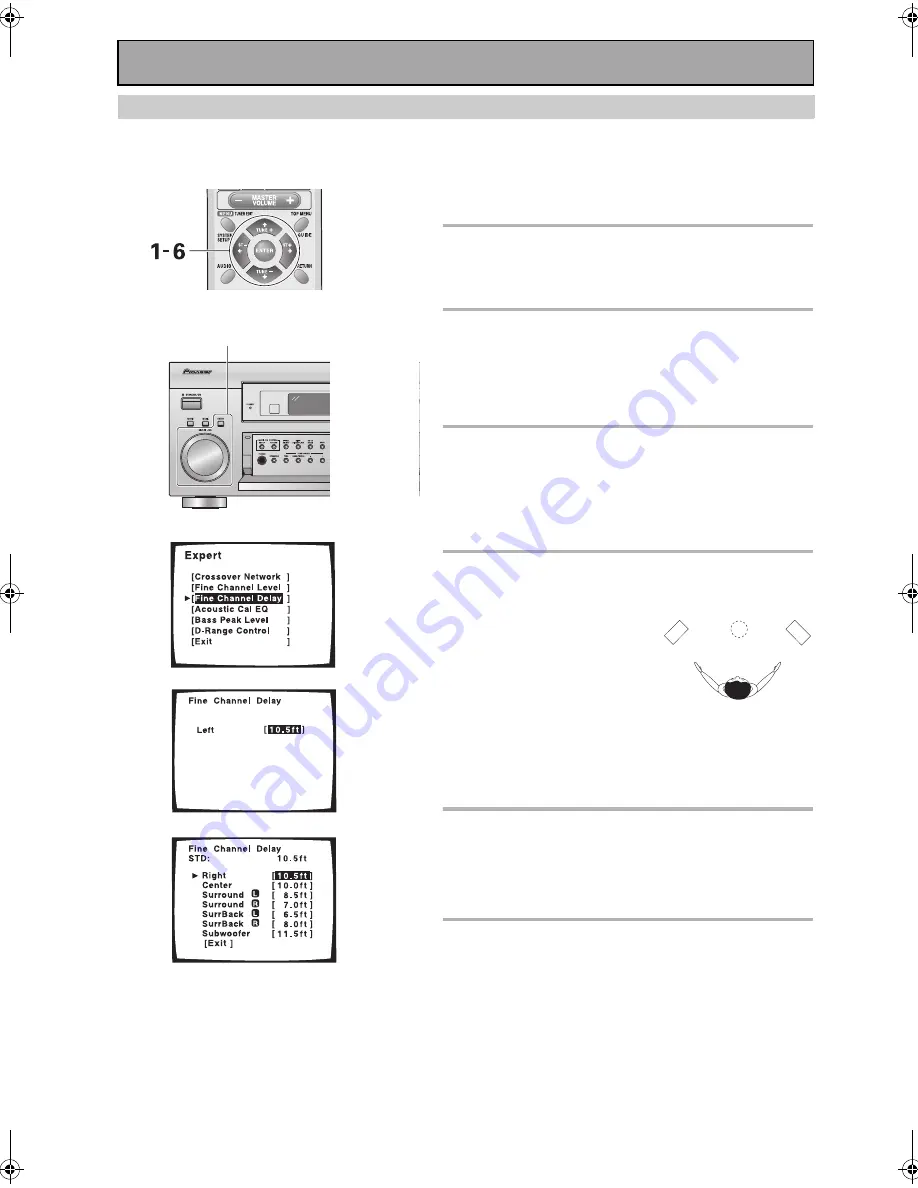
Fine Channel Delay

The following steps show you how to adjust the delay level of your speakers more finely than in the NORMAL setup 
(see page 38). Adding a slight delay to some speakers is necessary to achieve proper sound depth, separation as 
well as an effective surround sound effect.

Follow steps 1-5 on page 85, if necessary, to get to the 
starting point mentioned here.

1 FINE CHANNEL DELAY should be 

selected, if it isn’t use the 



 buttons 

to select and press ENTER.

2 Use  the 



 buttons to adjust the 

distance of the left channel. Press 
ENTER.

This channel will be the target reference which you use to 
measure the other channels.

3 Use  the 



 buttons to select the 

subsequent channel. Press ENTER.

Test tones will be output for the channel you want to 
adjust and a reference channel.
Listen to the reference channel and use it to measure the 
target channel.

4 Adjust the distance of each channel 

using the 



 buttons.

Listen to the reference channel 
and use it to measure the 
target channel. Stand facing 
the two speakers with your 
arms outstretched pointing at 
each speaker. Try to make the 
two tones sound as if they are 
arriving simultaneously at a 
position slightly in front of you and between your arm 
span. The distance can be set within a range of 0.5 to 45 
feet in 0.5 foot steps.
When you press ENTER you will automatically go to the 
next channel.

5 Press ENTER to select a new channel. 

Repeat step 4 for every channel.

If you want to change a setting before proceeding

Use the 



 buttons to go back to the channel you want 

to adjust and press ENTER. Then follow step 3.

6 When done select EXIT (if it's not 

already selected) and press ENTER.

Next, if you want, proceed to ACOUSTIC CAL EQ.

Left

1

2

3

1-6

00_VSX-53TX.book  Page 88  Monday, April 7, 2003  11:07 PM

Содержание Elite VSX-53TX

Страница 1: ...1 3 ...

Страница 2: ...2 ...

Страница 3: ...3 3 ...

Страница 4: ...nt Panel 28 Remote Control 30 Display 33 Back Panel 34 Setting Up for Surround Sound 36 Surround Back System 37 NORMAL Setup 38 Speaker Setting 39 Channel Level 41 Speaker Distance 42 Basic Operation 43 Stereo and Multichannel Playback 43 Selecting the Input Signal 44 Listening Modes 45 Stereo modes 45 MOVIE modes SURROUND mode 46 MUSIC modes SURROUND mode 47 Adjusting the Effect of a Listening Mo...

Страница 5: ... Off 77 Using SYSTEM OFF 77 Resetting the Remote Control 78 Erasing Multi Operations 78 Erasing Learning Remote Control Commands 78 Erasing All Remote Control Settings 78 Resetting the Main Unit 79 Fine Tuning Your System 80 THX CINEMA Setup 80 Assigning the Digital Inputs 81 Assigning the Component Video Inputs 82 Function Rename 83 12V TRIGGER function 84 Expert System Settings 85 EXPERT Setup 8...

Страница 6: ...asfilm and THX are trademarks or registered trademarks of Lucasfilm Ltd and TM Surround EX is a jointly developed technology of THX and Dolby Laboratories and is a trademark of Dolby Laboratories All rights reserved Used under authorization Manufactured under license from Dolby Laboratories Dolby Pro Logic Surround EX and double D symbol are trademarks of Dolby Laboratories DTS DTS ES Extended Sur...

Страница 7: ...uctions Remote Control Unit Microphone for Auto Microphone Stand for Auto Surround Sound Setup Surround Sound Setup 1 2 3 AA IEC LR6 batteries x 2 CAUTION Incorrect use of batteries may result in such hazards as leakage and bursting Observe the following precautions Never use new and old batteries together Insert the plus and minus sides of the batteries properly according to the marks in the batt...

Страница 8: ...r is located near a device emitting infrared rays Operated simultaneously with another remote control which uses infrared rays Installing the Receiver Opening the Front Panel To open the front panel push gently on the lower third of the panel with your finger CAUTION Do not cover this unit in any way for example with a sheet or piece of cloth This would prevent proper heat dispersal Do not any pla...

Страница 9: ...he Source Material DVDs have become the basic source material for home theater because they are convenient to use and offer excellent sound and picture quality as well as allow users to enjoy home theater soundtracks with more than two channels of audio For example Dolby Pro Logic plays back four channels front left front right center and a single channel for both surround speakers Dolby Digital a...

Страница 10: ...lso hook up your DVD player with analog audio connections Use regular RCA stereo cords for these connections Also hook up the video connection on your DVD player and your TV to this receiver For your TV it s easiest to use a regular composite RCA video cord as shown below Digital Connections Some DVD players have both coaxial and optical terminals but there is no need to connect both If your DVD p...

Страница 11: ...s how to hook up a subwoofer which provides realistic bass sounds For the subwoofer use a mono single plug RCA cord and for the other speakers use regular speaker cords Make sure you connect the speaker on the right to the R terminal and the speaker on the left to the L terminal Also make sure the positive and negative terminals on the receiver match those on the speakers Memo We recommend speaker...

Страница 12: ...ress the RECEIVER button on the remote control 2 Press the SYSTEM SETUP button The SYSTEM SETUP menu appears on your TV if it doesn t refer to page 10 to make sure you have prop erly connected the receiver to your TV 3 Looking at the on screen display on your TV use the buttons to select INPUT ASSIGN Press the ENTER button 4 DIGITAL IN SELECT should be selected if not use the buttons to select it ...

Страница 13: ... 36 and EXPERT Setup starting on page 85 Make sure all the components you need especially speakers have been properly connected before you do the steps described here 1 Hook up the microphone to the SETUP MIC jack on the Front Panel 2 Place the microphone at your normal listening position Use a table chair or something else to put the micro phone at the same height as you usually listen to your sy...

Страница 14: ...s and establish ambi ent noise levels the microphone status and what speak ers you hooked up 11 Check the speaker settings on the OSD If they match your speaker configuration make sure OK is selected and press ENTER The test tones will be out put loudly again The test tones may take up to 5 minutes this time After they have finished you see the SPEAKER SYS TEMS CHECK screen If you want to view the...

Страница 15: ...or the Dolby Digital DTS output settings are not correct Set the DVD player to output a digital signal and set the Dolby Digital and DTS output properly If you are unsure how to do this check the DVD initial setup in the manual that came with your DVD player Q2 There is no sound from the subwoofer or it is very low A2 There is a good possibility you haven t reached a part of the DVD that has an LF...

Страница 16: ...eceiver and from the receiver to your TV or monitor If you don t follow the default settings below you must assign the inputs you used with the Assigning the Component Video Inputs procedure see page 82 The default settings are COMPONENT VIDEO IN 1 DVD LD COMPONENT VIDEO IN 2 TV SAT CAUTION Don t confuse the MONITOR OUT for your TV with the MULTI ROOM SOURCE MONI TOR OUT for the MULTI ROOM fea tur...

Страница 17: ...ions and analog audio connections are necessary Connecting a DVD player Before making or changing the connections switch off the power and disconnect the power cord from the AC outlet Hook up your audio signal with either a coaxial or optical digital cords you don t need to do both If you hook up your DVD LD player using component video cable connections you might need to setup your DVD player for...

Страница 18: ...nputs on your VCR DVR Note that to record video from a source component the video connection from the source to the receiver and from the receiver to the recorder must be the same type Connecting a Video Component to the Front Panel Connect a portable DVD player video game console or any video component to the front panel as show here Front video connections are accessed via the front panel input ...

Страница 19: ...16 For the audio signal in order to use digital soundtracks broadcast you must hook up a digital input Use either a coaxial or optical cable it doesn t matter which see page 23 We recommend hooking up your audio with analog cables as well see below The arrows indicate the direction of the TV signal Memo If your digital connections are different than the default settings see page 23 you will need t...

Страница 20: ...s If you want to record to from digital components like a CD R to from analog components you must hook up your digital equipment with these analog connections The arrows indicate the direction of the audio signal Memo Depending on where the cassette deck is placed noise may occur during playback of your cassette deck which is caused by leakage flux from the transformer in the receiver If you exper...

Страница 21: ...ff the power and disconnect the power cord from the AC outlet If you have a DVD Audio or Super Audio CD SACD compatible player or are using an external Dolby Digital DTS decoder connect it to the multichannel analog inputs as shown below Memo If you use only one surround back input be sure to hook up to the SURROUND BACK L jack Components equipped with 5 1 7 1 channel analog output jacks ...

Страница 22: ...nt to coaxial in on the receiver Hook up your audio signal with either a coaxial or optical digital cords you don t need to do both If you hook up your DVD LD player using component video cable connections you might need to setup your DVD player for component video output as well See your DVD manual for details There are two optical digital out jacks the CD recorder is connected to one in the diag...

Страница 23: ... IN 1 optical TV SAT DIGITAL IN 2 optical CD R TAPE1 DIGITAL IN 3 coaxial DVD LD DIGITAL IN 4 coaxial CD See Assigning the Digital Inputs on page 81 if the way you hook up your equipment is different from the default settings listed here Coaxial cords Optical cables Commercially available digital audio coaxial cords standard video cords can also be used or optical cables not supplied are used to c...

Страница 24: ...quality Using outdoor antennas Single AM loop antenna 1 Assemble the antenna 2 Twist exposed wire strands together and insert 3 Attach to a wall etc if desired and face toward the direction providing the best reception AM loop antenna FM wire antenna To improve AM reception Connect a 15 to 18 feet 5 6 meter length of vinyl coated wire to the AM LOOP ANTENNA terminal in addition to the supplied AM ...

Страница 25: ...left to the L terminal Also make sure the positive and negative terminals on the receiver match those on the speakers Memo We recommend speakers with a nominal impedance rated 8 Ω 16 Ω but you can change the speaker impedance setting of the receiver see page 26 If you only have one surround back speaker hook it up to the left surround back terminal If you are using a THX certified subwoofer use th...

Страница 26: ...minals for the high and low frequencies To bi wire a speaker connect two sets of speaker cords to each speaker terminal on the receiver The easiest way to do this is to connect one wire in the normal way and use a banana plug for the other one Make sure you use a parallel not series connection when doing so Don t connect different speakers from the same terminal in this way First put the receiver ...

Страница 27: ...should not exceed 100 W CAUTION When installing the center speaker on top of the TV be sure to secure it with suitable means Memo When installing speakers near the TV we recommend using magnetically shielded speakers to prevent distortion in the color of the TV screen If you do not have magnetically shielded speakers and notice discoloration of the TV screen place the speakers farther away from th...

Страница 28: ...e 47 STEREO DIRECT see page 45 Switches the receiver into STEREO mode if it was in a different sound mode or toggles between DIRECT and STEREO mode 4 ENTER button Use this button to enter information concerning the SYSTEM SETUP listening mode or the tuner 5 STANDBY indicator Lights when the receiver is in STANDBY mode Please note that this receiver consumes a small amount of power 0 8 W in the sta...

Страница 29: ...JOG and ENTER buttons 17 MULTI ROOM SOURCE buttons see page 72 Press to use the multi room feature requires an optional IR receiver CONTROL button Used together with the MULTI JOG to select the function or use with the MASTER VOLUME to select the volume of the MULTI ROOM system ON OFF button Use to switch MULTI ROOM function on or off 18 PHONES jack Connect headphones for private listening no soun...

Страница 30: ...ode if it was in a different sound mode or toggles between DIRECT and STEREO mode 4 SYSTEM SETUP button Use for all system setups including the speaker and sound systems For more information see Setting Up for Surround Sound starting on page 36 For a DVD player use this button to bring up the DVD menu and for a tuner use this button in the same way as the TUNER EDIT button 5 AUDIO button Use to sw...

Страница 31: ...is a dedicated TV button Use it to turn on off your TV INPUT SELECT Press to select the input source for the TV CHANNEL Use these buttons to change the channel of the TV VOLUME Press to control the volume of the TV 9 MULTI OPERATION button Use this button with MULTI OPERATION page 75 and SYSTEM OFF page 77 10 LED display This display flashes when a command is sent from the remote control to the re...

Страница 32: ... a station and or a frequency 17 RETURN button When you are in a receiver setup operation this button will go back one step in the SYSTEM SETUP procedure When you are using your DVD menu screen this button acts the same as the DVD player s Return button When you are using cable tuners satellite tuners or digital TV tuners this button will either exit you from the menu screen or act like a Return b...

Страница 33: ... received 8 Volume level indicator 9 MULTI ROOM indicator Lights when the MULTI ROOM system is on 10 Hi BIT SAMPLING indicator Lights when a AUDIO SCALER mode is on 11 DSP indicators MOVIE Lights when a MOVIE mode is selected When a DSP MOVIE mode is selected DSP will light with a box around it MUSIC Lights when a MUSIC mode is selected When a DSP MUSIC mode is selected DSP will light with a box a...

Страница 34: ...ondary room Note that the MONITOR OUT here is different than the MONITOR OUT for the main system These are analog jacks 5 MONITOR OUT terminals connect a TV or monitor here see page 16 Use these terminals to output the video signal to your TV video projector or monitor in your main room Be careful not to confuse these jacks with the MULTI ROOM SOURCE MONITOR OUT 6 PRE OUT analog terminals connect ...

Страница 35: ...d of digital player To be able to play Dolby Digital and other surround soundtracks you need to make digital connections To do this use the digital terminals here If you don t connect as per the default settings see page 23 you need to complete Assigning the Digital Inputs on page 81 13 Audio input output terminals connect analog components here see page 20 Use these terminals to input output the ...

Страница 36: ...e selected If it isn t use the buttons to select it Press the ENTER button 4 Use the buttons to navigate through the menus When you have the setting you want in a particular menu press ENTER In each mode the current settings are displayed We suggest you do a basic system setup for surround sound when you first hook up the receiver That gets it out of the way and you won t need to do it again unles...

Страница 37: ...back system setting Press the ENTER button Choose from NORMAL SYSTEM if you want to use these speaker terminals for your surround back speakers in your main speaker system referred to as the A speaker system SECOND ZONE if you want to use the these speaker terminals for an independent speaker system referred to as speaker system B MR S if you want to use these speaker terminals for a different ind...

Страница 38: ...ss ENTER In each mode the current settings are displayed We suggest you adjust all these settings when you first hook up the receiver That gets them out of the way and you won t need to return to this setting mode unless you change your home set up by adding new speakers etc SPEAKER SETTING page 39 Use to specify the type and number of speakers you con nected CHANNEL LEVEL page 41 Use to balance t...

Страница 39: ...fault setting is SMALL Select LARGE if your speakers will reproduce bass frequencies effectively Select SMALL to send bass frequencies to the other speakers or subwoofer If you did not connect surround speakers choose NO In this case the sound of the surround channels is output from the front and center speakers If the front speakers are set to SMALL the surround speakers will automatically be set...

Страница 40: ...R Next proceed to CHANNEL LEVEL below If you want to change a setting before proceeding start over from step 1 Memo If you have a subwoofer and like lots of bass it may seem logical to select LARGE for your front speakers and leave the subwoofer selected This may not however yield the best bass results Depending on the size and shape of your room you may actually experience a decrease in the amoun...

Страница 41: ...el of each speaker using the buttons and ENTER When done go to step 4 In AUTO automatic test tone mode This mode switches the test tone between each speaker auto matically The test tone output cycles through the speakers in the following order Adjust the level of each speaker using the buttons as the test tone is emitted and wait for it to move to the next speaker When done go to step 5 If you wan...

Страница 42: ...ly If continuing from CHANNEL LEVEL go to step 1 If starting fresh complete steps 1 2 on page 38 1 The SPEAKER DISTANCE should be selected If it isn t use the buttons to select it Press the ENTER button The setup possibilities appear on your TV 2 Select each speaker channel with the buttons and press ENTER 3 Use the buttons to add or subtract the distance in feet that the speaker is from your norm...

Страница 43: ... See the next page for more details if necessary 4 Choose a LISTENING MODE one of two ways For SURROUND modes press MOVIE or MUSIC use the buttons to select the mode you want and press ENTER For STEREO DIRECT press the button for that mode On the front panel use the MOVIE or MUSIC buttons and the MULTI JOG dial Press the button of the mode type you want and then use the dial to cycle through the p...

Страница 44: ...w Memo When DIGITAL signal is selected 2 DIGITAL lights when a Dolby Digital signal is input DTS lights when a DTS signal is input If no digital inputs are assigned see page 81 you can only choose ANALOG in the SIGNAL SELECT Because the audio signal from a karaoke microphone and LDs are recorded with analog audio only they are not output from the digital outputs Set SIGNAL SELECT to ANALOG to list...

Страница 45: ...h these modes to see which suit your home system and personal tastes The MUSIC and STEREO modes are designed to be used with music sources but some MUSIC modes are also suitable for film soundtracks Again try different modes with various soundtracks to see which you like but you must choose one of the MOVIE and MUSIC listening modes in order to get surround sound Depending on your setup in STEREO ...

Страница 46: ...d and is suitable for movies The NEO 6 CINEMA mode delivers good channel separation for movie soundtracks With sources other than stereo 5 1 etc the display will automatically show the type of decoding being employed Dolby Digital DTS ES etc ACTION This mode is designed for action movies which generally use lots of sound effects The mode enriches the sound to make it more realistic and extends the...

Страница 47: ...ent surround and center sound With sources other than stereo 5 1 etc the display will automatically show the type of decoding being employed Dolby Digital DTS ES etc CLASSICAL Simulates the acoustic effects of a large concert hall Suitable for classical music A long delay time of reflected sounds coupled with reverb effects let the listener experience the dynamic and rich sounds characteristic of ...

Страница 48: ... explained here To start this setup select Dolby Pro Logic ll if necessary with the MUSIC button 1 Press RECEIVER 2 Press the EFFECT CH SEL button repeatedly and select the setting you want They appear in the receiver s display CENTER WIDTH With Pro Logic decoding center chan nel signals can come only from the center speaker If no center speaker is present this channel is split between the two fro...

Страница 49: ...h on DIGITAL NR This feature is effective with sources containing a lot of background noise like cassette and video tape 1 Press RECEIVER 2 Press the DNR button on the remote control Each press switches DIGITAL NR on or off When on DNR lights in the display Memo In cases described below noise may not be reduced even if DIGITAL NR is on Sudden noise Extremely loud noise Signals that contain too man...

Страница 50: ...sts itself automatically in accor dance with the volume level You can t use the MIDNIGHT mode with the THX CIN EMA MULTI CH IN or LOUDNESS modes If you set MIDNIGHT on when in DIRECT mode the receiver switches to STEREO mode Listening in LOUDNESS Mode The LOUDNESS mode boosts the bass and treble in a signal It is useful for listening to music at low volumes This feature is applicable only when the...

Страница 51: ... the tone the receiver will revert to the sound mode it was in at the beginning of the process Memo The tone control can be adjusted in a range of 6 dB The tone control cannot be set on in THX CINEMA MULTI CH IN modes If you set TONE control on in DIRECT mode the receiver will switch to STEREO mode Listening with Sound Delay Some video displays have a slight delay in presentation of the video Usin...

Страница 52: ...ton on the remote control or HI BIT HI SAMPLING button on the front panel Each press switches AUDIO SCALER mode on or off HI BIT SAMPLING lights in the display Memo This mode cannot be used with MULTI CH IN mode If the receiver is in DIRECT mode and you press the HI BIT button the receiver will switch to STEREO mode This feature cannot be used with source signals greater than 88 2kHz over a digita...

Страница 53: ... signal from the MULTI CH IN terminals output without digital processing You can only control each channel level OFF Cancels the MULTI CH IN modes Memo You can t use any kind of sound processing with MULTI CH IN Selecting a listening mode or switching these modes cancels the MULTI CH IN If any speakers are set to NO the signal for that those channel s won t get output at all You cannot set sound f...

Страница 54: ...OUND speakers set to something other than NO and have chosen NO for the SURROUND BACK speakers in SPEAKER SETTING see page 39 to use this mode To accomplish the same settings you could have had the AUTO SURROUND SETUP automatically set the SURROUND speakers on and the SURROUND BACK speakers off see page 13 to use this mode 1 Press the SB CH MODE button on the remote control Each press switches bet...

Страница 55: ... L ch1 and R ch2 indica tors in the display light to indicate the playback channel The different settings are DUAL CH1 where you only hear channel 1 DUAL CH2 where you only hear channel 2 and DUAL CH1 CH2 where you hear both channels but independently from different speakers Memo The default setting is DUAL CH1 You can only use this function with Dolby Digital sources that have this encoding Using...

Страница 56: ... you change the audio input If you change audio functions the receiver will reset itself to make the video and audio inputs correspond Also if you switch the power of the receiver off when you turn it back on the video and audio inputs will reset so that they correspond Adjusting the Brightness of the Display DIMMER Use the display DIMMER button to adjust the brightness of the fluorescent display ...

Страница 57: ...t to locate other stations For Manual Tuning To change frequencies one step at a time press TUN ING repeatedly To change frequencies quickly hold down TUNING and release when you reach the frequency you want MPX Mode If the TUNED or STEREO indicators do not light when tuning an FM station because the station is too far away or the broadcast signal is weak press MPX on the remote control to switch ...

Страница 58: ...e tuner operation mode 2 Press the BAND button to select the band FM or AM Each press switches the band FM AM 3 Press the D ACCESS button to activate the direct access tuning mode The cursor blinks in the display on the front panel 4 Use the number buttons to enter the frequency of the station you want Example To tune station 106 00 FM press 1 0 6 0 0 To cancel before inputting the frequency Press...

Страница 59: ...ess the TUNER EDIT button to activate the memory function 3 Press the CLASS button repeatedly to select a class number Each press switches the display 4 Press the ST buttons repeatedly or use the MULTI JOG to select a channel 0 9 within the respective class 5 Press the ENTER button to input your choice To continue repeat steps 1 5 3 4 5 3 4 2 CLASS A CLASS B CLASS C LOUDNESS MIDNIGHT TONE DNR ATT ...

Страница 60: ...select the preset channel 4 Press TUNER EDIT to select the station name mode 5 Enter the station name you want Names can be up to four characters long Use the MULTI JOG dial front panel or the ST but tons remote to select characters Press ENTER to confirm a character If no character is input a space is input To erase a station name simply repeat steps 1 4 and input four spaces instead of a name Th...

Страница 61: ...ss 0 For example If 99 50 MHz FM was memorized in class B at channel 7 To step through each channel in order Press the ST buttons repeatedly 2 3 LOUDNESS MIDNIGHT TONE DNR ATT STEREO TUNED RDS Hi BIT MULTI ROOM SAMPLING EON RF ATT MONO Neo 6 DIGITAL DTS ES EX MPEG AAC PRO LOGIC DSP L C R LFE AUTO SB CH ON MOVIE MUSIC OFF LS S RS AUTO RF DIGITAL CLASS A CLASS B CLASS C LOUDNESS MIDNIGHT TONE DNR AT...

Страница 62: ...E SETUP button press 1 to select the preset recall setup mode The LED begins to blink To cancel the preset recall setup mode press REMOTE SETUP 2 Press the MULTI CONTROL button for the component you want to control The LED lights continuously The TUNER button cannot be assigned 3 Point the remote toward the component to be controlled enter the 4 digit setup code see page 104 for codes The LED blin...

Страница 63: ...MULTI CONTROL button for the component you want to control The LED lights continuously The TUNER button cannot be assigned 3 Press the button to be programmed The LED blinks rapidly The TV TV INPUT SELECT TV CHANNEL and TV VOLUME buttons are only available for learning when programming TV CONTROL operations 4 Point the remote controls at each other and press the button on the other remote control ...

Страница 64: ...y stopped will cause the disc tray to open CD MD CD R VCR DVD LD DVD recorder Cassette deck SUBTITLE button Displays changes the subtitles on multilingual DVDs DVD DVD recorder Directly access tracks on a program source CD MD CD R LD Number buttons Directly access chapter on a program source DVD DVD recorder Directly select a channel VCR DVD recorder 10 button Select tracks or chapter higher than ...

Страница 65: ... Basic playback options Double cassette 2nd deck Button s Function Components TV Press to switch the TV Satellite TV or Cable TV between STANDBY and ON Cable TV Satellite TV TV INPUT SELECT Press to switch the TV input TV TV CHANNEL Select channels Cable TV Satellite TV TV TV VOLUME Adjust the TV volume TV MENU Takes you to the TV menu of that system Cable TV Satellite TV TV Digital TV GUIDE Takes...

Страница 66: ...does not go into VCR 2 mode 1 While holding down the REMOTE SETUP button press 4 to select the direct function setup mode The LED begins to blink To cancel the direct function setup mode press REMOTE SETUP 2 Press the MULTI CONTROL button of the component whose direct function you want to turn on or off The LED lights and remains lit For example if you want to turn off direct function for VCR 2 yo...

Страница 67: ...sure that the recorder is compatible with the source digital audio format See page 20 for more on analog audio connections and page 22 for digital audio connections Memo The receiver s volume channel level balance TONE DIGITAL NR MIDNIGHT LOUDNESS ACOUSTIC EQ and surround effects have no effect on the recorded signal In some cases digital recordings have copy guard protections and making a digital...

Страница 68: ...ly switch A speakers main speaker system on or off If you selected SECOND ZONE in the SURRBACK SYSTEM setup see page 37 this button will cycle through the A main speaker system the B speaker system the surround back speakers acting as a separate second zone both speaker systems and off 1 Press the SPEAKERS button on the front panel to switch speakers on off or cycle through the different speaker s...

Страница 69: ... switch off the power and disconnect the power cord from the AC outlet The arrows indicate the direction of the signal Memo You can use the additional amplifier on the surround back channels for a single speaker as well In this case plug the amplifier into the L SINGLE terminal only The sound from the surround back terminals will depend on how you have set up the SURRBACK SYSTEM see page 37 Powere...

Страница 70: ...ff MULTI ROOM connections On the VSX 53TX connect the IR receiver sensor to the MULTI ROOM SOURCE REMOTE IN jack then connect a separate amplifier and speakers and TV monitor to the MULTI ROOM SOURCE AUDIO and VIDEO OUT jacks All of this equipment should be placed in your sub room as shown below Memo When connecting the IR receiver be sure to connect it to the green MULTI ROOM SOURCE REMOTE IN jac...

Страница 71: ...ns to select the IR RECEIVER type PIONEER or OTHERS Press ENTER If you have an IR receiver from a different company than PIONEER select OTHERS However if selecting OTHERS doesn t seem to work try selecting PIONEER 6 Use the buttons to select EXIT then press ENTER to go back to the SYSTEM SETUP menu 7 Use the buttons to select EXIT and press ENTER You will exit the SYSTEM SETUP menu and return to n...

Страница 72: ...G and adjust the volume You can adjust the volume level in the following range VARIABLE 60dB to 0dB When using the surround back terminal 80dB to 12dB FIXED cannot be adjusted For this example we ll use the DVD LD function The display shown below will illuminate The MULTI JOG steps through the functions in the following order 4 When in TUNER function press the CLASS button and use STATION to selec...

Страница 73: ...D TAPE2 VCR 2 or VIDEO MASTER VOLUME buttons for adjusting the sub room s volume level but can t be used when set to FIXED CLASS button for selecting the memory class you want ST button for recalling memorized radio stations the tuner is selected automatically Number button 0 9 Memo Make sure the system is in STANDBY mode or ON When someone is controlling the system from the main room you won t be...

Страница 74: ...in room The PIONEER SR System Operating other PIONEER components Connecting an optional control cord allows you to operate other PIONEER components simply by pointing the receiver s remote control at the remote sensor on the front panel of the receiver The receiver then sends the remote control signals to the other devices via the CONTROL OUT terminal Memo You can also control PIONEER components a...

Страница 75: ...utomatically turns on Pioneer TVs Memo Be sure to set up each component before programming multi operations see Setting Up the Remote Con trol to Control Other Components on page 62 To exit from the REMOTE SETUP mode at anytime press the REMOTE SETUP button 1 While holding down the REMOTE SETUP button press 3 to select the multi operation setup mode The LED begins to blink To cancel the multi oper...

Страница 76: ...the DVD LD button then play to start playing the DVD player When you employ multi operations see below these three tasks will be performed in the same order 5 Press the REMOTE SETUP button to exit the multi operation setup mode The remote control return to their previous operation modes Performing Multi Operations Do the following to use the multi operations 1 Press the MULTI OPERATION button 2 Pr...

Страница 77: ...Each MULTI CONTROL button can be used for SYSTEM OFF If a SYSTEM OFF command relates to using a DVD player for example it makes sense to select the DVD LD button 4 Press the SOURCE button of the component to be set with SYSTEM OFF operations 5 Press the REMOTE SETUP button to exit the SYSTEM OFF setup mode The remote control return to their previous operation modes Using SYSTEM OFF Do the followin...

Страница 78: ...ttings will be erased Erasing Learning Remote Control Commands 1 Press and hold both the REMOTE SETUP button and 9 for more than 3 seconds LED lights will blink 3 times and all learned remote control commands will be erased Erasing All Remote Control Settings 1 Press and hold both the REMOTE SETUP button and 0 for more than 3 seconds LED lights will blink 3 times and all remote control settings wi...

Страница 79: ... appear in the display press the TONE button OK appears in the display press TONE When OK appears in the display all the settings including the speaker surround sound settings and tuner settings will be reset in the unit to the default settings Memo When resetting the receiver make sure the MULTI ROOM feature is off If the receiver is disconnected from a power source for about a month or longer it...

Страница 80: ... the SYSTEM SETUP button 3 Looking at the on screen display on your TV use the buttons to select THX CINEMA SETUP Press the ENTER button 4 Use the buttons to choose either PRO LOGIC ll MOVIE PRO LOGIC or NEO 6 CINEMA as the decoding method Press the ENTER button The default is PRO LOGIC ll MOVIE 5 EXIT should be selected if not use the buttons to select it Press ENTER 6 Use the buttons to select E...

Страница 81: ...ons to move through the different digital inputs and press the ENTER button 6 Use the buttons select the component that you hooked up to that digital in Press the ENTER button If you re not sure which component is connected to which digital in look on the back of the receiver and check the cables you connected 7 When you re finished use the buttons to select EXIT and press ENTER This exits the DIG...

Страница 82: ...he buttons to select INPUT ASSIGN Press the ENTER button 4 Use the buttons to select COMPONENT IN SELECT then press ENTER 5 Use the buttons to select the component video input you want to reassign Press the ENTER button 6 Use the buttons to assign a receiver function Choose between DVD LD TV SAT VCR1 and VCR2 7 When you re finished use the buttons to select EXIT and press ENTER You will leave the ...

Страница 83: ...me of the function for example DVD LD you want to change Press ENTER Either the cursor underline bar or a character depending on which is selected will blink The functions are divided into three different on screen displays so you may have to move through them to find the function you want to rename 5 Use the MULTI JOG to cycle the cursor through the letters numbers and symbols Use the ENTER butto...

Страница 84: ... the on screen display on your TV use the buttons to select 12V TRIGGER Press the ENTER button 4 Use the buttons to select the component you want to use the 12V trigger with for example DVD LD Press ENTER 5 Use the buttons to select the ON or OFF Press ENTER ON 12V TRIGGER function is activated OFF 12V TRIGGER function is not activated 6 Repeat steps 4 and 5 to set 12V TRIGGER for as many terminal...

Страница 85: ... button 4 Select EXPERT with the buttons Press the ENTER button 5 Follow the order below to make expert settings Use the buttons to navigate through the menus When you have the setting you want in particular menu press ENTER In each mode the current settings are displayed on the screen CROSSOVER NETWORK page 86 This feature determines which frequencies will be sent to the subwoofer or large speake...

Страница 86: ... If all speakers are set to LARGE see page 39 this setup is unnecessary Follow steps 1 5 on page 85 if necessary to get to the starting point mentioned here 1 CROSSOVER NETWORK should be selected if it isn t use the buttons to select and press ENTER 2 Use the buttons to select frequency cut off point Press ENTER Frequencies below the cut off point will be sent to the subwoofer or large speakers Fo...

Страница 87: ...R VOLUME rotates to the reference position 0 dB and after a few seconds the test tone is output 3 Use the buttons to select the subsequent channel Press ENTER 4 Adjust the level of the channel using the buttons Adjust the channel level from 10dB to 10dB in 0 5dB increments The default setting is 0dB Try to get the volume level of the target speaker to match that of the front left speaker which is ...

Страница 88: ...l you want to adjust and a reference channel Listen to the reference channel and use it to measure the target channel 4 Adjust the distance of each channel using the buttons Listen to the reference channel and use it to measure the target channel Stand facing the two speakers with your arms outstretched pointing at each speaker Try to make the two tones sound as if they are arriving simultaneously...

Страница 89: ...sary to get to the starting point mentioned here Memo If you have already performed AUTO SETTING page 13 this setting is not necessary 1 ACOUSTIC CAL EQ should be selected If it isn t use the buttons to select and press ENTER 2 EQ AUTO SETTING should be selected If it isn t use the buttons to select and press ENTER 3 Select START and then press ENTER to start EQ AUTO SETTING Make sure you have hoo...

Страница 90: ...select DATA COPY Press ENTER 3 Use the buttons to select CUS TOM 1 or CUSTOM 2 as the destina tion you want to copy the data to Press ENTER 4 Use the buttons to select ALL CH ADJUST or FRONT ALIGN as the type of curve you want to copy Press ENTER When you press ENTER the data is copied to the destination you chose After you have done this process once you can also copy data in CUSTOM 1 or CUSTOM 2...

Страница 91: ...eaker individually to suit your taste The test tones for each channel will sound individually FRONT ALIGN In this method all speakers except for the subwoofer are set in accordance with the settings of the FRONT speakers The settings that were input when you did the AUTO SURROUND SETUP see page 13 will be present but you can adjust each speaker individually to suit your taste This setting allows t...

Страница 92: ...uttons to select it and press ENTER 8 Use the buttons to adjust the TRIM and press ENTER TRIM will balance the volume level of each frequency in the overall volume of that speaker 9 EXIT should be selected if it isn t use the buttons to select it and press ENTER 10The cursor automatically goes to the next channel Press ENTER and repeat steps 3 8 to adjust all the channels 11EXIT should be selected...

Страница 93: ...o check Press ENTER That channel appears so you can check the setting 4 When that channel has been checked use the buttons to select the EXIT and press ENTER 5 Repeat step 3 and 4 to check all the channels 6 When all channels have been checked select EXIT if it s not already selected and press ENTER Leave the setup by using the buttons to select EXIT and pressing ENTER You can now go to another AC...

Страница 94: ...won t limit the peak level of the LFE channel If you selected SETTING CANCEL go to step 4 3 Use the buttons to adjust the test tone and specify the bass peak level 1 Raise the level gradually 2 Set the bass peak level at the point just before the tone starts to distort Be careful Test tones play back at loud volumes Make sure there are no infants or small children in the room You can leave this se...

Страница 95: ... starting point mentioned here 1 D RANGE CONTROL should be selected if it isn t use the buttons to select and press ENTER 2 Use the buttons to choose either OFF MID or MAX Press ENTER Dynamic Range Control is set OFF No Dynamic Range Control MID A moderate amount of Dynamic Range Control is applied MAX The most Dynamic Range Control available is applied 3 EXIT should be selected if it isn t use th...

Страница 96: ...efore when listening to typical two channel sources like CD the listener can enjoy a richer spatial effect When using software encoded with Dolby Surround this decoding system affords the listener an improved surround experience with greater sound detail Chart Comparing Dolby Pro Logic and Dolby Pro Logic II Dolby Digital Surround EX This new recording technology is able to play 6 1 channel sound ...

Страница 97: ...n In a theater the room is very large and dead sounding you sit a long way back from the speakers and the speakers themselves are very specialized Because a sound track recorded in this dead sounding space when it is played at home it sounds overbright THX Re Equalization adjusts for this difference in a very precise way Adaptive Decorrelation When a sound track sends mono sound to the surround sp...

Страница 98: ...does not respond when the buttons are pressed Static electricity caused by dry air Switch the unit off then on again Disconnect the power plug from the outlet and insert again During operation the unit suddenly switches off The speaker wires are frayed or sticking out of the jack and are touching the back of the receiver or another set of wires Reinsert the speaker wires making sure there are no s...

Страница 99: ...ecting the auto setup Check for household appliances air conditioner fan etc that may be affecting the environment and switch them off if necessary After the proper settings have been made there still seems to be something wrong with the sound The speakers have been incorrectly con nected left and right connections are reversed Check all connections Be sure match the right channel on the speaker w...

Страница 100: ...e 54 and choose one of the SURROUND listening modes see pages 46 and 47 Check all connections see page 25 Connect the speaker to the surround back left channel output see page 25 No sound output from one set of speaker s The speaker system setting is NO The speaker isn t connected properly The source has no sound output for that channel The speaker output level is set too small Change the speaker ...

Страница 101: ...from the receiver Place the antenna farther away from the equipment causing the noise Connect an outdoor AM or FM antenna see page 24 Noise or hum can be heard even when there is no sound being input There is electrical interference from another component or appliance Check that personal computers or other digital components connected to the same power source are not caus ing interference When a s...

Страница 102: ...en using the SIGNAL SELECT button Either the digital connections or the DIG ITAL IN SELECT is incorrect MULTI CH IN mode is on Make sure the digital connections see pages 17 and 22 and the DIGITAL IN SELECT see page 81 are done cor rectly Turn MULTI CH IN mode off see page 53 The digital format indicator doesn t light up even when playing a non PCM digital source The player is paused or stopped Th...

Страница 103: ...using the remote control Other components can t be operated with the system remote The preset code settings are wrong The batteries wore out and the system settings were cleared Input the correct preset code Reset the proper system settings The SR cable is connected but the connected components can t be operated with the remote The SR cable hasn t been connected properly The rest of the component ...

Страница 104: ...ODMANS 3053 3054 GRUNDIG 3055 HITACHI 3056 3057 3058 3059 3060 INSTANT REPLAY 3061 3062 ITT NOKIA 3063 JC PENNY 3064 3065 3066 3067 3068 3069 JVC 3070 3071 3072 KENDO 3073 KENWOOD 3074 3075 3076 LOEWE 3077 3078 LUXOR 3079 LXI 3080 3081 3082 3083 3084 3085 3086 MARANTZ 3087 3088 MARTA 3089 MATSUI 3090 MEMOREX 3091 3092 MINOLTA 3093 3094 MITSUBISHI 3095 3096 3097 3098 3099 MULTITECH 3100 3101 3102 N...

Страница 105: ...ime Used wisely your new sound equipment will provide a lifetime of fun and enjoyment Since hearing damage from loud noise is often undetectable until it is too late this manufacturer and the Electronic Industries Association s Consumer Electronics Group recommend you avoid prolonged exposure to excessive noise This list of sound levels is included for your protection Decibel Level Example 30 Quie...

Страница 106: ... Frequency Response 5 Hz to 40 MHz 0 3 dB Signal to Noise Ratio 65 dB Video Section Composite Input Sensitivity Impedance LINE 1 Vp p 75 Ω Output Level Impedance LINE 1 Vp p 75 Ω Frequency Response LINE 5 Hz to 10 MHz 0 3 dB Signal to Noise Ratio 65 dB FM Tuner Section Frequency Range 87 5 MHz to 108 MHz Usable Sensitivity Mono 13 2 dBf IHF 1 3 µV 75 Ω 50 dB Quieting Sensitivity Mono 20 2 dBf Ster...

Страница 107: ... TNMWF 03C00001 Printed in ARB7285 A Published by Pioneer Corporation Copyright 2003 Pioneer Corporation All rights reserved ...

Отзывы: