background image

80

IN

OUT

IN

OUT

IN

OUT

CONTROL

CONTROL

CONTROL

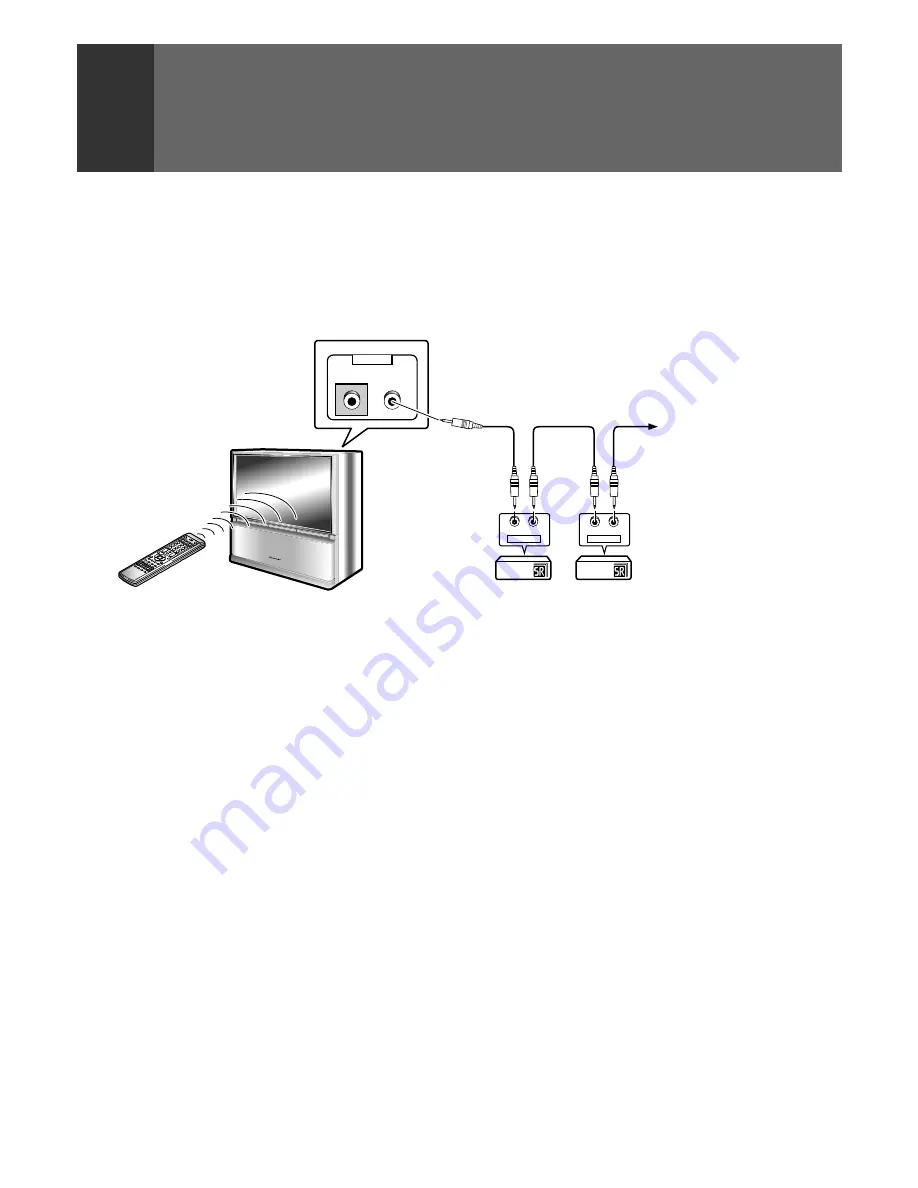
If you want to control are your Pioneer equipment with the
remote for this unit, you can daisy-chain the components.
Connect the audio/video components using the pioneer 

Î

terminals as shown below. See page 86 to 91 for how to
control other components.

<Connect as shown>

To other units bearing
the 

Î

mark.

NOTES:

• When the Pioneer unit with 

Î

 mark is connected to the

CONTROL IN terminal of the projection monitor, the remote
sensor of the projection monitor does not accept signals from
the remote control unit. In this case, point the remote control at
the unit in the chain (the equipment with no CONTROL IN
connection).

• To connect the control cord, use the commercially available mini

plug cord (monaural).

CONNECTING THE SYSTEM REMOTE
CONTROL 

(When operating Pioneer units with 

Î

 mark)

ARB1557A_En_075_080.P65

8/10/03, 09:05

80

Содержание Elite PRO-530HDI

Страница 1: ...Operating Instructions HDTV PROJECTION MONITOR PRO 730HDI PRO 530HDI ...

Страница 2: ...be displayed at high resolution Also by incorporating an achromatic coated lens for the blue CRT the picture image is reproduced with less halo and appears sharp Reference Theater mode and PRO mode Reference Theater Mode This mode reproduce film material just like a real film image By cuttingvideoenhancementcircuits thepicturebecomesmorenatural and looks film like PRO Mode This mode offers pro lev...

Страница 3: ... images TV video games close captioning computer programs on screen displays or other images with static or virtually static portions for a prolonged period of time may cause permanent residual images to appear on your Monitor Avoid displaying the same image continuously over a long period of time If the same image is displayed continuously for several hours or for shorter periods of time over sev...

Страница 4: ...may result in electrical or fire hazard 5 Do not attempt to service this Monitor yourself as opening or removingcoversmayexposeyou to dangerous voltage or other hazards Refer all servicing to qualified personnel 6 Neverpushtheobjectsofanykind into this Monitor through cabinet slots as they may touch dangerousvoltagepointsorshort out parts that could result in a fire orelectricshock Neverspillliqui...

Страница 5: ...n the cabinet for ventilationpurposestoensurethe reliable operation of the Monitor andtoprotectitfromoverheating These openings must not be blocked or covered Nevercovertheslotsoropenings with cloth or other material Never block the bottom ventilationslotsoftheMonitorby placing it on a bed sofa rug etc Never place the Monitor near or over a radiator or heat register NeverplacetheMonitorinabuilt in...

Страница 6: ...tion 21 If your Monitor is to remain unused for a period of time for instance when you go on a holiday turntheMonitor off and unplug it from the wall outlet 24 It is normal for some Monitor to make occasional snapping or popping sounds particularly whenbeingturnedonoroff Ifthe snapping or popping is continuous or frequent unplug the Monitor and consult your dealer or service technician IF THE HDTV...

Страница 7: ...U 26 AUTO CHANNEL PRESET 28 CONVERGENCE ADJUSTMENT 30 BASIC FUNCTIONS PROGRAM BLOCK V CHIP FUNCTION 32 CHANGING PASSWORD 39 CHANGING SCREEN SIZE 41 MULTI SCREEN FUNCTION 44 CLOSED CAPTION DECODE FUNCTION 46 CHANGING CHANNEL SET UP 47 PICTURE ADJUSTMENTS 52 CHANGING SCAN MODE 63 SOUND ADJUSTMENTS 64 DIGITAL INTERFACE 68 MULTI POINT CONVERGENCE ADJUSTMENT 73 VARIOUS FUNCTIONS CONNECTION WITH RECEIVE...

Страница 8: ... R F A C E C H A N N E L S E T U P MENU END SET SET SELECT C H A N N E L S E T U P c c C H A N N E L F A V O R I T E E X I T A U T O C H A N N E L P R E S E T A DD D E L C H A N N E L MENU END SET SET SELECT c c E X I T A U T O C H A N N E L P R E S E T T V C A B L E MO D E A U T O P R E S E T C A T V S T A R T A N T E N N A A MENU END SET SET SELECT c c E X I T A U T O C H A N N E L P R E S E T T...

Страница 9: ... Ask your dealer or a Pioneer authorized service center to clean the interior of the monitor in your area if the picture brightness is too low even with the max level This may be caused by dust buildup inside Condensation and picture blurring If the room temperature suddenly rises or if the Projection Monitor is moved from a cool place to a hot place condensation may form on the lenses resulting i...

Страница 10: ...THE PROVIDED FRAMECOVER PARTS INCLUDED FOR FRAME COVER INSTALLATION 2 SIDE FRAME COVERS L R TRIMS short 2 FRAME COVERS TRIMS long HOW TO ATTACH THE FRAME COVER ATTACH THE FRAME COVER BEFORE USING THE MONITOR 1 Attaching the side frame covers Push in the side frame cover from the outside along the groove on the panel frame until you hear a click Attachsideframecoveralongthealuminiumedgeguards leavi...

Страница 11: ...rames are made of aluminum so to protect them from scratches be extremely careful not to strike them with the rim of the screen frame 5 Remove the screws from the lower panel frame 4 Removetheprotectivescreenfromthelowerpanelframe 6 Reattach upper lower and side panel frames as indicated then follow on HOW TO ATTACH THE FRAME COVER Screw Sidepanel frame L Sidepanel frame L Protective screen Lower ...

Страница 12: ...h the TV perform the following procedure Connectthepowercordtothe AC wall socket Turn on the MAIN POWER button When the MAIN POWER is on the red STANDBY indicator lights up In this state the POWER STANDBY ON button or the TV Power button of theremotecontrolunitcanbeusedtoturnonand off the Monitor ConnectthecablesoftheVHFantenna andUHFantennatotheANTENNAA terminal See pages 14 and 15 Red indicator ...

Страница 13: ...et 7m 30 CAUTION Incorrectuseofbatteriesmayleadtoleakageorrupture Always be sure to follow these instructions A Never mix new and used batteries B Batteriesofthesamesizemayhavedifferentvoltages depending on their type Do not mix different types of batteries C Insertbatteriessothattheplus andminus sides are aligned according to the markings in the battery case D When not using the remote control un...

Страница 14: ...or have a central antenna for your building you will not need an external antenna Connecting VHF UHF antenna Connect the TV signal source to your Monitor properly Use a 75 ohm coaxial cable with an F type connector and connect the cable as shown in the illustration Connecting VHF UHF antenna with VCR UHF antenna UHF VHF VHF antenna U V mixer ANTENNA CABLE A B Antenna or Cable TV VCR VCR ANTENNA Sp...

Страница 15: ...nverter with VCR Connecting VHF UHF antenna and CATV converter CONNECTING THE ANTENNA ANTENNA CABLE A B VCR VCR ANTENNA OUT IN Splitter CATV converter Cable TV ANTENNA CABLE A B UHF antenna UHF VHF VHF antenna U V mixer CATV converter Cable TV ...

Страница 16: ...he AC outlet If both the VIDEO terminal pin jack type and S VIDEO terminal are connected the signals from the S VIDEO terminal will have priority OnlytheINPUT1andINPUT2jackscaninputthecomponent video signal When the component signal and other signals are input to the INPUT 1 or INPUT 2 jacks the component signal will be given priority B ÙÛ B ÙÛ VCR VCR VCR SAT tuner or Digital tuner VCR DVD DVR Vi...

Страница 17: ...B INPUT 3 INPUT ANTENNA CABLE A B CONTROL SERVICE ONLY IN OUT COMPONENT VIDEO COMPONENT VIDEO PB CB CB PB Y Y PR CR CR PR INPUT 1 PROFESSIONAL INPUT 1 INPUT 1 INPUT 2 INPUT 3 INPUT 2 INPUT 2 INPUT 3 INPUT 1 VIDEO INPUT INPUTS S VIDEO INPUTS VIDEO AUDIO AUDIO INPUTS OUTPUT INPUT CENTER TV MONITOR VAR FIXED AUDIO VIDEO Rear panel SAT tuner VCR DVD DVR SIGNAL SIGNAL SIGNAL SIGNAL SIGNAL SIGNAL SIGNAL...

Страница 18: ...L INPUT 1 INPUT 2 INPUT 2 INPUT 3 INPUT 1 VIDEO INPUT INPUTS VIDEO AUDIO AUDIO INPUTS OUTPUT INPUT CENTER TV MONITOR VAR FIXED AUDIO VIDEO SIGNAL SIGNAL R L AUDIO R L R L RGB OUTPUT Digital tuner R L VIDEO OUTPUT INPUT 4 S VIDEO L AUDIO R VIDEO MONO S VIDEO L R L V R V Video movie VCR Front panel RGB INPUT jack Inputs five signals R G B H and V output from digital tuners and the like Digital tuner...

Страница 19: ...ired when attaching devices with a DVI connector MONO L R ANTENNA CABLE A B CONTROL SERVICE ONLY IN OUT C Y INPUT 1 INPUT 1 INPUT 1 INPUT 2 INPUT 3 INPUT VIDEO INPUTS S VIDEO VIDEO AUDIO INPUTS INPUT 6 AUDIO L R OUTPUT DIGITAL AUDIO L R L R INPUT 5 INPUTS DIGITAL DVD player Digital tuner L R OUTPUT AUDIO DIGITAL AUDIO DIGITAL R L R L MONITOR TV OUTPUT jacks These are used for connecting the monito...

Страница 20: ... 5W instandby mode 4 INPUT SELECT and SET button Press to select your program source Each press of the INPUT SELECT button changes the selection to the next source While the menu is displayed it performs the same operation as the SET ENTER button on the remote control 5 CHANNEL and buttons Pressplus orminus totunetoahigherorlowerchannel Only the preset channels can be tuned in using these buttons ...

Страница 21: ... temporarily interrupted when a button is pressed ATTENTION The Projection Monitor will not function properly in the following cases An electrical discharge in the CRT Lightning storms High static electricity environment Poor voltage regulation in the power source If the Projection Monitor does not operate properly reset it as follows 1 Turn off the power of the unit with the 2 MAIN POWER button 2...

Страница 22: ...nnel return button Press to switch between the current channel and the channel you were watching immediately before 6 CH channel button Press plus or minus to tune in a higher or lower channel Only the preset channels can be tuned in using these buttons 7 MUTING button Presstotemporarilyturnoffthesound Pressagaintoreturn to the previous volume level 8 RETURN button Returns to the previous menu scr...

Страница 23: ...utton is pressed the display will change as follows The display varies according to the remaining time Example If the remaining time is 100 minutes 100 min 90 min 60 min 120 min OFF 30 min If the remaining time is 45 minutes 45 min 30 min OFF 60 min 90 min 120 min CH ENTER button Fix the selected channel with the direct channel selection buttons VOL volume buttons Press plus button to increase the...

Страница 24: ...izontal and Vertical Viewing Angle The optimum viewing angle is 140 in horizontal and 45 in vertical Watch from at least 10 feet 3m away from the screen optimum viewing distance is 10 to 23 feet Remote control unit 1 Turn on the POWER The green ON indicator lights up 3 Select antenna A or B Check the input signals at the ANTENNA A and B terminals Control panel of the monitor Remote control unit Re...

Страница 25: ... Inthecabletuningmode channelscanonlybeassigned to numbers 01 to 125 The specific channel number assignments and the corresponding alphabet designation are shown at the bottom left of the channel table For example Channel number 14 corresponds to midband cable channel A NOTE Cable CATV services can vary according to area The channel number assignments shown in the channel table may not correspond ...

Страница 26: ...T I N T S H A R P N E S S MOD E P R O SELECT P I C T U R E c c MENU END SET SET C ON T R A S T 0 B L A C K L E V E L 0 0 0 0 C O L O R T I N T S H A R P N E S S SELECT P I C T U R E c c MOD E P R O MENU END SET SET C O L O R T E MP S T D 3 D Y C L E V E L 3 3 D N R L E V E L 3 S VM H I G H F L E S H T O N E O N SELECT P I C T U R E c c P u r e C i n e m a S T D MENU END SET SET S H A R P E F F E C...

Страница 27: ... I O N I N P U T 3 N A T U R A L W I D E V P O S I T I O N 0 0 S C A N MO D E 1 0 8 0 i MENU END SET SET SELECT C C c c M T S MA I N MOD E C C 1 C C O N MENU END SET SET SELECT C C c c MOD E C C 1 C C O N MENU END SET SET SELECT S E T U P c c C ON V E R G E N C E C H A N N E L S E T U P P RO G R AM B L O C K C H A N G E P A S SWO R D S Y S T EM I N O U T D I G I T A L I N T E R F A C E MENU END SE...

Страница 28: ...ction of a single TV channel 5 Select ANTENNA then select A or B MENU END SET SET SELECT S E T U P c c C ON V E R G E N C E P RO G R AM B L O C K C H A N G E P A S SWO R D S Y S T EM I N O U T D I G I T A L I N T E R F A C E C H A N N E L S E T U P MENU END SET SET SELECT C H A N N E L S E T U P c c C H A N N E L F A V O R I T E E X I T A U T O C H A N N E L P R E S E T A DD D E L C H A N N E L ME...

Страница 29: ... E T A U T O P R E S E T S T A R T T V C A B L E MO D E C A T V A N T E N N A B MENU END SET SET SELECT c c E X I T A U T O C H A N N E L P R E S E T A U T O P R E S E T S T A R T T V C A B L E MO D E A I R C A T V A N T E N N A B MENU END SET SET ADJUST P R E S E T S T AR T Y E S N O 8 After setting press MENU to turn the menu off AUTO CHANNEL PRESET starts When AUTO CHANNEL PRESET ends the Monit...

Страница 30: ...ontwice proceedonto page 73 and perform MULTI POINT convergence This indicates that the color is misconverged Proceed to step 4 and perform the adjustment MENU END SET SET ADJUST ADJ CONVERGENCE MENU END SET SET ADJUST ADJ CONVERGENCE CONVERGENCEADJUSTMENT 1 Convergence adjustment Color deviation adjustment 2 Stabilized input signal Examples DVD player digital tuner etc Due to the differing magnet...

Страница 31: ...JUST ADJ CONVERGENCE MENU END SET SET SELECT C ON V E R G E N C E c c C ON V E R G E N C E E X I T A D J C E N T E R P O I N T A D J U S T M E N T A D J MU L T I P O I N T F OR 4 8 0 p When ADJ CENTER POINT is selected center convergence adjustment will be accessed Select ADJ MULTI POINT to perform fine convergence tuning Seepage73forfurtherinformationonmulti pointconvergence adjustment CONVERGENC...

Страница 32: ...ollowing D Some suggestive dialogue L Infrequent coarse language V Moderate violence S Some sexual situations TV 14 Parents Strongly Cautioned This program contains some material that many parents would find unsuitable for children under 14 years of age This program contains one or more of the following D Intensely suggestive dialogue L Strong coarse language S Intense sexual situations V Intense ...

Страница 33: ...e content inappropriate for unsupervised viewing by children aged 8 13 14 Programming contains themes or content which may not be suitable for viewers under the age of 14 Parents are strongly cautioned to exercise discretion in permitting viewing by pre teens and early teens 18 Adult May contain violence integral to the development of the plot character or theme intended for adult audiences CANADI...

Страница 34: ...E P A S SWO R D S Y S T EM I N O U T D I G I T A L I N T E R F A C E C H A N N E L S E T U P P RO G R AM B L O C K Enter a password Press numeric buttons 0 through 9 to enter a four digit password IfthepasswordhasnotbeenchangedasdescribedinChanging Password p 39 enter the default password of 1234 If you wish to change the password recomended see p 39 Changing Password for instructions on how to do...

Страница 35: ...N G NOTE Blocking programming with a low rating will cause all programming with a higher rating also to be blocked The NR not rated MPAA RATING may be set to View or Block without regard to other ratings MENU END SET SET SELECT c c E X I T M P A A R A T I NG P G P G 1 3 V I E W R V I E W N C 1 7 B L O C K X B L O C K N R B L O C K V I E W G V I E W 7 If you selected U S A RATING SYSTEM Select MPAA...

Страница 36: ...SYSTEM in step 6 select ENGLISH or FRENCH MENU END SET SET SELECT c c E X I T P RO G R AM B L O C K C A N A D I A N R A T I N G S Y S T EM F R E N C H E NG L I S H MENU END SET SET SELECT c c E X I T E NG L I S H R A T I NG E NG L I S H C 8 V I E W G V I E W P G B L O C K 1 4 B L O C K 1 8 B L O C K C V I E W 11 IfyouselectedENGLISH selectandthen confirmtherankoftheENGLISHRATING If you selected FR...

Страница 37: ...t and then confirm the rank of the FRENCH RATING MENU END SET SET SELECT c c E X I T F R E N C H R A T I N G 8 V I E W 1 3 B L O C K 1 6 B L O C K 1 8 B L O C K G V I E W MENU END SET SET SELECT c c E X I T F R E N C H R A T I N G 8 V I E W 1 3 B L O C K 1 6 B L O C K 1 8 B L O C K G V I E W B L O C K ...

Страница 38: ...moveblocking Becauseitisimpossibletoremoveblockingwhenthemain picture of 9 screen is blocked remove it after returning to the single screen WhenviewinginFREEZEscreen seepage44 mode only programming on the Moving screen to the left will be blocked and the programming on the Still screen to the right will be displayed as is KCBS 2 CH A PROGRAM B LOCKED TV 1 4 DL SV Block Moving screen Still screen S...

Страница 39: ...N C E P RO G R AM B L O C K S Y S T EM I N O U T D I G I T A L I N T E R F A C E C H A N N E L S E T U P C H A N G E P A S SWO R D Enter current password Press numeric buttons 0 through 9 to enter a four digit password If no password has been previously set enter the default password of 1234 Cut along dotted line and file after reading and filling out If you forget the password When the message IN...

Страница 40: ...buttons 0 through 9 to enter a four digit password and press the SET ENTER button MENU END SET SET SELECT c c C H A N G E P A S SWO R D E X I T P R E S S T O D E F I N E N EW P A S SWO R D N UM E R I C K E Y S 5 After setting press MENU to turn the menu off ...

Страница 41: ...s fixed at FULL Continuous operation for extended periods in 4 3 NORMAL size may burn out the screen We thus recommend that this size be used only in conjunction with another SCREEN size Press the SCREEN SIZE button NATURAL WIDE CINEMA WIDE 4 3 NORMAL FULL ZOOM NATURAL WIDE Suitable for when viewing regular TV news or sports programs Movies or sports programs can be viewed with an expansive powerf...

Страница 42: ... V POSITION in the same way MENU END SET SET SELECT c c S C R E E N K E Y S H P O S I T I O N I N P U T 3 C I N E MA W I D E 0 S C A N MO D E 1 0 8 0 i V P O S I T I O N 3 Adjust the screen position Adjustable range CINEMA WIDE mode 15 to 15 ZOOM mode 25 to 25 NOTES V screen position cannot be adjusted in NATURAL WIDE FULL or 4 3 NORMAL mode H screen position can be adjusted in DIGITAL signals 4 S...

Страница 43: ...FUNCTIONS 6 After adjusting press MENU to turn the menu off 5 MENU END SET SET ADJUST H P O S I T I O N 0 Adjust the screen position Adjustable range DIGITAL 31K 10 to 10 DIGITAL 33K 15 to 0 CHANGING SCREEN SIZE ...

Страница 44: ...ctions cannot be used when INPUT 1 or INPUT 2 is receiving a 1080i or 720p component signal or the signals might not be received or noise might be generated When a TV broadcast is being received the screen on the right will not show the antenna B signal RGB signals input from INPUT3 cannot be displayed During 1080i input of digital signal input INPUT 5 6 display is not possible Continuous operatio...

Страница 45: ...4 screen modes the screen may be disrupted SEARCHING FOR A PROGRAM ON A DIFFERENT CHANNEL SEARCH screen The screen can be made into nine or four different screens making it possible to search for programs or enjoy multiple images Press the SEARCH button Normal screen 4 screen 9 screen 1 9 screen On the search picture the antenna A preset channel see page 28 will bedisplayedasafrozenimage If8ormore...

Страница 46: ...e viewing or listening to the program 4 Select MODE NOTES When a video cassette or Video Disc carrying the CC mark etc is played the closed caption signal may not be output depending on your VCR or Video disc player During TV broadcast reception closed caption signal may not be decoded properly if the receiving broadcast signal is weak Closed caption signal may not be decoded properly depending on...

Страница 47: ...UP byusing the or button and then pressing button Refer to page 26 2 Select CHANNELSETUP inthesameway MENU END SET SET SELECT S E T U P c c C ON V E R G E N C E P RO G R AM B L O C K C H A N G E P A S SWO R D S Y S T EM I N O U T D I G I T A L I N T E R F A C E C H A N N E L S E T U P 3 Select CHANNEL ADD DEL MENU END SET SET SELECT c c E X I T C H A N N E L S E T U P F A V O R I T E A U T O C H A...

Страница 48: ... N N N E L S E T T I N G A DD L A B E L C H A N N E L 1 2 5 C H A N N E L A DD D E L A N T E N N A A 6 Select SETTING then select ADD addition or DEL deletion MENU END SET SET SELECT c c E X I T C H A N N N E L L A B E L C H A N N E L 1 2 5 C H A N N E L A DD D E L S E T T I N G A DD A N T E N N A A MENU END SET SET SELECT c c E X I T C H A N N N E L L A B E L C H A N N E L 1 2 5 C H A N N E L A D...

Страница 49: ...A B E L A N T E N N A A MENU END SET SET SELECT c c E X I T C H A N N N E L C H A N N E L 1 2 5 C H A N N E L A DD D E L S E T T I N G A DD L A B E L A B C D A B C D E F G H I J K LMN O P Q R S T U VWX Y Z 1 2 3 4 5 6 7 8 9 0 A N T E N N A A 8 Repeat steps 4 to 7 to add and or delete other channels 9 After setting press MENU to turn the menu off Input the first character When is selected a space c...

Страница 50: ... N G E P A S SWO R D S Y S T EM I N O U T D I G I T A L I N T E R F A C E C H A N N E L S E T U P 3 Select FAVORITE CHANNEL MENU END SET SET SELECT c c E X I T C H A N N E L S E T U P A U T O C H A N N E L P R E S E T A DD D E L C H A N N E L C H A N N N E L F A V O R I T E 4 Select the color of the button you wish to set MENU END SET SET SELECT c c E X I T F A V O R I T E C H A N N E L B L U E R ...

Страница 51: ...6 3 A 2 3 4 A 5 1 1 1 4 B 8 Tosetanothernumber repeatsteps5to 7 Tosetabuttonofadifferentcolor repeat steps 4 to 7 To return to step 4 press either the or the button to select EXIT and then press the SET ENTER button 9 After setting press MENU to turn the menu off If you made a mistake during setting press SET to select the incorrect entry and set it correctly 5 Select number MENU END SET SET SELEC...

Страница 52: ...icture becomes more natural and looks filmlike GAME LowerstherelativecontrastofTVgameimages to minimize discomfort to the eyes This will minimize bad effects such as discolored spots or stains on the CRT of the Monitor USER Calls up the picture quality the user has set See page 53 for on explanation of different picture qualities PRO In this mode you can finely adjust the picture quality to your t...

Страница 53: ... P I C T U R E c c MOD E S T D 3 Adjust the desired picture quality Refer to steps 2 and 3 on page 54 Ifanymode STD REFTHEATER orGAME isadjusted setting for USER mode The last mode that was adjusted will become the USER sub mode indicated in parentheses PRO mode displays PRO unchanged A USER mode can be stored for TV and the six input sources Indicates the adjusted picture quality setting that is ...

Страница 54: ... Adjustthepicturequalitywhenyouwantimprovethequalityofthepicture you are watching You can adjust the CONTRAST BLACK LEVEL brightness COLOR TINT and SHARPNESS CONTRAST Adjusting the contrast to match the brightness of the surroundings so it is easier to watch BLACK LEVEL brightness Adjusting the picture so that night scenes dark hair andotherdarkpartsofthescreenareeasiertowatch COLOR Adjusting it t...

Страница 55: ...ng the black part of the video signal automaticallycorrectsthegradationoftheblack 8 SHARP EFFECT This enables you to switch the SHARPNESS correction function 9 LTI Luminance Transient Improvement This enables you to switch the definition of the luminance signal 0 GAMMA This enables you to switch the balance of the contrast between the bright parts and dark parts of the luminance signal CONTRAST EX...

Страница 56: ...effects STD Standard PureCinema effects HQ Maximum PureCinema effects Optimum setting for the movie source 2 To adjust COLOR TEMP This function enables the image to be set to five different tones Select COLOR TEMP MENU END SET SET 3 D Y C L E V E L 3 3 D N R L E V E L 3 S VM O F F F L E S H T O N E O N SELECT P I C T U R E c c P u r e C i n e m a S T D C O L O R T E MP S T D MENU END SET SET SELEC...

Страница 57: ...or software using dynamic images Suitable for software using still images 4 To adjust 3D NR LEVEL Reducesthenoiseleveloftheluminanceandchrominancesignals Luminance signal Video signal that controls brightness Chrominace signal Video signal that controls color NOTE This can be used only during 480i 480p except when SCREEN MODE is FULL and 720p signal input Select 3D NR LEVEL MENU END SET SET S VM O...

Страница 58: ...S VM O F F F L E S H T O N E O N MENU END SET SET ADJUST F L E S H T O N E O N O F F PICTURE ADJUSTMENTS 5 To adjust Scan Velocity Modulation SVM Screen contour definition can be selected as desired NOTES This function cannot be used when SCREEN MODE is 4 3 NORMAL or PICTURE MODE is GAME It cannot be used during RGB signal input Select SVM MENU END SET SET F L E S H T O N E O N SELECT P I C T U R ...

Страница 59: ...MOD E 1 SELECT P I C T U R E c c B L A C K E N H AN C E ON MENU END SET SET SELECT B L A C K E N H AN C E O N O F F MENU END SET SET L T I M I D G AMMA T Y P E 3 C ON T R A S T E X P O F F S H A R P MO D E MOD E 1 SELECT P I C T U R E c c B L A C K E N H AN C E ON S H A R P E F F E C T O N 8 To adjust SHARP EFFECT This enables you to switch the SHARPNESS correction function NOTE It cannot be used ...

Страница 60: ... effects MENU END SET SET L T I M I D C ON T R A S T E X P O F F S H A R P MO D E O F F SELECT P I C T U R E c c B L A C K E N H AN C E ON S H A R P E F F E C T O N G AMMA T Y P E 3 0 To adjust GAMMA This enables you to switch the balance of the contrast between the bright parts and dark parts of the luminance signal NOTE It can be used only during PICTURE MODE PRO Select GAMMA MENU END SET SET SE...

Страница 61: ...END SET SET SELECT C ON T R A S T O N O F F E X P ON CONTRAST EXP effect is on OFF CONTRAST EXP effect is off MENU END SET SET L T I M I D SELECT P I C T U R E c c B L A C K E N H AN C E ON S H A R P E F F E C T O N G AMMA T Y P E 3 C ON T R A S T E X P O F F S H A R P MO D E MOD E 1 To adjust SHARP MODE This enables you to switch signal bands that correct sharpness NOTES It cannot be used during ...

Страница 62: ... R I V E 5 CUT OFF RGB R B It adjusts the color temperature of dark parts of the picture DRIVE RGB R B It adjusts the color temperature of bright parts of the picture Mutuallyadjustthesixlinesshownontheabovescreentooptimize the color temperatures of bright parts and of dark parts Adjustments 9 to can only be done when the PICTURE MODE is PRO Return all contents set in PRO mode to the default statu...

Страница 63: ...3 Change SCAN MODE 4 After adjusting press MENU to turn the menu off Press MENU and select SCREEN by using the or button and then pressing button Refer to page 26 Select SCAN MODE MENU END SET SET ADJUST S C A N MO D E 1 0 8 0 i 4 8 0 p NOTE This function cannot be used during INPUT1 2 component 1080i 720p INPUT3 RGB Signals INPUT 5 6 Digital Signals 1080i and PURE DIGITAL ON CHANGINGSCANMODE 1080...

Страница 64: ...E O F F SELECT S OU N D c c M T S MA I N 5 T R E B L E S UR R O U N D O N 3 Select the desired audio mode MENU END SET SET B A S S 1 0 B A L A N C E R 5 S T A B L E V O L U M E O F F SELECT S OU N D c c M T S MA I N S A P MO N O 5 T R E B L E S UR R O U N D O N NOTES This function can only be used for TV input Broadcast stereo and SAP reception operate in accordance with the Broadcast Television S...

Страница 65: ...c M T S MA I N 5 T R E B L E 3 MENU END SET SET B A S S 1 0 B A L A N C E R 5 S UR R O U N D O N S T A B L E V O L U M E O F F SELECT S OU N D c c M T S MA I N 5 T R E B L E 4 Adjust by pressing 2 or 3 Adjustable range BASS TREBLE 15 to 15 BALANCE L Left 15 to R Right 15 After adjusting press MENU to turn the menu off Repeat steps 2 and 3 for other items NOTE This function cannot be used when the ...

Страница 66: ...D MODE This function creates the sound with a sense of presence Inaconcerthallorinatheater youhearamixtureofsoundcomingdirectly to you direct sound and sound that reaches you with a slight delay after being reflected from the walls indirect sound Surround mode applies this principal to create a sense of presence by mixing slightly delayed sound signals with direct sound signals 1 Press MENU and se...

Страница 67: ...ge 26 MENU END SET SET B A S S 1 0 B A L A N C E R 5 SELECT S OU N D c c M T S MA I N 5 T R E B L E S UR R O U N D O N S T A B L E V O L U M E O F F 3 4 Set STABLE VOLUME to ON After adjusting press MENU to turn the menu off 2 Select STABLE VOLUME MENU END SET SET B A S S 1 0 B A L A N C E R 5 SELECT S OU N D c c M T S MA I N 5 T R E B L E S UR R O U N D O N S T A B L E V O L U M E O N O F F NOTE ...

Страница 68: ... E T U P A U T O S OU N D S E L E C T A U T O P OW E R M A N A G E M E N T O F F P UR E D I G I T A L O N 5 After setting press MENU to turn the menu off 1 PressMENUandselect SETUP byusing the or button and then pressing button Refer to page 26 Select PURE DIGITAL 4 MENU END SET SET SELECT P UR E D I G I T A L O N O F F Set PURE DIGITAL to ON ON The input signal is faithfully reproduced without an...

Страница 69: ...N T E R F A C E c c P I C T U R E S E L E C T A U T O P I C T U R E S E T U P A U T O S OU N D S E L E C T A U T O P OW E R M A N A G E M E N T A U T O P UR E D I G I T A L O N 5 After setting press MENU to turn the menu off 1 PressMENUandselect SETUP byusing the or button and then pressing button Refer to page 26 Select PICTURE SELECT 4 MENU END SET SET SELECT P I C T U R E S E L E C T A U T O Se...

Страница 70: ...c P I C T U R E S E L E C T A U T O P I C T U R E S E T U P A U T O S OU N D S E L E C T A U T O P OW E R M A N A G E M E N T O F F P UR E D I G I T A L O N 5 After setting press MENU to turn the menu off 1 PressMENUandselect SETUP byusing the or button and then pressing button Refer to page 26 Select PICTURE SETUP 4 MENU END SET SET SELECT P I C T U R E S E T U P A U T O Set PICTURE SETUP to AUTO...

Страница 71: ...T A U T O P I C T U R E S E T U P A U T O S OU N D S E L E C T A U T O P OW E R M A N A G E M E N T O F F P UR E D I G I T A L O N 5 After setting press MENU to turn the menu off 1 PressMENUandselect SETUP byusing the or button and then pressing button Refer to page 26 Select SOUND SELECT 4 MENU END SET SET SELECT D I G I T A L I N T E R F A C E c c P I C T U R E S E L E C T A U T O P I C T U R E ...

Страница 72: ...ss MENU to turn the menu off 1 PressMENUandselect SETUP byusing the or button and then pressing button Refer to page 26 Select POWER MANAGEMENT 4 MENU END SET SET SELECT D I G I T A L I N T E R F A C E c c P I C T U R E S E L E C T A U T O P I C T U R E S E T U P A U T O S OU N D S E L E C T A U T O P OW E R M A N A G E M E N T O N O F F P UR E D I G I T A L O N Set POWER MANAGEMENT to ON ON Turns...

Страница 73: ... 5 Adjust the red line S ET BLUE P O I NT MENU END SELECT ADJ MUL T I P O I NT NOTES The cursor is partially invisible around the edge of the screen according to the SCAN MODE It is not possible to adjust all these points points of change on the cross hatch Some of the cross hatch lines are not straight but this is not a malfunction They are not always straight on a normal TV 1 Convergence adjustm...

Страница 74: ...der Move to the next point to be adjusted and repeat steps 4 to 6 7 After completing the convergence adjustment press MENU twice to turn the menu off MULTI POINT CONVERGENCE ADJUSTMENT 6 Adjust the blue line S ET NEX T P O I NT ADJ MUL T I P O I NT MENU END SELECT ...

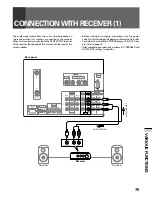
Страница 75: ...el Receiver Speaker Speaker R L R L AUDIO SIGNAL AUDIO SIGNAL The audio signal output from this unit can be reproduced on the receiver when this monitor is connected to the receiver When this monitor is connected to the CENTER OUT terminal of the receiver the speaker of this monitor can be used as the center speaker Before making or changing connections set the power switch to off and unplug the p...

Страница 76: ... N E L S E T U P S Y S T EM I N O U T Select the SPEAKER mode NOTE After the speaker mode is set to CENTER IN the volume of the center speaker should be controlled from this monitor SPEAKER and AUDIO OUT settings 3 Select SPEAKER MENU END SET SET SELECT c c S Y S T EM I N O U T A UD I O O U T E X I T F I X E D S Y S T EM MO D E O F F S P E A K E R N ORMA L NORMAL The Monitor sound is output from t...

Страница 77: ...F F S P E A K E R N ORMA L A UD I O O U T F I X E D E X I T FIXED SignalsoutputfromtheAUDIOOUTPUTterminal will not change even if the Monitor s volume is adjusted VAR variable Sound signals output will change as Monitor s volume is changed WhenSYSTEMMODEhasbeensettoON theaudiooutmode will change to MUTING and sound signals will not be output from the AUDIO OUTPUT terminal see page 79 The sound sig...

Страница 78: ...D AUDIO VIDEO SIGNAL SIGNAL SIGNAL SIGNAL SIGNAL SIGNAL SIGNAL Rear panel Speaker Speaker Mixer CATV converter DVD DVR VCR Receiver SAT tuner V V V R L V L R VCR SIGNAL CONNECTIONWITHRECEIVER 2 Thisunitcanbeusedasthemonitorforthereceiverwhenthis unit is connected to the receiver When this unit is connected to the CENTER OUT terminal of the receiver the speaker of this unit can be used as the cente...

Страница 79: ...ver will be displayed OFF Normal setting 5 After setting press MENU to turn the menu off Unless required set the SYSTEM MODE to OFF Notes on SYSTEM MODE ON The input cannot be switched even if you press the Input selector button of the remote control unit On the sub picture of a SPLIT screen only the input signal from the antenna can be displayed The SEARCH screen function will not be operable No ...

Страница 80: ... shown To other units bearing the Î mark NOTES When the Pioneer unit with Î mark is connected to the CONTROL IN terminal of the projection monitor the remote sensor of the projection monitor does not accept signals from the remote control unit In this case point the remote control at the unit in the chain the equipment with no CONTROL IN connection To connect the control cord use the commercially ...

Страница 81: ...e table on page 82 does not include your desired manufacturer or the remote control code does not work you can make the memory learn its code by the learning mode see page 84 The initial code is 000 PIONEER LED will begin blinking If the LED blinks rapidly when the number button has been pressed there has been an error Input the number again After setting you can automatically use the remote contr...

Страница 82: ...ARP DVD RECORDER 014 S A 3 CABLE MITSUBISHI6 SHARP2 DVD RECORDER 015 S A 4 CABLE PANASONIC TOSHIBA DVD RECORDER 016 ZENITH1 CABLE PANASONIC2 TOSHIBA2 DVD RECORDER 017 ZENITH2 CABLE PANASONIC3 018 ZENITH3 CABLE RCA 019 RCA2 020 PIONEER SAT RCA3 PIONEER LD 021 RCA1 SAT SANYO KENWOOD LD 022 RCA2 SAT SANYO2 PANASONIC1 LD 023 SONY SAT SANYO3 PANASONIC2 LD 024 SHARP PHILIPS LD 025 SHARP2 RCA LD 026 SHAR...

Страница 83: ..._MATHIS 082 CURTIS_MATHIS2 083 CURTIS_MATHIS3 084 FUNAI 085 ADMIRAL 086 KENWOOD 087 KENWOOD2 088 KENWOOD3 089 NEC 090 NEC2 091 NEC3 092 NEC4 093 WARDS 094 WARDS2 095 WARDS3 096 WARDS4 097 MEMOREX 098 MEMOREX2 099 JC_PENNY 100 JC_PENNY2 101 JC_PENNY3 102 JC_PENNY4 103 JC_PENNY5 104 JC_PENNY6 REMOTE CODE SET UP ...

Страница 84: ...e the remote control unit learn these signals Example To learn the VCR power to turn on Before operation TosetthemodeswitchtoVCRwhenavideocassetterecorderisconnected see page 16 1 At the same time press the LEARN button and number button 2 LED will begin blinking 2 Press the SOURCE POWER button to memorize the desired operation LED will remain lit ...

Страница 85: ...learn how to use the remote control unit you can adjust the distance of the remote control units 0 8 to 2 0 inch 2 to 5 cm VCR POWER If blinks once return to step2forotherbuttons Flashes four times it indicates an error has occurred This ends learn Repeat steps 2 and 3 for learning pertaining to other VCR devices If the remote control unit s LED blink four times it means that learning capacity has...

Страница 86: ...r button 2 the unit s capability to learn and store command codes fromotherremotecontrolunitswillbeactivated See page 84 2 Mode switch Use to switch the remote control unit modes 3 Light button When this button is pressed all the buttons on the remote control unit will light The lighting will turn off if no operations are performed within five seconds Thisbuttonisusedforperformingoperationsindarkp...

Страница 87: ...page 84 1 Direct channel selection buttons Press the button or buttons that corresponds to the channel that you wish to watch 2 CH channel buttons Press plus or minus to tune in a higher or lower channel 3 SOURCE POWER button Turns the power of the cable converter on and off 4 CH ENTER button Fix the selected channel with the direct channel selection buttons 5 CH RETURN channel return button Press...

Страница 88: ...rresponds to the channel that you wish to watch 2 CH channel buttons Press plus or minus to tune in a higher or lower channel 3 Select Set buttons SET ENTER Press the button to select items on the SAT GUIDE screen or MENU screen SET ENTER Press to activate the selected function 4 SAT INFO button When this button is pressed information on satellite broadcasting will be displayed Use this button to ...

Страница 89: ...creen SET ENTER Press to activate the selected function 5 DTV INFO button When this button is pressed information on DTV will be displayed 6 FAVORITE CH Colored blue red green and yellow buttons FAVORITE CH Used for making FAVORITE CH settings with the digital tuner Blue Red Green Yellow Used to make selections from the digital tuner menu 7 SOURCE POWER button Turns the power of the DTV digital tu...

Страница 90: ... makers and are not preset can also be operated using the remote control unit if buttons1 to 8 have learnt the functions see page 84 1 CH channel buttons Press to select the channel of the TV tuner on the VCR 2 3 PLAY button Selects playback 3 1 REW button Rewinds the tape and allows picture search 4 SOURCE POWER button Turns the power of the VCR on and off 5 8 PAUSE STILL button Set pauses and st...

Страница 91: ...tems on the DVD MENU screen SET ENTER Press to activate the selected function 4 3 PLAY button Selects playback 5 1 SCAN button Continue pressing to rewind 6 4 CHAPTER SEARCH button Pressing quickly once takes you to the start of the chapter currently playing Each time you press it you move back to the start of the previous chapter 7 SOURCE POWER button Turns the power of the DVD DVR player on and ...

Страница 92: ...P R O MENU END SET SET T R E B L E B A S S 1 0 5 B A L A N C E R 5 S UR R O U N D O N S T A B L E V O L U M E O F F SELECT S OU N D c c M T S MA I N SOUND adjustment menu See page 64 MENU END SET SET SELECT S C R E E N c c M T S MA I N S C A N MO D E H P O S I T I O N I N P U T 3 N A T U R A L W I D E V P O S I T I O N 0 1 0 8 0 i 0 SCREEN adjustment menu See page 42 SET UP menu See page 26 MENU E...

Страница 93: ... O C K I N P U T Y O U R P A S SWA R D PROGRAM BLOCK menu See page 34 SYSTEM IN OUT menu See pages 76 and 79 MENU END SET SET SELECT c c S Y S T EM I N O U T A UD I O O U T E X I T F I X E D S Y S T EM MO D E O F F S P E A K E R N ORMA L MENU END SET SET SELECT c c C H A N G E P A S SWO R D I N P U T Y O U R P A S SWA R D E X I T AUTO CHANNEL PRESET menu See page 28 CHANNEL ADD DEL menu See page 4...

Страница 94: ...thebatterycompartmentarenotcorrectlymatching the and polarities The battery has worn out Strong lights striking the remote control sensor may cause the internal microcomputer to malfunction Adjust the picture quality The room is too bright Adjust the color convergence TV CATV MODE is set incorrectly The power will not turn on The Monitor is inoperative A TV broadcast station cannot be received No ...

Страница 95: ...otor equipments such as hair dryers andvacuumcleaners ignitiondevicessuchascarsandmotorbikes flashingdevices such as thermostats and electricity discharge by transmission distribution lines Mixing of electric waves from TV stations FM stations amateur wireless public wireless simple wireless etc or nearby personal computer TV VCR audio equipment Sometimes creaking sounds will be produced when cabi...

Страница 96: ...Audio signal 500 mV rms 100 modulation Output impedance Video output 75 ohms Audio output Less than 1 kilo ohms Effective output Front both channels driven 10 W 10 W Built in speaker system 16 cm 6 5 16 in full range x 2 This jack cannot be used with a personal computer Tuner section Circuit type Video signal detection PLL full synchronous detection PLL digital synthesizer system Audio multiplex B...

Страница 97: ...97 OTHERS ...

Страница 98: ...98 ...

Страница 99: ...99 OTHERS ...

Страница 100: ...INC 300 Allstate Parkway Markham Ontario L3R OP2 Canada TEL 905 479 4411 PIONEER EUROPE NV Haven 1087 Keetberglaan 1 B 9120 Melsele Belgium TEL 03 570 05 11 PIONEER ELECTRONICS ASIACENTRE PTE LTD 253 Alexandra Road 04 01 Singapore 159936 TEL 656 472 1111 PIONEER ELECTRONICS AUSTRALIA PTY LTD 178 184 Boundary Road Braeside Victoria 3195 Australia TEL 03 9586 6300 PIONEER ELECTRONICS DE MEXICO S A D...

Отзывы: