Connecting up
02
12
En
Chapter 2
Connecting up
The following illustrations show the DV-868AVi,
but connections for the DV-668AV are the same
except where indicated
.
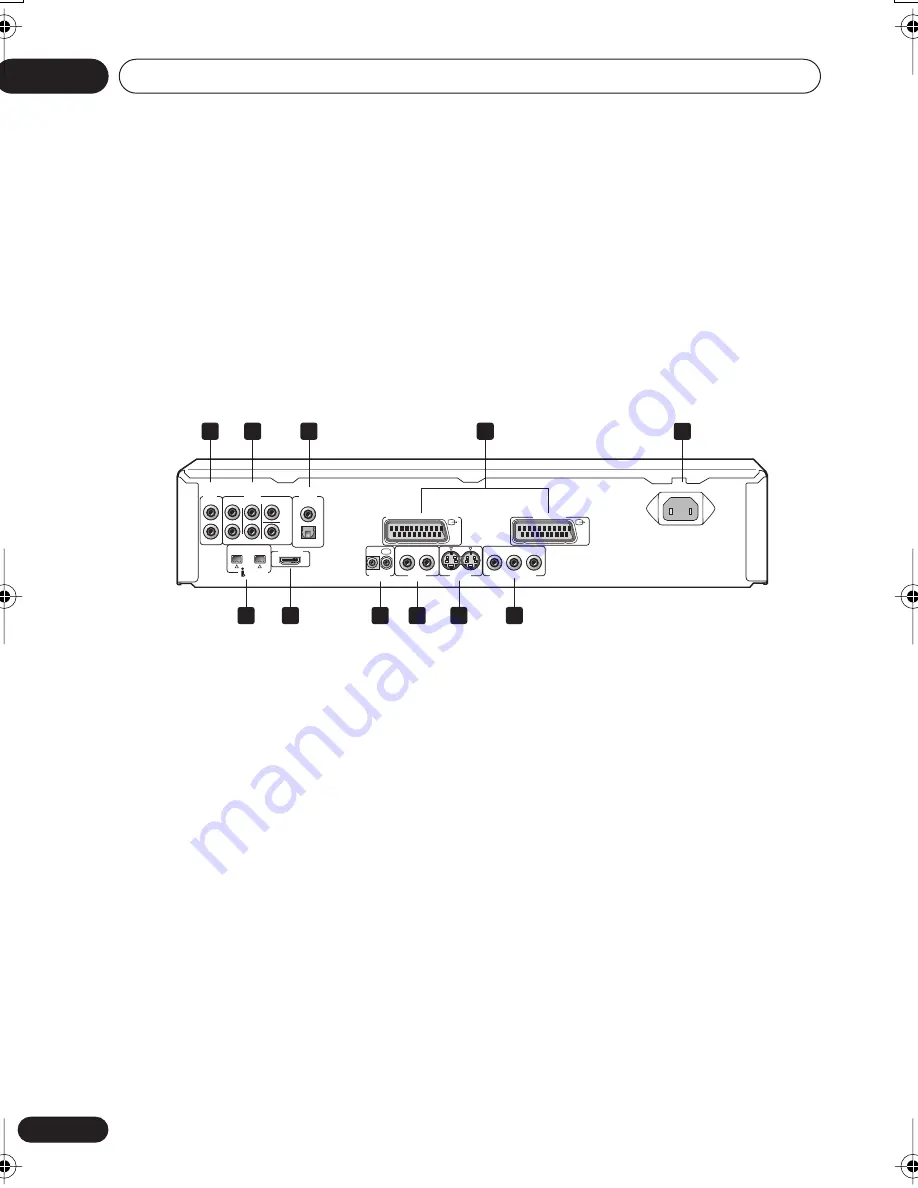
Rear panel
When connecting this player up to your TV, AV
receiver or other components, make sure that
all components are switched off and
unplugged.
1
AUDIO OUT (2ch)
Two channel analog audio outputs for
connection to your TV, AV receiver or stereo
system (page 14,18).
2
AUDIO OUT (5.1ch)
Multichannel analog audio outputs for
connection to an AV receiver with
multichannel inputs (page 17).
3
DIGITAL AUDIO OUT – OPTICAL /
COAXIAL
Digital audio outputs for connection to a
PCM, Dolby Digital, DTS and/or MPEG-
compatible AV receiver (page 18).
4
AV CONNECTOR
AV CONNECTOR 1 (RGB)-TV/AV
Receiver
Use a 21-pin SCART cable to connect to a
TV or monitor compatible with this type of
connection. Both audio (2 channel stereo)
and video (Video, S-video, and RGB)
signals are output from the
AV
CONNECTOR 1
(RGB)-TV (page 15).
AV CONNECTOR 2
Use a 21-pin SCART cable to connect to a
VCR (page 15).
AUDIO
OUT
(2ch)
AUDIO
OUT
(5.1ch)
CONTROL
OPTICAL
COAXIAL
IN
OUT
R
L
L
R
CENTER
SUB
WOOFER
SURROUND
FRONT
S-VIDEO
OUT
VIDEO
OUT
COMPONENT VIDEO OUT
P
B
P
R
Y
2
1
2
1
(AUDIO)
S400
AC IN
DIGITAL AUDIO
OUT
HDMI OUT
1
2
3
4
5
11
10
8
9
6
7
AV CONNECTOR 1 (RGB)-TV/AV Receiver
AV CONNECTOR 2
868en.book.fm 12 ページ 2003年8月19日 火曜日 午前9時30分