


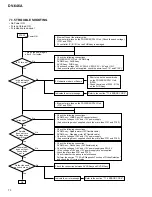


77
DV-646A
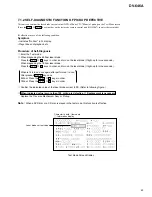
4
5
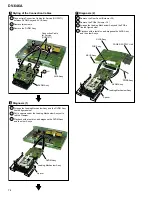
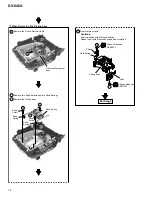
Pull out the Tray and remove it while unhooking a Hook.
6
In the Tray insertion, insert it after matching a triangle mark
of the Loading Base and a position of pin of the Drive Cam.
8
Remove a screw.
7
Remove the DVDM Assy (Screws
×
2).
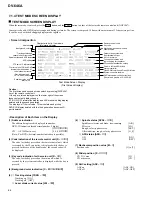
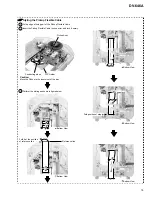
When Removing The Traverse Mechanism Assy
9
9
Traverse Mechanism
Assy
Traverse Mechanism
Assy
Remove the FFC Holder with the state which Flexible Cable
was atatched.
Remove the Bridge (Screw
×
1).
1
2
Remove the Front Panel.
3
Remove the Loading Mechanism Assy (Screws
×
4).
Turn the Short SW to Short side.
Remove the Bonnet and Tray Panel.
10
11
12
Unhook (
×
4)
Remove the Traverse Mechanism Assy
Remove the Pickup Flexible Cable
8
4
×
2
×
2
Bottom View
RearView
Short
Bridge
-1
4
-2
5
-1
5
-2
Loading Base
Triangle mark
Drive Cam
Pin
Short SW
6
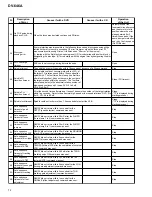
Exchange
Traverse
Mechanism Assy
Pickup Assy
Hook
Caution in the tray insertion
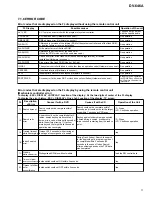
Cautions:
Screw is locked with Silicone adhesive.
Please lock it with Silicone adhesive when installs it.
Silicone Adhesive
GEM1037
12
10
11
11
Disassembly of the Traverse Mechanism Assy and the Pickup Assy
Open
FFC Holder
Содержание DV-646A
Страница 9: ...DV 646A 9 ...
Страница 15: ...DV 646A 15 ...
Страница 38: ...DV 646A 38 ...
Страница 44: ...A B C D 1 2 3 4 1 2 3 4 44 DV 646A Q45 Q450 Q774 Q771 Q768 Q706 Q707 Q708 IC921 VNP1839 A SIDE B C ...
Страница 46: ...A B C D 1 2 3 4 1 2 3 4 46 DV 646A D 4 4 SCRB ASSY CN702 C VNP1838 A SIDE A SCRB ASSY D ...
Страница 47: ...A B C D 1 2 3 4 1 2 3 4 47 DV 646A D VNP1838 A SIDE B SCRB ASSY D Q212 Q211 Q231 Q231 Q313 Q311 Q401 Q403 Q312 ...
Страница 65: ...65 DV 646A DVDM ASSY B SIDE B TE FE ...
Страница 101: ...101 DV 646A 8 PANEL FACILITIES AND SPECIFICATIONS 8 1 PANEL FACILITIES 8 1 1 Front Panel ...
Страница 102: ...102 DV 646A 8 1 2 Remote Control ...
Страница 103: ...103 DV 646A 8 1 3 Display Window ...