background image

52

En

Setting the Parental Lock
Level

 – DVD

This player lets you set the Parental Lock if the DVD has
a parental lock level recorded on it. With Parental Lock
capable discs, you can block access to material you feel
is inappropriate for your children. Refer to the DVD disc
jacket and the accompanying documentation to see if a
particular disc contains a parental lock level.
Make changes to the 

[Parental Lock]

 setting in the

Setup screen 

General

 menu. Please note that changes

to the Parental Lock level cannot be made when a disc is
playing. Stop playback of the disc before attempting to
make any changes.
You cannot select 

[Level]

 or 

[Country Code]

 until you

have registered a password. Select 

[Password]

 to

register a new password. See 

‘Entering the password’

on the this page for how to register a new password.

When a DVD with a Parental Lock level is
loaded

Playback cannot be started until the code number has
been correctly input by using the 

cursor buttons

 (

2

/

3

/

5

/

) or the 

number buttons

, and 

ENTER

 has been

pressed.

Settings:

Password (Password Change)

(For information, refer to 

‘Entering the

Password’

 on the this page.)

Level

(For information, refer to 

‘Setting the

Parental Lock Level’

 on the following

page.)

Country Code

(For information, refer to 

‘Setting the

Country Code’

 on the following page.)

—  

General

A2

V2 Language

Audio1

Video1

Exit

Move

Setup Menu Mode

Setup Navigator

Parental Lock

Basic

Password

Level
Country Code

Setup viewing restrictions

SETUP

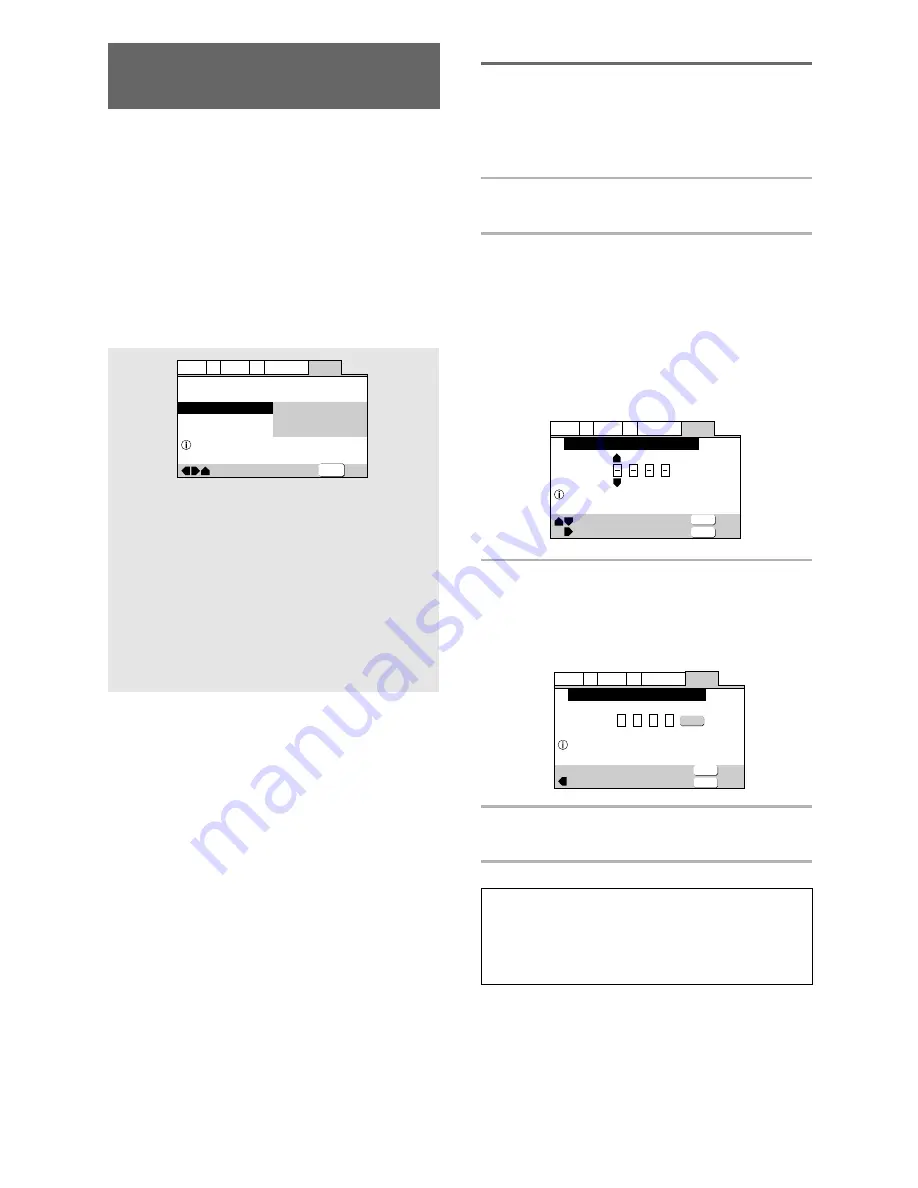
Entering the Password

When you select either 

[Level] 

or 

[Country Code]

, it is

necessary to register the password (4-digit code
number).  You’ll be asked to confirm your existing
password before registering a new one. Use the
following steps at any time you are asked to enter or
confirm your password.

1

Select [Password] in the [Parental Lock]
setting and press ENTER.

2

Use the cursor buttons (

5

/

) or the

number buttons to select a number
between 0 and 9.

You can also use the 

number buttons

 to enter the

numbers directly. When entering your password for
the first time, or changing it, you will be asked to
reenter your password. When using the 

number

buttons

 to confirm the password, the numbers

appear as asterisks, and the cursor advances
automatically  to the next position.

3

Use the cursor buttons (

2

/

3

) to move the

cursor to a different position in the
password.

When all four numbers of the passoword have been
entered, 

ENTER

 appears on the screen.

4

Press ENTER to set the password.

The password is entered.

Note

Be sure not to forget your password. If you should forget it,
reset the system, and enter a new password. To reset the
system, see 

‘Resetting the Player to System Settings’

(

page 54

). Please note that this procedure resets the system,

and clears all saved settings, not just the password.

General

A2

V2 Language

Audio1

Video1

Exit

+/–
Move

Return

Parental Lck: Register Code Number

Enter 4—Digit Code

SETUP

RETURN

General

A2

V2 Language

Audio1

Video1

Exit

Prental Lock: Register Code Number

Enter 4—Digit Code

+/–
Move

Return

SETUP

RETURN

ENTER

1

0

1

9

Содержание DV-444

Страница 1: ...DV 444 Operating Instructions DVD PLAYER ...

Страница 2: ...2 En ...

Страница 3: ...ons so you will know how to operate your model properly After you have finished reading the instructions put them away in a safe place for future reference This player is not suitable for commercial use This product incorporates copyright protection technology that is protected by method claims of certain U S patents and other intellectual property rights owned by Macrovision Corporation and other...

Страница 4: ...bility information The CD ROM must be ISO 9660 compatible Files should be MPEG1 Audio Layer 3 format 44 1 or 48kHz Incompatible files will not play and UNPLAYABLE MP3 FORMAT will be displayed Not compatible with some variable bit rate VBR files VBR files may not show play times correctly This player only plays tracks that are named with the file extension mp3 or MP3 This player is not compatible w...

Страница 5: ...he digital audio output jacks of this player output Dolby 2 Digital DTS 3 MPEG and linear PCM digital bitstreams This player has a function that converts Dolby Digital and MPEG audio formats into the linear PCM format This allows playback of DVDs recorded in Dolby Digital and MPEG without the need for a decoder TruSurround TruSurround 4 uses technology that simulates multichannel surround sound us...

Страница 6: ...e The Setup screen menus described in the section starting on page 24 are also used in a number of other functions Learning the procedure for operating these menus will make using this player much easier and more enjoyable Play a disc When all the connections and setups have been made you are ready to play a DVD Video CD CD or MP3 with the player The section Getting Started Using Your DVD Player s...

Страница 7: ...TV Screen Size 29 525 line Digital Progressive Scan Compatible Video Output 30 Switching the S Video Output 31 Selecting the Type of Paused Image to Display 31 Setting the Position of the On screen Display 31 Adjusting the Video Quality 32 Viewing from a Desired Camera Angle Multi Angle 35 Setting the Language Options 36 Setting the On screen Display OSD Language 36 Changing the Audio Language Mul...

Страница 8: ...L A B LAST MEMORY CONDITION MEMORY SEARCH MODE RANDOM STOP STEP SLOW ENTER DISPLAY CLEAR 5 5 5 5 4 1 8 7 e E 3 1 2 3 4 5 6 7 8 9 0 10 C Î 0 SETUP TOP MENU MENU 30 30 7m Notes Do not mix old and new batteries When replacing batteries use all new batteries When not using the remote control for a long period of time over 1 month remove the batteries to avoid possible damage from battery corrosion If ...

Страница 9: ...6 0 open close button Press to open and close the disc tray pages 20 23 7 4 1 reverse button Press to go back to previous chapters tracks Press and hold to perform reverse playback scanning pages 22 8 forward button Press to advance to chapters tracks Press and hold to perform fast forward scanning page 22 9 7 stop button Press to stop playback Pressing once enables playback to resume from a point...

Страница 10: ...LAST indicator Indicates the Last Memory location is recorded in memory for the currently loaded DVD or Video CD page 50 TRK PRGSVE GUI DTS D CHP LAST TITLE COND TOT AL REMAIN 2 2 3 4 5 6 7 8 9 0 1 0 COND indicator Indicates that Condition Memory settings are memorized for the currently loaded DVD page 51 TOTAL indicator Indicates that the disc in the player is stopped and DISPLAY has been pressed...

Страница 11: ... 16 4 AC IN power cord connection terminal Use to connect the power cord to the wall outlet page 14 5 S VIDEO OUT jack If your TV or monitor has an S video input clear picture reproduction is possible by connecting the player to your TV or monitor via the S Video jack page 16 You can switch between S1 and S2 S video output from the Setup menu page 31 6 VIDEO OUT jack Connect to the video input on ...

Страница 12: ...en pages 17 24 6 MENU button Use to display or close the DVD menu or MP3 Navigator screen pages 21 43 7 PREV 4 previous button During playback press PREV 4 to go back to a previous chapter track page 22 8 PLAY 3 button Press to start disc playback pages 20 23 9 STOP 7 button Press to stop playback Pressing once enables playback to resume from a point shortly before the location where it was stoppe...

Страница 13: ...utton Use to set the repeat mode page 44 REPEAT A B button Press at the beginning and end of the section you want to repeat or to mark a location you want to return to page 44 SEARCH MODE button Press to perform a title folder chapter track or elapsed time search page 42 TV CONTROL buttons TV FUNC Press TV FUNC to select the TV for remote control operation TV Press TV to turn the TV s power on or ...

Страница 14: ... changing connections check that the unit is off by pressing STANDBY ON and unplug the power cord from the power outlet The video output on this player uses copy protect circuitry to prevent the video playback on DVDs from being copied If you connect the player to a TV via a VCR or record and playback the contents of a disc with a VCR the playback picture may not be normal Connecting Your DVD Play...

Страница 15: ... transmitted as light pulses through a fiber optic cable Use to connect to an AV amplifier or receiver with built in Dolby Digital DTS or MPEG decoder Use a fiber optic cable not supplied to connect the DIGITAL OUT OPTICAL digital optical output on the player to the digital optical input on an AV amplifier or receiver DIGITAL OUT COAXIAL The digital signal is transmitted electronically through a c...

Страница 16: ...component bearing the Î mark you can control the player as though it were a component in a system system control If you connect for system control you cannot operate the player directly Point the remote control unit at the component AV amplifier etc connected to the CONTROL OUT jack to operate When controlling as a system be sure to make a connection to the amplifier using an audio or video cord e...

Страница 17: ...st time SETUP is pressed 3 Use the cursor buttons 5 to make a selection If you are going to use the Setup Navigator it is not necessary to change the setting on the first screen Please proceed to the next step If you do not want to set up the player using the Setup Navigator use the cursor button to select Auto Start Off at this time The Setup Navigator function may still be used at a later time i...

Страница 18: ...ropriately the width to height ratio of your television or monitor The width to height ratio of conventional TVs is 4 3 while the width to height ratio of wide screen and high definition TVs is 16 9 This width to height ratio is called the aspect ratio Settings Widescreen 16 9 Standard 4 3 Factory setting Note There are two screen formats that can be used to display wide screen format DVDs letter ...

Страница 19: ...ction Dolby Digital Dolby Digital DTS Dolby Digital MPEG Dolby D DTS MPEG PCM Not Connected SETUP ENTER Settings No Select if the connected AV component cannot process an audio signal with a sampling rate of 96 kHz Yes Select if the connected AV component can process an audio signal with a sampling rate of 96 kHz Don t Know Select if you are uncertain whether the connected AV component can process...

Страница 20: ...ons 2 3 5 or the number buttons then press ENTER When a Video CD is loaded Use the number buttons to select the item Notes Noise is output if you make digital audio connections to a receiver or amplifier that does not have a built in decoder Check that the digital audio output format selected in the Audio 1 menu corresponds to the audio components you have made connections to pages 26 27 The TV sc...

Страница 21: ... RETURN during Video CD playback displays the menu screen Refer to the DVD or Video CD disc jacket and accompanying documentation for more information To play Video CDs without displaying menu screens Video CDs with Playback Control PBC display a menu screen when play is started It is possible however to play back Video CDs without displaying menu screens When a Video CD with PBC is loaded press S...

Страница 22: ...on to resume normal playback Variable speed scanning 1 Press but don t hold FWD or REV 1 during playback to start scanning 1 or 1 1 appears on screen 2 Depending on the type of disc playing you can increase the scanning speed by pressing FWD or REV 1 The scan speed is shown on screen DVD discs have three scanning speeds 1 2 and 3 CD and Video CDs have two scanning speeds 1 and 2 MP3 have only one ...

Страница 23: ...s The actual restart position may be slightly before or after the resume position If you want to remove the disc but still want to resume playback from the last stopped position use the LAST MEMORY feature instead page 50 Stopping Playback and Switching Power Off DVD Video CD CD MP3 1 Press STOP 7 7 on the front panel Playback stops 2 Press OPEN CLOSE 0 0 on the front panel The disc tray comes out...

Страница 24: ...or buttons to enter the menu The top item within the menu becomes highlighted 5 Use the cursor buttons 5 to select the setting you want to change The options available for each setting appear to the right when the setting is selected The current setting appears with the setting indicator lit 6 Use the cursor buttons 3 to enter the setting options Not all menu options can be changed while a disc is...

Страница 25: ...t the setting indicator colors in the Setup screen menus When setting up the system or when making adjustments it is convenient to know what settings are applicable to the different disc formats When the settings appear for each menu option the currently selected setting appears with the setting indicator highlighted in one of three colors blue green or yellow These colors correspond to what forma...

Страница 26: ...amplifier or receiver with a Dolby Pro Logic decoder or a Digital Analog Converter DAC Settings Dolby Digital Dolby Digital 3 PCM Factory setting V2 Video1 General A2 Language Exit Move Audio DRC Dolby Digital Out DTS Out 96kHz PCM Out MPEG Out Audio1 Off Dolby Digital Dolby Digital 3 PCM 96kHz 3 48kHz MPEG 3 PCM Change Dolby Digital output mode SETUP Adjusting the Dynamic Range of the Audio Sound...

Страница 27: ... If you have made connections to a component capable of processing this signal rate select 96 kHz for the signal to be output as is As some components are incapable of processing digital signal input with sampling rates of 96 kHz selecting 96 kHz 3 48 kHz compresses the signal to a standard signal with a sampling rate of 48 kHz Settings Off DTS Factory setting Note If you have made digital audio c...

Страница 28: ... MP3 playback The digital audio output level is reduced when playing 2 channel Dolby Digital DVDs or Video CDs with TruSurround selected If you play a multichannel Dolby Digital DVD with Dolby Digital to PCM conversion see page 27 and TruSurround selected there is no digital output How good the surround effect is varies with the disc Audio2 Video1 Language General A1 V2 Exit Move Virtual Surround ...

Страница 29: ...itched or not depends on the disc Please refer to the information written on the disc jacket etc Some discs may not include the screen format selected in the TV Screen setting When this occurs the standard TV screen format available on the disc is automatically selected Differences in screen sizes and DVD formats The number of screen size formats currently available can be somewhat confusing If se...

Страница 30: ... are not compatible with progressive scan Check the TV s instruction manual if you are not sure about this Progressive Use this setting with TVs and monitors that have progressive scan component video inputs Check the TV s instruction manual if you are not sure about this Auto Progressive Switches to progressive scan when 16 9 DVD discs are played 4 3 DVD discs uses interlace setting Your TV monit...

Страница 31: ... General Audio1 V1 Exit Move Background Video Adjust Still Picture On Screen Display Angle Indicator Pioneer Logo t Field Frame Auto SETUP Setting the Position of the On screen Display Expert When watching conventional software on a wide screen TV the operation display is at the very top of the screen and may be difficult to see Changing the position of the display lets you see operation indicator...

Страница 32: ...e Video Memory Select Interlace Video Setup P Memory 1 P Memory 2 P Memory 3 Cinema Animation Standard Standard Presents the video with no effect added Cinema Delivers a cinema like picture Animation Provides images with bright clear colors I Memory1 P Memory1 Memory2 P Memory2 and Memory3 P Memory3 These are user programmable settings See Adjusting the picture quality settings on page 33 for more...

Страница 33: ...inished making adjustments press ENTER to establish the new settings To create your own setting 2 You can only adjust this setting if the Component Video setting in the Video 1 menu is set to Interlace 1 Use the cursor button 3 to select Start then press ENTER 2 Use the cursor button to select Interlace Video Setup and press ENTER 3 Press DISPLAY 4 Use the cursor buttons 5 to select the setting to...

Страница 34: ...PLAY 4 Use the cursor buttons 5 to select the setting to adjust You can adjust any or all of the following picture quality factors DNR Adjusts the amount of noise reduction NR applied to the Y brightness component Sharpness Adjusts the sharpness of the mid frequency less detailed elements in the picture Detail Adjusts how sharp edges appear in the picture Chroma Delay Compensates for misalingnment...

Страница 35: ...g in the Setup screen Video 2 menu in the Expert menu mode page 25 Note Even when the Angle Indicator setting is set to Off the indicator in the display panel of the player lights during multi angle playback Therefore it is possible to know when the multi angle function can be used without having to display the icon on the screen Video2 A2 Language General Audio1 V1 Exit Move Background Video Adju...

Страница 36: ...ssary to adjust this setting Changing the Audio Language Multi Language Function DVD Dolby Digital PCM and other audio data can be recorded on DVDs in a number of languages or audio tracks letting you choose the desired language or audio Press AUDIO repeatedly to select the desired language Pressing AUDIO once displays the currently selected language Subsequent presses rotates through the audio la...

Страница 37: ...ing playback by pressing AUDIO the language selected at this setting will be selected as the default when the DVD is changed Make changes to the Audio Language setting in the Setup screen Language menu You cannot make this setting with a disc playing Settings English French German Italian Spanish Other For details on how to select other languages see When Other is selected on page 39 Factory setti...

Страница 38: ...currently selected subtitle language Subsequent presses rotates through the subtitle languages available on the DVD Notes The subtitle language cannot be switched if the subtitle language is not recorded or if only one language is recorded Switching the subtitle language may not be possible with some discs In this case the mark will be displayed To clear subtitles during playback press SUBTITLE an...

Страница 39: ... selection screen appears 2 Use the cursor buttons 2 3 to select either List of Languages or Code 3 If you select List of Languages use the cursor buttons 5 to select the language For languages which are only shown as a code please refer to Language Code List on page 59 RETURN PREV NEXT REV PLAY FWD PAUSE STOP STEP SLOW ENTER CLEAR 5 5 5 5 4 1 8 7 e E 3 1 2 3 4 5 6 7 8 9 0 10 C SETUP TOP MENU MENU...

Страница 40: ...st subtitles that provide additional explanations of scenes in addition to the standard subtitles for viewers who are hard of hearing Select Assist Subtitle to display these subtitles on DVDs where this function is offered Make changes to the Subtitle Display setting in the Setup screen Language menu in the Expert menu mode page 25 You cannot make this setting with a disc playing Notes If there is...

Страница 41: ...OGRAM REPEAT VOLUME CHANNEL REPEAT TV TV FUNC TV CONTROL A B LAST MEMORY CONDITION MEMORY SEARCH MODE RANDOM STOP STEP SLOW ENTER DISPLAY CLEAR 5 5 5 5 4 1 8 7 e E 3 1 2 3 4 5 6 7 8 9 0 10 C Î 0 SETUP TOP MENU MENU PLAY 3 PAUSE 8 STEP SLOW e E 3 1 16 3 1 8 1 2 2 1 4 2 There are two reverse slow motion play speeds Slow 1 Ô Slow 2 To return to normal playback When viewing slow playback pressing PLAY...

Страница 42: ... To select number 87 press 8 and 7 When performing a time search To select 21 minutes 43 seconds press 2 1 4 and 3 To select 1 hour 14 minutes press 7 4 0 and 0 3 Press PLAY 3 Playback of the selected title folder chapter or track starts When a time search is performed playback begins at the appointed time Notes For some discs selection can be made using the top menu on the DVD In this case press ...

Страница 43: ...LDER 4 5 FOLDER 5 6 FOLDER 6 MENU ENTER Total number of Track Total number of Folder On the right side is a list of MP3 tracks from the first title in the list Navigate using the following controls Cursor buttons 2 3 Select folder and tracks from the current screen Cursor buttons 5 Select the previous next of folders and tracks To move rapidly up or down a long list of folders or tracks press and ...

Страница 44: ...n the same title chapter or track To cancel A B repeat play Press CLEAR Playback continues but the repeat function is canceled Return to a specified location on a disc DVD Video CD CD 1 Press REPEAT A B at the desired location 2 When you want to return to the specified location press PLAY 3 To clear the specified location Press CLEAR to cancel repeat play or to clear the specified location that wa...

Страница 45: ...u to normal playback of chapters tracks in order from the chapter track currently playing Notes With Video CDs random play is not possible during playback when the menu is displayed PBC playback To perform random play start playback without displaying a menu by pressing a track number button while in the stop mode and then press RANDOM Random play of programmed chapters tracks is not possible In t...

Страница 46: ... the new number and then press the number button s of the number to be inserted The new number is inserted before the previously selected number To stop program play Press STOP 7 Notes When programming chapters chapters not programmed may appear on the screen This is not a malfunction Programming may not be possible with certain DVD discs On these types of discs the mark will appear on the screen ...

Страница 47: ...Press PROGRAM to exit the program screen To delete a program 1 Press PROGRAM 2 Select the program with the cursor buttons 2 3 then press CLEAR 3 Press PROGRAM to exit the program screen Notes The complete program will be deleted even if the disc tray is open or power off standby Pressing CLEAR when the disc is stopped will clear all programs Programming Video CDs CDs A program with a maximum of 24...

Страница 48: ...LUME CHANNEL REPEAT TV TV FUNC TV CONTROL A B LAST MEMORY CONDITION MEMORY SEARCH MODE RANDOM STOP STEP SLOW ENTER DISPLAY CLEAR 5 5 5 5 4 1 8 7 e E 3 1 2 3 4 5 6 7 8 9 0 10 C Î 0 SETUP TOP MENU MENU 1 2 3 Cursor buttons CLEAR ENTER ENTER PROGRAM MP3 Program Exit Play Move Folder 001 25 Total number of folder or track Folder name Track name 3 Use the number buttons to enter a three digit track num...

Страница 49: ...program and recall it the next time you use the same DVD When the program memory exceeds 24 programs will be erased in chronological order from the oldest program in memory 1 Use the cursor button to highlight Program Memory and use the cursor button 3 to select On 2 Press ENTER The program is saved in memory Note When a DVD with a program stored in memory is loaded program playback may start auto...

Страница 50: ...mory point memorized Some DVDs will start playback automatically when loaded In this case press STOP 7 to stop playback 2 Press LAST MEMORY while in the stop mode The disc begins playback at the memorized point Last Memory mode may not function for some DVDs You can use Last Memory for up to five discs after that the one used least recently is deleted to make space for a new one Even with a disc y...

Страница 51: ...REV PLAY FWD PAUSE PROGRAM REPEAT VOLUME CHANNEL REPEAT TV TV FUNC TV CONTROL A B LAST MEMORY CONDITION MEMORY SEARCH MODE RANDOM STOP STEP SLOW ENTER DISPLAY CLEAR 5 5 5 5 4 1 8 7 e E 3 1 2 3 4 5 6 7 8 9 0 10 C Î 0 SETUP TOP MENU MENU CONDITION MEMORY When a disc that has memorized settings is loaded Condition Memory will appear on the screen and the previously memorized settings will be selected...

Страница 52: ...ord Level Country Code Setup viewing restrictions SETUP Entering the Password When you select either Level or Country Code it is necessary to register the password 4 digit code number You ll be asked to confirm your existing password before registering a new one Use the following steps at any time you are asked to enter or confirm your password 1 Select Password in the Parental Lock setting and pr...

Страница 53: ...he Password on the previous page 2 Use the cursor buttons 2 3 5 or the number buttons to enter the new password 3 When the new password has been entered press ENTER The new password is set and the screen returns to the General menu screen To go back to the General menu screen without making any changes press RETURN Setting the Country Code Change your Country Code whenever you feel it is necessary...

Страница 54: ...l program memory saved settings from functions such as Video Memory Last Memory and Condition Memory are cleared TV System is reset to AUTO and all Setup screen menus are returned to factory settings Audio1 Video1 Language General A2 V2 Exit Move TV Screen Component Video S Video Out Screen Saver 16 9 Wide Interlace S2 On Off SETUP SETUP Video2 A2 Language General Audio1 V1 Exit Move Background Vi...

Страница 55: ...pending on the format and type of disc being used not all screens may be displayed When playing Video CDs in PBC mode or unfinalized CD Rs not all the above information is displayed Play Chapter 3 32 54 53 1 51 0 21 Play Chapter 3 32 54 53 1 51 1 30 Play Tr Rate 3 32 54 53 6 3 Play Title 3 29 49 58 101 04 51 06 current title chapter number elapsed time of current title remaining time of current ti...

Страница 56: ...ack 1 9 1 11 1 3 1 22 1 15 1 2 Information MP3 DISPLAY MP3 CD Track 3 0 03 3 32 3 29 Play All 1 10 1 13 66 32 66 20 remaining total time of current tracks current track number Display off CD s total time elapsed time of current track current track number current total time of tracks remaining time of current track CD s remaining time Play Track 1 7 0 07 TRACK1 1 Play Folder 2 3 0 07 FOLDER 1 Play ...

Страница 57: ...per and Long Use of This Unit Do not move the unit during playback During playback the disc rotates at high speed Do NOT lift or move the unit during playback Doing so may damage the disc When moving the unit When changing places of installation or packing the unit for moving be sure to remove the disc and return the disc table to its original position in the player Then press STANDBY ON and switc...

Страница 58: ... connecting push all the way into the terminal Do not use cords with a length of over 3 m If moisture or dust has collected on the plug wipe it with a soft cloth before connecting 15 cm 6 in dia or more We Want You LISTENING For A Lifetime Selecting fine audio equipment such as the unit you ve just purchased is only the start of your musical enjoyment Now it s time to consider how you can maximize...

Страница 59: ...kk Greenlandic kl Cambodian km Kannada kn Kashmiri ks Kurdish ku Kirghiz ky Latin la Lingala ln Laothian lo Lithuanian lt Latvian lv Malagasy mg Maori mi Macedonian mk Malayalam ml Mongolian mn Moldavian mo Marathi mr Malay ms Maltese mt Burmese my Nauru na Nepali ne Norwegian no Occitan oc Oromo om Oriya or Panjabi pa Polish pl Pashto Pushto ps Quechua qu 0721 0801 0809 0818 0821 0825 0901 0905 0...

Страница 60: ...the next time a DVD is loaded Settings are canceled When the power is turned off by power failure or by unplugging the power cord settings will be canceled Before unplugging the power cord press STANDBY ON and check that OFF disappears in the display No picture Connection is incorrect Check that cord connections are correct and that plugs are firmly connected Operation settings of TV or AV amplifi...

Страница 61: ...ferent recording methods This is not a malfunction No DTS audio output You can only play DTS discs if you have a DTS compatible amplifier or a DTS decoder From the disc menu screen or using the AUDIO button select a non DTS setting pages 21 36 If this unit is connected to a non DTS compaible amplifier or decoder using a digital audio cable set DTS Out to Off in the Setup menu If you do not do this...

Страница 62: ... 1 DTS DTS stands for Digital Theater System DTS is a surround system different from Dolby Digital that has become a popular surround sound format for movies In order to enjoy the benefits of DTS encoded discs the digital output jack either coaxial or optical of this player needs to be connected to an AV amplifier or receiver or to a DTS decoder to be able to enjoy the surround sound of DTS audio ...

Страница 63: ...ack time of a disc from its beginning When using the time search function use the time number to locate scenes that occur at the time selected Title number DVD discs are divided into units referred to as titles and titles are divided into chapters Menu screens do not belong to any title A disc which contains a movie may have only one title with many or no chapter divisions Karaoke discs may have m...

Страница 64: ... Beach California 90801 1540 U S A PIONEER ELECTRONICS OF CANADA INC 300 Allstate Parkway Markham Ontario L3R OP2 Canada PIONEER EUROPE NV Haven 1087 Keetberglaan 1 B 9120 Melsele Belgium TEL 03 570 05 11 PIONEER ELECTRONICS AUSTRALIA PTY LTD 178 184 Boundary Road Braeside Victoria 3195 Australia TEL 03 9586 6300 PIONEER ELECTRONICS DE MEXICO S A DE C V San Lorenzo 1009 3er Piso Desp 302 Col Del V...

Отзывы: