background image

2

En

 Important

When installing this unit in a vehicle 
without an ACC (accessory) position on 
the ignition switch, failure to connect the 
red cable to the terminal that detects 
operation of the ignition key may result 
in battery drain.

Use of this unit in conditions other than 
the following could result in fire or 
malfunction.
– Vehicles with a 12-volt battery and 

negative grounding.

– Speakers with 50 W (output value) and 

4 Ω to 8 Ω (impedance value).

To prevent a short-circuit, overheating or 
malfunction, be sure to follow the 
directions below.
– Disconnect the negative terminal of the 

battery before installation.

– Secure the wiring with cable clamps or 

adhesive tape. Wrap adhesive tape 
around wiring that comes into contact 
with metal parts to protect the wiring.

– Place all cables away from moving parts, 

such as the shift lever and seat rails.

– Place all cables away from hot places, 

such as near the heater outlet.

– Do not connect the yellow cable to the 

battery by passing it through the hole 
to the engine compartment.

– Cover any disconnected cable 

connectors with insulating tape.

– Do  not  shorten  any  cables.

– Never cut the insulation of the power 

cable of this unit in order to share the 
power with other devices. The current 
capacity of the cable is limited.

– Use a fuse of the rating prescribed.
– Never wire the negative speaker cable 

directly to ground.

– Never band together negative cables of 

multiple speakers.

When this unit is on, control signals are 
sent through the blue/white cable. 
Connect this cable to the system remote 
control of an external power amp or the 
vehicle’s auto-antenna relay control 
terminal (max. 300mA 12 V DC). If the 
vehicle is equipped with a glass antenna, 
connect it to the antenna booster power 
supply terminal.

Never connect the blue/white cable to 
the power terminal of an external power 
amp. Also, never connect it to the power 
terminal of the auto antenna. Doing so 
may result in battery drain or a 
malfunction.

The black cable is ground. Ground cables 
for this unit and other equipment 
(especially, high-current products such as 
power amps) must be wired separately. If 
they are not, an accidental detachment 
may result in a fire or malfunction.

Connections/Installation

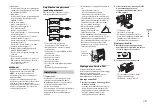
Connections

ACC position 

No ACC position

This unit

Antenna input
Microphone 4 m
Microphone input
DAB antenna input (Only for DEH-
X8700DAB)
Power cord input
AUX input jack (3.5 mm stereo jack)
Rear output
Front output
Subwoofer output
Wired remote input
Hard-wired remote control adapter can 
be connected (sold separately).
Fuse (10 A)
USB port
USB cable 1.5 m

Power cord

To power cord input
Depending on the kind of vehicle, the 
function of 

 and 

 may be different. 

In this case, be sure to connect 

 to 


and 

 to 

.

Yellow
Back-up (or accessory)
Yellow
Connect to the constant 12 V supply 
terminal.
Red
Accessory (or back-up)
Red
Connect to terminal controlled by the 
ignition switch (12 V DC).
Connect leads of the same color to each 
other.
Black (chassis ground)
Blue/white
The pin position of the ISO connector 
will differ depending on the type of 
vehicle. Connect 

 and 

 when Pin 5 

is an antenna control type. In another 
type of vehicle, never connect 

 and 

.

Содержание DEH-X8700BT

Страница 1: ...RDS SINTOLETTORE CD RDS REPRODUCTOR DE CD CON RECEPTOR RDS CD RDS EMPFÄNGER CD RDS ONTVANGER CD RDS ПРИЕМНИК DEH X8700DAB DEH X8700BT Installation Manual Manuel d installation Manuale d installazione Manual de instalación Installationsanleitung Installatiehandleiding Руководство по установке ...

Страница 2: ... the blue white cable Connect this cable to the system remote control of an external power amp or the vehicle s auto antenna relay control terminal max 300mA 12 V DC If the vehicle is equipped with a glass antenna connect it to the antenna booster power supply terminal Never connect the blue white cable to the power terminal of an external power amp Also never connect it to the power terminal of t...

Страница 3: ... the vehicle it may cause injury to a passenger as a result of a sudden stop Installation The semiconductor laser will be damaged if it overheats Install this unit away from hot places such as near the heater outlet Optimum performance is obtained when the unit is installed at an angle of less than 60 When installing to ensure proper heat dispersal when using this unit make sure you leave ample sp...

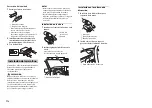
Страница 4: ...n and orientation that will enable it to pick up the voice of the person operating the system Use separately sold clamps to secure the lead where necessary inside the vehicle To install on the sun visor 1 Fit the microphone lead into the groove 2 Install the microphone clip on the sun visor Lowering the sun visor reduces the voice recognition rate To install on the steering column 1 Slide the micr...

Страница 5: ...5 En English ...

Страница 6: ...mande de système d un amplificateur de puissance externe ou à la borne de commande du relais d antenne automatique du véhicule max 300 mA 12 V CC Si le véhicule est équipé d une antenne de vitre raccordez cette dernière à la borne d alimentation de l amplificateur d antenne Ne raccordez jamais le câble bleu blanc à la borne d alimentation d un amplificateur de puissance externe De même ne le racco...

Страница 7: ...z pas de pièces non autorisées car cela pourrait provoquer des dysfonctionnements Consultez votre revendeur si l installation nécessite de percer des trous ou d apporter d autres modifications au véhicule Installation N installez pas cet appareil aux endroits où il peut interférer avec le fonctionnement du véhicule il peut causer des blessures à un passager à la suite d un arrêt brusque S il surch...

Страница 8: ...re à ce qu il ne gêne pas la conduite Il est recommandé d utiliser les serre câbles vendus séparément pour placer le fil REMARQUES Installez le microphone dans une position et une orientation qui lui permette de capter la voix de la personne qui utilise le système Utilisez des serre fils vendus séparément pour fixer le fil là où c est nécessaire dans le véhicule Pour installer l appareil sur le pa...

Страница 9: ...5 Fr Français ...

Страница 10: ... cavo al telecomando di sistema di un amplificatore di potenza esterno o al terminale di controllo relè dell antenna automatica del veicolo max 300 mA 12 V CC Se il veicolo è dotato di un antenna da vetro collegarla al terminale di alimentazione del booster Non collegare il cavo blu bianco al terminale di alimentazione di un amplificatore di potenza esterno Inoltre non collegarlo al terminale di a...

Страница 11: ...e malfunzionamenti Se l installazione richiede la foratura o altre modifiche del veicolo consultare il rivenditore Non installare l unità se può interferire con il funzionamento dei veicolo può causare lesioni ai passeggeri in caso di arresto improvviso Installazione In caso di surriscaldamento il laser semiconduttore può subire danni Installare l unità lontano da luoghi caldi come ad esempio vici...

Страница 12: ...stallare il microfono in modo tale da non ostacolare la guida Si consiglia di utilizzare dei morsetti venduti separatamente per sistemare l interlinea NOTE Installare il microfono in una posizione e un orientamento tale da consentire il rilevamento della voce della persona che utilizza il sistema Utilizzare i morsetti venduti separatamente per assicurare il cavo ove necessario all interno del veic...

Страница 13: ...5 It Italiano ...

Страница 14: ...control remoto del sistema de un amplificador externo o al terminal de control de relé de antena de automóvil máx 300 mA 12 V CC Si el vehículo incorpora una antena en el cristal conéctela al terminal de alimentación de intensificación de la antena Nunca conecte el cable azul blanco al terminal de alimentación de un amplificador externo ni al terminal de alimentación de la antena para automóvil De...

Страница 15: ...r si la instalación requiere el taladrado de orificios u otras modificaciones en el vehículo No instale esta unidad en los siguientes lugares donde pueda interferir con el control del vehículo donde pueda lesionar a un pasajero en caso de parada brusca Instalación El láser semiconductor puede resultar dañado en caso de recalentamiento Instale esta unidad lejos de lugares calientes como por ejemplo...

Страница 16: ... en lugares en los que no interfiera con la conducción Recomendamos utilizar bridas vendidas por separado para recoger el cable NOTAS Instale el micrófono en una posición y orientación que permita detectar la voz de la persona que utiliza el sistema Use las abrazaderas compradas por separado para fijar el cable en los lugares del interior del vehículo donde sea necesario Instalación en la visera 1...

Страница 17: ...5 Es Español ...

Страница 18: ...n Wenn dieses Gerät eingeschaltet ist werden Steuersignale durch das blauweiße Kabel gesendet Schließen Sie dieses Kabel an der Systemfernbedienung eines externen Leistungsverstärkers oder an der Steuerklemme des Automatikantennenrelais des Fahrzeugs an max 300 mA 12 V Gleichspannung Wenn das Fahrzeug eine Scheibenantenne besitzt schließen Sie sie am Stromversorgungsanschluss für den Antennenverst...

Страница 19: ...fen Sie alle Anschlüsse und Systeme vor dem endgültigen Einbau Verwenden Sie keine nicht autorisierten Teile da dies Funktionsstörungen verursachen kann Einbau Wenden Sie sich an Ihren Händler wenn der Einbau das Bohren von Löchern oder andere Modifikationen des Fahrzeugs erfordert Bauen Sie dieses Gerät nicht dort ein wo es den Betrieb des Fahrzeugs stören kann es infolge plötzlichen Anhaltens ei...

Страница 20: ...bel zu wickeln Achten Sie darauf das Mikrofon so anzubringen dass es das Fahren nicht behindert Es wird empfohlen zum Ordnen des Kabels die Klammern separat erhältlich zu verwenden HINWEISE Wählen Sie für die Anbringung des Mikrofons eine Position und Ausrichtung die eine problemlose Erfassung der Stimme der das System bedienenden Person ermöglicht Verwenden Sie nach Bedarf zusätzliche separat erh...

Страница 21: ...5 De Deutsch ...

Страница 22: ...ekers samen Als het toestel ingeschakeld is worden stuursignalen via de blauw witte kabel verstuurd Verbind deze kabel met de systeemafstandsbediening van een externe eindversterker of met het relaiscontact voor de automatische antenne max 300 mA 12 V gelijkstroom Als de wagen uitgerust is met een ruitantenne moet verbinding worden gemaakt met de voedingsaansluiting van de antennebooster Verbind d...

Страница 23: ...installatie Gebruik geen ongeoorloofde onderdelen want dit kan tot storingen leiden Raadpleeg uw verdeler als u voor de installatie gaten moet boren of andere wijzigingen aan de wagen moet aanbrengen Installatie Installeer het toestel niet op de volgende plaatsen waar het de goede werking van de wagen kan storen waar passagiers gekwetst kunnen geraken bij bruusk afremmen De halfgeleiderlaser raakt...

Страница 24: ...sdanig dat het rijden op geen enkele manier wordt gehinderd Het is aan te bevelen klemmen afzonderlijk verkocht te gebruiken om de draad vast te leggen OPMERKINGEN Installeer de microfoon op een plaats waar de stem van degene die het toestel bedient kan worden opgevangen Gebruik waar nodig los verkrijgbare klemmen om de kabel in het voertuig vast te zetten Installeren op de zonneklep 1 Plaats de m...

Страница 25: ...5 Nl Nederlands ...

Страница 26: ...ов Когда устройство включено сигналы управления отправляются по синему белому кабелю Подключите данный кабель к удаленному управлению системой внешнего усилителя или терминалу релейного управления автоматической антенны автомобиля макс 300 мА 12 В пост тока Если автомобиль оснащен антенной встроенной в лобовое стекло подключите ее к терминалу питания антенного усилителя Подключения Установка Подкл...

Страница 27: ...ала Задний громкоговоритель К переднему выходу Передний громкоговоритель К выходу канала сабвуфера Сабвуфер Важно Перед установкой проверьте все подключения и системы Не используйте неоригинальные запчасти так как это может привести к неисправностям Обратитесь к дилеру если для установки требуются дополнительные отверстия или модификации в автомобиле Не устанавливайте данное устройство в следующих...

Страница 28: ...к возникновению чрезвычайно опасной ситуации Устанавливайте микрофон таким образом чтобы он не мешал управлять автомобилем Рекомендуется использовать зажимы приобретаются отдельно для фиксации провода ПРИМЕЧАНИЯ Установите микрофон в таком положении чтобы он мог уловить голос человека управляющего системой При необходимости используйте зажимы для закрепления кабеля в салоне автомо биля продаются о...

Страница 29: ...5 Ru Русский ...

Страница 30: ...6Ru ...

Страница 31: ...7 Ru Русский ...

Страница 32: ... 2014 PIONEER CORPORATION All rights reserved 2014 PIONEER CORPORATION Tous droits de reproduction et de traduction réservés PIONEER CORPORATION 2014 Все права защищены QRD3259 A EW ...

Отзывы: