background image

51

DEH-M6156ZH,M6356ZH

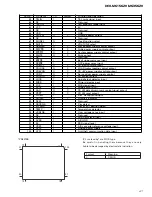
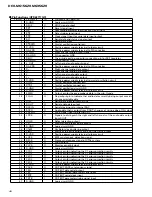
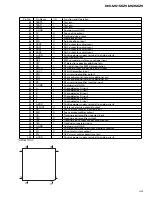
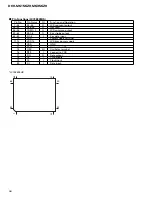
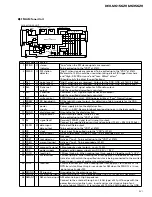
No. Symbol I/O Explain

1 STIND

O

stereo

"Low" when the FM stereo signals are received.

indicator

To be pulled up to the "VDD" at 47k

.

2 FMSD

O

FM station

"High" when signals are received. To be pulled up to the "VDD" at 47k

detector

Meanwhile, 10k

should be used when taking diver FIX trigger from here

and "High: 0.9VDD or more" and "Low: 250mV or less".
(Should satisfy the diver IC specifications) 

3 NL1

O

noise level-1

"High" when noise is received.  Output for the RDS. GND at 47k

//1,800pF.

4 NL2

O

noise level-2

"High" when noise is received.  Output for the RDS. GND at 36k

//330pF.

5 Rch

O

R channel

FM stereo "R-ch" signal output or AM audio output.

output

Add the specified di-emphasis constant. 

6 Lch

O

L channel

FM stereo "L-ch" signal output or AM audio output.

output

Add the specified di-emphasis constant. 

7 WC

write control

EEPROM write control.  Writing permissible at "Low". Normally open. 

8 SDBW

O

SD bandwidth

SD bandwidth signal output.  For detection of detuning data for the RDS.

9 NC

Not used

10 VDD

power

Power supply pin for the digital section.

supply

D.C. 5V +/- 0.25V. Be careful about overlapping noise in the logic section.

11 DGND

digital ground

Grounding for the digital section. 

12 CE2

I

chip enable-2

EEPROM chip enable.  Active a "Low"
To be pulled up to the "VDD" at 47k

13 SL

I/O signal level

Received FM/AM signal level (strength) output.
Connect the specified load resistor and capacitor (10k 

+ 39k 

//4,700pF) 

14 DI/DO

I/O data input/

Data input/Data output

data output

To be pulled up to the "VDD" at 47k

15 CK

I

clock

Clock input To be pulled up to the "VDD" at 47k

16 CE1

I

chip enable-1

AF·RF chip enable.  Active at "High" To be grounded at 47k

17 NC

Not used

18 LDET

O

lock detector

Active at "Low".  To be pulled up to the "VDD" at 47k

19 CREQ

I

current request

Active at "Low".  To be grounded at 47k

20 NC

Not used

21 COMP

O

composite signal

FM composite signal output.  r out < 100

22 VCC

power supply

Analog section power supply pin.D.C.8.4V +/- 0.3V 

23 LOCH

I

local high

FM local high pin. When seeking local high, apply 5V together with "LOCL". 

24 FMLOCL I

FM local low

FM local low pin. When seeking local low, apply 5V to the base of the NPN 
transistor with which the specified resistor is being connected to the emitter. 
Keep it open in case of ordinary marketed models. 

25 LOCL

I

local low

FM/AM local low pin.  When seeking local low, apply 5V to the base of the 
NPN transistor. Since this pin is exclusive for AM when the FMLOCL is in use,

do not drive it under FM. 

26 RFGND

RF ground

Grounding for the antenna section. 

27 FMANT I

FM antenna input FM antenna input.  75

. Serge absorber (DSP-201M-S00B) is necessary. 

28 AMANT I

AM antenna input AM antenna input.  High impedance.

Connect to the antenna through an L (LAU type) of 4.7µH.To cope with the
power transmission line hums, insert a series circuit consisting of an L
(a coil of about 100mH) + R (a resistor of 470 

to 2.2k

) between the GND. 

IC 3

EEPROM

FM/AM TUNER UNIT

28

27

FM/AM 1ST IF 10.7MHz

T51 Q51 CF51 CF52 CF53

IC1

MIXER, IF AMP, DET.

6

21

18

LDET

COMP

22

25

10

14

12 15 16

8

13

2

3

4

CF202

VDD

VCC

DI/DO

CE2

CK

CE1

SDBW

SL

FMSD

NL1

NL2

IC 2 FM MPX

AMANT

FMANT

ATT

ATT

AMRF

FMRF

RF ADJ

ANT2 ADJ

X901

10.25MHz

ANT1 ADJ

LOCL

23

LOCH

AMDET

MPXREF 41kHz

AM 2ND IF

450kHz

19

CREQ

11

DGND

1

STIND

L ch

5

R ch

9

24

NC

FMLOCL

20

17

7

NC

NC

WC

26

RFGND

-

FM/AM Tuner Unit

Содержание DEH-M6156EW

Страница 1: ...EUROPE November 2000 08A02 3C6 2100 01 DEH M6156ZH X1P EW 08A02 3C6 2000 01 DEH M6356ZH X1P EW DEH M6156ZH X1P EW This service manual should be used together with the following manual s Model No Order No Mech Module Remarks CX 958 CRT2423 S8 1 CD Mech Module Circuit Description Mech Description Disassembly DEH M6356ZH X1P EW CONTENTS 1 SAFETY INFORMATION 2 2 EXPLODED VIEWS AND PARTS LIST 3 3 BLOCK...

Страница 2: ...ered by this manual Improperly performed repairs can adversely affect the safety and reliability of the product and may void the warranty If you are not qualified to perform the repair of this product properly and safely you should not risk trying to do so and refer the repair to a qualified service technician 1 Safety Precautions for those who Service this Unit When checking or adjusting the emit...

Страница 3: ...lene Bag UEG1229 8 2 ID Card CEE1018 9 1 Owner s Manual URD 162 9 2 Polyethylene Bag UEG1116 Mark No Description Part No Mark No Description Part No PACKING SECTION PARTS LIST NOTE Parts marked by are generally unavailable because they are not in our Master Spare Parts List Screws adjacent to mark on the product are used for disassembly Owner s Manual Model Part No Language DEH M6156ZH X1P EW URD ...

Страница 4: ...4 DEH M6156ZH M6356ZH 2 2 EXTERIOR A B ...

Страница 5: ...747 32 Insulator CNM5967 33 FM AM Tuner Unit UWE1576 34 Holder CNC7532 35 Screw PRZ30P060FSN 36 Chassis Unit CXB5897 37 Button EJECT CAC6703 38 Button L M U CD AUX CAC6704 39 Button TA PTY ASEL SCAN CAC6705 40 Button 1 6 CAC6706 41 Button SEEK TUNE CAC6707 42 Conductor CNC9043 43 Lighting Conductor CNV6299 44 Lighting Conductor CNV6301 45 Holder CNV6302 46 Rubber CNV6304 47 Knob Assy CXB7508 48 Gr...

Страница 6: ...6 DEH M6156ZH M6356ZH C D 2 3 CD MECHANISM MODULE ...

Страница 7: ...41 Bracket CNC8567 42 43 Spacer CNM3315 44 Sheet CNM6659 45 46 47 Ball CNR1189 48 Belt CNT1086 49 Roller CNV4509 50 Arm CNV6037 51 Arm CNV5247 52 Arm CNV5248 53 Arm CNV5249 54 Guide CNV5254 55 Guide CNV5255 56 Gear CNV5257 57 Gear CNV5256 58 Guide CNV6272 59 Damper CNV6010 60 Arm CNV6096 61 Arm CNV6031 62 Arm CNV6211 63 Guide CNV6012 64 Guide CNV5510 65 66 Guide CNV5751 67 Clamper CNV6013 68 Gear ...

Страница 8: ...D5VON 1 CDLOAD LD MD MD LD 2 1 HOLOGRAM UNIT FOCUS ACT TRACKING ACT IC 501 S 81250PGPD POWER ON MUTE IC 601 TA2063F IC 201 UPD63710GC IC 301 BA5985FM CD DRIVER RF AMP SERVO DSP DAC LPF CN701 CN802 CN801 CN101 5V REGULATOR IC 701 BA05SFP PICKUP UNIT SERVICE P8 BUS BU BUS BUS L BUS L 1 2 8 6 5 IPDO IPDI IPPW swvdd BU CN601 BU Q853 Q854 Q806 Q805 A TUNER AMP UNIT C CONTROL UNIT D PHOTO UNIT 13 TEMP 9...

Страница 9: ...N761029DL IC 602 S 80735ANDZI IC 901 TDA7384 reset VDD Q804 Q602 SYSPW BU PDO IPDI IPDO IPDI IPPW ELECTRONIC VOLUME SOURCE SELECTOR swvdd BU VDD STBY MUTE IC 901 LC75883EHS LCD DRIVER KEY MATRIX LCD 16 1 13 1 16 4 KEY DATA LCD DATA VCC 70 CN602 CN901 Q859 Q860 Q609 KEYBOARD UNIT 2 ACC Q603 VST VCK VDT TUN L BUS L BUS L CD L Q901 IC 301 BA4560F IC 302 BA4560F 3 2 1 7 5 EE2 28 ANTLED VDD 9 8 Q610 Q6...

Страница 10: ...D UNIT LCD DRIVER E VOL SOURCE SELECTOR A TUNER AMP UNIT 9V 5V 3 2 OVERALL CONNECTION DIAGRAM GUIDE PAGE Note When ordering service parts be sure to refer to EXPLODED VIEWS AND PARTS LIST or ELECTRICAL PARTS LIST A a A b A a A a A b A b A b A b A a A a Large size SCH diagram Guide page Detailed page A A a B ...

Страница 11: ... 7 8 5 6 7 8 D C B A FM 5 0dBs AM 8 0dBs CD 9 4dBs FM 6 0dBs AM 9 0dBs CD 8 4dBs SYSTEM CONTROLLER ILL BACK LIGHT GA NET FM 20dBs AM 17dBs CD 34 4dBs 5V 8 5V REGULATOR REGULATOR BACKUP SENSE ACC SENSE POWER AMP 9V 13 2V 5V A b A ...

Страница 12: ...12 DEH M6156ZH M6356ZH 1 2 3 4 1 2 3 4 D C B A CD MECHANISM MODULE FM 26 0dBs AM 29 0dBs FM 5 0dBs AM 8 0dBs CD 9 4dBs C E VOL SOURCE SELECTOR A TUNER AMP UNIT 9V 5V A a A a A b 1 2 3 4 ...

Страница 13: ...13 DEH M6156ZH M6356ZH 5 6 7 8 5 6 7 8 D C B A 4 4dBs B KEYBOARD UNIT SYST LCD DRIVER 9V A a A a A b B 5 6 ...

Страница 14: ...14 DEH M6156ZH M6356ZH 1 2 3 4 1 2 3 4 D C B A 5 0dBs 8 0dBs 9 4dBs FM 6 0dBs AM 9 0dBs CD 8 4dBs 5V 8 5V REGULATOR REGULATOR POWER AMP 5V A a A b A b 1 2 3 4 ...

Страница 15: ...15 DEH M6156ZH M6356ZH 5 6 7 8 5 6 7 8 D C B A SYSTEM CONTROLLER ILL BACK LIGHT GA NET FM 20dBs AM 17dBs CD 34 4dBs 5V BACKUP SENSE ACC SENSE 9V 13 2V A b A a A b 5 6 ...

Страница 16: ...ANISM MODULE D C 16 BA05SFP SERVICE P8 PICKUP UNIT PHOTO UNIT S8 CL203IRXTU CL203IRXTU CONTROL UNIT SPINDLE MOTOR Q2 CPT230SX TU Q1 CPT230SX TU M3 CXB2562 CARRIAGE MOTOR M1 CXB2190 M2 CXB2195 LOADING MOTOR RF AMP SE 5V REGULATOR CD DRIVER CN101 CN802 CN801 D C ...

Страница 17: ...EH M6156ZH M6356ZH 5 6 7 8 5 6 7 8 D C B A C MP SERVO DSP DAC LPF SWITCHES CONTROL UNIT S801 HOME SWITCH ON OFF S802 CLAMP SWITCH ON OFF The underlined indicates the switch position CN701 16 934MHz A CN601 ...

Страница 18: ...5V div 9 CH2 TD 0 5V div Test mode 32 tracks jump FWD 0 5ms div 8 CH1 TE 0 5V div 9 CH2 TD 0 5V div Test mode Single jump FWD 0 5ms div 8 CH1 TE 0 5V div 9 CH2 TD 0 5V div Test mode 100 tracks jump FWD 5ms div 6 CH1 FE 0 1V div 3 CH2 FD 0 2V div Normal mode Play 20ms div 3 CH1 FD 0 5V div 0 CH2 MD 1V div Normal mode Focus close 12cm 0 5s div 3 CH1 FD 0 5V div 0 CH2 MD 1V div Normal mode Focus clos...

Страница 19: ...mal mode play 8 CH1 TE 1V div CH2 TEC 1V div Test mode Focus close Tracking open 2ms div 8 CH1 TE 0 5V div 6 CH2 FE 0 5V div Normal mode AGC after focus close 0 2s div PLCK 2V div 0 5µs div Normal mode play 20ms div SCKO 2V div 1µs div Normal mode play Dout 2V div 10µs div Normal mode play LRCK 2V div 20µs div Normal mode play VD 5V div 50ms div Normal mode No disc GND REFO REFO GND REFO REFO REFO...

Страница 20: ...D 0 5V div Normal mode During AGC 1 CH1 RFI 1V div CH2 HOLD 5V div Normal mode The defect part passes 800µm B D 0 2ms div 1ms div 0 5ms div 3 CH1 FD 0 5V div CH2 HOLD 5V div Normal mode The defect part passes 800µm B D 0 5ms div 9 CH1 TD 0 1V div CH2 HOLD 5V div Normal mode The defect part passes 800µm B D 0 5ms div REFO REFO REFO REFO REFO REFO REFO REFO REFO REFO REFO REFO ...

Страница 21: ...21 DEH M6156ZH M6356ZH ...

Страница 22: ...UNIT NOTE FOR PCB DIAGRAMS 1 The parts mounted on this PCB include all necessary parts for several destination For further information for respective destinations be sure to check with the schematic dia gram 2 Viewpoint of PCB diagrams A A Capacitor Connector P C Board Chip Part SIDE A SIDE B TUNER AMP UNIT ...

Страница 23: ...23 DEH M6156ZH M6356ZH 5 6 7 8 5 6 7 8 D C B A A FRONT PCLA TESTA ANTENNA FM AM TUNER UNIT SIDE A ...

Страница 24: ...24 DEH M6156ZH M6356ZH 1 2 3 4 1 2 3 4 D C B A FRONT A A TUNER AMP UNIT ...

Страница 25: ...25 DEH M6156ZH M6356ZH 5 6 7 8 5 6 7 8 D C B A A SIDE B ...

Страница 26: ...26 DEH M6156ZH M6356ZH 1 2 3 4 1 2 3 4 D C B A 4 2 KEYBOARD UNIT CD EJECT VOL POWER SEEK TUNE SEEK TUNE 2 1 5 4 3 6 TA SCAN RPT PTY NEWS CLOCK A SEL RDM TUNE MODE CD AUX L M U B SIDE A B KEYBOARD UNIT ...

Страница 27: ...27 DEH M6156ZH M6356ZH 1 2 3 4 1 2 3 4 D C B A B B KEYBOARD UNIT SIDE B A CN602 ...

Страница 28: ...M6156ZH M6356ZH 1 2 3 4 1 2 3 4 D C B A 4 3 CD MECHANISM MODULE SIDE A C D CONTROL UNIT HOME M1 CARRIAGE MOTOR M2 LOADING MOTOR M3 SPINDLE MOTOR PICKUP UNIT SERVICE P8 CN802 CN601 3 2 1 PHOTO UNIT S8 A C D C D ...

Страница 29: ...29 DEH M6156ZH M6356ZH D C B A 1 2 3 4 1 2 3 4 SIDE B C CLAMP CONTROL UNIT C ...

Страница 30: ...D1859 Q 853 Transistor 2SA1576 Q 854 Transistor 2SC4081 Q 859 Transistor 2SB1236 Q 860 Transistor 2SC4081 Q 901 Transistor DTC114EU Q 902 Transistor 2SC4081 Q 903 Transistor DTC114EU D 101 Diode 1SS133 D 301 Diode HZS6L A1 D 501 Diode MPG06G 6415G3 D 502 Diode HZS16L 1 D 601 Diode 1SS133 D 602 Diode HZS7L C3 D 603 Diode HZS7L C2 D 604 Diode RD18JS B2 D 605 Diode RD18JS B2 D 607 Diode 1SS133 D 801 ...

Страница 31: ...3J R 539 RS1 16S222J R 540 RS1 16S222J R 542 RD1 4PU151J R 601 RAB4C222J R 605 RS1 16S102J R 607 RS1 16S102J R 608 RS1 16S102J R 609 RS1 16S102J R 610 RS1 16S223J R 611 RS1 16S472J R 613 RS1 16S0R0J R 615 RS1 16S102J R 622 RS1 16S473J R 628 RA3C102J R 637 RS1 16S102J R 638 RA3C473J R 641 RS1 16S303J R 642 RS1 16S102J R 643 RS1 16S822J R 644 RS1 16S473J R 645 RS1 16S104J R 646 RS1 16S473J R 647 RS1...

Страница 32: ... 407 CKSRYB471K50 C 408 CEAL4R7M35 C 409 CKSRYB473K16 C 501 CKSRYB182K50 C 502 CKSRYB472K50 C 503 CKSRYB183K25 C 504 CKSRYB183K25 C 505 CEAL1R0M50 C 506 CEAL1R0M50 C 507 CKSRYB223K25 C 508 CKSRYB473K16 C 509 CKSRYB224K10 C 510 CKSRYB224K10 C 511 CEAL101M6R3 C 512 CKSRYB102K50 C 513 CEJA101M16 C 516 CKSRYB102K50 C 517 CEAL220M10 C 519 CKSRYB103K50 C 521 CKSRYB223K25 C 522 CKSRYB103K50 C 523 CEAL470...

Страница 33: ... CKSRYB104K16 C 212 CKSRYB104K16 C 213 CKSRYB392K50 C 214 CKSRYB104K16 C 215 CKSRYB104K16 C 216 CCSRCJ3R0C50 C 217 CCSRCH270J50 C 218 CKSRYB104K16 C 219 CCSRCH181J50 C 220 CCSRCH510J50 C 221 CKSRYB682K25 C 222 CEV220M6R3 C 223 CKSRYB103K25 C 224 CKSRYB224K10 C 301 CEV101M10 C 603 CCSQSL152J50 C 604 CCSQSL152J50 C 702 10µF 10V CCH1349 C 703 CKSQYB334K16 Unit Number Unit Name Photo Unit S8 Q 1 Photo...

Страница 34: ...L1674 IL 956 Lamp 14V40mA CEL1674 IL 957 Lamp 14V40mA CEL1674 LCD 951 LCD CAW1677 RESISTORS R 951 RS1 10S683J R 953 RS1 16S103J R 954 RS1 16S103J R 955 RS1 16S103J R 956 RS1 16S103J R 957 RS1 10S221J R 958 RS1 10S561J R 960 RS1 16S103J R 961 RS1 16S103J R 962 RS1 16S103J R 963 RS1 16S103J CAPACITORS C 951 CKSRYB473K16 C 953 CKSRYB473K16 C 954 CKSRYB473K16 C 955 CCSRCH821J50 C 956 CKSRYB103K50 C 95...

Страница 35: ... to stabi lize Since the protective systems in the unit s software are rendered inoperative in test mode be very careful to avoid mechanical and or electrical shocks to the sys tem when making adjustment Disc detection during loading and eject operations is performed by means of a photo transistor in this unit Consequently if the inside of the unit is exposed to a strong light source when the oute...

Страница 36: ...d RF AGC F T RF AGC Focus open Jump off Focus Mode select Tracking Close CRG TR Jump switching CRG TR Jump Toward inner perimeter r SEC MIN TRK 00 00 SEC 00 MIN TRK 99 99 SEC 99 MIN TRK SEC 2 MIN TRK 91 91 SEC 91 MIN TRK 0X 0X SEC 0X MIN TRK 00 00 SEC 00 MIN TRK 99 99 SEC 99 or MIN TRK 00 00 SEC 00 MIN TRK 99 99 SEC 99 or MIN TRK 00 00 SEC 00 MIN TRK 99 99 SEC 99 3 3 2 Auto Adjustment Display Sele...

Страница 37: ...U unit to the innermost track 3 Press key SCAN RPT to close focus the display should read 91 Press key 2 to implement the tracking balance adjustment the display should now read 81 Press key SCAN RPT 2 times The display will change returning to 81 on the fourth press 4 As shown in the diagram above monitor the LPF outputs using the oscilloscope and check that the phase differ ence is within 75 Ref...

Страница 38: ...38 DEH M6156ZH M6356ZH Grating waveform Ech Xch 20mV div AC Fch Ych 20mV div AC 45 0 75 60 30 90 ...

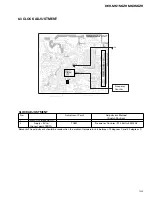
Страница 39: ... TC601 PCLA TESTA 5V CLOCK ADJUSTMENT No Adjustment Point Adjustment Method Switch Position 1 Switch ACC back up On 2 Apply 5V to TC601 Frequency Counter 312 5kHz 0 001kHz the test point TESTA Remarks The adjustment should be made when the ambient temperature is between 10 degrees C and 30 degrees C ...

Страница 40: ...nse temperature error DISC Focus error F2 Focusing not available Stains on rear side of disc or excessive vibrations on REWRITABLE Spindle not locked Sub code is strange not readable An appropriate RF AMP gain can t be determined Failure on spindle stains or damages on disc or excessive vibrations CD signal error A disc not containing CD R data is found Turned over disc are found though rarely AGC...

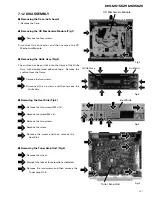
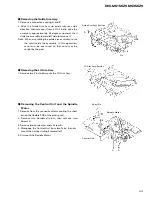
Страница 41: ...e connector and then remove the CD Mechanism Module Removing the Grille Assy Fig 2 The cushion has been stuck onto the frame of the Grille Assy with double faced adhesive tape Remove the cushion from the frame Remove the two screws Disconnect the six claws and then remove the Grille Assy Fig 1 Fig 3 Fig 4 Tuner Amp Unit Heat Sink CD Mechanism Module Removing the Tuner Amp Unit Fig 4 Remove the scr...

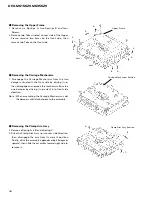
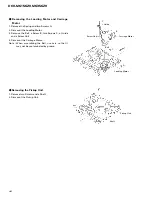
Страница 42: ...engage and remove the mechanism from the one damper by driving it up aslant into front side direction Note When assembling the Carriage Mechanism coat the dampers with alcohol prior to the assembly Removing the Clamp Arm Assy 1 Remove a Spring A a B and a Spring C 2 Drive the Clamp Arm Assy up into rear side direction then disengage the arm from its current position Finally drive the assembly appr...

Страница 43: ...n care must be exercised so that cord may be caught by the gear Removing the LO Arm Assy 1 Remove two Pins to dismount the LO Arm Assy Removing the Control Unit and the Spindle Motor 1 Remove from the connector after mounting the short pin on the flexible PCB of the pickup unit 2 Remove two Soldered joints then remove two Screws A 3 Remove two connectors and a Screw B 4 Disengage the Control Unit ...

Страница 44: ...emove the Belt a Screw B two Screws C a Guide and a Screw Unit 4 Dismount the Carriage Motor Note When assembling the Belt use care so that it may not be contaminated by grease Removing the Pickup Unit 1 Remove two Screws and a Shaft 2 Dismount the Pickup Unit Pickup Unit Shaft C Guide B Screw Unit Carriage Motor A A C Belt Loading Motor ...

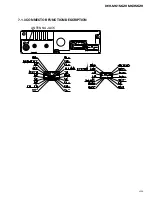
Страница 45: ...45 DEH M6156ZH M6356ZH 7 1 3 CONNECTOR FUNCTION DESCRIPTION ANTENNA JACK ...

Страница 46: ...I RDS 57kHz pulse count input 26 VOL UP I Encoder 1 input 27 VOL DOWN I Encoder 1 input 28 PEE2 O C Beep tone output 29 DIN I BUS data input 30 DOUT O BUS data output 31 XDSO O C CDS serial data output 32 XDSI I CDS serial data input 33 xdsck O C CDS serial clock output 34 discind O C DISC detect indicator 35 PDO O C Data output for PLL IC 36 PDI I Data input from PLL IC 37 pck O C Serial clock ou...

Страница 47: ...T O C Servo driver power supply control 80 VDCONT O C VD control output 81 LOCK I Spindle lock detector input 82 MIRR I Mirror detector input 83 FOK I FOK signal input 84 xstb O C Strobe output CD 85 XAO O C CD LSI data discernment control signal output 86 xrst O C CD LSI reset output 87 clamp I Disc clamp sense input 88 antled O C Antitheft indicator 89 REM I Not used 90 DSCSNS I Disc detect 91 E...

Страница 48: ... indicate that audio data currently being output consists of noncorrectable data 29 DIN I Serial data input to internal DAC 30 DOUT O Serial audio data output 31 SCKIN I Serial clock input to internal DAC 32 SCKO O Audio data that is output from DOUT changes at rising edge of this clock 33 LRCKIN I LRCK signal input to internal DAC 34 LRCK O Signals to distinguish the right and left channels of th...

Страница 49: ...F amplifier equalizer parts additional pin 79 EQ1 RF amplifier equalizer parts additional pin 80 RF I RF summing amplifier inverted input 81 A GND Analog circuit GND 82 A I Photo detector A input 83 C I Photo detector C input 84 B I Photo detector B input 85 D I Photo detector D input 86 F I Photo detector F input 87 E I Photo detector E input 88 A VDD Positive power supply terminal to analog circ...

Страница 50: ... COM1 3 O LCD common output 59 64 KS1 6 O Key strobe output 65 69 KI1 5 I Key data input 70 VDD Power supply terminal 71 72 VDD1 2 LCD bias power supply 73 VSS GND 74 TEST Connect to VSS 75 OSC I O Oscillator terminal 76 res I Connect to VDD 77 DO O Data output 78 CE I Chip enable 79 CL I Clock input 80 DI I Data input LC75883EHS 24 25 40 41 64 65 80 1 ...

Страница 51: ...to the VDD at 47kΩ 16 CE1 I chip enable 1 AF RF chip enable Active at High To be grounded at 47kΩ 17 NC Not used 18 LDET O lock detector Active at Low To be pulled up to the VDD at 47kΩ 19 CREQ I current request Active at Low To be grounded at 47kΩ 20 NC Not used 21 COMP O composite signal FM composite signal output r out 100Ω 22 VCC power supply Analog section power supply pin D C 8 4V 0 3V 23 LO...

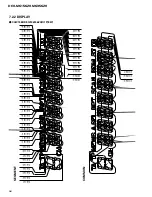
Страница 52: ...G28 SEG27 SEG26 SEG25 SEG24 SEG23 SEG22 SEG21 SEG20 SEG19 SEG18 SEG17 SEG16 SEG15 SEG14 SEG13 SEG12 SEG11 SEG10 SEG 9 SEG 8 SEG 7 SEG 6 SEG 5 SEG 4 SEG 3 SEG 2 SEG 1 SEG37 SEG38 SEG39 SEG40 SEG41 SEG42 SEG43 SEG44 SEG45 COM 1 COM 2 COM 3 COMMON SEGMENT 7 2 2 DISPLAY CAW1588 DEH M6156ZH X1P EW ...

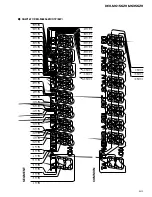
Страница 53: ...EG29 SEG28 SEG27 SEG26 SEG25 SEG24 SEG23 SEG22 SEG21 SEG20 SEG19 SEG18 SEG17 SEG16 SEG15 SEG14 SEG13 SEG12 SEG11 SEG10 SEG 9 SEG 8 SEG 7 SEG 6 SEG 5 SEG 4 SEG 3 SEG 2 SEG 1 SEG37 SEG38 SEG39 SEG40 SEG41 SEG42 SEG43 SEG44 SEG45 COM 1 COM 2 COM 3 COMMON SEGMENT CAW1677 DEH M6356ZH X1P EW ...

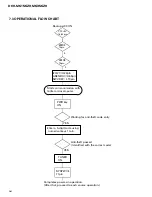
Страница 54: ... SYSPW L 71pin YES PWR key ON IPPW H 22pin ASENBO H 69pin SWVDD L 70pin asens 75pin bsens 74pin VCC 5V 16 62pin Backup ACC ON L L Starts communication with Grille microcomputer TUNER ON YES Waiting for anti theft code entry Enter a 5 digit code using numerical keys 1 to 6 Anti theft passed Identified with the correct code ...

Страница 55: ...55 DEH M6156ZH M6356ZH 8 OPERATIONS AND SPECIFICATIONS 8 1 OPERATIONS DEH M6156ZH X1P EW DEH M6356ZH X1P EW ...

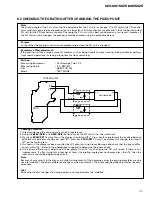
Страница 56: ...ns 12 to cancel the anti theft function BASIC OPERATIONS SWITCHING POWER ON Radio 8 15 When button 8 is pressed the radio power is turned on To turn off press button 15 CD PLAYER 1 9 15 When a CD is inserted in the disc slot 3 it is loaded and starts playing automatically It can be stopped by pressing button 15 and restarted by pressing button 9 To remove the CD press button 1 Advice When the prop...

Страница 57: ...ance and fader adjustments are made even if maximum or minimum levels are set a beep will be heard at the center position The adjustment mode is canceled approximately 5 seconds after an adjustment is made Advice When driving a volume level should be selected that allows sounds outside the vehicle to be heard Advice When a CD is loaded pressing button 9 will alternate between CD and CD changer MD ...

Страница 58: ...set number 7 will light and the station will be memorized in the chosen button Recalling a Station 12 When the button 12 is pressed again after a station has been memorized the radio will be tuned to the station stored in that button The number of the pressed button lights in 7 on the display SEEK SCAN 4 Pressing button 4 starts Seek Tuning operation When a station broadcasting a strong signal is ...

Страница 59: ...he button is pressed 0 5 Advice If you press the button for longer than 0 5 seconds fast forward rewind will operate and it will not be possible to perform a track number search LISTENING TO A CD 9 15 When button 9 is pressed CD playback starts and the disc number track number appear on the display Playback is stopped by pressing button 15 SELECTING A DISC 12 Pressing buttons 12 5 or 6 you can swi...

Страница 60: ...cs Compact disc Signal format Sampling frequency 44 1 kHz Number of quantization bits 16 linear Frequency characteristics 5 20 000 Hz 1 dB Signal to noise ratio 94 dB 1 kHz IEC A network Dynamic range 92 dB 1 kHz Number of channels 2 stereo FM TUNER Frequency range 87 5 108 MHz Usable sensitivity 12 dBf mono S N 30 dB 50 dB quieting sensitivity 16 dBf mono S N ratio 70 dB IEC A network Distortion ...

Отзывы: