background image

20

Chapter 1

Basic Operation

3

Select the zone code mark and click the 
OK button.

If the destination is in another zone, this 
changes the zone setting.

Once the zone has been selected, you only 
have to change the zone when your desti-
nation is outside of the zone you have 
selected.

4

Select the zone code of the destination 
and click the OK button.

Modifies the zone setting and returns you to 
the previous display.

5

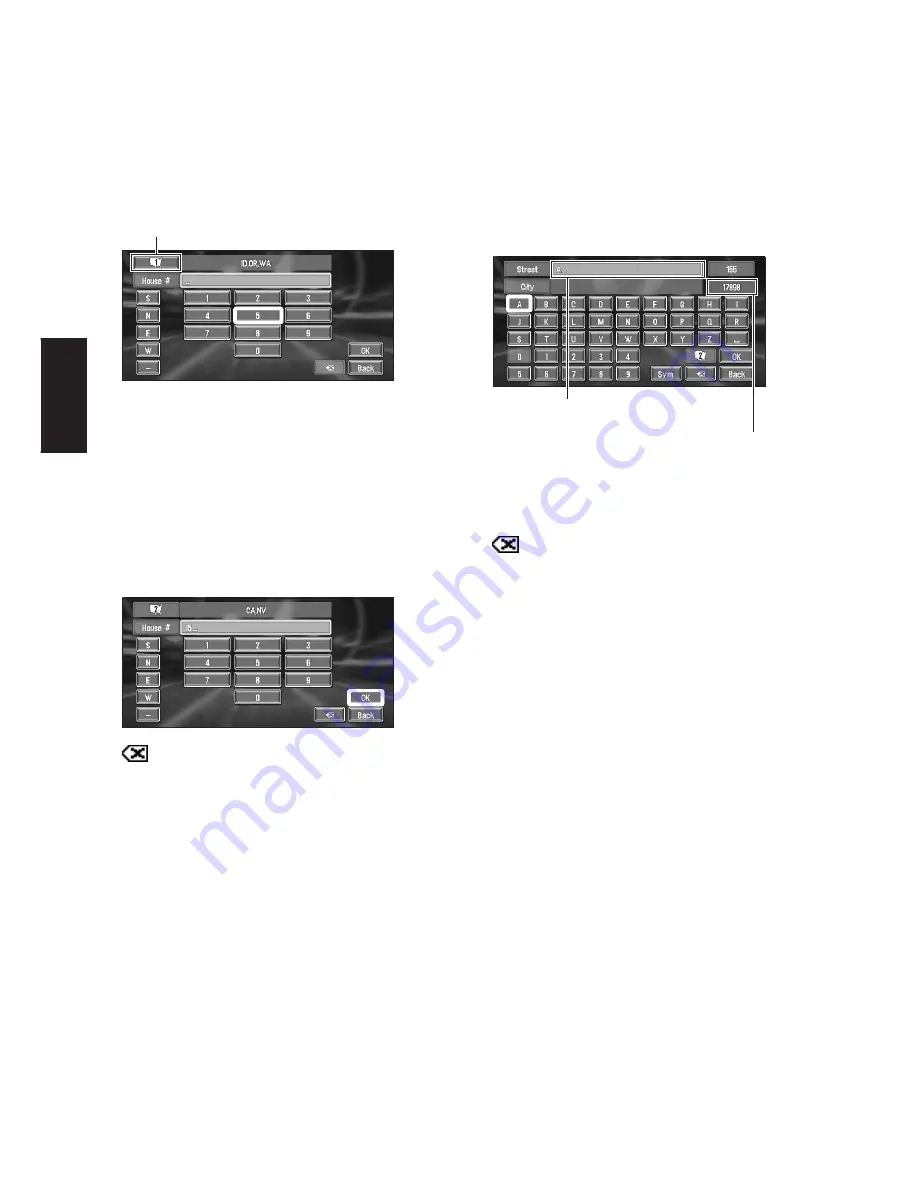
Input the house number and click the OK 
button.

Select the characters you wish to input and 
click the 

OK

 button.

 :

The input text is deleted letter by letter from 
the end of the text. You can delete all of the 
input text by selecting this item and holding 
down the 

OK

 button for more than two sec-

onds. 

“Back” :

Returns you to the previous screen.

Also input a prefix to the house number.

If the house number you have input is not 
found among subsequently selected 

Street

” or “

City

” data, a message 

appears saying that the address has not 
been found. In that case, try inputting the 
house number again.

Selecting “

OK

” with no input allows you to 

specify and search a street name or the 
name of the city or area first. Proceed to 
the next step.

6

Input the street name.

Select the letter you wish to input and click 
the 

OK

 button. If the next screen is not auto-

matically displayed even though the street 
name is entered, try selecting “

OK

”.

“City” :

Select if you wish to first specify the destina-
tion city or area.

 :

The input text is deleted letter by letter from 
the end of the text. You can delete all of the 
input text by selecting this item and holding 
down the 

OK

 button for more than two sec-

onds. 

You can also delete all of the text by open-
ing the cover of the remote control and 
holding down the 

DELETE

 button for 

more than two seconds.

“Sym.” :

You can input text with marks such as “&” and 
“+”.

“0-9” :

You can input text with numbers.

“Back” :

Returns you to the previous screen.

You can also return to the previous screen 
by pressing the 

BACK

 button on the 

remote control.

For example, for “Early California Ct”, you 
can just enter part of the name, such as 
“California”.

While entering characters, if there is only 
one candidate following the next, that is 
automatically entered.

Zone code mark

The number of applicable candidates

The input text

Содержание CNDV-40R

Страница 1: ...ware that the manufacturer cannot take any responsibility for lost data in the event the data is lost Upgrading to the newer version Page 93 Notice to all users This software requires that the navigation unit be properly connected to your vehicle s parking brake If not properly connected and depending on your vehicle additional instal lation may be required For more information please contact your...

Страница 2: ...estination History data being lost It is highly recommended to use a PC Card PCMCIA TYPE II 5 V to back up Address Book data Since the Destination History cannot be stored on a PC Card directly to keep the Destination History data first store it in the Address Book then onto the PC Card Address Book data includes Return Home and Go to contents Any existing calculated routes will be canceled Person...

Страница 3: ...ion or any other means You shall not use the Software to operate a service bureau or for any other use involving the processing of data for other persons or entities Pioneer and its licensor s shall retain all copy right trade secret patent and other proprietary ownership rights in the Software The Software is copyrighted and may not be copied even if modi fied or merged with other products You sh...

Страница 4: ...orted outside the United States except as authorized and as permitted by the laws and reg ulations of the United States If the Software has been rightfully obtained by you outside of the United States you agree that you will not re export the Software nor any other technical data received from Pioneer nor the direct product thereof except as permitted by the laws and reg ulations of the United Sta...

Страница 5: ...other means You shall not use the Software to operate a service bureau or for any other use involving the processing of data for other persons or entities Pioneer and its licensor s shall retain all copy right trade secret patent and other proprietary ownership rights in the Software The Software is copyrighted and may not be copied even if modi fied or merged with other products You shall not alt...

Страница 6: ...cal law which provides that such a dis claimer or limitation cannot be waived or preempted 4 EXPORT LAW ASSURANCES You agree and certify that neither the Software nor any other technical data received from Pio neer nor the direct product thereof will be exported outside Canada except as authorized and as permitted by the laws and regulations of Canada If the Software has been rightfully obtained b...

Страница 7: ... FOR A PARTIC ULAR PURPOSE TELE ATLAS ITS LICENSORS AND SUPPLIERS DO NOT WARRANT THAT THE DATA WILL MEET YOUR REQUIREMENTS OR THAT THE OPERATION OF THE DATA WILL BE UNINTERRUPTED OR ERROR FREE NO ORAL OR WRITTEN ADVICE GIVEN BY TELE ATLAS ITS LICENSORS SUPPLIERS OR ANY OF THEIR RESPECTIVE EMPLOYEES CREATES A WAR RANTY OR IN ANY WAY INCREASES TELE ATLAS ITS LICENSORS OR SUPPLIERS LIABIL ITY AND YOU...

Страница 8: ...IVEN BY HER MAJ ESTY THE QUEEN THE MINISTER OF NATU RAL RESOURCES TELE ATLAS OR ITS LICENSORS AND EMPLOYEES CREATES A WARRANTY OR IN ANY WAY INCREASES HER MAJESTY THE QUEEN AND THE MINISTER OF NATURAL RESOURCES LIABILITY AND YOU MAY NOT RELY ON ANY SUCH INFORMATION OR ADVICE b Disclaimer of Liability IN NO EVENT SHALL THE LICENSORS INCLUDING HER MAJESTY THE QUEEN IN RIGHT OF CANADA THE MINISTER OF...

Страница 9: ...t time may not be reflected in this database Canada database was developed and recorded up to July 2003 Changes to streets highways made after that time may not be reflected in this database It is strictly prohibited to reproduce and use any part or the whole of this map in any form without permission from the copyright owner If the local traffic regulations or conditions deviate from this data fo...

Страница 10: ...nce or Exit of a Freeway as Your Destination 31 Searching for Your Destination by Specifying the Telephone Number 32 Route Calculation to Your Home Location or to Your Favorite Location 32 Selecting Destination from the Destination Histo ry and Address Book 33 Modifying the Route Calculation Conditions 33 Items that users can change 33 Perform the route calculation of the several rou te options an...

Страница 11: ...R MENU 70 BSSM Best Station Sequential Memory 70 Storing broadcast stations 70 Recalling broadcast stations 71 DVD 71 How to watch a DVD 72 Displaying the DVD MENU 72 Repeating play 72 Playing tracks in a random order 73 Scanning tracks of a CD 73 Pausing CD playback 73 Using ITS playlists 73 Information indications are displayed 73 Disc Playback 74 Chapter and Track Advance Return 74 Returning to...

Страница 12: ...mote Control AVIC 9DVD 95 About operation of the DVD player 96 Positioning Technology 96 Positioning by GPS 96 Positioning by dead reckoning 96 How do GPS and dead reckoning work together 97 Map matching 97 Handling Large Errors 97 When the positioning by GPS is impossible 98 Conditions Likely to Cause Noticeable Positioning Errors 98 Vehicles that Cannot Obtain Speed Pulse Data 101 About the Data...

Страница 13: ...rary advice Failure to input correct information about the local time may result in the navigation system providing improper routing and guidance instructions Never set the volume of your Navigation Sys tem so high that you cannot hear outside traf fic and emergency vehicles To promote safety certain functions are disa bled unless the parking brake is applied The data encoded in the disc is the in...

Страница 14: ...could be dangerous if used while driving To prevent them being used while in motion there is an interlock with your vehicle s parking brake If you attempt to use these functions during driv ing their onscreen items may be indicated in gray and inoperable If so stop in a safe place apply the parking brake then operate To ensure safe driving To avoid the risk of accident and the potential violation ...

Страница 15: ...es of screen display can be selected for navigation guidance Map View Driver s View Route View Guide View Wide Variety of POI Information Approximately 12 million POIs are included in this database as of October 2002 for U S July 2003 for Canada Some POI information may not be accurate or may become inaccurate through the passage of time Please directly contact the POI to ver ify the accuracy of t...

Страница 16: ...se read this section It will explain the basics of operating this system including items appearing on the display and how to use basics the different menus Setting a Route to Your Destination This section describes various ways of searching the destination changing the route search conditions and the route operation during route guidance Editing the Navigation Utilities Describes convenient functi...

Страница 17: ...cated like this e g Setting the Route Options Page 33 Map Discs for Navigation System Configuration of data recorded on discs The map for this navigation system is supplied on two discs one for the west and the other for the east Please set the disc to use according to your destination or current location The areas recorded on each disc are as follows West area disc Eest area disc Removing the dis...

Страница 18: ...16 ...

Страница 19: ...oneer DVD map disc to the disc loading slot 3 Press the NAVI AV button to switch to the navigation map screen Pressing the NAVI AV button switches between the navigation map screen and the audio screen If you use AVD W6010 or AVD W6000 press the V SEL button on the display to switch to a navigation screen 4 Check the details of the cautionary mes sage and click the OK button If the route is alread...

Страница 20: ...stination is reached the set route will not be deleted automatically even if the power is turned off Basic Navigation The most frequently used function is the Address Search in which the address is specified and the destination searched This section describes how to use the Address Search and the basics of using the Navigation System For safety reasons you cannot use these basic navigation functio...

Страница 21: ... Page 36 1 Park your vehicle in a safe place and apply the parking brake 2 Insert the Pioneer DVD map disc to the disc loading slot 3 Press the MENU button to display the Main menu 4 Select Destination from the Main menu 5 Select the method of searching for your destination 6 Enter the information about your des tination 7 Your Navigation System sets the route to your destination and the map of yo...

Страница 22: ...ecting OK with no input allows you to specify and search a street name or the name of the city or area first Proceed to the next step 6 Input the street name Select the letter you wish to input and click the OK button If the next screen is not auto matically displayed even though the street name is entered try selecting OK City Select if you wish to first specify the destina tion city or area The ...

Страница 23: ...he street name select the street from the list and proceed to step 9 In the selected zone if you select City without entering the name of city or area you can check the list of the cities or areas which you have searched in the past This item cannot be selected when searching by the name of a city or area for the first time with this system or when you have selected a zone that you have never sear...

Страница 24: ...nation and search for a new route or search for a route via that area Adding way points to the route Page 37 Once searched for a location is automati cally stored in the Destination History Page 40 10Drive in accordance with the screen and voice information Your Navigation System gives you the follow ing information with the timing adjusted to the speed of your vehicle Distance to the next turning...

Страница 25: ...estination search method Also the route set can be canceled from this menu Specifying the address and searching the des tination Page 19 Searching the destination by map Page 28 Other search methods Page 29 to 33 Information menu Used to check the route you set or check the nav igation status You can use Route Profile and Route Scroll only when a route has been entered Checking the set route Page ...

Страница 26: ... in the route guidance Searching another route Page 36 Detour for a specified distance Page 36 Checking the route Page 35 Canceling the route guidance Page 36 Skipping a way point Page 38 Registration Registering the location indicated by the scroll cursor to Address Book Registering a place Page 40 Vicinity Search You select a location with the scroll cursor Nearby POIs Points Of Interest will al...

Страница 27: ...s the NAVI button repeatedly to select the mode you want to display You can also select the desired mode by moving the joystick left and right and click ing the OK button If the mode is selected the screen auto matically switches to the selected map dis play mode after 4 seconds How to view the map of the cur rent location In Driver s View a small gauge with no scale is depicted but is not intende...

Страница 28: ...point The next guidance point next turning point etc is shown by a yellow flag Destination The checker flag indicates your destination 1 Name of the next street to be used 2 Distance to the guidance point 3 Current location The current location of your vehicle The tip of the triangular mark indicates your heading and the display moves automatically as you drive 4 Distance to the destination 5 Name...

Страница 29: ... the map by moving the joystick towards the location you want to see The scroll ing stops when you release your finger from the joystick At this time the scroll cursor appears at the center of the screen Also a line connecting between the current location and scroll cursor appears Pressing the NAVI button returns you to the map of your surroundings To scroll through quickly press down the joy stic...

Страница 30: ... map and select in the Shortcut menu you can specify your destination on the map 1 Press the NAVI button to access the map screen 2 Scroll the map and move the scroll cursor to the place you want to make your desti nation Moving the map to view the part you want to see Page 27 3 Click the OK button The Shortcut menu appears 4 Select and click the OK button If you press the NAVI button during route...

Страница 31: ...facilities Points Of Interest POI such as gas stations amusement parks or restaurants is available By selecting the category or entering the POI Name you can search for a Point Of Interest You can also narrow down the search range by initially specifying the name of the city or area where your destination is located Searching for Points of Interest POI 1 In the Destination menu select POI Search a...

Страница 32: ... you want to search and click the OK button Then select Back and click the OK button When only a few types of the detailed categories are selected blue check marks will appear You can select the detail category for up to 100 items 3 Select POI and click the OK button Names of POIs and their distance from your current location appear They are listed in nearest to furthest order To the left of each ...

Страница 33: ... Viewing the information of POI Page 27 When some sub categories are selected the corresponding category is marked blue When all the sub categories within a category are selected that category is marked red Setting an Entrance or Exit of a Freeway as Your Destination You can set the entrance or exit of a freeway as your destination 1 In the Destination menu select Freeway Search and click the OK b...

Страница 34: ... item you want in the list clich the OK button and then proceed to step 3 3 If the displayed place is satisfactory select OK and then click the OK but ton If you want to change the destination select Scroll and click the OK button Scroll the map by moving joystick towards the location you want to visit Searching the destination by map Page 28 Route Calculation to Your Home Location or to Your Favo...

Страница 35: ...ample of changing the number of the route to be searched 1 In the Route Options menu select Number of Routes and click the OK but ton The content currently set appears under the name of the item Each time you click the OK button the setting appearing on the item changes Repeatedly click the OK button until the value you want to set appears Items that users can change This section describes the det...

Страница 36: ...e 43 Perform the route calculation of the several route options and select one You can get route calculations for several route options After route options are calculated select the one you want 1 Set the Number of Routes to Multiple Changing the search conditions Page 33 2 Search your destination and set the route Calculated routes are shown in different colors from two to six routes 3 To change ...

Страница 37: ...lect two methods checking the pass ing streets with a list and checking the shape of the route by scrolling the map along the route Checking the set route with the map 1 In the information menu select Route Scroll and click the OK button The screen to select the point to start scrolling appears 2 Select the point to start scrolling and click the OK button You can select the following items 1 Start...

Страница 38: ...lating the Route to Your Destination You can set the length of the area and avoid just that area or you can even search a new route from the current location to your destination On the map screen during route guidance try the fol lowing operations 1 On the map display click the OK button The Shortcut menu appears 2 Select and click the OK button The Route Detour menu appears 3 Select Reroute or th...

Страница 39: ...points This is achieved as follows 1 Specify the location you want to visit Specify a way point in the same way as speci fying a destination At completion of the location search a mes sage is displayed asking whether or not to set that specified location as the destination or as a pass through location Specifying the address and searching the destination Page 19 Searching the destination by map Pa...

Страница 40: ...point appears 4 Select Yes and click the OK button A new route to your destination through all the remaining way points except for the skipped way point is calculated Deleting a way point from the route If you no longer need to pass through a way point you have not yet reached you can delete that place from the list of way points and calculate a new route 1 In the Destination menu select Cancel Ro...

Страница 41: ...urn Home and Go to Registering your home and your favorite location Of the 300 registered locations that can be stored home location and favorite location can be stored separately in the Address Book Reg istering your favorite location for the first time is described here You can change the registered information later You might find it useful to reg ister your workplace or a relative s home as yo...

Страница 42: ...yed Searching the destination by map Page 28 3 Select Registration and click the OK button Registration is now complete Editing a location s information Page 40 in the Shortcut menu Page 24 Editing a location s information In the Address Book using on the right hand side of the place displays the Address Book Oper ate menu To edit the information about the location 1 In the Destination menu select...

Страница 43: ...e you entered When you select Yes and click the OK but ton is shown on the left side of the loca tion name displayed in the Address Book This mark indicates that this name can be used as a voice command during voice operation If the number of items to be used in voice operation exceeds 100 a list appears on the display Select an item from the list and over write it You can also store locations in ...

Страница 44: ...ress Book Entries or Delete All Destinations Delete all the Address Book or Destination History data 4 Select Yes and click the OK button The data you selected is deleted Alternative option No The display shown in Step 3 appears Because deleted data cannot be restored take extra care not to select Delete All Address Book Entries by mistake Changing the position of loca tions registered in the Addr...

Страница 45: ...le and decide the size of the area to avoid The area to avoid is enclosed in a red frame You can also change the map scale though the maximum map scale for registering Areas to Avoid is 0 1 mile 100 m 5 Scroll the map adjust the position of the red frame Click the OK button 6 Click the OK button If you want to stop registration press the BACK button Depending on the setting of route search con dit...

Страница 46: ... the power supply for the nav igation system or turn the ignition switch to ACC OFF until initialization of the PC card is complete 3 Select Yes and click the OK button If you want to cancel the initialization select No Storing the data of registered locations in the PC card You can select any entry registered in the Address Book and store the data on the PC card Data can be stored in groups A new...

Страница 47: ... Select Delete PC Card Data and click the OK button 3 Select a group where the location you want to delete is stored Click the OK but ton 4 Select a location you want to delete and click the OK button Alternative option All Select or cancel all locations in a group 5 Select OK and click the OK button The selected location is marked To delete other locations repeat this step 6 Select Yes and click ...

Страница 48: ...cture you want for the back ground and click the OK button 6 Select how to display the picture and click the OK button You can select the following items Center Selected picture is displayed at the center of the screen Repeat Selected picture is patterned and displayed as covering the whole screen When selecting images already stored on the Pioneer DVD map disc you cannot select the layout method ...

Страница 49: ...e street is indicated To clear values If you want to delete the learned results stored in Distance Speed Pulse or Learning Sta tus select each item and click the OK button Then select Clear and click the OK button The navigation system can automatically detect outer dimensions of the tires If tires have been replaced the navigation system automatically detects it and begins learning according to t...

Страница 50: ...hen the parking brake is released Off is displayed 5 Power Voltage The power supply reference value pro vided from the vehicle battery to the naviga tion system is shown If the voltage does not fall within the range of 11 to 15V check that power cable connection is correct 6 Illumination When the headlights or small lamps of a vehicle are on On is displayed If the orange white lead is not connecte...

Страница 51: ...en you select items with no setting below them a setting screen appears by clicking the OK button Selecting Next or Previous changes the screen and displays another item 3 Select KM Mile Setting and click the OK button Mile Yard is displayed below KM Mile Setting indicating that KM Mile Setting is set to Mile Yard If you want to change another setting select the item you want to change and repeat ...

Страница 52: ...Night Display To improve the visibility of the map during the evening you can change the combination of the colors of the map Nighttime You can change the combination of the colors of a map according to whether the vehicle lights are On or Off Daytime The map is always displayed with bright colors Map Display Screen display related items can be set Tracking Display The tracking display setting has...

Страница 53: ...Once you change the language installation of the program starts Once the installation of the program starts do not cut off the power supply for the Navigation System and do not switch off the Navigation System until the instal lation is completed and the map of your surroundings appears Mute Setting Items related to muting of sound volume can be set This can be set when your Navigation System is c...

Страница 54: ...nces in miles and yards km Show distances in kilometers Auto Voice Recognition After you have started the engine turn on voice recognition and set whether or not to perform all operations up to route searching by voice This function is effective only when a route is not set On The automatic voice recognition is activated Off For starting voice operation press the TALK button Voice Recog Help This ...

Страница 55: ...n the navigation system is combined with a Pioneer AV Head Unit AVH P6400CD or AVH P6400 you can connect Pioneer AV equipments by using IP BUS and AV BUS When the AV equipment and navigation units are connected together it is possible to mix the information dis played on the screen If Navigation is selected as a Priority then basic audio information can also be shown as well as the map If the audi...

Страница 56: ...witch 14 Used when operating audio 1 PGM DVD POWER button When the operation mode switch is set to NAVI the functions set for each source before hand become available A function is preset for each source as shown below Sources not shown below do not feature this function Depending on the component you can change the Prepro gram For details refer to the Head Unit s instruc tions NAVI This is set wh...

Страница 57: ...ng each source It also cancels the menu you are viewing and returns you to the original display 11 Control stick and PLAY PAUSE button When the control stick is pushed voice operation is activated During voice operation if you want to cancel voice operation push the control stick down 14 Operation mode switch Changes the remote control s mode 15 VOL dial When you turn the dial downwards the volume...

Страница 58: ...ed the volume is reduced to around 1 10th of the volume ATT function When pressed again the volume returns to its previous level 16 MENU button When a DVD is played the route menu stored on the DVD is shown When the DVD is stopped the default setting screen appears 17 TOP MENU button The main menu stored in DVD is displayed 18 7 7 7 7 DETOUR button This button is used to stop the playback of the d...

Страница 59: ...ayer M CD Multi CD player EXT External unit 1 EXT External unit 2 AUX auxiliary CD or DVD NAVI source Depending on the equipment connected the source you can select differs When the power of AV equipment is off or a disc is not set you may not be able to select the source In such a case turn the power of the AV equipment on and insert a disc before switching the source 2 Adjust the volume using th...

Страница 60: ...this operation this display will appear and disappear If you do not operate for 4 seconds the information plate automati cally disappears If you press the DISP button in the screen of each source you can switch the items dis played on the screen As you press the DISP button displayed items are switched over The number of switching over varies accord ing to the source selected All the characters ma...

Страница 61: ... 3 3 3 3 to change the setting As you press the BACK FUNC button the previous screen is displayed If you want to change other settings repeat the Steps 3 to 5 You can also select BACK and press the A MENU AUDIO button to return to the previous screen 6 Press the BAND ESC button to end the operation Original screen appears TUNER These are the basic steps necessary to operate the radio More advanced...

Страница 62: ...re vious display To cancel the menu press the BAND ESC button If you do not operate the function within about 30 seconds the menu is automatically can celed Storing the strongest broadcast frequencies BSM Best Station Memory lets you automati cally store the six strongest broadcast frequen cies 1 Select BSM BEST STATIONS MEM ORY from the TUNER MENU and press the A MENU AUDIO button 2 Press 5 5 5 5...

Страница 63: ...e operation When you have finished press the BAND ESC button to return to the source display The selected radio station frequency has been stored in memory You can use 5 and to recall radio station frequencies assigned to P CH P1 P6 COMPACT DISC AVH P6400CD only These are the basic steps necessary to play a CD More advanced CD operation is explained start ing on page 62 Using the built in DVD play...

Страница 64: ... discs you cannot select TRACK LIST During playback of a CD Text disc you cannot select TITLE EDIT Select BACK in the menu display or press the BACK FUNC button to return to the pre vious display To cancel the menu press the BAND ESC button If you do not operate the function within about 30 seconds the menu is automatically can celed Repeating play Repeat play lets you hear the same track over aga...

Страница 65: ...tles of up to 10 characters can be displayed Display of some characters may not be possi ble Pausing CD playback Pause lets you temporarily stop playback of the CD 1 Press 5 or to select PAUSE from the COMPACT DISC MENU and press the A MENU AUDIO button 2 Press 5 to turn pause on Play of the current track pauses 3 Press to turn pause off Play will resume at the same point that you turned pause on ...

Страница 66: ...switch between the following settings TRACK TITLE track title DISC ART IST disc artist name TRACK ART IST track artist name If specific information has not been recorded on a CD TEXT disc NO TITLE will be dis played MULTI CD You can use Pioneer AV Head Unit AVH P6400CD or AVH P6400 to control a multi CD player which is sold separately These are the basic steps necessary to play a CD with your mult...

Страница 67: ...RESSION ITS INSTANT TRACK SELECTION PLAY ITS INSTANT TRACK SELECTION MEM TITLE EDIT You can operate a desired function For details refer to the pages for each of the func tions Select BACK in the menu display or press the BACK FUNC button to return to the pre vious display To cancel the menu press the BAND ESC button If you do not operate the function within about 30 seconds the menu is automatica...

Страница 68: ...lable only when a CD TEXT disc is played with a Multi CD Player with the CD TEXT disc playback function 1 Press 5 or to select TRACK LIST from the MULTI CD MENU and press the A MENU AUDIO button 2 Press 5 or to select the track you want to play in the list and press the A MENU AUDIO button Playback of the selected track begins After that tracks play in order Up to six tracks in the list can be dis...

Страница 69: ...ldest one If you do not operate the function within about 30 seconds the menu is automatically can celed Erasing a track from your ITS playlist When you want to delete a track from your ITS playlist you can if ITS play is on If ITS play is already on skip to step 2 If ITS play is not already on press the A MENU AUDIO button 1 Play a CD you want to delete a track from your ITS playlist and turn ITS...

Страница 70: ...er wide letters such as W or M you may not be able to enter 10 characters 1 Play a CD that you want to enter the title of 2 Press 5 or to select TITLE EDIT from the MULTI CD MENU and press the A MENU AUDIO button When playing a CD TEXT disc you cannot select TITLE EDIT The disc title will have already been recorded on a CD TEXT disc 3 Press the A MENU AUDIO button to select the desired character t...

Страница 71: ...T discs Only these specially encoded CD TEXT discs support the functions listed below Displaying titles on CD TEXT discs 1 Press DISP button when playing a CD TEXT disc from the multi CD player Press the DISP button repeatedly to switch between the following settings TRACK TITLE track title DISC ART IST disc artist name TRACK ARTIST track artist name If specific information has not been recorded o...

Страница 72: ...us display To cancel the menu press the BAND ESC button If you do not operate the function within about 30 seconds the menu is automatically can celed BSSM Best Station Sequential Memory The BSSM function automatically memorizes strongly transmitted broadcast stations in order from the lowest channel up 1 Press the BAND ESC button to display the band you want to use for BSSM 2 Select BSSM BEST STA...

Страница 73: ... s manual This cannot be used unless the AV Head Unit is combined and the source unit is connected by IP BUS Using the built in DVD player of your Naviga tion System Page 96 For other equipment see DVD Operation Ref erence Table on page 113 table indicating the differences of DVD operations or the operation manual of that equipment Read this chapter when you play a CD or Video CD with the DVD play...

Страница 74: ...s DVD 2 Select DVD and press the A MENU AUDIO button The DVD MENU is displayed as follows REPEAT RANDOM SCAN PAUSE ITS INSTANT TRACK SELECTION PLAY ITS INSTANT TRACK SELECTION MEM You can operate a desired function For details refer to the pages for each of the func tions RANDOM SCAN and PAUSE are available when playing CDs ITS PLAY and ITS MEMORY are availa ble if the Multi DVD player is connecte...

Страница 75: ...ll begin again Pausing CD playback Pause lets you temporarily stop playback of the CD 1 Press 5 or to select PAUSE from the DVD MENU and press the A MENU AUDIO button 2 Press 5 to turn pause on Play of the current track pauses 3 Press to turn pause off Play will resume at the same point that you turned pause on Using ITS playlists You can operate this function only when a multi DVD player is conne...

Страница 76: ...r To select 23 press 10 10 and 3 in order Specifying the Track 1 Press the numeric keypad corresponding to a desired track number To select 3 press 3 To select 10 press 10 and 0 in order To select 23 press 10 10 and 3 in order With some discs the prohibited mark may be displayed and operation may not be possible Disc Fast Forward Reverse Fast Forward 1 During play move the control stick right 2 Re...

Страница 77: ...layback Depending on the disc and the playback loca tion on the disc the prohibited mark may be displayed indicating that Still Frame by Frame and Slow Motion playback are not possible With some discs images may be unclear dur ing Frame by Frame and Slow Motion play back When connecting XDV P9 or XDV P90 Reverse Frame by Frame playback and Reverse Slow Motion playback are possible by the e CANCEL ...

Страница 78: ... ANGLE OK button on the Remote Con trol Operating with Information Dis play 2 With Information Display 2 you can set Repeat play range and audio L R settings You can also specify a Title Chapter and Time Switching the Repeat play range You can set Repeat play range for a Disc Title or Chapter Repeat play 1 Push the joystick left right to select Repeat play range in Information Display 2 The select...

Страница 79: ...ed Channel number is displayed when CH NUMBER is selected and category is dis played when CATEGORY is selected How to listen to the XM 1 Press SOURCE button to select the XM 2 Use VOL dial to adjust the sound level 3 Press the BAND ESC button to select a band Press the BAND ESC button until the desired band is displayed XM1 XM2 or XM3 4 Select the desired channel with 2 or 3 Displaying the XM MENU...

Страница 80: ... you have finished press the BAND ESC button to return to the source display You can also use 5 or to recall stations assigned to preset channels Display the ID Code Each XM tuner is identified with a unique radio ID You will need the radio ID when activating XM service or when reporting a problem How to dis play the ID code depends on the channel select mode Channel number select mode If you sele...

Страница 81: ...NCTION3 FUNCTION4 AUTO MANUAL The features assigned to each option vary depending on the equipment to be connected For details refer to the operation manual of the external unit that is connected to the navi gation unit Some features require holding down the but ton on the remote control for more than two seconds to switch the enable disable status Using 1 6 KEY 1 Press 5 or to select 1 6 KEY and ...

Страница 82: ...he same regard less of which source you operate from Displaying the AUDIO MENU 1 Press the A MENU AUDIO button in each source display MENU is displayed 2 Press 5 or to select AUDIO and press the A MENU AUDIO button The AUDIO MENU is displayed as follows FADER BALANCE fader balance adjust ment EQUALIZER MENU equalizer curve adjust ment BASS bass TREBLE treble LOUDNESS loudness SUB WOOFER subwoofer ...

Страница 83: ... or 3 to select the desired posi tion LEFT CENTER RIGHT If you adjust the bass or treble CUSTOM memorizes an SFEQ mode in which the bass and treble are adjusted for personal prefer ence If you switch the SFEQ mode the HPF HIGH PASS FILTER function is auto matically switched off By switching the HPF HIGH PASS FILTER function on after selecting the SFEQ mode you can combine the HPF HIGH PASS FILTER ...

Страница 84: ...ress the EQ button on Pioneer AV Head Unit AVH P6400CD or AVH P6400 to select the equalizer Press the EQ button on Pioneer AV Head Unit AVH P6400CD or AVH P6400 repeatedly to switch between the following equalizer SUPER BASS POWERFUL NATURAL VOCAL CUSTOM1 CUSTOM2 FLAT Adjusting equalizer curves You can adjust the currently selected equalizer curve setting as desired Adjusted equalizer curve settin...

Страница 85: ...nsates for deficiencies in the low and high sound ranges at low volume 1 Press 5 or to select LOUDNESS from the AUDIO MENU and press the A MENU AUDIO button 2 Press 5 to turn loudness on Loudness level e g LOUDNESS ON MODE MID appears in the display 3 Press 2 or 3 to select the level LOW MID HIGH 4 Press to turn loudness off Using subwoofer output Pioneer AV Head Unit AVH P6400CD or AVH P6400 is e...

Страница 86: ...higher than those in the selected range are output from the front or rear speakers If you switch the SFEQ mode the HPF HIGH PASS FILTER function is automatically switched off By switching the HPF HIGH PASS FILTER function on after selecting the SFEQ mode you can combine the HPF HIGH PASS FILTER function with the SFEQ function Adjusting source levels SLA Source level adjustment lets you adjust the ...

Страница 87: ... with 5 or Pressing 5 or will switch WARNING between ON and OFF Switching the auxiliary setting It is possible to use auxiliary equipment with Pio neer AV Head Unit AVH P6400CD or AVH P6400 Activate the auxiliary setting when using auxiliary equipment connected to Pioneer AV Head Unit AVH P6400CD or AVH P6400 AUX Page 80 1 Press 5 or to select AUX AUXIL IARY from the INITIAL SETTINGS MENU and pres...

Страница 88: ...ofer controller 3 Change the subwoofer controller with 2 2 2 2 or 3 3 3 3 Pressing 2 2 2 2 or 3 3 3 3 will switch between S W CONTROL INTERNAL and S W CON TROL EXTERNAL Switching the Muting Attenua tion When the navigation outputs the guidance voice or when a mute signal has been received from the yellow black lead connected to the Pioneer AV Head Unit the audio volume is muted or attenuated This ...

Страница 89: ...If the equipment is connected to a RCA video input choose VIDEO to view video of the equipment When using a Pioneer DVD player or Multi DVD player connected with an RCA and IP BUS cable select M DVD Otherwise there will be no picture even if you switch sources When using a Pioneer DVD player or Multi DVD player connected with an AV BUS cable do not select M DVD If you do there will be no picture I...

Страница 90: ... AUDIO button 2 Press 2 2 2 2 to select the manual Press 2 2 2 2 until the OPEN CLOSE MANUAL setting appears in the display Each time you press a manually set display s OPEN CLOSE button the display opens or closes 3 Press 3 to select the auto Press 3 until the OPEN CLOSE AUTO setting appears in the display With auto set ting the display automatically opens or closes when power to Pioneer AV Head ...

Страница 91: ...n press the BAND button and the F button to switch on the oper ation mode of the Steering Remote Control When the operation mode is switched on by pressing the BAND button of the Steering Remote Control you can activate voice opera tion which is equivalent to pressing the TALK button CD SR90 and CD SR100 can be used For the details of their operation see the instruction manuals attached to them If...

Страница 92: ...f no command is made in the next 6 seconds voice recognition is canceled and the Naviga tion System is on hold until the next opera tion Press the TALK button to reactivate voice operation Operating by only voice when the Navi gation System is started Turning on Auto Voice Recognition in the Settings menu allows all settings to be imple mented by voice from after the navigation system is turned on...

Страница 93: ...Play Repeat Play For Multi CD M CD source Track 1 20 Random Play Disc 1 12 ITS Play Next Disc Previous Disc For XM source Preset 1 6 Band Change For TV source Preset 1 12 Seek Up Down Band Change For S DVD M DVD source Disc 1 6 ITS Play Random Play Next Disc Previ ous Disc For NAVI source Track 1 20 Repeat Play Random Play Some commands may be canceled according to the condition of the audio unit ...

Страница 94: ...estination by map Page 28 Tips for Voice Operation For your voice commands to be correctly recog nized and interpreted ensure that conditions are suitable for recognition Reduce the volume setting on your vehicle audio system The sound volume is automatically reduced during voice operation Page 51 If your Pioneer Head Unit has a Mute lead the sound volume of the Head Unit is automati cally reduced...

Страница 95: ...tarts do not cut off the power supply for the navigation system or turn the ignition switch to ACC OFF until the installation is completed and the map of your surround ings or Audio screen appears 3 Press the NAVI AV button to change the navigation screen 4 Select Yes Oui and click the OK button When you start the navigation unit for the first time you will see a confirmation message asking if you...

Страница 96: ... Time and click the OK button to change the time if you are in the daylight saving period This turns the display below DST On 10To complete the setting select Back and click the OK button The map of your surroundings appears This completes the setup of your Navigation Sys tem Chapter 1 explains the basic operation of your Navigation System To change the language and time later Page 51 If You Have ...

Страница 97: ... mode switch is set to NAVI It is canceled if the mode is set to DVD Switching the screen display display of frequency etc You cannot do this with the Remote Control included with the AVIC 9DVD If the AV Head Unit is combined you can do this with the AV Head Unit Playing the Built in DVD player Press the control stick while the Operation mode switch is set to DVD Frame by frame playback and slow m...

Страница 98: ... GPS uses a net work of satellites orbiting the Ground Each of the satellites which orbit at a height of 68 900 000 feet 21 000 km continually broadcasts radio signals giving time and position information This ensures that signals from at least three can be picked up from any open area on the ground s surface The accuracy of the GPS information depends on how good the reception is When the signals...

Страница 99: ...re maximum accuracy the dead reckon ing system learns with experience By comparing the position it estimates with your actual position as obtained using GPS it can correct for various types of errors such as tire wear and the rolling motion of your vehicle As you drive the dead reckoning system gradually gathers more data learns more and the accuracy of its estimates gradually increases So after y...

Страница 100: ...ot be received learning and error correction are not possible If GPS positioning has been operat ing for only a short time your vehicle s actual position and the current location mark on the map may diverge considerably Once GPS reception is restored accuracy will be recov ered Conditions Likely to Cause Noticeable Positioning Errors For various reasons such as the state of the road you are travel...

Страница 101: ...ds If there is a loop or similar road configuration If you take a ferry If you are driving on a long straight road or a gently curving road If you are on a steep mountain road with many height changes If you enter or exit a multi storey parking lot or similar with a spiral layout If your vehicle is turned on a turntable or simi lar ...

Страница 102: ...anner as in a traffic jam If you join the road after driving around a large parking lot When you go round a roundabout When starting driving immediately after start ing the engine If you insert the disc and turn your Navigation System on while driving Some types of vehicle may not output a speed signal while driving at just a few kilometers per hour In such a case the current location of your vehi...

Страница 103: ...one the system may forcibly switch to the zone selection screen A Freeway Search covers all areas regard less of the disc on which the information is recorded If a Vicinity Search is performed on the bor der of an unrecorded area the system will not necessarily select the nearest facility The search will take place only within the range of areas recorded on the disc Guidance When your vehicle appr...

Страница 104: ...disc cannot be set as an Area to Avoid A set Area to Avoid may be deleted when the software is updated If this happens the sys tem will automatically try to recover the deleted information but data can be recovered only for areas stored on the disc For items that could not be recovered a recovery process will begin when you set another disc ...

Страница 105: ...s are operated by the US Department of Defense and the US government reserves the right to distort positioning data for military reasons This may lead to greater positioning errors If a vehicle phone or cellular phone is used near the GPS antenna GPS reception may be lost temporarily Do not cover the GPS antenna with spray paint or vehicle wax because this may block the reception of GPS signals Sn...

Страница 106: ...s play setting Page 50 and if desired select Daytime The vehicle cabin temperature is extremely low A Liquid Crystal Display LCD is used and such displays tend to darken when cold Wait for the vehi cle to warm up There is no voice guidance or the vol ume is low The volume setting is low or the speaker lead is disconnected Check the volume setting on the dis play or turn the volume up according to ...

Страница 107: ...changed Set again by following the instructions below 1 Park your vehicle in a safe place and pull the side brake 2 Turn the ignition switch off ACC OFF 3 While pressing AUDIO button on the bottom left of the numeric keypad of the Remote Con troller turn the ignition switch on ACC ON Image output is switched as the image of the navigation RGB image is output from RCA Video out put and the image is...

Страница 108: ... the vehicle is stationary the Navigation System is installed in a place where the navigation unit may be affected by a large vibration Re install the navigation system in a place where the navigation unit will not be affected by vibration Direction of G sensor is not correct Please power off the system and check the installation After you have checked please re boot the system and press OK Direct...

Страница 109: ...tination or way points that do not pass through the Areas to Avoid The route could not avoid the speci fied area Toll road has not been avoided If the route to the destination or way point cannot be established by bypassing toll roads including toll areas and Areas to Avoid If the current route is not desired set destination or way points that do not pass through toll roads including toll areas an...

Страница 110: ...are selected Please indicate what records that you would like to remove from the memory When the total 98 registered points for using voice recongition are in the PC card and Address Book you attempt moving an item to the Address Book from PC card If the number of registered records of the voice recognition reaches or exceeds 98 Delete some registered items as appropriate or reduce currently selec...

Страница 111: ...f the PC card could not be initialized for any reason Use the PC to initialize No map data available on this scale Scaling up When the scale that had been dis played could not be displayed because the map was scrolled to areas not stored on the map disc unrecorded areas or the vehicle moved to areas not stored on the map disc unrecorded areas If the desired scale cannot be selected insert the map ...

Страница 112: ...er to use freeway or not Avoid Freeway Calculate a route that avoids freeways A route using the freeway may be set if your destination is far away The system assumes the driver deviated either intentionally or inadvertently from the route and searches for another route intelligent rerouting Depending on the situation the system may search a new route that does not return to the original one The ca...

Страница 113: ...g cases when your vehicle is not on a street when your vehicle is on a ferry when driving on a road inside a facility when driving on a roundabout when your vehicle is on a very narrow street Route highlighting Once set the route is highlighted in bright green on the map The immediate vicinity of your starting point and destination may not be highlighted and neither will areas with particularly co...

Страница 114: ...destination or a way point is available Please review and obey all local traffic rules along the highlighted route For your safety No turn by turn directions or arrow icons will be displayed on these roads When your vehicle reaches to the entrance of this road the icon will be displayed indicating that the guidance is not available with this type of road The icon will be indicated for the road wit...

Страница 115: ...ack Push the NEXT PREV control upward Returning to the previous track Push the NEXT PREV control downward Repeat play Random play or Scanning on or off 1 Move the Joystick to the right and left to select the required function 2 Move the Joystick up or down for on off On off of Pausing Push the Control Stick upward pushing it upward again turns it off Folder Select For WMA MP3 1 Move the Joystick t...

Страница 116: ...con Home location Your registered home location Menu A list of options shown on the display choices can be selected using the joystick Navigation map disc This DVD ROM disc contains Pioneer navigation soft ware Map data is also recorded on the disc PC card Card type peripheral equipment mainly used for per sonal computers The Navigation System can use a memory card to store data Point of Interest ...

Страница 117: ...ion History P 31 Freeway Search P 32 Telephone Search P 36 Cancel Route Information P 36 Route Profile P 31 Overlay POI P 47 Connection Status P 35 P 44 Route Scroll PC Card 3D Calibration Route Options P 33 Avoid Freeway P 33 Avoid Ferry P 34 Route Condition P 34 P 34 Number of Routes P 43 Avoid Toll Road Designate Areas to Avoid P 47 P 33 Auto Reroute Address Search ...

Страница 118: ...ound Picture Setting P 51 93 Language Selection Mute Setting P 51 94 Time P 52 KM Mile Setting P 52 Auto Voice Recognition P 52 Voice Recog Help P 51 Voice Recognition P 51 Voice Guidance Settings Adjust Display Position Monitor Type P 51 P 52 P 50 Tracking Display P 51 Arrow in AV P 50 Close up of Junction P 50 AV Guide Mode P 50 Travel Time Display P 50 Map Orientation ...

Страница 119: ...ut menu P 28 Destination Chg Route P 40 Registration P 30 Vicinity Search P 31 Overlay POI Shortcut menu P 36 Reroute P 36 Cancel Route P 36 Route Profile P 35 Route Scroll P 38 Skip Way Point P 36 1 km mi 50 km mi detour ...

Страница 120: ...NV Haven 1087 Keetberglaan 1 B 9120 Melsele Belgium TEL 0 3 570 05 11 PIONEER ELECTRONICS ASIACENTRE PTE LTD 253 Alexandra Road 04 01 Singapore 159936 TEL 65 6472 7555 PIONEER ELECTRONICS AUSTRALIA PTY LTD 178 184 Boundary Road Braeside Victoria 3195 Australia TEL 03 9586 6300 PIONEER ELECTRONICS OF CANADA INC 300 Allstate Parkway Markham Ontario L3R OP2 Canada TEL 1 877 283 5901 PIONEER ELECTRONI...

Отзывы: