background image

Black plate (48,1)

!

:

Touch this key to add a new destination.

!

:

Touch this key to delete a destination.

!

:

Touch this key to modify the start point of
the route.

!

More

:

Touch this key to reorder the list. You can do
it manually or you can let this system opti-
mize the route for you.

Canceling the current route
guidance

If you no longer need to travel to your destina-
tion, follow the steps below to cancel the route
guidance. You can cancel it from either the

Navigation Menu

screen or the map

screen.

1

Touch [Menu] on the map screen.

The

Navigation Menu

screen appears.

=

For details of the operations, refer to

Screen

switching overview

on page 19.

2

Touch [My Route] on the

Navigation

Menu

screen.

3

Touch [Cancel Route].

The current route is deleted with all its
waypoints.

Checking route alternatives
for the current route

To recalculate the current route with a differ-
ent route planning method, you can modify
the settings for the route calculation (refer to

Checking and modifying the current route

on

page 42). There is another way to do this and
to compare different route alternatives with
the same route planning method.

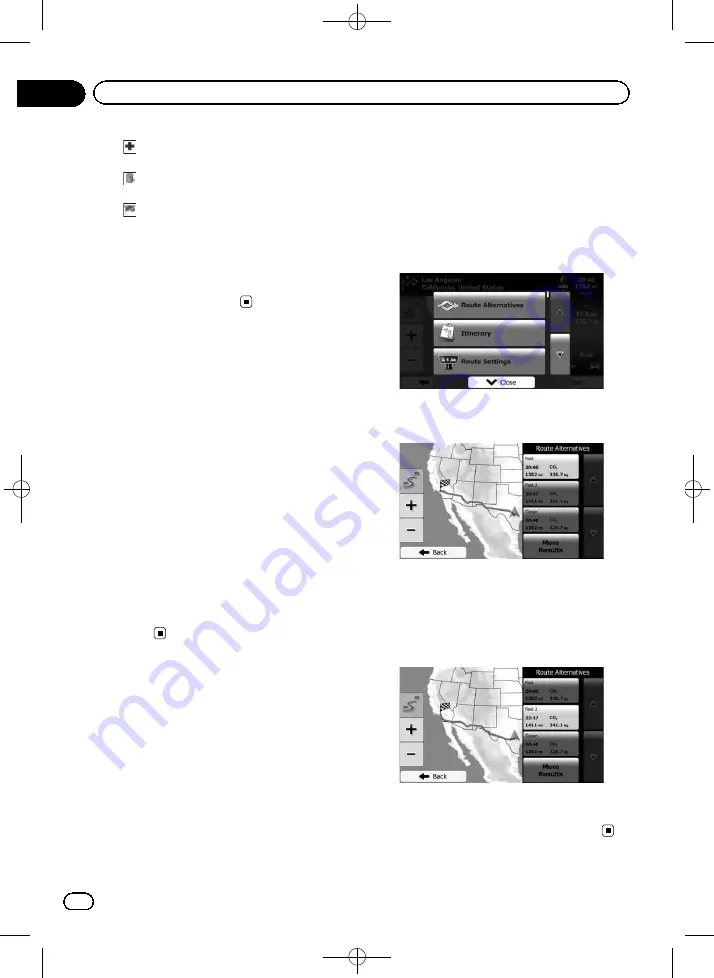
1

Touch [Menu] on the map screen.

The

Navigation Menu

screen appears.

=

For details of the operations, refer to

Screen

switching overview

on page 19.

2

Touch [My Route] on the

Navigation

Menu

screen.

3

Touch [More].

4

Touch [Route Alternatives].

5

Touch any of the alternatives to see it

on the map.

If you cannot find a good alternative, touch
[

More Results

] and scroll down for routes

with different routing methods.

6

Select one of the alternatives and

touch [Back].

The map screen returns. The navigation sys-
tem recalculates the route. The orange line
now shows the new recommended route.

<127075004586>48

En

48

Chapter

08

Checking and modifying the current route

Содержание AVIC-U250

Страница 1: ...Black plate 1 1 Owner s Manual ADD ON NAVIGATION SYSTEM AVIC U250 For details on software updates visit www naviextras com English 127075004586 1 ...

Страница 2: ...rocessor 16 Before you start On first time startup 17 Regular startup 18 How to use the navigation menu screens Screen switching overview 19 What you can do on each menu 20 Operating list screens e g route settings screen 20 Operating the on screen keyboard 20 Monitoring the GPS reception quality 21 How to use the map How to read the map screen 22 Frequently shown route events 23 Seeing the curren...

Страница 3: ...hen a route is already set 46 Setting a new starting position for the route 46 Editing the list of destinations 47 Canceling the current route guidance 48 Checking route alternatives for the current route 48 Watching the simulation of the route 49 Navigating in off road mode 49 Registering and editing locations Storing a location in Favorites 50 Saving a location as an alert point 50 Editing an al...

Страница 4: ...loop fastener 67 Appendix Positioning technology 68 Positioning by GPS 68 Handling large errors 68 When positioning by GPS is impossible 68 Conditions likely to cause noticeable positioning errors 68 Route setting information 70 Route search specifications 70 SD and SDHC logo 71 Display information 72 Glossary 73 Specifications 74 127075004586 4 Contents En 4 ...

Страница 5: ...ircuit different from that to which the re ceiver is connected Consult the dealer or an experienced radio TV technician for help WARNING Handling the cord on this product or cords asso ciated with accessories sold with the product may expose you to chemicals listed on proposi tion 65 known to the State of California and other governmental entities to cause cancer and birth defect or other reproduc...

Страница 6: ... neering disassembly decompilation or any other means You shall not use the Software to operate a service bureau or for any other use involving the processing of data for other per sons or entities Pioneer and its licensor s shall retain all copy right trade secret patent and other proprie tary ownership rights in the Software The Software is copyrighted and may not be cop ied even if modified or ...

Страница 7: ...ted States except as authorized and as permitted by the laws and regulations of the United States If the Soft ware has been rightfully obtained by you out side of the United States you agree that you will not re export the Software nor any other technical data received from Pioneer nor the direct product thereof except as permitted by the laws and regulations of the United States and the laws and ...

Страница 8: ...ng disassembly decompilation or any other means You shall not use the Software to operate a service bureau or for any other use involving the processing of data for other per sons or entities Pioneer and its licensor s shall retain all copy right trade secret patent and other proprie tary ownership rights in the Software The Software is copyrighted and may not be cop ied even if modified or merged...

Страница 9: ...sclaimer or limitation cannot be waived or preempted 4 EXPORT LAW ASSURANCES You agree and certify that neither the Software nor any other technical data received from Pioneer nor the direct product thereof will be exported outside Canada except as authorized and as permitted by the laws and regulations of Canada If the Software has been rightfully obtained by you outside of Canada you agree that ...

Страница 10: ...Black plate 10 1 END USER LICENSE AGREEMENT 127075004586 10 En 10 Chapter 02 Introduction ...

Страница 11: ...Black plate 11 1 127075004586 11 En 11 Chapter 02 Introduction Introduction ...

Страница 12: ...NING Do not attempt to install or service your navi gation system by yourself Installation or servi cing of the navigation system by persons without training and experience in electronic equipment and automotive accessories may be dangerous and could expose you to the risk of electric shock or other hazards If liquid or foreign matter should get inside this navigation system park your vehicle to s...

Страница 13: ...he rear view camera option if purchased if doing so will divert your attention in any way from the safe operation of your vehicle Always observe safe driving rules and fol low all existing traffic regulations If you ex perience difficulty in operating the system or reading the display park your vehicle in a safe location and apply the parking brake before making the necessary adjustments Never all...

Страница 14: ... sure to drive according to the actual speed limit Additional safety information Parking brake interlock This navigation system receives the status of the parking brake from the connected AV recei ver WARNING Do not take any steps to tamper with or dis able the parking brake interlock system which is in place for your protection Tamper ing with or disabling the parking brake inter lock system coul...

Страница 15: ...ccurs on the sto rage device for any reason it is usually not possible to recover the data Pioneer accepts no liability for damages costs or expenses arising from data loss or corruption Never insert or eject an SD memory card while driving Do not insert anything other than SD memory cards Notes before using the system In case of trouble Should the navigation system fail to operate properly contac...

Страница 16: ...ll SD memory cards is not guaranteed 1 Insert an SD memory card into the SD card slot 2 Gently press the card in against the spring latch until it stops then release The card will lock firmly into place inside the SD card slot Resetting the microprocessor CAUTION Please refer to the related section before clearing The microprocessor should be reset under the following conditions Prior to using thi...

Страница 17: ...n touch Done p Later you can change it in Regional set tings For details refer to Customizing the regional settings on page 60 The navigation system will restart and the End User Licence Agreement screen is dis played 5 Read the terms carefully checking its details and then touch Accept if you agree to the conditions The configuration wizard starts 6 Touch Next to continue 7 Select the language th...

Страница 18: ...uch Finish The initial setup is now complete After touching Finish the Navigation Menu screen appears and you can start using the navigation system Regular startup 1 Start the engine to boot up the system 2 Press the MODE button of the AV recei ver After a short pause the navigation screen ap pears p The display will turn off if you press the MODE button of the AV receiver immedi ately after the n...

Страница 19: ... switching overview Navigation screen Press the MODE button of the AV receiver AV receiver screen e g AVH X5500BHS 127075004586 19 En 19 Chapter 04 How to use the navigation menu screens How to use the navigation menu screens ...

Страница 20: ...ion 5 My Route menu You can display your route information on the map You can also perform route related ac tions such as editing or canceling your route on this menu 6 More menu You can customize the way the navigation sys tem works to simulate demo routes or to run some additional applications 7 Traffic summary screen You can check the summary of traffic events on the set route Operating list sc...

Страница 21: ...ng appear in a list after entering a couple of characters to open the list of results before it appears automati cally touch Results 6 Touch to switch to a keyboard offering nu meric and symbol characters 7 Touch to correct your entry on the keyboard Touching and holding deletes several char acters or the entire input string 8 Touch to finalize the keyboard entry accept the suggested search result...

Страница 22: ...n shows the type of the second next maneuver if it is near the first one For details refer to Frequently shown route events on the next page 3 Distance to the next guidance point man euver Shows the distance to the next maneuver 4 Second maneuver arrow Shows the turning direction after next gui dance point and the distance to there 5 Current position Indicates the current location of your vehicle ...

Страница 23: ...into account in the route calculation b Quick menu Touching this key causes the quick menu to appear For details refer to Quick menu on page 20 Frequently shown route events Icon Description Turn left Turn right Turn back Bear right Turn sharp left Icon Description Keep left Continue straight in the intersec tion Go left on the traffic circle 3rd exit next maneuver Enter traffic circle second next...

Страница 24: ...earch for useful Points Of Interest POI nearby on the screen Follow the steps below to open the Where Am I screen 1 Display the map screen For details of the operations refer to Screen switching overview on page 19 2 If the current street is displayed below the arrow mark current position touch it to open the Where Am I screen Touch in the top right corner of the screen to open the quick menu scre...

Страница 25: ...guarantee arrival at that time For details refer to Setting the vehicle parameters on page 43 p You can change the value by touching and holding any of the fields Display during freeway driving In certain locations of the freeway lane infor mation is available indicating the recom mended lane to be in to easily maneuver the next guidance Lane information While driving on the freeway freeway exit n...

Страница 26: ...keys appear 3 Touch or to change the map scale p Map scaling has a limit in 3D map view mode If you zoom out further the map switches to 2D view mode For details refer to Switching the map be tween 2D and 3D on the next page 4 Touch Back to move the map back to follow the current GPS position Smart Zoom Your navigation system features Smart Zoom that works in two ways When the route is set When ap...

Страница 27: ...n switching overview on page 19 2 Touch anywhere on the map during na vigation The map stops following the current position and control keys appear 3 Touch to tilt up down or to rotate left right p Touching the key once modifies the view in large steps and touching and holding the key modifies it continuously and smoothly 4 Touch Back to move the map back to follow the current GPS position Switchi...

Страница 28: ... back to follow the current GPS position Viewing information about a specified location An icon appears at registered places such as Favorites entries and places where there is a POI icon or traffic information icon Place the cursor over the icon to view detailed infor mation 1 Scroll the map and move the scroll cur sor to the icon you want to view 2 Touch to see the details of the se lected locat...

Страница 29: ...traffic regulations when driving Searching for a location by address The most frequently used function is Find Address in which the address is specified and the location is searched p Depending on the search results some steps may be skipped 1 Touch Menu on the map screen The Navigation Menu screen appears For details of the operations refer to Screen switching overview on page 19 2 Touch Find the...

Страница 30: ...ails of the operations refer to Search ing for a location by address on the previous page 4 Touch Street and enter the street name on the keyboard 5 Touch Select Street The map screen appears with the selected point in the middle The midpoint of the street is selected as the destination For the subsequent operations refer to Set ting a route to your destination on page 39 Searching for a location ...

Страница 31: ... to Screen switching overview on page 19 2 Touch Find then Find Address 3 If necessary modify the country For details of the operations refer to Search ing for a location by address on page 29 4 Touch City and enter the name of the city using its ZIP code p To open the numeric keypad touch 5 Touch Street and enter the street name on the keyboard 6 Touch House Number and enter the house number on t...

Страница 32: ...list and touch the place you want A full screen map appears with the selected point in the middle The name and address of the place is displayed at the top of the screen For the subsequent operations refer to Set ting a route to your destination on page 39 p To see the details of the selected place touch Touching Back returns to the map screen p The places in the list are ordered by their distance...

Страница 33: ...ouch Find then Find Places 3 Touch Custom Search 4 Select the area around which the POIs should be searched for In a City Searches for a place within a selected city The result list will be ordered by the dis tance from the center of the selected city Around Last Known Position Searches around the current position or if it is not available around the last known posi tion The result list will be or...

Страница 34: ... selected lo cation or along the route Finally the results appear in a list 8 Touch the POI you want The searched location appears on the map screen For the subsequent operations refer to Set ting a route to your destination on page 39 Searching for a POI directly from the name of the facilities You can search for POIs by their names 1 Touch Menu on the map screen The Navigation Menu screen appear...

Страница 35: ...touch Find by Name to search among all places 6 Select one of the place subcategories e g Hotel or Motel to search in or touch Find by Name to search in the selected place category 7 Touch Find by Name if you have not done it before 8 Using the keyboard start entering the name of the place 9 After entering a few letters touch Re sults The screen appears showing the list of places with names contai...

Страница 36: ...the operations refer to Screen switching overview on page 19 2 Touch Find on the Navigation Menu screen 3 Touch Find on Map 4 Move and scale the map to locate your destination 5 Touch Select The selected location appears on the map screen For details refer to Setting a route to your destination on page 39 p You can also select a map location as the destination by scrolling the map For details refe...

Страница 37: ...istory field for easier access 1 Touch Menu on the map screen The Navigation Menu screen appears For details of the operations refer to Screen switching overview on page 19 2 Touch Find on the Navigation Menu screen 3 Touch or in the History field The searched location appears on the map screen For the subsequent operations refer to Set ting a route to your destination on page 39 History Three mos...

Страница 38: ...e searched location appears on the map screen For the subsequent operations refer to Set ting a route to your destination on the next page Searching for a location by scrolling the map Specifying a location after scrolling the map enables you to set the position as destination waypoint 1 Display the map screen For details of the operations refer to Screen switching overview on page 19 2 Touch and ...

Страница 39: ...n a route is already set on page 46 3 Touch Go Your navigation system starts the route gui dance Touch More to modify route parameters Checking route alternatives when planning the route You can select from different route alternatives or change the route planning method after you have selected a new destination 1 Search for a location For details refer to Searching for and select ing a location o...

Страница 40: ...g overview on page 19 2 Touch My Route on the Navigation Menu screen 3 Touch Create Route p The start point of the route normally it is the current GPS position is displayed 4 Touch p When the Create Route option is not dis played touch More to open a list with more options 5 Select the destination you want to set You can select the destination of the route the same way as described in the previou...

Страница 41: ...ated p If you have already set the route to the desti nation Next will appears Touch Next and select the way to modify the current route For details refer to Selecting a new destina tion when a route is already set on page 46 7 Touch Go Your navigation system starts the route guidance 127075004586 41 En 41 Chapter 07 After the location is decided After the location is decided ...

Страница 42: ...e g Fast 7 Estimated delay calculated from traffic events on your route p The following options are available For details refer to Registering and editing locations on page 50 Edit Route Touch this key to add or remove destina tions or change their sequence You can also set a route start point other than your current location This can be useful to plan and save a future map Overview Touch this key...

Страница 43: ...only if access for buses is allowed Private roads resident only roads and walk ways are excluded from routes Default Taxi Maneuver restrictions and directional con straints are taken into account when plan ning a route Roads are used only if access for taxis is al lowed Private roads resident only roads and walk ways are excluded from routes This system calculates the route optimized for the new v...

Страница 44: ... actual weight of the vehicle Freight Select one or more hazard types if the vehicle carries dangerous material You can also set the following option Confirm Parameters for Each Route Plan ning When enabled the list of vehicle para meters always appears before route calcula tion This helps you quickly adjust the parameters when some of them actual weight for instance often change 7 When finished m...

Страница 45: ...be accessed using some of the excluded road types they will be used but only as much as ne cessary In this case a warning icon will be shown on the route parameter and the part of the route not matching your preference will be displayed in a different color on the map For details refer to Checking route para meters and accessing route related func tions on page 42 1 Touch Menu on the map screen Th...

Страница 46: ...ation at the end of the current route New Route Touch this key to plan a new route to the newly selected location The previous desti nation and waypoint s are deleted Waypoint Touch this key to add the newly selected lo cation as a waypoint to your route The other destinations of the route remain in tact p The new waypoint is placed among des tinations to keep the route optimal To decide where a w...

Страница 47: ...alculated starting from the selected location Touch Turn on GPS Normal navigation returns For details refer to Seeing the current posi tion on the map on page 23 Editing the list of destinations You can edit the route by modifying the list of destinations You can add or remove destina tions modify the start position or reorder the list 1 Touch Menu on the map screen The Navigation Menu screen appe...

Страница 48: ...natives for the current route To recalculate the current route with a differ ent route planning method you can modify the settings for the route calculation refer to Checking and modifying the current route on page 42 There is another way to do this and to compare different route alternatives with the same route planning method 1 Touch Menu on the map screen The Navigation Menu screen appears For ...

Страница 49: ...mulation Jumps to the next guidance point maneu ver Increases the speed of the simulation to four eight or 16 times faster Touching the key again returns to the normal speed Touch Back The simulation stops Navigating in off road mode You can switch your navigation to off road mode The off road mode navigates between destinations in a straight line regardless of the road network and traffic regulat...

Страница 50: ...nload more from our website or save any map location as an alert point a speed camera or a railway crossing for example p This feature can warn you when you ap proach one of these points The following alert types are available Audio and Visual A sound beeps or announces the type of the alert Visual The type of the alert point its distance and the related speed limit ap pear on the map For details ...

Страница 51: ...or a railway crossing for exam ple 1 Scroll the map and select the alert point to edit The cursor appears around the alert point 2 Touch More 3 Scroll down the list and touch Edit Alert Point 4 Modify the necessary parameters Type of Alert Modify the type of alert point Direction of Alert Modify the direction from which you expect the alert Speed Limit Modify the speed limit for this alert point i...

Страница 52: ...t If you need to enable the TMC receiver follow the steps below 1 Touch Menu on the map screen The Navigation Menu screen appears For details of the operations refer to Screen switching overview on page 19 2 Touch More 3 Touch Settings then Traffic 4 Touch Traffic Receiver and enable the receiver p When traffic information that may affect your route is received this system will warn you that it is...

Страница 53: ...of the traffic receiver when there are no traffic incidents on your route otherwise it shows the type of the next traffic incident on your route 1 Touch 2 Touch Event List The list of traffic incidents appears 3 Touch any of the list items to see its de tails and to display the affected road seg ment on the map If there are traffic incidents on the recom mended route that this system has not by pa...

Страница 54: ...hese controls affect key sounds Voice Language Displays the current voice guidance profile If you touch this key you can select a new profile from the list of available languages and speakers Touch any of these to hear a sample voice prompt Just touch Back when you have selected the new spoken language Different voice profiles are capable of differ ent levels of service Natural Voice These prereco...

Страница 55: ...nd the related speed limit appear on the map screen while you are ap proaching one of these cameras For some of the alert points the enforced or expected speed limit is available For these points the audio alert can be different if you are below or above the given speed limit When approaching The audio alert is always played when approaching one of these alert points In order to draw your attentio...

Страница 56: ...information screen with satellite position and signal strength in formation Setting the traffic information The recommended route is not always the same between two points Whenever suitable data exists traffic information can be taken into account in the route calculation 1 Display the settings screen For details of the operations refer to Dis playing the settings screen on page 54 2 Touch Traffic...

Страница 57: ...rs 3 Touch the setting item You can see the effect when you change a set ting View Mode Switch the map view between a 3D perspec tive view and a 2D topdown view Viewpoint Adjust the basic zoom and tilt levels to your needs Three levels are available Automatic Overview When selected the map zooms out to show an overview of the surrounding area if the next route event maneuver is far When you get cl...

Страница 58: ... Guidance Settings 3 Touch the setting item Data Fields The data fields in the corner of the map screen can be customized Touch this key and select the values you want to see The values can be different when you navigate a route from when you are just cruising with out a given destination You can select gen eral trip data like your current speed or the altitude or route data related to your final ...

Страница 59: ... ing Turn to the suggested new direction and the route will be automatically recalcu lated Offer Real time Route Alternatives Alternative routes can be suggested when driving on normal roads This system will select a different turn in the upcoming in tersection and offers you a different route for the next section of the route But you cannot modify the offered detour Offer Parking Around Destinati...

Страница 60: ...gs contain useful information about your trips Trip logs can be saved manually when you reach your destination or you can turn on the automatic saving here You can ac cess these logs in the Trip Monitor Trip Monitor is available from the More menu 1 Display the settings screen For details of the operations refer to Dis playing the settings screen on page 54 2 Touch Trip Monitor 3 Touch More then t...

Страница 61: ...r details refer to Customizing the regional settings on the previous page 5 If needed modify the default route planning options then touch Next p Later you can change them in Route Set tings For details refer to Setting the route calcula tion on page 44 Resetting to the default settings Delete all saved data and reset all settings to their factory defaults 1 Display the settings screen For details...

Страница 62: ... regular car mainte nance Sunrise Sunset Touch this key to see the sunlit and dark areas of the world Your current location and route points are marked on the map Touch Details to see the exact sunrise and sunset times for all your route points your current location all waypoints and the final destination Trip Monitor If you save your trip logs when you arrive at some of your destinations or let t...

Страница 63: ...ectrical tape Do not allow any bare wir ing to remain exposed Do not directly connect the yellow lead of this product to the vehicle battery If the lead is directly connected to the battery engine vibration may eventually cause the insulation to fail at the point where the wire passes from the passenger com partment into the engine compartment If the yellow lead s insulation tears as a re sult of ...

Страница 64: ... can cause a fire and or damage the products if their grounds became detached When replacing the fuse be sure to only use a fuse of the rating prescribed on this product When disconnecting a connector pull the connector itself Do not pull the lead as you may pull it out of the connector This product cannot be installed in a vehi cle without ACC accessory position on the ignition switch ACC O N S T...

Страница 65: ...ts other than supplied or compatible ones are used they may damage internal parts of this product or they may work loose and the product may become de tached It is extremely dangerous to allow cables to become wound around the steering col umn or shift lever Be sure to install this product its cables and wiring away in such so that they will not obstruct or hin der driving Make sure that leads can...

Страница 66: ...Pioneer AV receiver TMC antenna supplied Attach the GPS antenna to the GPS ANTENNA jack on the side of this product GPS antenna supplied TMC antenna IF AV receiver RGB cable supplied Yellow B To the terminal that the power is always supplied regardless of the ignition switch position Black GND To vehicle metal body Power cord supplied Fuse 3 A 250 V Affix the double sided tape supplied on the surf...

Страница 67: ...ttach the hook and loop fastener Navigation unit Protective sheet 3 Decide on the installation position 4 Peel off the other protective sheet and install the navigation unit on the surface of the glove compartment or similar location Navigation unit Protective sheet Surface of the glove compartment or similar location 127075004586 67 En 67 Chapter 13 Installation Installation ...

Страница 68: ...disabled if signals can not be received from more than two GPS satellites In some driving conditions signals from GPS satellites may not reach your vehicle In this case it is impossible for the system to use GPS positioning In tunnels or en closed parking garages Under elevated roads or similar structures When driving among high build ings When driving through a dense forest or tall trees If a car...

Страница 69: ...ke a recently opened road that is not on the map If you drive in zigzags If the road has a series of hairpin bends If there is a loop or similar road configura tion If you take a ferry If you are driving on a long straight road or a gently curving road If you are on a steep mountain road with many height changes 127075004586 69 En 69 Appendix Appendix Appendix ...

Страница 70: ...lated the route and voice guidance for the route are automatically set Also for day or time traffic regulations only infor mation about traffic regulations applicable at the time when the route was calculated is consid ered One way streets and street closures may not be taken into consideration For example if a street is open during the morning only but you arrive later it would be against the tra...

Страница 71: ...alculation again When there is a traffic congestion ahead a detour route may not be suggested if driv ing through the traffic congestion would still be better than taking the detour There may be instances when the starting point the waypoint and the destination point are not on the highlighted route The number of traffic circle exits displayed on the screen may differ from the actual number of roa...

Страница 72: ...ore Settings Sound and Warnings 54 Customize Quick Menu 55 Traffic 52 56 Route Settings 43 44 User Profiles 57 Map Settings 57 Visual Guidance Settings 58 Display 59 Regional 60 Trip Monitor 60 Start Configuration Wizard 60 Reset to Defaults 61 Page More Updates and Extras 62 Unit Converter Clothing Calculator Fuel Consumption Sunrise Sunset Trip Monitor Country Information Help 127075004586 72 En...

Страница 73: ...in the data such as railway stations shops restaurants and amusement parks RDS TMC A communication system for informing drivers of the latest traffic information using FM multi plex broadcast Information such as traffic congestion or accidents can be checked on the display Route setting The process of determining the ideal route to a specific location route setting is done auto matically by the sy...

Страница 74: ...el system Reception frequency 1 575 42 MHz Sensitivity 157 5 dBm typ Position update frequency Approx once per second GPS antenna Antenna Micro strip flat antenna right handed helical polari zation Antenna cable 3 0 m 9 84 ft Dimensions W H D 50 6 mm 15 5 mm 50 6 mm 1 99 in 0 61 in 1 99 in Weight 85 g 0 19 lbs SD Compatible physical format Version 2 00 Max memory capacity 32 GB File system FAT16 F...

Страница 75: ...Black plate 75 1 127075004586 75 En 75 ...

Страница 76: ...lsele Belgium Belgique TEL 0 3 570 05 11 PIONEER ELECTRONICS ASIACENTRE PTE LTD 253 Alexandra Road 04 01 Singapore 159936 TEL 65 6472 7555 PIONEER ELECTRONICS AUSTRALIA PTY LTD 5 Arco Lane Heatherton Victoria 3202 Australia TEL 03 9586 6300 PIONEER ELECTRONICS DE MEXICO S A de C V Blvd Manuel Avila Camacho 138 10 piso Col Lomas de Chapultepec Mexico D F 11000 TEL 55 9178 4270 先鋒股份有限公司 台北市內湖區瑞光路407...

Отзывы: