background image

31

Chapter 2

Menu and Map Display

NAVI

If the “

CAMERA

” is set to “

OFF

”, the rear 

view image is not displayed. Please set it to 

ON

”. 

Camera setting 

 Page 89

When using a camera set to turn OFF/ON in 
conjunction with the reversing signal, no 
camera images will be displayed in rear view 
mode if the camera is connected normally.

If the camera is set always ON, it can display 
images in rear view mode when the vehicle is 
moving forward. In that case, you should ask 
the camera maker or dealer whether the cam-
era’s functions or longevity would be affected.

Rear View

 can be displayed at all times (e.g. 

when monitoring an attached trailer, etc.) as a 
split screen where map information is par-
tially displayed. Please beware that in this set-
ting, camera image is not resized to fit, but 
that a portion of what is seen by the camera is 
not viewable.

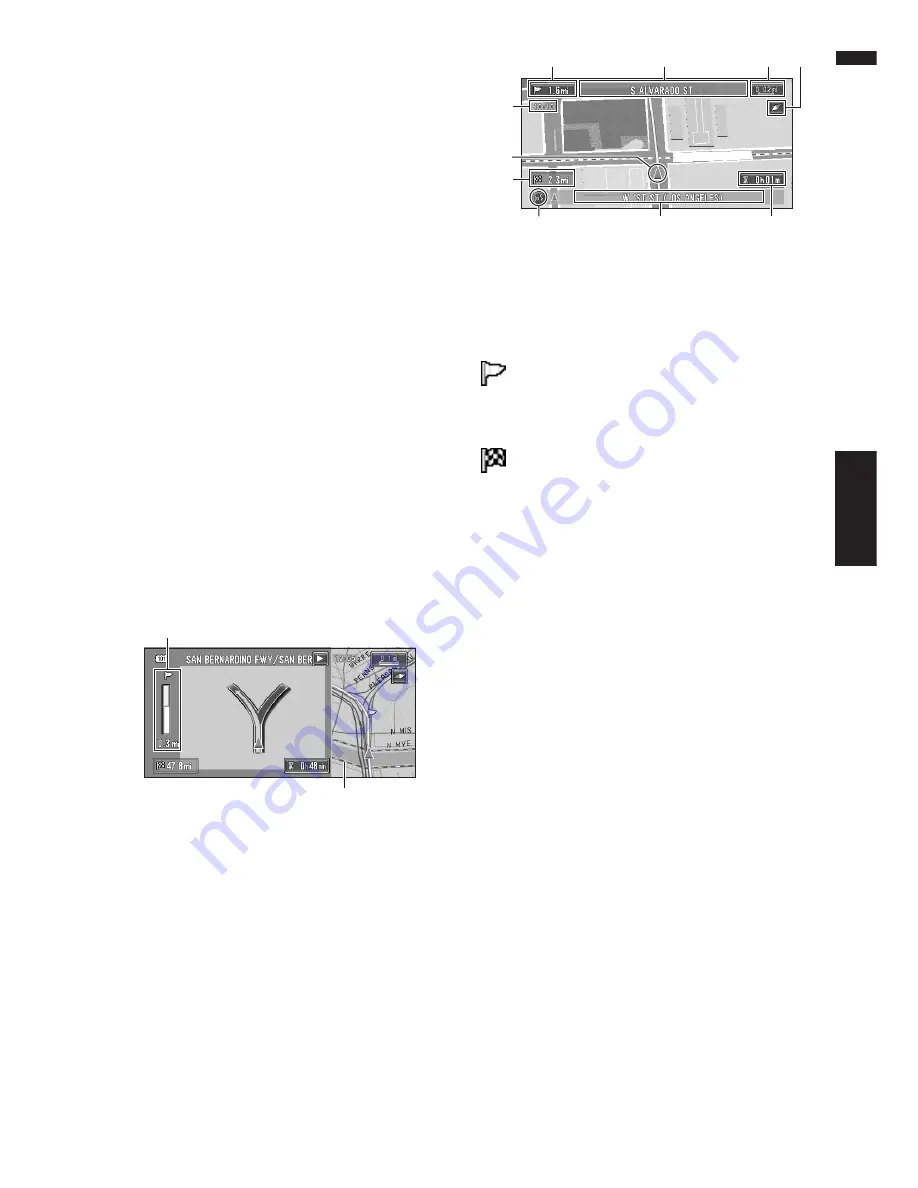
Enlarged map of the intersection

When “

Close-up of Junction

” in the Settings 

menu is “

On

”, an enlarged map of the junction 

appears. If driving on freeway, the special guide 
illustration is displayed.

When set to 

Driver’s View

 and 

Vehicle 

Dynamics

, the system cannot be changed to 

an enlarged intersection map.

City Map

When driving in a city, the detailed city map is 
indicated if the map scale is set to 0.05 mi (50 m) 
or lower (only those cities whose detailed city 
maps are registered in the map disc).

Detailed city map is not displayed during the 
memory navi mode. 

Display items

Guidance point*

The next guidance point (next turning point, etc.) 
is shown by a yellow flag.

Destination*

The checker-flag indicates your destination.

(1) Name of the next street to be used*

(2) Distance to the guidance point*

Touch to access the next information.

(3) Current location 

The current location of your vehicle. The tip of the 
triangular mark indicates your heading and the 
display moves automatically as you drive.

(4) Distance to the destination (or distance 
to way point)*

If way points are set, the display changes with 
each touch.

(5) Name of the street your vehicle is 
traveling along (or City Name, etc.)

(6) Compass 

The red arrow shows North. Each touch changes 
the map’s display direction. (North is UP or 
Heading Up.)

(7) Map scale

The scale of the map is indicated at distance. In 

Route View

 and 

Driver’s View

AV Status

Rear View

, it shows the scale of the map dis-

played on the right-hand side of the screen. 
Touch to change the map’s scale.

Changing the map’s scale 

 Page 32

(8) VOICE icon

Touch to change to voice recognition mode.

(13)

(12)

(2)

(1)

(7)

(5)

(10)

(3)

(4)

(6)

(9)

(8)

Содержание AVIC N1 - Navigation System With DVD player

Страница 1: ...Operation Manual DVD MULTIMEDIA AV NAVIGATION SERVER AVIC N1 ENGLISH ...

Страница 2: ...The screen shown in the example may differ from the actual screen The actual screen may be changed without notice for performance and function improvements ...

Страница 3: ...ion or any other means You shall not use the Software to operate a service bureau or for any other use involving the processing of data for other persons or entities Pioneer and its licensor s shall retain all copy right trade secret patent and other proprietary ownership rights in the Software The Software is copyrighted and may not be copied even if modi fied or merged with other products You sh...

Страница 4: ...orted outside the United States except as authorized and as permitted by the laws and reg ulations of the United States If the Software has been rightfully obtained by you outside of the United States you agree that you will not re export the Software nor any other technical data received from Pioneer nor the direct product thereof except as permitted by the laws and reg ulations of the United Sta...

Страница 5: ...ther means You shall not use the Software to operate a service bureau or for any other use involving the processing of data for other persons or entities Pioneer and its licensor s shall retain all copy right trade secret patent and other proprietary ownership rights in the Software The Software is copyrighted and may not be copied even if modi fied or merged with other products You shall not alte...

Страница 6: ...al law which provides that such a dis claimer or limitation cannot be waived or pre empted 4 EXPORT LAW ASSURANCES You agree and certify that neither the Software nor any other technical data received from Pio neer nor the direct product thereof will be exported outside Canada except as authorized and as permitted by the laws and regulations of Canada If the Software has been rightfully obtained b...

Страница 7: ...ACY TITLE AND FITNESS FOR A PARTIC ULAR PURPOSE TELE ATLAS ITS LICENSORS AND SUPPLIERS DO NOT WARRANT THAT THE DATA WILL MEET YOUR REQUIREMENTS OR THAT THE OPERATION OF THE DATA WILL BE UNINTERRUPTED OR ERROR FREE NO ORAL OR WRITTEN ADVICE GIVEN BY TELE ATLAS ITS LICENSORS SUPPLIERS OR ANY OF THEIR RESPECTIVE EMPLOYEES CREATES A WAR RANTY OR IN ANY WAY INCREASES TELE ATLAS ITS LICENSORS OR SUPPLIE...

Страница 8: ...RAL OR WRITTEN ADVICE GIVEN BY HER MAJESTY THE QUEEN THE MINISTER OF NATURAL RESOURCES TELE ATLAS OR ITS LICENSORS AND EMPLOYEES CREATES A WARRANTY OR IN ANY WAY INCREASES HER MAJESTY THE QUEEN AND THE MINISTER OF NATURAL RESOURCES LIABILITY AND YOU MAY NOT RELY ON ANY SUCH INFORMATION OR ADVICE b Disclaimer of Liability IN NO EVENT SHALL THE LICENSORS INCLUDING HER MAJESTY THE QUEEN IN RIGHT OF C...

Страница 9: ...laws In the event that any provision or part of a provi sion of this Agreement is determined to be invalid illegal or unenforceable such provision or part thereof shall be stricken from this Agree ment and the remainder of this Agreement shall be valid legal and enforceable to the maximum extent possible Any notice under this Agreement shall be delivered by courier to Tele Atlas North America Inc ...

Страница 10: ...ap 36 Setting an Entrance or Exit of a Freeway as Your Destination 37 Searching for Your Destination by Specifying the Telephone Number 38 Route Calculation to Your Home Location or to Your Favorite Location 38 Selecting Destination from the Destination Histo ry and Address Book 39 Modifying the Route Calculation Conditions 39 Items that users can change 39 Perform the route calculation of the sev...

Страница 11: ... 78 Playing a disc 78 Selecting a disc 78 Advanced DVD player operation 78 Repeating play 78 Pausing disc playback 79 Playing tracks in a random order 79 Scanning tracks of a CD 79 Using ITS playlists 79 Chapter 8 Customizing the Audio Source Set ting Audio Adjustments 81 Introduction of audio adjustments 81 Using the equalizer 81 Using balance adjustment 81 Adjusting equalizer curves 82 Adjusting...

Страница 12: ...ion outside the memorized area 101 Deleting the memory data 101 Vehicles that Cannot Obtain Speed Pulse Data 102 Conditions Likely to Cause Noticeable Positioning Errors 102 About the Data being Deleted 102 Limitation of Functions for Areas not Stored on the Disc 102 Other Function Limitations 103 Troubleshooting 104 Problems in the Navigation screen 104 Problems in the Audio screen common 105 Pro...

Страница 13: ... if this product provides contrary advice Failure to input correct information about the local time may result in the product providing improper routing and guidance instructions Never set the volume of your Navigation Sys tem so high that you cannot hear outside traf fic and emergency vehicles To promote safety certain functions are disa bled unless the parking brake is on The data encoded in the...

Страница 14: ...otential violation of applicable laws this unit is not for use with a video screen that is visible to the driver In some countries or states the viewing of images on a display inside a vehicle even by persons other than the driver may be illegal Where such regulations apply they must be obeyed This unit detects whether your vehicle s parking brake is engaged or not and prevents you from watching a...

Страница 15: ...ation It is possible to operate the navigation function and the Audio function by using touch panel key Compatible with the memorized naviga tion Memorized navigation functions are provided to the hardware which supports the memorized navigation mode Compatible with the Voice Recognition System Using a separately sold Pioneer voice recognition kit CD VC1 will enable voice operation for both the na...

Страница 16: ...a background image Imported original images will be stored in the memory but saving cannot be guaranteed completely If original image data is deleted set the CD R again and re import the original image Auto CD title and MP3 file listing Title lists will automatically be displayed when a CD TEXT or MP3 disc is played This system pro vides easy to operate audio functions that allow playback simply b...

Страница 17: ...ead this section It will explain the basis of operating the system This section also describes the basic operations for playing a CD with the naviga tion unit Menu and Map Display Describes how to display the menu screen and the method of changing map mode or map scale Setting a Route to Your Destination This section describes various ways of searching the destination changing the route search con...

Страница 18: ...e g After removing the disc from the slot keep it in the case The references are indicated like this e g Setting the Route Options Page 39 Customizing the Audio Source Setting Using the audio source various settings are available to suit your audio visual taste This chapter describes how to change the settings Operating Your Navigation System with Voice Describes navigation operations such as sear...

Страница 19: ...west and the other for the east Please set the disc to use according to your destination or current location The areas recorded on each disc are as follows Removing the disc and inserting another disc causes the navigation system to automatically restart and reload the new route You cannot cancel this Reroute operation West area disc East area disc ...

Страница 20: ...18 ...

Страница 21: ...udio screen 4 Check the details of the cautionary mes sage and touch OK You can operate the Navigation System by touching keys displayed on the screen If the route is already set it changes to route guidance mode The map of your surround ings is displayed How to read the current position screen Page 29 Time settings Page 98 Starting the operation with voice com mands only Page 58 The text of touch...

Страница 22: ... is in motion To enable these func tions you must stop in a safe place and put on the parking break Basic flow of operation 1 Insert the Pioneer DVD map disc to the disc loading slot 2 Press the NAVI MENU button to dis play the Main menu 3 Select Destination from the Main menu 4 Select the method of searching for your destination 5 Enter the information about your des tination 6 Your Navigation Sy...

Страница 23: ...h the characters you wish to input The input text is deleted letter by letter from the end of the text Continuing to press deletes all of the text Back Returns you to previous screen Also input a prefix to the house number If the house number you have input is not found among subsequently selected Street or City data a message appears saying that the address has not been found In that case try inp...

Страница 24: ...ities or areas which you have searched in the past This item cannot be selected when searching for the first time with this system or when you have selected an area that you have never searched before 7 Touch the street from the list Touching the or on the scroll bar scrolls you through the list and allows you to view the remaining items Searching the destination by map Page 33 In the case of an i...

Страница 25: ... follow ing information with the timing adjusted to the speed of your vehicle Distance to the next turning point Direction of travel Road number of the freeway Way point If this is set Your destination How to view the screen Page 29 Searching for another route Page 43 Canceling route guidance Page 43 Touching the allows you to hear the information again If you deviate from the route with the Guid ...

Страница 26: ...w data in the memory during navigation operation such as when the destination is far away The memory navi mode uses the following map data to per form navigation Memory navi indicator When new route guidance starts the route data from the map disc is read into the memory of the navigation unit The status of the memory navi mode is indicated by the following icons on the top left of the map screen ...

Страница 27: ...orized ena bling playback from that point when you play the disc again To play back the disc again touch The buttons The status of the buttons appearing on the screen is indicated by their color Depending on the function the navigation is per forming you can touch some buttons while other buttons are not available Blue touch key The button is operable Dark gray touch key The function is not availa...

Страница 28: ...26 Chapter 1 Basic Operation NAVI AV ...

Страница 29: ...he menu you want to use touch the name of the menu displayed at the top of the screen The main menu is divided into four Destination Information Route Options and Settings 3 If you want to return to the map press the POS or NAVI MENU button Destination menu Select the destination search method Also the route has set can be canceled from this menu Specifying the address and searching the des tinati...

Страница 30: ... with the cross pointer Searching the destination by map Page 33 Chg Route Can be selected only during route guidance You can add changes to the route in the route guidance Searching another route Page 43 Detour for a specified distance Page 43 Checking the route Page 41 Canceling the route guidance Page 43 Skipping a way point Page 44 Registration Registering the location indicated by the cross p...

Страница 31: ...Rear View Only possible when the CAMERA is set to ON 1 Press the POS button to display a map of the area around your current position 2 Press the POS button again 3 Touch the mode name or press the POS button to select the mode you want to dis play If the mode is selected by pressing the POS button the screen automatically switches to the selected map display mode after 4 seconds How to view the m...

Страница 32: ... of your vehicle You can change the items indicated to the meters on the left and right In the Vehicle Dynamics Display mode the speedometer display may show a different speed than your vehicle s actual speedome ter because your unit measures speed in a different way Vehicle Dynamics cannot be displayed if sensor initialization is not complete Setting the Vehicle Dynamics Display Page 53 Rear View...

Страница 33: ...ection map City Map When driving in a city the detailed city map is indicated if the map scale is set to 0 05 mi 50 m or lower only those cities whose detailed city maps are registered in the map disc Detailed city map is not displayed during the memory navi mode Display items Guidance point The next guidance point next turning point etc is shown by a yellow flag Destination The checker flag indic...

Страница 34: ...e gauge and Map scale key Directly touching the Map scale key changes the map to the selected scale Touching or on the scale gauge allows you to specify the scale in greater detail within a range of 25 yards 1000 miles 25 meters 2000 kilometers Selection of the scales is limited during the memory navi mode The icon of a registered location is indicated when the map scale is 10 miles 20 km or lower...

Страница 35: ...es Page 45 Displaying facilities POI mark on the map Page 36 3 Touch Back You are returned to the previous display In the memory navi mode you can only see detailed information for registered points when available Finding a destination on the map If you search the location you want to visit by scrolling the map and touch in the Shortcut menu you can specify your destination on the map 1 Press the ...

Страница 36: ...34 Chapter 2 Menu and Map Display NAVI ...

Страница 37: ... When the map disc is inserted the reroute is done by force This rerouting cannot be can celed Finding Your Destination by Selecting the Type of Facility Information about various facilities Points Of Interest POI such as gas stations amusement parks or restaurants is available By selecting the category or entering the POI Name you can search for a Point Of Interest You can also narrow down the se...

Страница 38: ...n the subcate gory list appears touch the item and touch Back When only a few types of the detailed categories are selected blue check marks will appear You can select the detail category for up to 100 items 3 Touch POI Names of POIs and their distance from your current location appear They are listed in nearest to furthest order To the left of each item is an icon indicating the category When you...

Страница 39: ...nding category is marked blue When all the sub categories within a category are selected that category is marked red Setting an Entrance or Exit of a Freeway as Your Destination You can set the entrance or exit of a freeway as your destination 1 Touch Destination in the Main menu and then touch Freeway Search The display for entering the name of the free way appears 2 Touch the zone code key of th...

Страница 40: ... places is dis played Touch the item you want in the list and proceed to step 3 3 If the displayed place is satisfactory touch OK Touching Scroll changes the destination Searching the destination by map Page 33 Route Calculation to Your Home Location or to Your Favorite Location If your home location is registered the route home can be calculated by a single touch of the touch key from the Main me...

Страница 41: ...Route Options menu The following description features an example of changing the number of the route to be searched 1 Touch Route Options in the Main menu The Route Options menu appears 2 Touch Number of Routes The content currently set appears under the name of the item Each time you touch the item the setting changes Repeatedly touch the item until the value you want to set appears Items that us...

Страница 42: ...oute options and select one You can get route calculations of several route options After route options are calculated select the one you want 1 Set the Number of Routes to Multiple Changing the search conditions Page 39 2 Search your destination and set the route Calculated routes are shown in different colors from two to six routes 3 Touch Next to change the displayed route The following informa...

Страница 43: ... is completed and you have already started your vehicle the route selected at the time is automatically chosen Checking the Set Route You can check information about the route between your current location and your destina tion You can select two methods checking the pass ing streets with a list and checking the shape of the route by scrolling the map along the route Checking the set route with th...

Страница 44: ...ch Route Profile 4 Check the contents on the display As necessary scroll the list 5 Touch Back You can return to the previous display When a long distance route is calculated your Navigation System may not be able to list all the roads In this case the remain ing roads will be shown in the list as you drive on Checking the set route from the Information menu You can also check the information abou...

Страница 45: ... position to your destination is recalculated The distance of the detour 1 50 mile km Searches detours of a specified distance in the route ahead of your current position For details of switching the display between mile miles and km KM Mile Set ting Page 57 Canceling the Route Guidance If you no longer need to travel to your destination or if you want to change your destination follow the steps b...

Страница 46: ...n a straight line from the current loca tion to way point1 and sort the other points including your destination in order of dis tance from way point1 Original You can return the way points and destination to their original order Skipping a way point If the points are set the next way point along the route can be skipped 1 Touch the map screen The Shortcut menu appears 2 Touch The Route Detour menu...

Страница 47: ... registered locations that can be stored home location and favorite locations can be stored separately in the Address Book Reg istering your favorite location for the first time is described here You can change the registered information later You might find it useful to reg ister your workplace or a relative s home as your favorite location Map icons Home location icon Favorite location icon 1 To...

Страница 48: ...e map of that place can be displayed Searching the destination by map Page 33 3 Touch Registration 4 Touch Save Registration is now complete If you want to stop registration touch Back Editing a location s information Page 46 in the Shortcut menu Page 28 Editing a location s information In the Address Book menu touching the on the right hand side of the place displays the Address Book Operate menu...

Страница 49: ...can enter a new name between 1 and 23 char acters long 3 If the pronunciation is correct touch Yes The details you set are registered and the Address Book menu appears Alternative options No Select to return to the display for entering characters Repeat You can reconfirm the pronunciation of the name you entered When you select Yes is shown on the left side of the location name displayed in the Ad...

Страница 50: ...elected is deleted Alternative option No The display shown in Step 3 appears Because deleted data cannot be restored take extra care not to select Delete All Address Book Entries by mistake Changing the position of loca tions registered in the Address Book You can select a location registered in the Address Book display a map of its surround ings and change its position 1 In the Address Book menu ...

Страница 51: ...Avoid can be set from the Route Options menu An area not stored on the disc cannot be set as an Area to Avoid Registering an Area to Avoid This section describes how to register an Area to Avoid for the first time You can register up to five Areas to Avoid 1 Touch Route Options in the Main menu then touch Designate Areas to Avoid 2 Select one of the items shown in New Area When registering for the...

Страница 52: ...al computer or a digital camera If you save the pic tures to a CD R or CD RW you can use them as background pictures The following two types of background pictures can be changed AV Background Background for the screen during the operation of audio or during play back Navigation Background Background of navigation menu screen Several background pictures are stored in the Pioneer DVD map disc If yo...

Страница 53: ...kground image appears 7 Touch Done On this screen you can select the following items Select another Picture This is selected when you want to change to another picture Return to Step 5 Change to another background Select if you want to successively change the Audio Operating screen backgrounds or the Navigation backgrounds Return to step 3 Only JPEG format jpg or JPG pictures can be used as a back...

Страница 54: ...o left or right is shown 7 Inclination Degree of slope of the street is indicated To clear values If you want to delete the learned results stored in Distance Speed Pulse or Learning Sta tus touch the relevant result then touch Clear This unit can automatically use two types of sensor memory based on the outer dimen sions of the tires Checking the connections of leads and installation positions Ch...

Страница 55: ...nitialization is not complete 1 Switch to the Vehicle Dynamics Display Changing the map display mode Page 29 2 Touch the left or right instrument Touch keys are displayed 3 Touch the items you want to display You can select the following items Voltage Acceleration Acceleration in a forward direction is dis played The sign indicates acceleration while the sign indicates deceleration Side Accelerati...

Страница 56: ...54 Chapter 4 Editing the Navigation Utilities NAVI ...

Страница 57: ...creen appears Touching Next or Previous changes the screen and displays another item 3 Touch KM Mile Setting Mile Yard is displayed below KM Mile Setting indicating that KM Mile Setting is set to Mile Yard If you want to change another setting select the item you want to change and repeat the procedure in step 3 Items Users can Change This section describes the details of the setting for each item...

Страница 58: ... set the simulation of the route guid ance to a destination is automatically displayed Normally set this to Off On Repeat Repeat demo drive Off Demo Mode is set off If you eject the map disc during the demo drive the demo mode will be stopped Day Night Display To improve the visibility of the map during the evening you can change the combination of the colors of the map Nighttime You can change th...

Страница 59: ...on the volume of the Audio source is muted automatically Off The volume of the Audio source stays the same during voice operation If you select Off the sound from the Audio source may interfere with the voice recogni tion system Voice Guidance This setting controls whether the volume of the Audio source is automatically muted during voice guidance On During voice guidance the volume of the Audio s...

Страница 60: ...you need the microphone kit CD VC1 which is sold separately Before connecting the microphone be sure to first turn the igni tion switch OFF ACC OFF When the micro phone is connected turn the ignition switch ON ACC ON On The automatic voice recognition is engaged each time your vehicle is started Off Voice operation starts after touching VOICE icon Voice Recog Help This setting controls the list of...

Страница 61: ...l keys Touch to do various operations 1 Press the NAVI AV button to switch Audio operation screen 2 Touch the screen to activate the touch panel keys corresponding to each source The touch panel keys appear on the display To go to the next group of touch panel keys touch 3 Touch ESC to hide the touch panel keys If you do not use the touch panel keys for 30 seconds they will be hidden automati call...

Страница 62: ...e FUNCTION menu and Advanced each source operation 2 AUDIO key Touch to select various sound quality controls Using the AUDIO menu Page 81 3 SETUP key Touch to select various setup functions Using the SETUP menu Page 89 4 BACK key Touch to return to the previous display 5 ESC key Touch to cancel the control mode of functions 6 Touch ESC to return to the display of each source If you do not operate...

Страница 63: ...een selected 6 Subtitle language indicator Shows what subtitle language has been selected 7 Audio language indicator Shows what audio language and audio system have been selected 8 Track number indicator Shows the track currently playing 9 Disc title indicator Shows the title of the currently playing disc 10 Repeat indicator Shows the selected repeat range 11 Current folder name indicator Shows th...

Страница 64: ... see the list of track titles or folder names on a disc and select one of them to playback If a folder list or a track list is not displayed touch DISP Touching or switches to the next or previous page in the list A list will not be displayed when using DVD video In the case of normal CDs no title informa tion is recorded Accordingly the display shows 2 Using the resume function When a disc is rem...

Страница 65: ...itching the screen display Switching screen display Page 91 8 Disappear the touch keys 9 Fast forward or backward Keep touching or to perform fast for ward or backward DVD If you keep touching or for five seconds the icon or changes into or When this happens fast reverse fast forward continues even if you release or To resume playback at a desired point touch Fast forward fast reverse may not be p...

Страница 66: ...3 files on disc nothing may be dis played Operation using the FUNCTION menu How to display the FUNCTION menu Page 59 RANDOM and SCAN cannot be used during a DVD video playback 1 Repeating play Each touch of the REPEAT changes the set tings as follows DVD TITLE Repeat just the current title CHAPTER Repeat just the current chapter OFF Play throughout the current disc If you perform chapter title sea...

Страница 67: ...c is playing Touching either of these keys again lets you start playback from the location selected from the menu For details refer to the instructions provided with the disc 1 Touch the screen to display to touch panel keys 2 Touch to display 3 Touch to display touch panel keys to operate the DVD menu 4 Touch or to select the desired menu item 5 Touch ENTER Playback starts from the selected menu ...

Страница 68: ...stems during playback 1 Touch AUDIO during playback Each time you touch AUDIO switches between audio mode The number in the mark on a DVD s package indicates the number of recorded languages audio systems With some DVDs switching between lan guages audio systems may only be possi ble using a menu display Only digital output of DTS audio is possi ble If navigation unit s optical digital out puts ar...

Страница 69: ... Listening to the radio These are the basic steps necessary to operate the radio More advanced radio operation Page 68 Pressing the DISP button changes the screen display Switching screen display Page 91 1 Source icon Shows which source has been selected 2 Band indicator Shows which band the radio is tuned to AM or FM 3 Preset number indicator Shows what preset has been selected 4 Frequency indica...

Страница 70: ... hidden automati cally Advanced radio operation 1 Function display Shows the function names How to display the FUNCTION menu Page 59 Storing and recalling broadcast frequencies If you touch any of the preset tuning keys P1 PRESET 1 P6 PRESET 6 you can easily store up to six broadcast frequencies for later recall with the touch of a key 1 When you find a frequency that you want to store in memory k...

Страница 71: ...r settings let you receive progressively weaker stations Storing the strongest broadcast frequencies BSM best stations memory lets you automati cally store the six strongest broadcast frequen cies under preset tuning keys P1 P6 and once stored there you can tune in to those frequencies with the touch of a key 1 Touch BSM in the FUNCTION menu 2 Touch START to turn BSM on BSM begins to flash While B...

Страница 72: ...70 Chapter 6 Using the AV Source Built in DVD Drive and Radio AV RADIO ...

Страница 73: ...M CD to select the multi CD player 2 Touch the screen to display the touch panel keys 3 Touch any of 01 06 to select a disc you want to listen to If you want to select a disc located at 7 to 12 touch or to display 07 12 When 01 06 and 07 12 are not displayed you can display them by touching DISP You can also sequentially select a disc by touching or or moving the joystick up or down 4 To skip back...

Страница 74: ...cks While you are using DISC the beginning of each track on the selected disc plays for about 10 sec onds When you are using M CD the beginning of the first track of each disc is played for about 10 seconds 1 Select the repeat range Repeating play Page 72 2 Touch SCAN in the FUNCTION menu Touching SCAN switches between ON and OFF The first 10 seconds of each track of the cur rent disc or the first...

Страница 75: ...o delete a track from your ITS playlist and turn ITS play on Playback from your ITS playlist Page 73 2 Touch ITS MEMORY in the FUNCTION menu 3 Touch or to select a track you want to erase 4 Touch CLEAR to erase a selected track from your ITS playlist The currently playing selection is erased from your ITS playlist and playback of the next track from your ITS playlist begins If there are no tracks ...

Страница 76: ... the following settings COMP OFF COMP 1 COMP 2 COMP OFF DBE 1 DBE 2 XM tuner Listening to the XM You can use navigation unit to control a XM satel lite digital tuner GEX P910XM which is sold separately For details concerning operation refer to the XM tuner s operation manuals This section provides information on XM operations with navigation unit which differs from that described in the XM tuner s...

Страница 77: ...ame preset tun ing key P1 P6 the station is recalled from memory When the touch panel keys are not displayed you can display them by touching the screen When P1 P6 are not displayed you can display them by touching Up to 18 stations 6 for each of three XM bands can be stored in memory You can also use and to recall sta tions assigned to preset tuning keys P1 P6 Switching the XM channel select sett...

Страница 78: ... TV tuner s operation manual This section provides information on TV operations with navigation unit that differ from those described in the TV tuner s operation manual Pressing the DISP button changes the screen display Switching screen display Page 91 1 Source icon Shows which source has been selected 2 Band indicator Shows which band the TV tuner is tuned to 3 Preset number indicator Shows whic...

Страница 79: ...ouching a preset tuning key P1 P12 until the preset number e g P ch 1 stops flashing The number you have touched will flash in the preset number indicator and then remain lit The selected station has been stored in mem ory The next time you touch the same preset tun ing key P1 P12 the station is recalled from memory To switch between P1 P6 and P7 P12 touch or When the touch panel keys are not disp...

Страница 80: ...l keys 3 To skip back or forward to another chap ter track touch or briefly You can also skip back or forward to another chapter track by moving the joystick left or right 4 To perform fast forward or reverse keep touching or for about one second and release You can also perform fast reverse fast forward by holding the joystick left or right If you keep touching or for five seconds the icon or cha...

Страница 81: ...ing CD playback 1 Touch RANDOM in the FUNCTION menu Touching RANDOM switches between ON and OFF Tracks will play in a random order Scanning tracks of a CD You can operate this function only during CD playback 1 Touch SCAN in the FUNCTION menu Touching SCAN switches between ON and OFF The first 10 seconds of each track is played 2 When you find the desired track touch SCAN to turn scan play off Usi...

Страница 82: ...80 Chapter 7 Using the AV Source Pioneer AV Equipments AV S DVD ...

Страница 83: ...d Recalling equalizer curves There are six stored equalizer curves which you can easily recall at any time Here is a list of the equalizer curves 1 Press EQ button to select the equalizer Press EQ button repeatedly to switch between the following equalizers POWERFUL NATURAL VOCAL CUSTOM FLAT SUPER BASS CUSTOM is an adjusted equalizer curve that you create A separate CUSTOM curve can be cre ated fo...

Страница 84: ...equency to be set as the center frequency Q FACTOR You can select the details of the curve charac teristics 1 Touch EQ MENU in the AUDIO menu 2 Touch or to select the equalizer band to adjust Each time you touch or selects equalizer bands in the following order LOW low MID mid HIGH high 3 Touch or to adjust the level of the equalizer band Each time you touch or increases or decreases the level of ...

Страница 85: ...is increased or decreased 5 Touch or to select cut off frequency Each time you touch or selects cut off frequencies in the following order 50 80 125 Hz Only frequencies lower than those in the selected range are output from the sub woofer Using non fading output When the non fading output setting is on the audio signal does not pass through navigation unit s low pass filter for the subwoofer but i...

Страница 86: ...me automatically Compensating for equalizer curves EQ EX The EQ EX function smoothes the effects of each equalizer curve Furthermore you can adjust bass and treble for each source when CUSTOM curve is selected 1 Touch EQ EX in the AUDIO menu Touching EQ EX switches between ON and OFF Setting Up the DVD Player To set up the DVD of an optional DVD player please refer to the Owner s Manual for that D...

Страница 87: ...d to REAR OUT When using a regular display select either LETTER BOX or PANSCAN Selecting 16 9 may result in an unnatural picture If you select the TV aspect navigation unit s display changes to the same setting 1 Touch SET UP and then touch TV ASPECT Each touch of the TV ASPECT changes the settings as follows 16 9 Wide screen picture 16 9 is dis played as it is initial setting LETTER BOX The pictu...

Страница 88: ...ctions If you forget the registered code number touch CLEAR 10 times on the screen in the Step 2 The registered code number is canceled letting you register a new one Initial Settings Adjusting initial settings Initial settings lets you perform initial set up of different settings for navigation unit 1 Function display Shows the function names 1 Touch the source icon and then touch SOURCE OFF to t...

Страница 89: ...fer output SUB WOOFER and non fading output NON FADING in the AUDIO menu return to the factory settings Both rear speaker leads output and RCA rear output are switched simultaneously in this setting Switching the sound muting attenuation Sound from this system is muted attenuated or mixed automatically in the following cases When a call is made or received using a cellu lar telephone connected to ...

Страница 90: ...annel sound Enter the following setting when combining the multi channel processor system DO NOT enter this setting before you con nect the multi channel processor system If this setting is entered the RCA will out put maximum volume for the multi chan nel processor system Pioneer is not responsible for any damage to the speaker equipment caused by ignoring this warn ing 1 Touch the source icon an...

Страница 91: ...n the left Please beware that in this setting camera image is not resized to fit but that a portion of what is seen by the camera is not viewable Pioneer recommends the use of a camera which outputs mirror reversed images otherwise screen image may appear reversed Confirm the setting immediately whether the display changes to a rear view camera image when the shift lever is moved to REVERSE R from...

Страница 92: ...he AUTO FLAP changes the settings as follows MANUAL You have to press OPEN CLOSE button to open close the display AUTO The display automatically opens closes when power to navigation unit is turned on Using the AUX source An IP BUS RCA Interconnector such as the CD RB20 CD RB10 sold separately lets you connect navigation unit to auxiliary equipment featuring RCA output For more details refer to th...

Страница 93: ... discs have certain information encoded on the disc during manufacture These discs which may contain such information as the CD title track title artist s name are called CD TEXT discs Track List Disc Title Disc Artist Track Title Track Artist If specific information has not been recorded on a CD TEXT disc NO XXXX will be dis played e g NO ARTIST CD MP3 disc Folder and title list list off Informat...

Страница 94: ...Siswati ss 1919 Aymara ay 0125 Kannada kn 1114 Sesotho st 1920 Azerbaijani az 0126 Kashmiri ks 1119 Sundanese su 1921 Bashkir ba 0201 Kurdish ku 1121 Swahili sw 1923 Byelorussian be 0205 Kirghiz ky 1125 Tamil ta 2001 Bulgarian bg 0207 Latin la 1201 Telugu te 2005 Bihari bh 0208 Lingala ln 1214 Tajik tg 2007 Bislama bi 0209 Laothian lo 1215 Thai th 2008 Bengali bn 0214 Lithuanian lt 1220 Tigrinya t...

Страница 95: ...efer to the commands displayed in the Voice Help menu a list of the words you can speak When your vehicle is parked with the parking brake on Touch VOICE icon to display a list of available voice commands Voice Help menu Display of the Voice Help menu can be turned on off with Voice Recog Help in the Settings menu When you are used to voice operation fea tures and no longer need Voice Help you can...

Страница 96: ...t Option Repeat Commands for display change Displaying the navigation screen Display NAVI GATION Displaying the Audio screen Display AV Available voice commands related to navigation You can say the following commands Give the following verbal commands after switching to the navigation screen Specifying your destination New Destination Address Book Return Home Registered name POI category name For...

Страница 97: ...on A list of commands for voice operation appears After the message the beep indi cates that the system is ready to accept your voice command You say a command after this beep 2 Say New Destination A message to prompt the next operation is given Uttering POI category name using this procedure starts a vicinity search in that category In this case proceed to step 6 3 Say POI in Vicinity You say the...

Страница 98: ...at wind through the vehicle win dow or miscellaneous noise from outside the vehicle can interfere with voice operation Position the microphone carefully For optimum pick up the microphone should be fixed at a suitable distance directly in front of the driver In order to operate the navigation unit by voice you need the microphone kit CD VC1 which is sold separately Please refer to the Owner s Manu...

Страница 99: ...ing Audio screen appears 3 Press the NAVI AV button to change the navigation screen 4 Touch Yes Oui When you start the navigation unit for the first time you will see a confirmation message asking if you wish to select another language English is the default language of the Naviga tion System If desired you can select another language as shown To keep English touch No Non After this proceed to Ste...

Страница 100: ...if you are in the daylight saving period This turns the display below DST On 10To complete the setting touch Back The map of your surroundings appears This completes the setup of your Navigation Sys tem Chapter 1 explains the basic operation of your Navigation System To change the language and time later Page 57 Memory Navi Mode While the map disc is inserted you can store the data on the map disc...

Страница 101: ... is auto downloaded mem ory area This is the vicinity of the route in the map area automatically stored in the memory when the route is set When the route distance is less than about 50 miles a zone with a width of approxi mately 7 5 miles around the route is stored When the route distance is about 62 5 miles or more a zone with a width of approximately 5 miles around the route is recorded As you ...

Страница 102: ...avi mode and the DVD navi mode Free zooming of scale is not available Detailed city map cannot be displayed If a route was set to your destination in mem ory navi mode inserting the map disc automat ically starts recalculation of another route You cannot cancel this reroute operation If the route calculation fails for some reason a message will appear asking you to either recal culate a route Rero...

Страница 103: ...ration outside the memo rized area When the vehicle leaves the memorized area the functions will be limited The auto reroute function does not work You can only display a larger scale map The map display will automatically change to a 25 mi or 50 mi scale The map matching function will not be availa ble Therefore the position of your vehicle may be misaligned Only the navigation guidance when arri...

Страница 104: ...ed manually Area to avoid Registered Locations Limitation of Functions for Areas not Stored on the Disc For areas not stored on the disc unrecorded areas the functions will operate as follows Inoperable buttons for unrecorded areas Page 25 Displaying the Map Maps with a scale of between 0 02 mi and 0 25 mi cannot be displayed If the scale was set to between 0 02 mi and 0 25 mi it is automati cally...

Страница 105: ...rrow indicating the traveling direction will not be displayed in the Audio Status and the Audio screen Route Information If the set route goes through an unrecorded area no route profile for the unrecorded area will be displayed If the set route traverses both an unrecorded area and area stored on the disc only the route profile within the recorded area will be displayed Route scrolling for an unr...

Страница 106: ...your vehicle on the map or the positioning error is large The quality of signals from the GPS satellites is poor causing reduced positioning accuracy Such a loss of signal quality may happen for the fol lowing reasons The GPS antenna is in an unsuita ble location Obstacles are blocking signals from the satellites The position of satellites relative to your vehicle is bad Signals from the GPS satel...

Страница 107: ...or will not operate Installation or connection has been carried out incorrectly Check with your dealer The display is very dim The vehicle s light is turned ON and Nighttime is selected on Day Night Display Read about the Day Night Dis play setting Page 56 and if desired select Daytime The vehicle cabin temperature is extremely low A Liquid Crystal Display LCD is used and such displays tend to dar...

Страница 108: ... to the source display and then select the correct setting for CAMERA About CAMERA setting Page 89 Symptom Cause Action See No sounds are heard The volume level will not rise Cables are not connected correctly Connect the cables correctly The unit is performing still slow motion or frame by frame playback There is no sound during still slow motion or frame by frame playback dts is selected for the...

Страница 109: ... mean this unit is malfunctioning Message When What to do You cannot use this function while driving While trying to make a menu selec tion Pull over and come safely to a halt put the parking brake on and then try again This is not the appropriate disc Please insert the appropriate disc If you try to use a disc which is incompatible with this system including the old version map disc Insert a suit...

Страница 110: ...a destination and way point s farther from the starting point Route calculation was not possible due to traffic regulations The destination or way point s are in a Control Traffic Zone CTR and the route calculation is hampered Your vehicle is currently in a Control Traffic Zone CTR and the route cal culation is hampered Set a destination and way point s outside the CTR if you know where the restri...

Страница 111: ...he route condition When the calculation of only one route is set you can search a route option by combining the fol lowing conditions How to set the calculation conditions Page 39 For example when Fastest and Avoid Free way On are combined the route which avoids freeway and has the shortest travel time will be calculated and displayed on the screen Condition 1 whether to put priority on the distan...

Страница 112: ...unced It is possible that guidance may direct you off a freeway and then back on again In some cases the set route may require you to travel in the opposite direction to your current heading In such cases you are instructed to turn around so please turn around safely by following the actual traffic rules In some cases guidance may direct you past your destination and then indicate a U turn to get ...

Страница 113: ...s switched off Page 56 Types of the Road Stored in the Disc There are three types of roads in the map of this disc Turn by Turn Routable Roads contain full attribute data and can be used for full Route Guidance Pioneer Navigation will display full route guidance including turn by turn voice directions and arrow icons Routable Roads The Route displayed and highlighted in Purple Color have only basi...

Страница 114: ... files in up to 8 tiers of folders can be played back However there is a delay in the start of playback on discs with numerous tiers For this reason we recommend creating discs with no more than 2 tiers It is possible to play back up to 253 items from folder on one disc Copyright 1984 2004 Tele Atlas North America Inc All Rights Reserved Data by Info USA 2004 All Rights Reserved Canadian Data 2004...

Страница 115: ...is stands for Digital Theater Systems DTS is a sur round system delivering multi channel audio from up to 6 independent channels Favorite location A frequently visited location such as your workplace or a relative s home that you can register to allow easy routing GPS Global Positioning System A network of satellites that provides navigation signals for a variety of purposes Guidance mode The mode...

Страница 116: ... output By transmitting audio signals in a digital signal format the chance of sonic quality deteriorating in the course of transmission is minimized An optical digital output is designed to transmit digital signals optically Packet write This is a general term for a method of writing on CD R etc at the time required for a file just as is done with files on floppy or hard discs Parental lock Some ...

Страница 117: ...mands In order to operate the navigation unit by voice you need the microphone kit CD VC1 which is sold sep arately Please refer to the Owner s Manual for the microphone kit Way Point A location that you choose to visit before your destina tion a journey can be built up from multiple way points and the destination ...

Страница 118: ...rn Home P 38 45 Go to P 35 POI Search P 36 Vicinity Search P 39 46 Address Book P 39 46 Destination History P 37 Freeway Search P 38 Telephone Search P 43 Cancel Route Information P 42 Route Profile P 36 Overlay POI P 52 Connection Status P 41 Route Scroll P 48 Read from Disc 3D Calibration P 52 ...

Страница 119: ...rea P 56 Average Speed P 56 Hardware Volume P 56 Demo Mode P 56 Day Night Display Map Display P 57 Background Picture Setting P 57 Language Selection Mute Setting P 57 98 Time P 57 Modify Current Location P 57 KM Mile Setting P 58 Auto Voice Recognition P 58 Voice Recog Help P 56 Tracking Display P 56 Close up of Junction P 57 Voice Recognition P 57 Voice Guidance Settings P 56 AV Guide Mode P 57 ...

Страница 120: ...tcut menu P 33 Destination Chg Route P 46 Registration P 36 Vicinity Search P 36 Overlay POI Shortcut menu P 43 Reroute P 43 Cancel Route P 42 Route Profile P 41 Route Scroll P 44 Skip Way Point P 43 1 mile km 50 mile km detour ...

Страница 121: ...INITIAL menu P 81 FAD BAL BALANCE P 82 EQ MENU P 82 BASS P 82 TREBLE P 83 LOUDNESS P 83 83 SUB WOOFER NON FADING P 83 HPF SLA P 84 EQ EX AUDIO P 84 P 86 INITIAL AUX P 87 REAR SP P 87 TEL GUIDE P 87 DISC AUTO SUB D DIM P 88 GUIDE VOICE P 87 REAR SP P 87 PREOUT ...

Страница 122: ...o CD MP3 S DVD M DVD P 89 SET UP AV INPUT CAMERA P 89 REAR DISP P 90 FLAP SET BACK P 90 AUTO FLAP CAMERA POLARITY P 89 P 89 P 64 REPEAT P 64 RANDOM P 64 SCAN P 64 PAUSE FUNCTION P 78 REPEAT P 79 RANDOM P 79 SCAN P 79 PAUSE P 73 ITS PLAY P 72 ITS MEMORY FUNCTION ...

Страница 123: ...121 Appendix NAVI AV M CD RADIO TV P 72 REPEAT P 72 RANDOM P 72 SCAN P 73 TRACK LIST P 72 PAUSE P 74 COMP P 73 ITS PLAY ITS MEMORY FUNCTION P 72 P 69 BSM P 69 LOCAL FUNCTION P 77 BSSM FUNCTION ...

Страница 124: ...122 Appendix NAVI AV DVD SETUP menu LANGUAGE A SUB TITLE P 85 M ANGLE P 85 TV ASPECT P 85 PARENTAL DVD SETUP P 84 AUDIO LANGUAGE P 84 MENU LANGUAGE SUB T LANGUAGE P 85 P 84 P 84 ...

Страница 125: ...123 Appendix NAVI AV ...

Страница 126: ...124 Appendix NAVI AV ...

Страница 127: ...ra Road 04 01 Singapore 159936 TEL 65 6472 1111 PIONEER ELECTRONICS AUSTRALIA PTY LTD 178 184 Boundary Road Braeside Victoria 3195 Australia TEL 03 9586 6300 PIONEER ELECTRONICS OF CANADA INC 300 Allstate Parkway Markham Ontario L3R OP2 Canada TEL 905 479 4411 PIONEER ELECTRONICS DE MEXICO S A de C V Blvd Manuel Avila Camacho 138 10 piso Col Lomas de Chapultepec Mexico D F 11000 TEL 55 9178 4270 P...

Отзывы: